Tuesday, 30 August 2016

Audio environments from frozen spectral grains...

Atmospheric sounds


You hear them all the time, but mostly they slip under the radar. Environmental sounds are the background 'atmosphere' that pervades spaceships, control rooms, power stations, busy offices, streets, and everywhere else. The classic 'bridge sound' from the original Star Trek is a perfect example: if you hear a few seconds of it you know exactly what it is, and yet most of the time you aren't are of it. Like a lot of audio that underpins moving pictures, your eyes are distracted, and the sound plays a strong supporting role. But remove the sound, and suddenly the pictures aren't as compelling or interesting.

Music uses background sounds too. On stage, the atmosphere built up by the right sound gradually rising from subliminal to noticeable can make the reveal of the musicians all the more an event. Staging isn't just lights... And during a set, the right background sounds can control mood as well as provide links between songs.

Crafting atmospheric sounds requires a lot of knowledge about the way that sounds work on people. It also eats up source material, which is why making background sounds is a challenge, and it explains why some of the most popular plug-in downloads aren't what you might expect. 'Sound Generators' are a key part of the tools that creators use, along with the audio editing software and  sound effects library that you were probably expecting.

Grainy spectrums

Granular synthesis is very popular at the moment, and there are a lot of software instruments that are devoted to producing sounds using little fragments of sound. But creating frozen spectrum grabs is only part of the solution, mainly because freezing a sound produces a static spectrum, and that quickly gets boring. Just as movement makes movies engaging, evolution makes sounds interesting. Recently, I've been looking at various ways of capturing spectral fragments, and I've struggled to turn them into something that I can use.

So, my latest Max For Live plug-in for Ableton Live is specially designed to turn audio fragments into atmospheric background sounds. It is a sound generator based on grains instead of the longer samples (or FM or feedback algorithms) that are often used. gFreez_mr allows the capture and playback of four separate grains of frozen spectra, and then uses a four-phase LFO and LFO-controlled panning to animate those four components into a constantly shifting atmospheric sound. gFreez_mr is particularly good for synthetic, electronic sounds, and it has a number of functions that are specifically designed for live use.

gFreez_mr

First things first - you need to be able to play the audio samples in Live, and Simpler is perfect for this, although you can use Sampler and any other sample player you like. gFreez_mr is an audio effect, and so goes after the sample player:


gFreez_mr has four horizontal 'slots' for the grains, and those empty boxes on the left hand side are where these will appear. The first thing to do is to set the 'Dry/Wet' mix control to slightly dry, and the 'button underneath it to 'Input' instead of 'Mute'. This button routes the input of gFreez_mr to the output so that it can be heard whilst the grains are being captured (the 'Mute' setting is used during playback). The top slot control buttons should also be set to 'On', so that the output of that slot is permanently audible. When you play a sound from Simpler (either via MIDI, or the virtual keyboard: A, W, S, E, D, F, etc.), then you should hear the sound in the output of the gFreez_mr effect. To actually capture the audio, you click on the 'GRAB' button on the far left. This will grab the spectrum of the sound (in stereo) and you should hear this as the output of the effect, and the spectrum will be shown in the slot:


The 'top slot control buttons should now be set to 'Mute' so that the sound is no longer heard, and the second slot should be set to 'On' and a new spectrum grain grabbed. When you have repeated this for all four slots then gFreez_mr will look like this:
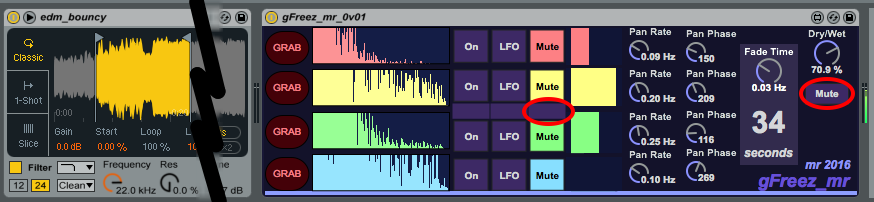
Note that since we have now captured all of the four slots, then the 'Input/Mute' button on the far right has been set to 'Mute' so that we will no longer hear any audio from the sample player. The small row of buttons in the centre of the four slots affect all of the slots, and so clicking in the 'Mute' column will set all of the slots to muted, and so no audio will be heard at the output. You can also just click on the slot control button if you wish.

Playback

The easiest way to set all of the four slots playing at once is to use the small row of buttons in the centre again - this time in the 'LFO' column:


This sets gFreez_mr playing all of the slots, an you will se the four volume indicators in the centre right moving back and forth. The larger the block, the louder the volume, and the LFO has four phases, so each slot fades in and out in order. The 'Fade Time' rotary control sets the rate of the LFO, and because the actual time for a complete cycle is important in this type of sound generator, then the time for a cycle is indicated in large numbers - '34 seconds' in the screenshots here.

As well as smoothly fading each slot in and out in sequence, there are pan controls for each slot. The rate controls the rate of auto pan of the left and right channels of the stereo spectrum grains. The 'phase' controls alter the relative phase of the panning LFO for the two stereo channels - so hen they are the same, then you get conventional panning of the stereo grains, but if you set them to '180' degrees apart, then the two channels will be panning in anti-phase, and you will hear the two channels separately (assuming the spectra are different enough!). Setting the pan controls can make the output sound animated and interesting, and can helps to hide the repeats of the main 4-phase LFO cycle. If you set the pan rate to zero, then there is no panning...

 Live updating

As an additional way to hide the repetitions, you can update the slots whilst gFreez_mr is playing. The process is as follows:

1. Wait for the volume block in your chosen slot to drop to zero, then 'Mute' that slot. You can now 'Grab' a new spectrum, although you won't be able to hear it because the 'Input/Mute' button will be set to 'Mute' to prevent this. (You can always set the 'Input/Mute' switch to 'Input' so you can hear it, but your audience will hear it too!) I tend to go by the spectrum display when I'm doing this live updating, and you should quickly get the hang of assessing kind of what a grain will sound like based on the spectrum.
2. Play the sound you want to grab, and click on the 'GRAB' button. The spectrum display will update with the new grain. (If you don't like th look of th spectrum, then just grab the spectrum of another sound by repeating this step!)
3. Wait for the volume block for that slot to get to zero again, and quickly click on the 'LFO' button. The new slot will then be included in the new cycle.


This process isn't as tricky as it might sound, and it enables much longer sounds to be generated live.

Sounds

Remember that gFreez_mr does not capture samples - it captures the spectrum of a very short piece of audio: a grain. So the sound that you hear from each slot is that spectrum turned back into sound - a very simple resynthesis process. This type of sound generation has limitations, and there is a distinctive character to the sounds, but there is a pretty wide variation of timbres, and mixing in real samples can provide additional variation in an audio editor.

This first version of gFreez_mr does not save the spectral grains, and so it is intended for live use. Future versions may add additional functionality, of course. Anyway, have fun with this first version, available as usual from MaxForLive.com.

Audio demo at: https://soundcloud.com/martinruss/gfreez_mr-demo-01-edited


Monday, 8 August 2016

Free Max For Live M4L Packs from SynthesizerWriter

Here is a summary of my latest free MaxForLive 'Echo' effects. As usual, these are all available from MaxForLive.com via the 'Download' buttons in each of the boxes below.

Max for Live
Missing Echo dark

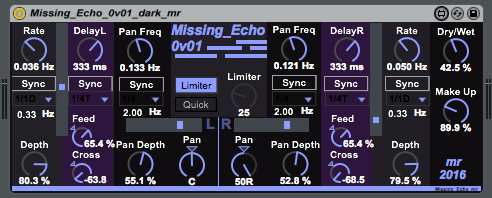
This echo puts an LFO inside the feedback loop, so the number of echoes changes over time.

F R E E

Download
Max for Live
Field Echo dark

This two-stage echo enables you to place echoes in the stereo image: a very 'musical' echo.

F R E E

Download
Max for Live
Field Echo

This two-stage echo enables you to place echoes in the stereo image: a very 'musical' echo.

F R E E

Download
Max for Live
Delay Delay Echo

Delay Delay is a simple echo with two sections. This is the most basic of my echoes, and my first!

F R E E

Download

Max for Live
SpecD

SpecD is a stereo dual-stage pitch-shift/chorus echo, and the 'dark' version of the DDFS echo.

F R E E

Download
Max for Live
DDFS

This echo adds frequency shifting inside the feedback loop, hence: Delay Delay Frequency Shift.

F R E E

Download
Max for Live
Rnd Echo dark

This echo provides echo times controlled by random noise... Not your ordinary echo effect at all!

F R E E

Download
Max for Live
Pan Echo

This echo provides auto-panning of the echo outputs, and so livens up the stereo image.

F R E E

Download

These echo effects provide a snapshot of my MaxForLive programming: Delay Delay Echo is a very early 'learning' project, DDFS adds frequency shifting, and SpecD is an experiment to see if 'dark' effects are more popular (and if using something reminiscent of a 1970s Japan naming scheme makes the effect more appealing!). Pan Echo starts to explore what you can do with auto-panning of echoes, whilst Field Echo explores static stereo fields.

Note that whilst there are four 'dark' and four 'ordinary' effects here, both colour variants are not always available - Rnd Echo and Missing Echo are only available in 'dark'.

Finally, two echoes that explore more unusual areas: Rnd Echo provides random echo delay times, whilst Missing Echo lets an LFO control the feedback inside the delays. The experimental nature of these last two means that they will probably be extended, or a new variant will be added at some stage. Maybe eventually I will produce a dual delay with frequency shifting, auto-pan, stereo field, random delay times and LFO controlled feedback...

Sunday, 24 July 2016

Altering parameters inside an Echo Effect...

In several of my MaxForLive effects, I have examined what happens if you modulate a parameter that is normally not associated with that type of control. So there's a Limiter with an LFO, an Echo effect where the modulation of time is derived from Random Noise, and my most recent effect, 'Missing Echo' allows the feedback inside a delay line to be altered by an LFO.
You can do this manually, and there's a number of performance techniques based on this general principle. I've covered this before in my 'Dopplator' effect, but that was based on a rounded pulse as the LFO waveform, and didn't have any panning facilities. 'Missing Echo' is much more in the mainstream sequence of my effects, and so has dual syncable independent LFOs for panning, plus a Limiter to keep things under control if you require it, and dual syncable independent delay lines, as well as dual syncable independent LFOs to modulate the feedback. Yes, this is a lot of LFOs, but those always were the modules I ran out of first when I used to play with modular synths...
The LFO modulates the feedback in a slightly different way to the way that you might expect, and I'm still exploring things to find the optimum method. The current version first sweeps from zero feedback to the modulation setting for in-channel feedback and then back, and then sweeps from zero feedback to the modulation setting for the other-channel and then back to zero. So you get one half cycle of ordinary echo, followed by one half cycle of ping-pong echo, with all of the stereo imaging that you would expect from this arrangement. Add in the stereo auto-panning, and there's a lot that can be going on in that stereo image - if you want! As I said, I'm still trying to find the best way of controlling this, and a later version may add more facilities...

 'Missing Echo' can be downloaded from MaxForLive.com

 Because I have several different variations on the Echo effect available (from www.maxforlive.com) then I'm going to be adding a special easy selection page soon, so that it is easier to browse through the different variants on the echo effect that I have produced.

Sunday, 8 May 2016

A different type of echo effect...

I have always liked echo, from my very early 'wannabe Space Echo' days with merely a guitar and a customised Melos 'tape cartridge' echo box, through to the wonderfully bouncy 'Ping Pong Echo' in Ableton Live. But I've also always wanted more from my echoes, and I have done lots of exploring to try and find that itchy place that needs scratching, and I have got close sometimes - look at MaxForLive.com for a host of experiments with echoes. Random time delays was one of my more recent investigations, and the lack of structure was what got me thinking about a very different approach.

Turning an idea into reality sometimes clicks quickly and easily, and sometimes it just turns into treacle and everything goes slow-mo. This one didn't go well, and I spent rather longer than I ever intended getting the details correct. But I eventually got my head around it, and managed to get the Max4Live working more or less as I wanted - although as you will see, the 'Auto' function still needs some work. So what sort of echo is this latest one?

Field Echo


'Field Echo' is named after my intention to do something more with stereo echoes that just bounce them round from channel to channel. Fun though that is, real world echoes work 'inside and as part of' the sound field, and don't have ''channels, and that's why I made this new experimental echo effect.


Field echo has two stereo delays in series, but the feedback is separated into 'same channel' feedback and 'other channel' feedback (ping-pong). The two feedback channels also provide two outputs per stereo delay, and these outputs can be panned anywhere in the stereo stage. The layout is exactly as you might expect, and I've mixed the left/right channel metaphor a bit, but I think it works.


The best way to find out about it is to use it, so here are some hints and tips about what to explore.

1. Similar but slightly different times for all the four delays is a good starting point, and panning the L and R 'same channel' outputs mid-way towards left and right, and the 'other channel' LD ping-pong outputs hard left an right. This gives a big, bold stereo echo, and a good starting point for further exploration.

2. Try breaking the rules and distributing the L and R outputs to the Left, and distributing the LD and LR outputs over to the Right (Remember that the intention is to create stereo imagery, not hard left and right walls of echoes). You should find that you get interesting haloes rather than the hard brittle echoes that you might be used to. Try tweaking the delay times, and when you increase the delay in the first section, try reducing the time in the second. You should use extreme caution when using this type of setting with Marimbas or other physical percussion  instruments, because you may find that hours slip by without you noticing!


3. Try the 'Auto' control for amy first attempt at making the 'up a it, down a bit to compensate' process a bit faster. I ha problems with the maths inside Max, and so this is isn't perfect, but it is still interesting, and there's now only only delay time control to play with. Note that you can set negative times, but the delay lines don't know what to do with them! In the next version I will window the time delays to real values.

As I now do with all my M4L, there is also a 'dark' version.


I hope you find Field Echo an interesting diversion for a while, and you may even find it useful. As always, you can find it on MaxForLive.com (dark) or MaxForLive.com (light).


Sunday, 24 January 2016

Generating audio soundscapes...

A few weeks back, I revisited my old Reaktor workspace and started reworking some of the ideas in there for M4L. Here's the second output from that project...


Saw4Generator_Dark is a sound generator with preset memories. It does not respond to MIDI inputs - it just sits there and makes noises continually...

The basic idea is very simple. There are two sections: a sound generator that produces the raw sounds; and a mix processor that controls how those sounds are formed into a stereo sound stage. Both sections have manual controls that can be tweaked, as well as LFOs that allow some changes to be made cyclically over time (although this version does not allow the sound generator modulation settings to be controlled by LFOs, which is something for a future version)


The sound generator section starts with a sawtooth wave oscillator with and and LFO to modulate the pitch and the output is frequency modulated by another similar oscillator, which is modulated by another similar oscillator, and another one on top of that... The result is a simple FM vertical arrangement that is often referred to as a 'stack'. There are a lot of controls!

The mix processor is a flexible output stage with even more controls! The output allows mixing of four deliberately-harmonically-diverse outputs: the final oscillator itself ('Saw'), the ring modulated output of the third and final oscillators ('Ring'), the output of the third oscillator 'sample & hold' processed by the final oscillator ('S&H'), and the output of the second oscillator 'sample & hold' processed by the final oscillator ('H&S'). In other words there are four separate outputs, each with its own unique harmonic content. The output stage has LFO modulation of the mixing, plus LFO panning as well.

There's a lot of power here to control the sound, and a lot of LFOs providing the bulk of that automation. As always with LFOs (and often with VCOs, and especially with digital versions of these building blocks...), the 'never the same twice' rule applies - so don't set all the LFOs to the same rate or the same modulation, instead go for values that won't 'collide' too frequently: ratios that are prime numbers are good. Here's why:

If you think about two LFO were one is twice the speed (rate) of the other, then they will 'collide' or repeat (have the same values at the same time) every cycle of the slowest LFO. In the diagram I've simplified the LFO to show only two output states (0 and 1):

01010101010101  (rate = 1)
00110011001100  (rate = 1/2)
^   ^   ^   ^   (the pattern repeats quickly) 

But if the rates (or the ratios between them) are prime numbers, then the collisions take much longer to happen:

00011100011100011100011100011100011  (rate = 1/3)
00000111110000011111000001111100000  (rate = 1/5)
^                             ^      
(the pattern repeats more slowly)

So by setting values like these:
0.01
0.02
0.03
0.04
You will get lots of places where the LFOs are in sync, and digital systems are pretty precise with timing for LFOs, and so you tend to get short repetitive patterns, which normally isn't what you want when you are controlling a complex sound generator...

Better values for getting long times between repeats would be more like:
0.03
0.05
0.07
0.11
Which takes quite a long time to repeat, and sounds a lot more complex when you hear the controlled output.

Getting Started

A good way to start with Saw4GeneratorDark is to turn all the controls to the leftmost minimum position, and then to select the Saw button, adjust the volume to your preference, and choose the pitch you want in Oscillator 4 (there's just a Pitch control there, so it is easy to find! You will also find the 'preset' store buttons here. 'Shift & Click' to store, Just Click to recall. Saving this 'All leftmost' preset is a good place to start again when you get lost).

Using just one oscillator is a good way to learn the output options: LFO modulation of volume, plus LFO panning. Once you have gt your head around the controls (some ping-pong echo is very often applied to the output of this type of generator...) then there is the LFO modulation of the pitch of the oscillator to try out. Saving a simple sound like this is often a good starting point for further exploration.

When you are comfortable with all of that then you can try moving to the left and try exploring the pitch and modulation controls for Oscillator 3, then the LFO pitch modulation for that oscillator, and so on to the leftmost Oscillator. Because Oscillator 1 is at the top of a stack of FM then it can cause big changes to the oscillators underneath it, so be cautious at first with the pitch and modulation controls. If everything gets too much, then just go back to the 'all leftmost' and start again from Oscillator 3.

Further processing

The screenshot above shows one possible chain of audio processing that you can add after Saw4GeneratorDark. A 'Saturator' is used in the 'wave shaper' mode, followed by an 'Auto Filter' set so that a resonant filter peak scans across the frequency spectrum, then a limiter to avoid problems with a peaky filter on the resulting rich audio material, and then the ubiquitous 'Ping-Pong Delay'.


The thinking behind this type of audio processing chain is straightforward: generate a harmonically-rich sound source, and then dynamically filter it down into a simpler sound. The Saw4GeneratorDark output already has a lot of harmonic content, and so the Saturator doesn't need very much drive in order to get a lot of frequencies, but it can be useful for a little bit of thickening or 'colouring' of the output. The low-pass peaky filter lets some low frequencies through, and so tends to give a stronger sound, but try using a peaky band-pass (or high-pass) and see the difference that it makes to the sound landscape that is produced. You can replace the simple Limiter with a Multiband Compressor if you want more control over the output frequencies, but you might think that there are already enough controls! The final Ping Pong Delay just pushes things together, and could be replaced (or augmented) with some Reverb.

This is just one possible chain of post-generator processing. There are many more possibilities to play with, and when combined with Saw4GeneratorDark, you can create a wide variety of unusual soundscapes. There's a lot to explore in Saw4Generator, and a lot of sounds waiting to be created. Recording the output and processing it further is thoroughly encouraged!

(As always, this is a work in progress, so it may not be perfect, and early versions tend not to have very much help on controls included in the M4L. Please feel free to report bugs via the comments, and I will try to fix them when I can find time.)

Sunday, 3 January 2016

Sweeping wavetables using .WAVs

Previously I've blogged about 'Waivy', the simple swept wavetable glimpse into the forthcoming update to Waverne. 

Well, as I was playing with Waivy, it struck me that instead of fixing the wavetable with the carefully compiled fixed version that I'd included, it might be interesting to allow .WAVs to be used instead, and so 'Sweeper' was born. 


Simple and fun (and with free 'Frasier' references), Sweeper is a variation of my recent 'Waivy' plug-in, but adapted for use by those people who like to use their own .wavs instead of pre-compiled wavetables. 

Sweeper allows you to use the default wavetable (different to the one in Waivy, of course) or drop your own .WAVs onto the waveform display and then select the part of the waveform that looks interesting (and sounds interesting). The separate 'Wave' control allows finer selection, and the 'Sweep' control allows dynamic wavetable sweeps in real-time, as per various synthesizers of the past. 

Please note that M4L and Live are a little bit selective in their import of AIFFs, and so only .wavs can be used in this plug-in. (Sound of people converting AIFFs into WAVs...)

Also note that the obvious use: extracting waves from loops, turns out to be somewhat less than anywhere near as brilliant as I had hoped, so don't be disappointed. (Sound of people not converting AIIFs into WAVs...)

Because Sweeper is deliberately simple, the envelope is an 'AD' 'contour-like' shape, which isn't as limiting as you might expect, and remember that this is a preview! Also there isn't any filtering, which can make Sweeper a little brittle in sound, but this is easily overcome by adding a filter, and Ableton Live makes this very easy:


The 'Auto Filter' remains one of my favourite effects in Live, and in this case, it allows you to do more than just remove some of the harsh top-end, it also allows you to dynamically filter the output of Sweeper using the LFO. Adding all of this functionality into Sweeper would have made it much more complex, and when you can add 'Auto Filter'....

As always with early versions of my M4L devices, you may need to do some tweaking of settings to get the best results. In particular, the 'Wave' and 'Start' controls tend to interact and you may need to adjust them to get the wavetable sound you want, instead of a metallic buzzing. Alternatively, if you want nasty metallic buzzing, then Sweeper does it by accident too!

Anyways, as a free 'explore me!' plug-in, Sweeper has lots of scope for making some very nice sounds, plus some dreadful aliased sounds as well -  and which is which all depends on your taste...

Sweeper is available for download from MaxForLive.com.


DIY MIDI Controller with LEDs

Possibly one of the least amazing titles for a blog articles! In these days where RGB LEDs feature on just about every specification list for MIDI Controllers, then the only difference is that it's a simple home-brew MIDI Controller - creatively mis-using a spare numeric keypad.


The numeric keypad is intended to be used with laptops that don't have separate number keys in a nice neat square form, and require the user to either use the buttons over the 'qwerty' row, or to do various extra key-presses to re-use other keys on the main qwerty keyboard. So the keys on the keypad just map into the standard key numbers as if this was a full external keyboard. To use the keypad as a controller, I have been working on a simple MaxForLive plug-in that intercepts the incoming key number messages and allocates them to functions in Ableton Live - this is still ongoing work, but the controller is finished, hence this blog entry!

The keypad as supplied is very boring: black plastic everywhere, and the only concession to RGB LED-ness is a red 'Num Lock' LED that isn't really relevant in this context. So this obviously needed augmenting. First task was to light up the keypad itself, and four blue LEDs did that very nicely. The numeric keypad came with a USB plug, so power was easily available, and I just added a few series resistors to the LEDs. I could have added more LEDs, but four was okay for this first iteration, and there is a definite limit to how much hot-melt glue you can use without waiting for it to cool down properly.

The flashing yellow circle came from a concert wristband that my son was about to throw away because the batteries had died, and so that was pressed into service (with an on/off switch). The flashing multi-coloured interior to the circle was one of those 'infinite mirror' displays where two mirrors bounce light back and forth many times giving an illusion of depth, and so that became the middle of the circle, again with a selector button to allow the choice of flashing mode.

The end result looks very flashy (deliberate pun!) but has one problem - the backspace and return key tend to be used in mot application UIs - and in Ableton Live the Backspace key deletes the active plug-in, which is usually the custom M4L plug-in, whilst the Return key tends to spawn a new version of the plug-in. Obviously these buttons are not very useful in a control context, and the simplest solution was to disable them - mechanically (you were expecting a software method, perhaps?).

 Disabling keys on keypads is relatively easy given the lack of travel of modern keypads - you just put lumps of blu-tack (or other similar slightly sticky substance) underneath them, so that pressing them doesn't result in any movement. Here are some photos showing bits of this process.


Prising keys off is usually pretty easy - I use a screwdriver. doing the blu-tack is easy, and putting the key back is normally just a question of pushing it back.

Please note that the lower cost the numeric keypad, the easier these types of mods tend to be. Levering out the keys on an expensive laptop (an Apple MacBook Pro for example) and trying to put them back with blu-tack underneath is definitely not recommended! (Just don't do it!)


To indicate that two of the keys were now disabled, I covered them with white typing correction fluid, something which used to be a standard home office accessory... I'm looking for a better solution, and 'sticky-back plastic' is definitely beckoning me!


And that's it. A spare (actually unwanted, although it sounded like a good idea at the time!) numeric keypad turned into something which looks like a MIDI Controller, and which may well be used when I iron the bugs out of the MaxForLive plug-in. In the meantime, it looks very good on stage, and isn't that one of the prime reasons behind all of those RGB LEDs anyway?

Now that I think about it, I probably didn't need to modify the keypad at all - I could have just assembled a few bits of LED toys and put them into a suitably technical-looking box and I'd have a stage box that smart-alecks and know-it-alls would look at and say things like: '...and there was this amazing home-brew controller...'. Maybe there's a business opportunity here?

[ Note that I'm not suggesting that you modify/wreck your own (or anyone else's) keypads, keyboards, laptops or anything else. I'm just showing that I sometimes do hardware as well as M4L! If you do make any modifications, then you assume full responsibility for them! ]