Showing posts with label Sound Generator. Show all posts

Tuesday, 25 February 2020

256 oscillators (I mis-counted) plus Detune control...in a Max For Live plug-in.

My excuse is that I was distracted. On Twitter I under-stated the number of oscillators in my INSTframeOSCmr Max For Live plug-in for Ableton Live 10. There are actually 256: 64 per frame, but there are two parallel pairs of frames, and if you select the 'Stereo' button, then there are two separate oscillator banks per channel, so what you hear is 256 oscillators in total.


But whilst I was looking at the design, I saw a better way of doing the stereo routing, and so I added that. I also figured out a way to solve one of the biggest problems that I had with the user interface - drawing lines in the Frequency grid. The result is INSTframeOSCmr02, as usual a free upgrade from maxforlive.com.

I also realised that the frequency grids aren't easy to understand, so here's a guide to using them, plus details of the new 'Detune' control.

First we need to see how the frequency grid and the spectrum plots align...

Spectrum plots and frequency grids


1. Single low frequency

Here's a spectrum of the basic frequency grid setting - a horizontal line. This gives a single frequency at the output. (Note that the 'Detune' rotary control is set to zero.)


One way to think of how this is working is to just take the frequency grid and rotate it clock-wise - that horizontal row of orange blocks turns into a vertical line, which is the single frequency shown in the spectrum (Okay, so spectrum analysis always turns frequencies into these weird spikes that are narrow at the top and wider at the bottom, but that is just the way that the maths works). Now that the frequency grid is rotated, low frequencies are on the left, and high frequencies are on the right - just as in the spectrum:


2. Single high frequency

If we re-draw the orange blocks at the top of the frequency grid, then we get a single frequency 'spike' at a high frequency in the spectrum:


And if we rotate the frequency grid, then you can probably see how the two line up...:


3. Two frequencies: Low and High

If we draw low and high frequency horizontal lines in the frequency grid, then we get two lines in the spectrum. (Notice that the oscillator index doesn't matter to the spectrum - you can try it yourself by drawing the two horizontal lines with different positions, and the spectrum will stay the same):


And the rotated frequency grid now looks like this (the blue cursor just happens to be where the two orange lines change frequency - this isn't significant!):


4. Three frequencies

So what about three frequencies? Well, we just draw three horizontal lines in the frequency grid:


And the rotated version looks like:


At which point you may notice that the spacing of the three frequencies in the frequency grid and the spectrum are different! This is because the frequency grid horizontal axis is 'linear', where the frequency goes up in equal steps, whilst the spectrum's horizontal axis is 'logarithmic' where the frequency goes up in steps that keep doubling. This is exactly the same way that notes double in frequency when you transpose them by an octave. So a C2 at 110 Hz, becomes C3 at 220 Hz, and a C4 is 440 Hz, whilst a C5 is 880 Hz. So the spectrum's 'logarithmic' horizontal axis is a good way of showing musical intervals: a C2, C3, C4 and C5 would all have the same horizontal spacing. Unfortunately, the Max 'multi slider' object that I'm using for the frequency grid does not have a logarithmic axis option.


5. Detune

You can see how the logarithmic horizontal axis works by adding 'Detune' to the 'Two frequency' example. Notice how the low frequency (the right-hand orange horizontal set of blocks in the frequency grid) gives a wide band of frequencies in the spectrum, but the high frequency (the left-hand orange horizontal set of blocks in the frequency grid) gives a much narrower band of frequencies. The detune values that are applied are the same in both cases - the frequencies that are added or subtracted are the same, but the way that the spectrum shows the resulting band of frequencies is different. Actually, to sound correct musically, then the detune values should be larger for higher frequencies, but that's not how I programmed it...


Okay, that completes the tutorial on the alignment between the frequency grids and the spectrum plots.

How to use the frequency grid...

1. Single frequency

Now that you have a better idea of what is happening on the frequency grid and the spectrum, let's look at that single frequency example again. When you look at the frequency grid and spectrum now, then you should see that the horizontal orange set of blocks in the frequency grid corresponds to the single 'spike' in the spectrum plot:


2. Rising ramp

And next, the plot that seems to confuse people. A rising ramp on the frequency grid... Remember that the horizontal axis is the oscillator index, so what the rising orange line means is that the frequency goes up as the oscillator index goes up - each oscillator will produce a different frequency. So this will produce a block of frequencies:


3. Chords

Next, some horizontal lines drawn by dragging the mouse horizontal across the grid. This gives four different frequencies (a chord!), because all of the oscillators along the horizontal axis are set to the same vertical frequency:


4. Wobbly lines give bands of frequencies

And now to that problem I mentioned. If you aren't good at drawing horizontal lines with the mouse, then you actually don't get single frequencies, but you get broader 'bands' of frequencies. if you look, you can see that the lines are not horizontal, they are 'wobbly' in the vertical direction, and this produces the bands of frequencies in the output:


5. Detune...

Now for Detune. Here's that first 'single frequency' setup, but with the 'Detune' rotary control turned up past half-way, it is as if that horizontal line was very wobbly up and down vertically. So now you don't need to try to wobble the lines, you just turn up the 'Detune' rotary control. What you get is bands of frequencies instead of single ones:


6. Detuned chords

Finally, a nice neat horizontal 'chord' grid, but with quite a lot of 'Detune' - so you get several bands of frequencies all mushed together (The screenshot doesn't capture the dynamism of the spectrum that you get here - it is going up and down all over the place!):


The Detune rotary control saves you the hassle of trying to draw wobbly horizontal lines - and most importantly: you can quickly adjust the control, instead of having to redraw wobbly horizontal lines with more or less wobble.

Detune?

The 'Detune' rotary control applies little frequency offsets to the oscillators. It does this with different values for each grid - each grid has a captured list of random values that it uses to apply the detuning to the oscillators. Which brings me to this post's 'Max' content, and it concerns the 'vexpr' object.

Vexpr works on lists. Give it a list like (1,2,3,4) and it will process the 1, then the 2, then the 3, and finally the 4. So one object in Max allows you to change four values at once. So in INSTframeOSCmr I use it to process the frequency grid, which is a list. I'm going to use a single diagram with numbered 'points of interest':


1. This is a 'bang' event that indicates that a frame has been activated, and that the oscillators should load new values for their frequency and amplitude.

2. The frequency grid outputs a list of 64 frequency values.

3. This message box contains a list of 64 different randomly-generated 'Detune' values.

4. The 'Detune' rotary control controls how much detune is going to be applied to the frequency grid output values (which is a list of 64 frequency values).

5. This is the first of two 'Vexpr' objects. This one has 'Scalar Mode 1' set, and so it multiplies every value in the list of detune values by the single value from the Detune control. In this case, the Detune is set to zero, so the output of this Vexer object will be a list of 64 zeroes.

6. This is the other 'Vexpr' object. This one does not have Scalar Mode 1 set, and so it works on two lists. It adds the list of frequency values from the frequency grid (2) with the list of Detune values, so if you imagine that the 'Detune' rotary control was set to something other than zero, then the list of detune values would be 64 different randomly-generated values, and they would be added, one by one, to the 64 frequency values from the frequency grid output. If lists were not used here, then there would need to be a lot of * and + objects in this Max For Live Patch! (As a quick aside, what would happen if this '+' object was a '*' (multiply) object instead? Would this affect how the detune is applied to the frequency values?)

7. I have cheated here by pasting in a message box containing the 64 frequency values that would have been output if the Detune control was higher than zero!

8. The 'detuned' list of frequency values eventually gets to the 'ioscbank~' object, which contains the 64 oscillators for this frame.

Note that the two different versions of Vexpr do very different things.

  • The Scale Mode 1 version takes a list and processes every item in the list with a single value (from the Detune rotary control in this example).
  • The other version (without the Scale Mode 1) takes two lists, and processes every item in one list with the same item in the other list. 

Getting INSTframeOSCmr

You can get the updated version of  INSTframeOSCmr here:

     https://maxforlive.com/library/device/6012/instframeoscmr

Here are the instructions for what to do with the .amxd file that you download from MaxforLive.com:

     https://synthesizerwriter.blogspot.co.uk/2017/12/where-do-i-put-downloaded-amxd.html

(In Live 10, you can also just double-click on the .amxd file, but this puts the device in the same folder as all of the factory devices...)

Oh, yes, and sometimes last-minute fixes do get added, which is why sometimes a blog post is behind the version number of MaxForLive.com...

Modular Equivalents

In terms of basic modular equivalents, then INSTframeOSCmr would require two LFOs, and 256 VCOs, a lot of stored parameters (blocks of 16?) to do the frame loads, a mixer and a Ring Modulator, giving a total of well over 260 ME, which is the biggest count so far, I think. You might want to use some specialist additive oscillators instead of brute-force VCOs!

If you find my writing helpful, informative or entertaining, then please consider visiting this link:


Friday, 21 February 2020

128 oscillators in a Max For Live plug-in...

Every so often, I produce a sound generator. When I was a kid it was neon relaxation oscillators or cascaded unijunction oscillators, but these days they tend to be implemented in Max For Live. Since BankOSC, I've been exploring some ideas to see if I could come up with another simple but powerful user interface to Max's 'ioscbank~' object, and I'm going to share the result with you now.

INSTframeOSCmr


INSTframeOSCmr builds on INSTbankOSC, but quadruples the number of oscillators, has two independent sound generating channels, and as with many of my generators, there is is a ring modulator in the output stage. There are now 64 oscillators in the oscillator banks, and a simpler user interface -BankOSC was cool, but it wasn't straight-forward. FrameOSC has two channels (A and B), each of which contains two 'Frames'. The frames contain frequency and amplitude lists for the 64 oscillators, and you can control the rate at which the frames are loaded into the oscillator banks - as well as how long it takes for the oscillators to adapt to the new parameter lists. But unlike BankOSC, where the frequency lists were fixed to MIDI notes, the frequency range in FrameOSC can be varied - so you can have each of the pairs of 64 oscillators playing frequencies over a range of a few hertz, to a few thousand hertz, and you can tune all the oscillators with an offset rotary control. This means that you can make a lot of very rich, thick, swarmy textural sounds which can nicely cover the spectrum from ethereal to scary.

Oh, and the oscillators are in stereo, so there's actually 256 oscillators in total...

The two numbers in orange between the frequency and amplitude grids are NOT related to the horizontal indexing of the 64 oscillators - this space was just a convenient place to put the 'Span' limits of the vertical frequency axis (anywhere else gets in the way of other UI elements). The left number is the lowest frequency set by the frequency grid and the 'Span' rotary control. The right hand number is the highest frequency set by the frequency grid and the 'Span' vertical control. It all makes sense once you are used to the way the grids and the span control work!

When you first see FrameOSC, you will notice the two pairs of frames: channels A and B. Each pair of fames has an underlying left-to-right scrolling cursor that shows the position of the LFO as it scans across the frames. The rate of the LFO is controlled by the 'Rate' rotary control, and the border of the left frame of the A pair will light up in white as the cursor scans across from left to right. When it gets to the right hand edge of the left frame, then the right frame will get a white border and the cursor will then scan across that. When the cursor reaches the right hand edge then it jumps back to the left and repeats. So, at a glance, you can see which frame is current active, which one will be active next, and how long it is going to be before the cursor reaches the edge and triggers the change. Remember that the cursor scanning across from left to right is just a metaphor for the LFO timing - it does not mean that the oscillators at that position are affected by the cursor.


When the border jumps from one frame to another, the frequency and amplitude parameter lists are loaded into the oscillators. The 'Smooth' rotary control sets how long it takes for the parameter changes to happen. The range is from more or less immediately, through to multiple tens of seconds. If you set the LFO rate to be fast, and have a long smooth time, then you won't hear much happening, because the oscillators can't track the changes, but if you reduce the smooth time, then you will gradually hear the changes happening with more and more effect, until at very short smooth times, the oscillators will change from one set of parameters to another very quickly. Fo slower LFO rates, then the smooth control has much the same effect - if it is set too long then the changes occur very slowly (or maybe never reach the limits, whilst faster smooth times will give more abrupt changes.

The frames contain editable lists of frequency and amplitude for the 64 oscillators - you just click and drag in the rectangles. For the Frequency list, vertical is frequency, which for the amplitude grid, vertical is amplitude. Left to Right is the 64 oscillators. There are two rotary controls in each frame: 'Span' adjusts the frequency span of the frequency list, whilst 'Tune' adjusts the pitch up and down - just an offset control, really. At the far right hand side, there are volume controls for the A an B pairs of frames, plus a third volume control for the ring modulator (RM).


To encourage experimentation, and to avoid too much of a 'preset' mind-set, I have deliberately not included memories in INSTframeOCmr - think of it as being like a modular synthesizer that forces you to unlearn any reliance you may have developed for the instant recall of sounds. I await the first modded versions with memories added!

Notes

If you don't have any parameters set in the frequency and amplitude grids, then you aren't going to get very interesting output sounds. Zero Hertz at zero amplitude is not very useful. 

The LFO isn't quite what you might expect - it actually runs 16 times faster than the actual rate of crossing the frames, but this is so that it can drive the cursor. There is also a large amount of latency in the way it responds to slow rate settings - you may find that it appears to have stopped. You can press the 'Reset' button to reset the LFO cycle if this happens.

Ring modulators accentuate the difference between two sounds, so if you set very similar sounds in the A and B pairs of frames, then the RM output may not be interesting.

Remember that left to right is selecting oscillators in the grids, whilst vertical is frequency or amplitude. These are not waveforms or spectra.

If you like a set of parameters, use the 'Save' icon in the top right hand corner of the device in Ableton Live to save it as a 'preset', so that you can get it back later on!

INSTframeOSCmr does not respond to MIDI notes. It produces an output all the time, and this is not pitchable or triggerable using a keyboard. The frequencies are not on a scale, or a temperament - they are just raw frequencies.

Adding echo, delay or reverb after INSTframeOSCmr will thicken the output even more.

Remember that the cursor scanning across from left to right is just a metaphor for the LFO timing - it does not mean that the oscillators at that position are affected by the cursor. I'm repeating this because this was the second thing that people said in the beta testing.

Yes, you can make it sound like Louis and Bebe Barron's soundtrack to the movie: 'Forbidden Planet'.  (This is the first thing that people said in the beta testing.) But you can do lots more than that. (Oh, and the reason is sounds like 'Forbidden Planet' is because recording lots of manually tuned oscillators tends to produce a distinctive sound...) And yes, that is a young Frank Drebin played by Leslie Neilsen, or is it the other way round, or something else entirely?

As always, INSTframeOSCmr is free!

Updated version


Version 0.2 is now available. I have added extra guides to how the frequency grids work, plus the new 'Detune' rotary control, and a 'Max For Live' 'What is happening inside the patch' detail for the 'Vexpr' object in a new blog post.

Getting INSTframeOSCmr

You can get INSTframeOSCmr here:

     https://maxforlive.com/library/device/6012/instframeoscmr

Here are the instructions for what to do with the .amxd file that you download from MaxforLive.com:

     https://synthesizerwriter.blogspot.co.uk/2017/12/where-do-i-put-downloaded-amxd.html

(In Live 10, you can also just double-click on the .amxd file, but this puts the device in the same folder as all of the factory devices...)

Oh, yes, and sometimes last-minute fixes do get added, which is why sometimes a blog post is behind the version number of MaxForLive.com...

Modular Equivalents

In terms of basic modular equivalents, then INSTframeOSCmr would require two LFOs, and 256 VCOs, a lot of stored parameters (blocks of 16?) to do the frame loads, a mixer and a Ring Modulator, giving a total of well over 260 ME, which is the biggest count so far, I think. You might want to use some specialist additive oscillators instead of brute-force VCOs!

If you find my writing helpful, informative or entertaining, then please consider visiting this link:


Saturday, 9 February 2019

Modulated Sine Waves Two Ways - A Recipe in Two Parts (Part 2)

In the first part of this post, I covered the 'gen' part of how I made an FM drone generator based on the Rebel Technology Tutorial Workshop at Somerset House, London, in December. In this second part, I look at taking the gen code and turning it into a Max For Live device.

My starting point was as generic an FM sound generator as I could produce, using the many workshop attendee examples as the starting points (so the underlying examples in the workshop are a strong influence here). The gen~ code and the block diagram for what I made as my underlying oscillator module looked like this:


Now Gen is part of Max, and I was still running Max 7.3.5 at the time, because I'm a cautious updater rather than a b/leading edger. My plan was to leave the gen~ code alone and just put it inside a Max For Live device, which is where things got interesting...


So here's the gen~ module inside a Max For Live wrapper, with added spectrum display and rotary controls. 

Now you may have seen a social media post reporting that some versions of Live 10 and Max 8 doesn’t do exactly what you might expect with gen~. I saw it, so I contacted Cycling’ 74 and Ableton (which, btw, is always the best route: social media can sometimes be unreliable) and found that the Live 10.0.6 release should be fine with editing gen~ if you are using the full licensed Max 7 or Max 8. 

As a related sideline, I also learned something very interesting: Max 8 introduces a new object called ‘gen’ that works for events. Despite the name, that lack of a squiggly tilda is very significant. The underlying technology that you see in all of the gen~ patchers that I have been showing is called Gen, and it provides access to ‘lower level’ objects than the ones you get in Max, as well as embedded code. In this example, I’m working with audio signals, and so I'm using the gen~ object, not the ‘gen’ object.


Now  I wasn't aware of the new ‘gen’ object, and it is always good to take a look at new things in Max. So to find the differences between the gen and the gen~ objects, I looked at the help pages inside Max:


So rather than try and explore unknown territory with Live 10.0.2 (and more recently 10.0.5) I decided to update from Max 7.3.5 to Max 8.0.2, and to convert from using gen~ to just Max so that I could leave exploring using gen~ inside Max For Live for later on, when Live 10.0.6 is released (which now seems to be part 3 of this two-part blog post). So not quite the easy 'write it in gen~ and use it anywhere' that I was going to do, but at least I had learnt a lot, and I was now slightly more cautious about my planned next step follow-up, which was to explore the possibilities of the 'gen~-to-VST’ process (part 4!).

So the new 'first' task for a Max For Live version was now to turn this 'gen~' code into Max For Live for each of the bits that were inside the gen~ object in the grey screenshot several shots above.


This is the top level of the gen~ code, directly translated from gen~ into Max. Because Max has a toggle button already, then all of the DIY code to create a toggle button isn't needed here! The number of oscillators has also been increased: 10 pairs giving 20 oscillators here.


The 'spreader' code is almost exactly the same! Now I know that in Max 8, there are built-in functions to allow you to create 'spread' parameters for the multiple instances of a patch that you get by using the 'mc' object, but that would completely wipe out the 'gen~-to-Max' theme that I started with, and will be something I will look at in a future post! (Also, the spread functionality is in Max, and not in gen~, and so it won't work for projects that can only use gen~, as is the case with devices like those from Rebel technology.


As in the gen~ code, in the translation-to-Max, there are two oscillators, one detuned by 1.001 (I didn't spend any time optimising this!) and a straight-forward LFO-driven anti-phase panning circuit. Above this, there is the modulation section, which has another LFO (that can also run at audio frequencies...) and uses a selectable '+' or '*'object to do the modulation. The '+' gives 'linear' 'vibrato-style' FM and the '*' 'multiply' object gives 'multiply' FM (FM = frequency modulation). In this implementation (with these frequencies and modulation indexes), then 'Linear/vibrato' gives a milder sound, whilst 'Multiply/FM' is much brighter in timbre. Having two different sound source timbres is always good, and in Max For Live it is easy to add a switch for it. In hardware devices like the OWL Pedal, then adding a toggle switch isn't quite as straight-forward - but I have done it and this is described in a previous post in this blog.

One final translation is something which I've long wondered about why there isn't a pre-made object like this in Max. The 'dc-block' gen~ object stops DC voltages from getting into the audio output, and for an FM-based sound generator, then it should be very useful for avoiding 'clicky' speaker-stressing audio signals.


The contents of the DC-block patcher aren't complex - it is just that the parameters are tricky to remember!

Anyway, the final MAX-ified version has three repetitions of the 20-oscillator 'grey screenshot' above, and so provides 60 oscillators across three separate 'parts'. This gives some very interesting sound generation possibilities. Finally, I added MIDI input for pitch, so this is now a simple monophonic instrument for making drone sounds with various timbres and frequency content. Enjoy!

Getting INSTsineATMOSPHERE

You can download INSTsineATMOSPHERE for free from MaxForLive.com.

If you drag the .amxd file that you download from MaxForLive.com into the 'Third Party Packs' folder in 'Places' in the Brower panel on the left-hand side of Live, then you will be able to find it easily when you need it.

Modular Equivalents

In terms of modular equivalents, then reproducing this functionality using just basic modules in my modulars just required lots of VCOs and LFOs. But 60 VCOs is a lot of modules, and when you add LFOS it gives a modular equivalent of 120 ME, with a lot more modules required for the panning... If I throw away the 'you can only use basic modules' requirement, then things are different, but then we lose any basis of comparison.

Buy me a coffeeBuy me a coffee


Tuesday, 14 August 2018

A Bank of Max For Live Oscillators - revisited

When I created BankOSCmr0v01, I thought that it was quite a neat, simple multi-oscillator sound generator, and so I released it into the wild...

After a bug report, followed by careful investigations by myself, Ableton and Cycling'74, it looks like  we could not reliably generate the problem, and so I went back to playing with it and seeing where this took me - which is where it started to get really interesting...

The problem with large numbers of oscillators is always one of control. Additive synthesis suffers from this because there are lots of harmonics that you need to control. BankOSCmr has 32 oscillators, and so suffers from similar problems, although I was determined not to do a traditional 'separate envelope for each oscillator' and I was equally focussed on not going anywhere near the standard FFT-based 'draw a response' approach either - the beauty of having 32 separate oscillators with a few Hertz resolution across the audio band is that you have a very different audio palette to FFT-based generators. (Plus I have already done a couple of those!)

BankOSCmr0v03f


So I played around with logical extensions of what I already had, and this rapidly expanded into the control method that is in BankOSC0v03f. The main new additions are the Freq and Volume 'damping' controls, and these affect the way that the density of the oscillator frequencies and volumes are affected by the scanning across the oscillators. Low values of damping create thick clusters of frequencies, whilst high values of damping give more open, thin whips of frequencies. I also added a timed 'Update' function, which resets the frequencies and volumes of the oscillators to random values, just to add a bit of variety in how the oscillators can be controlled. You can also click on the 'New' (at the top of the Van De Graaf) to force a new set of random values for the oscillators.

And it was great fun. The additions allow a lot more control over the sound pallete that BankOSCmr could create, and widened the possible sounds as well. In fact, it felt like you could almost use it for performance as it was, and so I put it through 3rd hand, the automatic volume fader, and just played around for 12 minutes or so, capturing it on video.

The result is available on YouTube.

The (Updated) video demo of BankOSCmr0v03f was recorded live, and the only effect is Zynaptiq's superb free SubSpace plug-in to add a bit of spatial variety (If I could afford it, then I would be using their astonishingly wonderful Adaptiverb instead, which I fell in love with at NAMM, and which comes incredibly highly recommended by me!). 3rd Hand is just an automatic volume control. In more skilled hands than mine, then the demo would be better, and there's a few warts in the audio (this is version 0v03 remember!), but this was my first time putting everything together of a live video demo... and now I have added better text commentary...
So what's going on in the demo? Well, the Update time is set to just under 15 seconds, so there's a bit of timed underpinning in the background for much of the time, although I do turn it off, and then back on again, just to show how this is simple to do. Then I just explore the various controls. High and Low set the range of frequencies generated by the 32 oscillators, whilst the Time sets how long it takes for each oscillator to change frequency, so you can go from very quick jumps, to very slow glides. Freq and Volume control the damping, and the Run control sets how quickly the scan runs across the oscillators. Fill has two functions: above 0.1s it just generates ramp functions, whilst below that it generates random values. The ramps allow the generation of some very cool Shepard tones, as you can hear in the middle part of the demo. The random values can give some astonishing bell-like timbres, again in the middle of the demo. At the end, I break with convention, and keep altering things as the fade out progresses. One of my more commercial songs introduced a blistering lead solo just after half way through the final fade, just so that anyone who was listening got the feeling that there was more - kind of the reverse of Roxy Music's intro to Virginia Plain (Sound of lots of people looking this up on iTunes and Spotify...).

What intrigues me is that there are lots of videos on the Interweb that show people playing Modular synths live and 'DAW-less', whilst I haven't been able to find very many that show an Ableton Live plug-in being played live, sans any sequencing or pre-recorded backing. Well, now there is one. Enjoy!

Getting BankOSCmr0v03f

You can download BankOSCmr0v03f for free from MaxForLive.com.

Here are the instructions for what to do with the .amxd file that you download from MaxforLive.com:

     https://synthesizerwriter.blogspot.co.uk/2017/12/where-do-i-put-downloaded-amxd.html

(In Live 10, you can also just double-click on the .amxd file, but this puts the device in the same folder as all of the factory devices...)

Adaptiverb...

Adaptiverb is incredibly highly recommended, and comes from Zynaptiq.

Modular Equivalents

In terms of modular equivalents, then reproducing this functionality in my modulars either involved 32 VCOs and four 8-step sequencers, or advanced oscillators banks or sequencers that I can't count as 'basic' modules, so I would rate this version as being about 46 ME (or 12ME if bank oscillators are allowed, or 8ME with fancy sequencers!).


Buy me a coffeeBuy me a coffee


Thursday, 5 July 2018

My first visit to a Bank of Oscillators...

I have always been fascinated by sound generators. Over the years, I have done a lot of dabbling into FM, AM, Ring Modulation, Granular, FFTs and many other techniques, and what I have found is that the interesting stuff is often in the detail. So my previous forays into Reaktor produced large numbers of generators exploring lots of ideas, and I sometimes reach back into that abandoned era to provide inspiration for MaxForLive devices. This brings me to my latest sound generator, whose name tells you just about everything about it: BankOSCmr0v01.

A Bank of Oscillators...

Any sound generation method that uses large numbers of oscillators has a basic problem that can be boiled down into a simple question: How do you control all of those oscillators?' Additive synthesis is a good example: lots of harmonics means lots of things to control, and creating a powerful and appropriate 'high-level' user interface can be a difficult challenge. But my current research interest is in inharmonics, and so I wanted to explore ways of working with non-harmonically related frequencies.

After poking around in some of the quieter parts of the Max object world, I found ioscbank~, and decided that this might be suitably inspiring. The Max documentation showed filling the paired frequency and amplitude controls with random values, but I like my sound generators to produce dynamic evolving sounds, not boring static timbres. So I added scanning that swept across the bank of oscillators, gradually changing the frequency and amplitude of each oscillator, and slugged the interpolation of these parameters so that they changed slowly - and I got an interesting 'big bank of oscillator' sound that had a lot of promise.

One of the techniques that I learned when creating synth patches was to explore the extremes of the available parameters, and so I experimented with the rate that updates happened, with the interpolation time, and with the range of frequencies and amplitudes. Messing about with the amplitudes did not seem very interesting, and so I abandoned that and moved to the other parameters. (Anyone who is shaking their head at this point needs to move to the follow-up article to this one, where I realise that I nearly missed something big and went back to controlling the amplitude.) After adding some filtering and some additional tweaks, I had an interesting result that could make a quite broad range of not-so-ordinary sounds: BankOSCmr0V01.


BankOSCmr0v01's user interface is dominated by the large display in the centre, and this is not interactive at all. It is purely to show you what is going on for each of the 32 sine-wave oscillators that this version uses. The display shows the 32 oscillators from left to right, and each vertical shows the frequency as an orange square and associated bar underneath, and shows the amplitude (the volume...) as a purple square and associated bar underneath. Low frequencies and amplitudes are at the bottom, and high frequencies and amplitudes are at the top.

To control the oscillators, the controls on the left affect:
- the Rate at which the update sweeps across the oscillators from left to right
- the High and Low extremes of the frequencies of the oscillators
- the Time for the frequencies and amplitudes to change to the new values from the scanning
- a 'New' button to generate a new set of random values for frequency and amplitude (If you send a MIDI note to this device when the Rate is set to the slowest time (...all the way clock-wise: 'Run' changes to 'Stop'), then this triggers the 'New' button.)

On the right, there is a simple state-variable filter that provides low-pass, high-pass, band-pass and notch transfer functions, and has Frequency and Q controls, an finally an Output control that has a deliberately large range to partially compensate for having no controls over oscillator amplitude (and I should add a second hint about the next version here as well).

And that was that. A simple bank oscillator that generates a range of sounds using a small number of controls. Nothing particularly special so far, but then there's more coming up next time... and plans beyond that as well.

Media

Several people have asked me why I never post videos of my MaxForLive devices on YouTube, and I never had a really good reason why not, so I'm posting a simple video to my YouTube channel, which is really going to surprise my 34 subscribers! I will also do my usual SoundCloud example as well.

Getting BankOSCmr0v01

You can download BankOSCmr0v01 for free from MaxForLive.com.

The YouTube video.

The SoundCloud demo.

Here are the instructions for what to do with the .amxd file that you download from MaxforLive.com:

https://synthesizerwriter.blogspot.co.uk/2017/12/where-do-i-put-downloaded-amxd.html

Modular Equivalents

In terms of modular equivalents, then reproducing this functionality in my modulars either involved 32 VCOs and four 8-step sequencers, or advanced oscillators banks or sequencers that I can't count as 'basic' modules, so I would rate this version as being about 40 ME (or 10ME if bank oscillators are allowed, or 6ME with fancy sequencers!).


Buy me a coffeeBuy me a coffee


Sunday, 29 October 2017

sFreez_mr - 4-phase LFO looped sample live performance tool in M4L for Ableton Live

When I programmed gFreez_mr, I was exploring granular synthesis, and so an 'atmospheric sound generator' was a logical way to use the results of my experimentation. sFreez_mr takes the underlying  'live performance' framework of gFreez_mr, and turns it into a sound generator based on looped samples. So the way you work with both M4L plug-ins is the same, but the sound sources are different. Maybe in the future I will make a hybrid of the two...

So this blog entry is a rambling user manual for sFreez_mr...

sFreez_mr 


sFreez_mr allows the simultaneous playback of up to four separate samples in a way that is designed for live performance, but it can also be used in the studio as well. Instead of manually mixing between the sound samples, it uses a four-phase LFO with variable 'overlap waveforms' to control how the mixing happens. A simple sine wave just mixes between three sounds at any one time, whilst other waveforms can mix between pairs or even all four. (My original plan was to make the phase shits between the four LFO outputs user-controlled, but this required three controls, and actually, there weren't that many useful sets of settings, so (unusually for me) I went for the classic audio plug-in design approach of 'less controls is better').

There's a clear design decision here. DJs normally mix between and process (with effects) two main sources of sounds (vinyl, CDs, decks, sample players... (insert your favoured technology here)), and fly in additional sounds from other sources - and they do this live. This treats the sound sources as components in a music instrument that works at the level of samples of audio, and there's enough abstraction from the one detail (down at the sample level) to allow them to 'play' those samples expressively in a performance that has structure and connects at an emotional level. sFreez_mr removes just the mixing part and automates it, leaving the performer/DJ free to work with 4 separate sources of sound at once - and actually, by changing the LFO rate or using the On/LFO/Mute buttons, the mixing is controllable too. So you can think of the 4-phse LFO as a 'helper' that enables the assembly of more sound sources into a live performance by reducing the loading on the performer/DJ. I'm expecting great things from talented performers /DJs when they start to get the hang of what sFreez_mr lets you do...

Now this wouldn't be one of my M4L creations if it didn't have LFO-controlled panning, and here four separate LFOs are used to animate the four LFO-controlled samples components into a constantly shifting atmospheric sound. sFreez_mr is particularly good for slowly evolving background sounds, and it has a number of functions that are specifically designed for live use.

Let's look in detail at each of the sections that make up sFreez_mr:

Sample Players


There are four looped sample players, which can be 'Load'ed with AIFFs (or WAVs), or you can drag and drop samples onto the four waveform displays. The four samples are each colour-coded: red, yellow, green and blue. Each sample player waveform display has several sections: there's the central waveform display, the sample name on top of that, and two rows of buttons (above and below). That's a lot of functionality in a small space!

Left-most are four big 'Load' buttons that allow direct loading of samples. On gFreez_mr, these were the record or 'capture' buttons for grabbing the source material for the granular players, and I did consider  having the same functionality here, but eventually went for providing dedicated buttons AND drag & drop. These buttons cycle at the rate set by the 4-phase LFO, so you can always see which sample track is not currently in the mix. When the button is bright, then the LFO has set that tracks fader to off or very low, and so you can make changes to that track without being heard. So when the button goes bright, that is when you replace the sample (or drop a new sample in the waveform display - one technique is to grab the sample and hover over the waveform display, waiting for the button to light up!).


The top row of little buttons transpose the sample, whilst the lower row of buttons stretch or shrink it. The range of transposition is limited, so I made some decisions about the available settings, and so you get fifths purely for usability (a future version might allow these to be customisable). The centre setting is the 'no transposition, real time' setting, and either side of this the sounds get more and more altered. In the centre default, then you get a mildly conventional sample playing device that operates in what many people would class as 'DJ' territory, whilst away from the centre, you get more atmospheric and experimental sounds - but I encourage everyone to break through any barriers, recommendations or preconceptions of use. I debated for quite a while if I need a Play button, and eventually decided to leave it in, (although for me it stays on all the time, and so need not be there, but I wanted to leave the control there for other performance styles...). The 'Play' button is the rounded edge button next to the 'chevron' forward (to the right) or reverse (to the left) buttons. You can use the chevron buttons to change the sync of samples by reversing for a time and then going back to forwards. I use this for rhythmic samples where I want to change timing relationships , and I do it when the 'Load' button is bright so that the next time that sample track gets back into the mix it is different.

Track controls


The next three buttons are linked and only one can be selected at any time for each coloured sample 'track': On (the sample plays all the time), LFO (the sample volume is modulated by the 4-phase LFO), or Mute (the sample audio is muted). These buttons fade the sound quite quickly, and so shouldn't cause too much audio hassle (like zipper noise), but they are intended to be 'played' live, so don't just dismiss them as being used in setup (especially since 'setup' can be happening live during a performance, not just beforehand).

The thin buttons in the middle are 'group' controls that affect all four sample tracks simultaneously - once again, this is intended for live performance use - so you can quickly stop everything happening by muting all four small tracks, or alternatively, you can blast all four tracks full on by using the 'On' button. Normally, the 'LFO' middle position is where the buttons will be set, and having a single button that restores this can be very useful. On you have learned this user interface, then you may find yourself wishing that other button-based UIs had similar shortcuts...

The final part of the track controls are the LFO displays, which show the 4-phase LFO as four colour-coded virtual faders. Left is off, no coloured bar) and right is full volume (full coloured bar) - just listen to a single track to get your head around this (press the thin central 'Mute' button, then the 'LFO' button for the sample track that you want to audition...). Remember that when the fader bar vanishes, then the 'Load' light will be bright, and you can make changes to that sample track without being heard in the output mix. In performance, your head needs to be in sync with the 'Load' buttons or the LFO fader displays.

Mixer


The next section is kind of a 'mixer', but very specific to what is needed in this context.

First, there's a display of the audio level for each sample, which helps you keep track of what is playing, and which can be very useful to all you if a track is playing a slow continuous sound, or a bouncy rhythmic sound. I'm never sure if this display should be part of the previous 'track control' section, or if it should be included in the mixer...

Then there are trims for volume for each sample track, and then the Pan LFO controls; frequency and phase. To fix the pan position in the stereo image, you low it right down and use the phase to set where you wan the pan position to be. Note that the phase does NOT map directly to L and R (i.e. All the way left on the has control is not necessarily hard Left panning) - watch the little pan display blob to see where the actual position is in the stereo image.

4-phase LFO


The 4-phase LFO has a rate control that is how you interact with the LFO, but the main number that is shown is how long it takes for a complete cycle (in seconds). The wo things are inversely related - the 'how long' display number is, again, designed for use in live performance. The LFO has additional 'waveforms' that set how the samples are faded in and out, and so I suspect that 'transfer function' is a more accurate description. Anyway, try the new waveforms out: they allow you to vary the number of samples that are mixed at any time. Each waveform gives a different 'feel' to that way that the sample tracks get cyclically mixed together.

Finally, the 'Makeup' control adjusts the overall output volume, whilst the 'Mute' button and 'Gain' control are inherited from gFreez_mr, and allow you to monitor the input audio - which adds to the live performance possibilities...

Practice

sFreez_mr is intended to be a live performance tool that can also be used in the studio. To get the most out of any tool when performing live, you will need to have spent time learning how to use it effectively. Also, don't forget that this is 'work in progress'...

sFreez_mr can be downloaded for free from MaxForLive.com

SoundCloud demo1 - wind
SoundCloud demo2 - rain
SoundCloud demo3 - seq
SoundCloud demo4 - loop
SoundCloud demo5 - fx
SoundCloud demo6 - fx2
SoundCloud demo7 - drum
SoundCloud demo8 - drum


Tuesday, 30 August 2016

Audio environments from frozen spectral grains...

Atmospheric sounds


You hear them all the time, but mostly they slip under the radar. Environmental sounds are the background 'atmosphere' that pervades spaceships, control rooms, power stations, busy offices, streets, and everywhere else. The classic 'bridge sound' from the original Star Trek is a perfect example: if you hear a few seconds of it you know exactly what it is, and yet most of the time you aren't are of it. Like a lot of audio that underpins moving pictures, your eyes are distracted, and the sound plays a strong supporting role. But remove the sound, and suddenly the pictures aren't as compelling or interesting.

Music uses background sounds too. On stage, the atmosphere built up by the right sound gradually rising from subliminal to noticeable can make the reveal of the musicians all the more an event. Staging isn't just lights... And during a set, the right background sounds can control mood as well as provide links between songs.

Crafting atmospheric sounds requires a lot of knowledge about the way that sounds work on people. It also eats up source material, which is why making background sounds is a challenge, and it explains why some of the most popular plug-in downloads aren't what you might expect. 'Sound Generators' are a key part of the tools that creators use, along with the audio editing software and  sound effects library that you were probably expecting.

Grainy spectrums

Granular synthesis is very popular at the moment, and there are a lot of software instruments that are devoted to producing sounds using little fragments of sound. But creating frozen spectrum grabs is only part of the solution, mainly because freezing a sound produces a static spectrum, and that quickly gets boring. Just as movement makes movies engaging, evolution makes sounds interesting. Recently, I've been looking at various ways of capturing spectral fragments, and I've struggled to turn them into something that I can use.

So, my latest Max For Live plug-in for Ableton Live is specially designed to turn audio fragments into atmospheric background sounds. It is a sound generator based on grains instead of the longer samples (or FM or feedback algorithms) that are often used. gFreez_mr allows the capture and playback of four separate grains of frozen spectra, and then uses a four-phase LFO and LFO-controlled panning to animate those four components into a constantly shifting atmospheric sound. gFreez_mr is particularly good for synthetic, electronic sounds, and it has a number of functions that are specifically designed for live use.

gFreez_mr

First things first - you need to be able to play the audio samples in Live, and Simpler is perfect for this, although you can use Sampler and any other sample player you like. gFreez_mr is an audio effect, and so goes after the sample player:


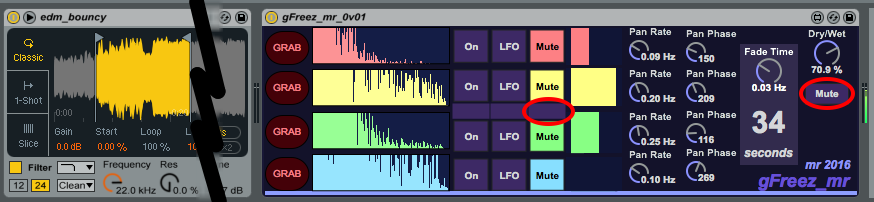
gFreez_mr has four horizontal 'slots' for the grains, and those empty boxes on the left hand side are where these will appear. The first thing to do is to set the 'Dry/Wet' mix control to slightly dry, and the 'button underneath it to 'Input' instead of 'Mute'. This button routes the input of gFreez_mr to the output so that it can be heard whilst the grains are being captured (the 'Mute' setting is used during playback). The top slot control buttons should also be set to 'On', so that the output of that slot is permanently audible. When you play a sound from Simpler (either via MIDI, or the virtual keyboard: A, W, S, E, D, F, etc.), then you should hear the sound in the output of the gFreez_mr effect. To actually capture the audio, you click on the 'GRAB' button on the far left. This will grab the spectrum of the sound (in stereo) and you should hear this as the output of the effect, and the spectrum will be shown in the slot:


The 'top slot control buttons should now be set to 'Mute' so that the sound is no longer heard, and the second slot should be set to 'On' and a new spectrum grain grabbed. When you have repeated this for all four slots then gFreez_mr will look like this:

Note that since we have now captured all of the four slots, then the 'Input/Mute' button on the far right has been set to 'Mute' so that we will no longer hear any audio from the sample player. The small row of buttons in the centre of the four slots affect all of the slots, and so clicking in the 'Mute' column will set all of the slots to muted, and so no audio will be heard at the output. You can also just click on the slot control button if you wish.

Playback

The easiest way to set all of the four slots playing at once is to use the small row of buttons in the centre again - this time in the 'LFO' column:


This sets gFreez_mr playing all of the slots, an you will se the four volume indicators in the centre right moving back and forth. The larger the block, the louder the volume, and the LFO has four phases, so each slot fades in and out in order. The 'Fade Time' rotary control sets the rate of the LFO, and because the actual time for a complete cycle is important in this type of sound generator, then the time for a cycle is indicated in large numbers - '34 seconds' in the screenshots here.

As well as smoothly fading each slot in and out in sequence, there are pan controls for each slot. The rate controls the rate of auto pan of the left and right channels of the stereo spectrum grains. The 'phase' controls alter the relative phase of the panning LFO for the two stereo channels - so hen they are the same, then you get conventional panning of the stereo grains, but if you set them to '180' degrees apart, then the two channels will be panning in anti-phase, and you will hear the two channels separately (assuming the spectra are different enough!). Setting the pan controls can make the output sound animated and interesting, and can helps to hide the repeats of the main 4-phase LFO cycle. If you set the pan rate to zero, then there is no panning...

 Live updating

As an additional way to hide the repetitions, you can update the slots whilst gFreez_mr is playing. The process is as follows:

1. Wait for the volume block in your chosen slot to drop to zero, then 'Mute' that slot. You can now 'Grab' a new spectrum, although you won't be able to hear it because the 'Input/Mute' button will be set to 'Mute' to prevent this. (You can always set the 'Input/Mute' switch to 'Input' so you can hear it, but your audience will hear it too!) I tend to go by the spectrum display when I'm doing this live updating, and you should quickly get the hang of assessing kind of what a grain will sound like based on the spectrum.
2. Play the sound you want to grab, and click on the 'GRAB' button. The spectrum display will update with the new grain. (If you don't like th look of th spectrum, then just grab the spectrum of another sound by repeating this step!)
3. Wait for the volume block for that slot to get to zero again, and quickly click on the 'LFO' button. The new slot will then be included in the new cycle.


This process isn't as tricky as it might sound, and it enables much longer sounds to be generated live.

Sounds

Remember that gFreez_mr does not capture samples - it captures the spectrum of a very short piece of audio: a grain. So the sound that you hear from each slot is that spectrum turned back into sound - a very simple resynthesis process. This type of sound generation has limitations, and there is a distinctive character to the sounds, but there is a pretty wide variation of timbres, and mixing in real samples can provide additional variation in an audio editor.

This first version of gFreez_mr does not save the spectral grains, and so it is intended for live use. Future versions may add additional functionality, of course. Anyway, have fun with this first version, available as usual from MaxForLive.com.

Audio demo at: https://soundcloud.com/martinruss/gfreez_mr-demo-01-edited