Showing posts with label Ableton. Show all posts

Tuesday, 29 September 2020

Selecting different effect paths in an Ableton Live MIDI Effects Rack...

The 'Racks' in Ableton Live are very neat solutions that contain a lot more functionality than you might think at first glance. The obvious application for the Audio or MIDI Racks is to put several effects in series into a rack, and then assign Macro Controls to specific important parameters in those effects, and then hide the effects leaving just the macro panel visible.

A simple example first...

Here's exactly this process for a very common set of MIDI Effects. 

The first effect is the 'Random' MIDI effect, which is being used to add an offset of -12 or +12 semitones to the incoming MIDI note number, with a 50% probability (so half of the time, the incoming note will be unchanged, and half of the time it will be transposed up or down by 1 octave). 

This is followed by the 'Velocity' MIDI effect, which is adding a random number (up to 29) to the MIDI velocity of the incoming MIDI note. 

The overall result of these two MIDI effects is to produce random inversions of chords (or transpositions of individual notes), with random 'voicing' (relative differences in timbre or volume caused by the velocity). This is very useful for string or synth pads, making it sound like the part, and the playing of that part, is much more complex than the contents of the source clip! 

To store these two MIDI effects as a single device, you just insert a blank MIDI Effect Rack into the track strip:


The MIDI Effect Rack will initially have no effects in it (just a grey bit in the middle), so you just add the two effects to the empty 'Drop MIDI Effects Here' area in the middle.:


Which gives us a neatly encapsulated effects 'chain' that can be named and saved, and re-used whenever pad 'sweetening' is needed. 

On the left hand side, there are some button that control which parts of the MIDI Effect Rack are visible. If we turn on the top button:

...then the left hand side opens up and we see the Macro Controls:

The Macro Controls have all been mapped here. So let's look at how that works. Some of the controls in the effects on the right hand side have a small green dot, and this means that they are actually controlled by one of the Macro Controls. 

All that you do ito set this up s click on the control on the right hand side (four little corners appear around the control) and then right-click on it. A pop-up menu appears, and you just select the appropriate Macro Control:

Because the mapping to the Macro Control is already set up, the highlighted option here says: 'Unpam from Chance'. If you were doing this from scratch, then it would say 'Map to Macro 1', much like some of the other menu options shown.

Once you have mapped the effects controls to Macro Controls, you can colour and name the Macros. If  you click on the middle button on the left hand side, you will see this:


The middle button unhides the middle section of the window, and it contains some buttons, then a large box called 'Chain', which represents the chain of effects over to the right, and then another empty grey space with 'Drop MIDI Effect Here' - just like where we added the two MIDI Effects right at the beginning of this blog post. Clicking on the middle button again will hide this centre section.

Finally, you can click on the lowest little button on the left hand side, and the effects will be hidden:


(You can see that the lowest button on the left hand side is no longer yellow!). 

And that's it! Two MIDI Effects turned into a useful composite effect that you can grab from Live's browser and insert on any pad track that needs inversions and velocity processing.

There's more...

But there are more advanced ways to use Racks, and this is where people seem to have problems. The metaphors used in the Racks appear to have been strongly influenced by the way that samplers manage samples: velocity switching ('Vel'), and the note range that a sample is assigned to ('Key'). But the 'Chain' button uses a different mind-set - kind of like multiple Racks that you can switch between. 

Now I have already used the word 'chain' to describe those two MIDI effects placed one after the other in the Rack - 'in series' is how techies describe this arrangement. But MIDI Effect Racks allow you to have more than one chain inside them...

Remember how the middle section had a 'Drop MIDI Effects Here' underneath the large 'Chain' box? Let's see what happens when we do that...

I'm not going to repeat the previous effects. Instead let's start by just making some chords:


This chain of two MIDI Effects uses the 'Chord' MIDI effect to generate a triad of three notes to make a Major chord based on the root note input from the Clip, followed by the same 'inversion generator' effect as before, using the 'Random' MIDI Effect. The 'Random' MIDI Effect is polyphonic, so when you pass the three note from the chord through it, it will apply the random inversion to each of the three notes separately. After the Rack, there's one of my MaxForLive note monitors, showing an inverted C Major chord, and then a Collision Instrument to make a sound.  

If we now click on that middle button, the middle section unhides, and we get the 'Chain' box with the 'Drop MIDI Effects Here' grey area underneath:


I have renamed 'Chain' to 'Major' because that box represents those two MIDI Effects that are producing inverted Major chords.

Next let's alter one of the MIDI Effects:


Above is another chain showing the same two MIDI Effects, but this time with the 'Chord' MIDI Effect set so that it produces a Minor chord. If we drop these two MIDI Effects into the grey 'Drop MIDI Effects Here' area, then we get this:

A second large box appears underneath the 'Major' box that used to be called just 'Chain'. I have renamed this new box 'Minor' because it contains the 'Chord' MIDI Effect that creates minor chords. I have also mapped across the Chance and Sign controls to Macro Controls on the left, and aded some colour. I have also added a 'Chord Maj Min' control because that seems like what we want to end up with... but what do we map to it?

Before we look at that, let's see what is happening inside this MIDI Effect Rack... 


In the above diagram, I have shown the two large chain boxes (Major and Minor) and how they map to the two chains of MIDI Effects. You don't actually ever see a view like this, but it shows how there are two chains in parallel.

What do those two chains do, and what are those controls to the right of the large boxes with 'Major' and 'Minor' in? There seems to be a loudspeaker button, a 'Solo' button, a 'Refresh' button, and a bar-graph like the ones in MIDI tracks. If the Major chain is soloed:


Then the output of the Rack is Major chords.

If the Minor chain is soloed:


Then the output of the Rack is Minor chords.

So only one chain can be active at any one time, which makes sense! But how do we control these two chains. Mapping the solo buttons doesn't work, of course!

The answer lies in the 'Chain' button. As I noted earlier, the 'Key' and 'Vel' buttons seem to be influenced by samplers, since in other Racks they deal with key ranges and velocity switching, but clicking on the 'Chain' button opens a similar looking section to the ones for 'Key' and 'Vel'...


Now it isn't immediately obvious what to do, but it looks a lot like the 'Key' range control, so if we assign the two ranges to 'Major' and 'Minor' then it looks like this:


Unlike the 'Key' section, the numbers at the top go from 0 to 127, which looks like a MIDI range, and there's a light blue highlighted box for the '0' (zero) position. If you right-click on this box then you get  a pop-up:


'Chain Selection Filters MIDI Ctrl' tells us that this is a control for that 0-127 range. Also notice the 'Distribute Ranges Equally' - you can use this to set the ranges like this if you want... If we map this to that pre-defined Macro Control (Macro 5), then we get a result that looks like this:


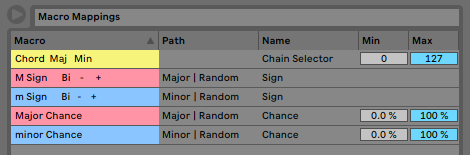
Here are the mappings that have been added:

So the 0-127 horizontal bar in the 'Chain' view is for a 'Chain Selector', which means that when the value is from 0-63, then the Major MIDI Effect chain is active (soloed), and when the value is from 64-127 then the Minor MIDI Effect chain is active (soloed!).

So now we have a MIDI Effect rack which produces Major or Minor chords, with random inversions. But how can we automate the Major/Minor selection? You could map an LFO to Macro 5, but another way is to use a Clip Envelope (My Favourite!):


This Clip Envelope is mapped to 'Chord Major Minor', which is the mapping name for Macro 5, that controls the Chain Selector. So this clip envelope plays a Major chord first, then a Minor chord. You can, of course, change the clip envelope to suit when you want the chord type...

More chains!

Adding more chains just requires more dropping of MIDI Effects in the 'Drop MIDI Effect Here' area, and the setting of separate ranges in the 'Chain' view. Here's an example I prepared earlier:

Again, this isn't what you would actually see on screen!

Files


Downloads for the example Racks featured in this blog post (plus previous Racks) are available here.

---

If you find my writing helpful, informative or entertaining, then please consider visiting this link:


Synthesizerwriter's StoreSynthesizerwriter's Store
 (New 'Modular thinking' designs now available!)


Wednesday, 8 July 2020

Note Count Processor in Max For Live for Ableton Live

After I described the 'Triple Transposing Delay' with three different ways of connecting the delays together, as 'experimental', people seemed to like that, so my latest release is 'extremely experimental'!

Although it isn't a reliable guide, I've not seen anything like MIDIoneOF before, although, of course, you could do some of it using clip envelopes. In fact, I reckon that you can do almost anything by using clip envelopes, and I'm sure that those people who produce YouTube videos with apparently click-attracting titles like: 'Powerful Advanced Generative Techniques For Ableton Live', in huge white block capitals will be busy making yet more of those videos as I type, although they don't seem to use clip envelopes... When I did release a YouTube video on using Clip Envelopes, it got a wonderful review (Thanks, Darwin!) and over a hundred views, so maybe I should make some more...

MIDIoneOF


MIDIoneOF is the first of a series, because people seem to like it when there is more than one of something, and actually that's part of where the name comes from. I wanted to called it 'n of m' because it is based on permutations and modulo arithmetic, but mathematical notation like 'n of m' isn't very good for naming Max For Live plug-ins, and 'Nofm' sounds like onomatopoeia for eating food, rather than a cool M4L device. So 'One of' got the most votes, and may well be followed by 'Two of' when I have time to finish it. (I have no idea what the third might be called...) Me? Busy? I've been doing several major projects over the last few months (the TR-505 was just one of them) and I can't talk about some of them, but they might even see the light of day at some time. Over the years, I've become rather used to doing stuff that never has the media spotlight turned onto it, and I'd probably be surprised now if a glimmer of limelight ever appeared on any of my stuff. But hey, It means that sometimes I can hint abut something rare and unusual!

(*) MIDIoneOF counts notes as they arrive at the input, and then processes those notes in various ways. The main process is muting: you can set notes to be muted depending on two criteria: the note count length (from 2 to 16 notes), and the 'Mute Pattern' which you can set in the 16 light purple boxes (although you can only set ones which are within the note count length!).

The Mute buttons mute the note if they are grey, but let the note through if they are light purple, by the way.... 

So if the note count is set to 7 notes, then you can set mutes for note counts between 1 and 7 notes. There are 'Speedup' buttons to set all the mutes on ('AllOn') or off ('AllOff'), as well as a random selection.

The muting affects the notes as they pass through the device, and all of the timing is derived from those notes... Despite appearances, the mute buttons are only indirectly connected to the timing transport of Ableton Live - and if you don't quantise your notes, then there's no real connection at all. So what may look like a simplistic rhythmic accenting utility isn't quite that at all... It may look like a step sequencer, but the steps are the notes, not the transport timing. It's kind of a step sequencer turned inside out...

This is probably a good time to revisit the start of a previous paragraph (*). When I say: 'as they arrive', I mean that if you have a clip with 8 notes in it, then MIDIoneOF will get those 8 notes, and will process them in the order in which they arrive. So if the note count length is set to 7, then the first 7 notes will be processed (and muted or not, depending on the settings of the numbered buttons in the Mute Pattern. The eighth note will then be processed as the first note of the second set of 7 notes, and MIDIoneOF will continue processing in groups of 7 notes, until you stop Ableton Live.

The clip (or live playing) can include single staccato notes, legato notes, or chords, although there are limits to the speed and quantity of notes which it can deal with! Remember that I did say: 'Extremely experimental!'. Note also that this behaviour isn't what you probably associate with a step sequencer, but as I said, this isn't...

The second bit of processing is the 'AutoRandom' button, which saves you from the effort of clickng on the Mute buttons. You set a number (between 2 and 16 - a motif in this series) and after that number of multiples of note counts (so every n x 7 notes in the example I have used so far), the Mute buttons will be randomised. Properly random, and not one of those 'tailored randoms to make random more suited to human beings', so you can have everything muted, nothing muted, and these can repeat several times. Real random is like that, although in a lot of modern software it has been 'tailored' to suit people's expectation - the classic example is iTunes, where the Shuffle function does not play the same track twice, even though a random selection might play it twice, or even thrice, or even... It seems that people report it as a problem if a random shuffle plays the same thing twice... So you set the number of multiples of the note count length, and click on the 'AutoRandom' button, and off it goes. Setting the multiple to 4, 8 or 16 sounds kind of musical, because too much exposure to popular music seems to have convinced many people that everything happens every 4, 8 or 16 bars at 120 bpm in 4/4 time. Since the example so far has been every 7 notes, then try 7 as the multiple and you will find that it might feel slightly early.

The second processing is MIDI velocity. Since the note count and Mute Pattern know which number each note is, then we can do interesting things to the velocity value of the notes. The clue is the 'Rise/Fall' button, and this has an Offset rotary control on the left side, and a Scaling rotary control on the right hand side. Rise increases the velocity value as the note count increases, whilst Fall decreases the velocity value as the note count increases. This means that, as with lots of stuff that I do, velocity matters! You should try MIDIoneOF with an Instrument that is velocity sensitive... The important thing to remember is that the velocity processing happens depending on the note count length, so with the 7 note example and a Fall button setting, then the first note will have the largest velocity value, then the velocity will drop over the next 6 notes to the 7th note, which will be the quietest (lowest MIDI velocity value), and finally, the 8th note will then be loud again, after which it will drop for th next 6 notes, and so on. The 7 note cycle will repeat until you change it.

Note that all of the processing happens based on just the notes themselves. MIDIoneOF takes all of its timing from thosee notes, not from the bars and beats within Live. So if your clip has notes in a complex rhythm, then MIDIoneOF will process the notes in that same complex rhythm. As I said, you can feed your own playing through MIDIoneOF if you wish... And I'm not going to mention Olafur Arnalds here...

The final processing is Probability, which is independent of the note count length! One thing that I have realised is that 100% is not enough, and I'm looking at this to see if there is anything I can do, but adding in extra notes is quite tricky in real time...

There's also the slightly red '!' "All Notes/Sounds Off" button in case you need to stop errant hanging notes. This may well signpost this as an 'experimental' device regardless of how I tag it in MaxForLive.com...

And that's the MIDIoneOF device. Hopefully you haven't seen anything quite like it before... because I much prefer not to repeat things that other people have already done. There have been a lot of Max For Live devices recently which are just people re-making a device which is already on Max For Live. I think that time is too short to waste it re-coding something which is already available!

Inside

I won't bore you with a counter, and I won't bother explaining why the count is from 2 to 16 and not 1 to 16 (1 is the obvious minimum, but it is really boring using a count of one!). Instead, this is probably a good place to do another in the occasional series of 'Things that Max doesn't have a pre-made object for...'

In this case, it's those 'Mute Buttons' that are the source of the problem. To mute the MIDI note when any of the mute buttons are highlighted requires what I call a 'wide' OR function - a 16-input OR gate. This isn't standard in Max...which is not hugely surprising... Now I know that you can use Boolean logic to transform the gate, but as far as I can see,  this doesn't really do anything other than mean that a different 'wide' gate and extra inversions are needed. So what did I do? I made a 16-input OR gate using a tree hierarchy of 2-input OR gates. Yep, I resorted to 'brute force and ignorance' to save time and effort. Sorry.


Two things are probably notable in this sub-patcher. First, there's the left-most input, which sets all of the outputs to zero. I've had all sorts of 'difficult to track down' problems caused by the gswitch object when there's no input on one of the two inputs (This would be a 'floating input' if this was hardware, which it isn't...), and so this ensures that that won't happen. Second, there's my standard 'use a blink to make both inputs trigger the output' approach, which enables the ORs to ripple downwards from either side. I'm sure there's a better way to do this whole 'Wide OR' functionality, but I have't had a flash of inspiration yet... It works well enough for my purposes.

Links

YouTube video on using Clip Envelopes - Features Clip Envelopes - in a video!
All Things Modular - Inspired by Modular - Darwin's blog has some interesting posts in it! Including this one where it refers to the above video on clip envelopes.

Getting MIDIoneOF

You can get MIDIoneOF here:

     https://maxforlive.com/library/device/6436/midioneof

Here are the instructions for what to do with the .amxd file that you download from MaxforLive.com:

     https://synthesizerwriter.blogspot.co.uk/2017/12/where-do-i-put-downloaded-amxd.html

(In Live 10, you can also just double-click on the .amxd file, but this puts the device in the same folder as all of the factory devices...)

Oh, yes, and sometimes last-minute fixes do get added, which is why sometimes a blog post is behind the version number of MaxForLive.com... and pictures may not always be the current version... but Schrodinger's cat's status is permanently uncertain...

Modular Equivalents

In terms of basic modular equivalents, then implementing MIDIoneOF in a modular synth is just a step sequencer (or a ring counter in old parlance) driven by gates or triggers instead of a clock, some toggle switches for selecting the steps, and some velocity processing in a CV utility. About 5 modules by my count, giving an ME of 5. I hope that this blog post makes more people think about pulling out that patch cable from the clock input of the step sequencer and connecting it to a gate instead of an LFO or a Clock Generator. Modulars synths have cliches too! 

---

If you find my writing helpful, informative or entertaining, then please consider visiting these links:


Synthesizerwriter's StoreSynthesizerwriter's Store (New 'Modular thinking' designs now available!)


Thursday, 25 June 2020

Triple Flexible Routing Probabilistic Transposing Delay in Max For Live for Ableton Live

Sometimes, a MaxForLive device is right on the edge of not working, and normally I put it to one side for 'further investigation'. But every so often, an 'almost working' device is so cool that it goes along a different route: an experimental device with warnings. MIDIdelA3 is just such a device...

For a while now, I have been exploring the edge of the musical map that has 'Probability' on it, off to one side of a region called 'Generative'. But it wasn't until I combined probability with a much older topic, echoes, that things started to get really interesting. One of my very early echo effects was called 'Missing Echo', because it didn't put an echo on every note, and updating the concept with probability, as well as moving the delay into the MIDI domain, started to produce some useful results.

People have been playing around with echo and delay effects for a long, long time. One of the current 'leading lights' is Olafur Arnalds, an Icelandic multi-instrumentalist who has been using custom 'smart delay' software in live performance, and who recently collaborated with Spitfire Audio to release 'Stratus', a toolkit of software and a linked sample library that uses complex delays to augment live performance.

MIDIdelA3


MIDIdelA3 isn't complex, and it isn't anywhere near the functionality of Stratus, but it hovers at the edge of what my 2008 Macbook Pro can reliably accomplish in MaxForLive. It might be generously described as being 'far from perfect', and isn't really suitable for 'mission critical' use, but it is a fascinating glimpse into what is possible with MaxForLive. It has three identical processing sections, each with a delay, a transposer, a probability control, a velocity scaler and a loop switch. You can connect the three sections together in three different ways: in series, in parallel, and in a mix of serial and parallel. There are 20 memories, and a large rotary control that lets you select from those memories, so once you have set up the memories, then it can be used as a 'single control' device if you wish.

Setting up the memories sounds easy, but there's more to it than meets the eye. Having three different topological connections between the three sections is quite hard to get your head around, and the probability control has more effect that you might think, because when a note has an 80% chance of passing through a section, then that drops when it goes through a second section with 80% probability, and if it goes through a third section, then another 80% probability means that you aren't going to hear that triply-delayed note very often. Then there's the velocity scaling, which reduces the velocity of notes, and which is particularly important when you loop a section, because it keeps things stable, or almost does. Yep, this is one of those delays that can run away with itself...

Inside

I haven't used the MIDI Delay that Ableton include as one of the MaxForLive demos because it is too much like 'a maze of twisty little passages, all different'... Instead I have coded it myself using a different approach, and this probably explains why it 'almost' works - my programming is not very advanced, I'm afraid. But it does get close enough to being usable to be worth revealing, because I'm sure that there are better programmers out there who can improve on the concept...and like all of my software on MaxForLive.com, it is free and unencumbered by rights licensing restrictions.

The way that you are supposed to do operations on time-critical events is to time-stamp them as they arrive, and then work your way through a time-based list, so that they are dealt with in strict time order. If you look inside the Ableton MIDI Delay example MaxForLive code then that is exactly what you will find - and there's quite a lot of code in there...

I chose to do it using the much simpler 'cheat's' way. I used two 'pipe' objects, one for the MIDI Note Number values, and the other for the MIDI Velocity values. Normally, when time-stamping a pair of values like Note Number and Velocity, you would group them together as a single event, and give that pair of values a time-stamp. When using two separate pipe objects, then the Note Number becomes one event in a time-delay, whilst the Velocity becomes a different event in a different time-delay. You can probably see why this isn't a perfect solution! But, for 'quick and dirty', it kind of works, and it requires very little coding!

So for the three processing sections (Time Delay, Transpose, Probability, Velocity Scaling, and Looping) there are six pipe objects, arranged in pairs (Note Number, Velocity). These three sections are connected together using a set of 24 switches that do all of the routing for the three different ways that the three sections can be connected (serial, parallel, and a mix). The three connection diagrams look a little bit like the FM 'Algorithm' diagrams that the Yamaha DX7 had on its top panel, and they kind of show the same sort of routing, but nothing more than that.

Using it

Depending on the way that the three processing sections are connected, the basic explanation goes like this:


Connection 1 - the serial (top diagram) connection sends the MIDI messages through section 1 (and outputs delayed notes), then section 2 (and outputs delayed notes), then section 3 (and outputs delayed notes).


Connection 2 - the mix of serial and parallel connections (middle diagram) sends the MIDI messages through section1 and outputs delayed notes), and then through section 2 and 3 at the same time (in parallel) (and outputs delayed notes from both sections).


Connection 3 - the parallel (lower diagram) connection sends the MIDI messages through sections 1, 2 and 3 at the same time (and outputs delayed notes from all 3 sections.)

Each section has a separate Loop button, and the Velocity Scaling rotary control acts like the 'Feedback' control in an ordinary audio delay or echo effect. If the Velocity Scaling is set too high, then the processor will quickly become overwhelmed with too much data, and will stop working. This may cause strange noises, which may be loud! Please use the Loop buttons with care. If the device does become overwhelmed, then the 'All' button can be used to turn off any of the Loop buttons.

The Loop buttons can be turned on whilst the device is operating. So you can set up the controls, and then turn on looping for just one of the sections - this is very effective for creating rhythmic 'motifs' and other repeating sounds. The recommendation is that you normally have all of the Loop buttons set to Off, and turn one (or more) on to get a repeated motif for a short time, and then to turn the Loop button off again. This will keep the device stable.

If you have a transpose control set to anything other than the middle 'zero' setting, then using the Loop buttons will quickly cause very low or high MIDI notes to be produced - because the transposition accumulates for each repeat. If you set it for an octave, then after only a few repeats the notes will be at the limit of the MIDI range. Please use the Loop buttons with care when using the Transpose rotary controls.

The Time, Probability and Velocity Scaling rotary controls are not linear - half way round is not half the effect. This is deliberate, and is intended to provide the most control where it is needed. For example, the Velocity Scaling you will use most will be at around 70 or 80%. 100% may cause the effect to be overwhelmed, and is not recommended. Less than 60% will tend to produce only a small number of repeats (echoes).

Note that the Probability rotary control prevents notes from passing through a section. This applies to repeated echoes, so the Probability rotary control and Velocity Scaling rotary control will both reduce the number of repeats (echoes), and will help to prevent the device from being overwhelmed.

To store settings that you like in a preset 'memory', shift-click on the relevant grey square in the lower left hand corner. To recall a 'memory' preset, just click on the relevant square (it will change to white), or use the 'Preset' rotary control. If you use the 'Save' icon on the upper right of the device, then you can save your settings in a file inside Ableton Live, ready for use next time.

MIDIdelA3 is a sophisticated MIDI delay unit. It is capable of some interesting effects, including some that are not normally found in echo or delays that process audio signals (digital or analog). Please be aware that too many notes played at once, or high settings of Probability or Velocity Scaling may cause the processor to become overwhelmed, so take care. The red '!' round button is a placeholder for a future method of stopping the processing from becoming overwhelmed.

MIDIdelA3 sometimes behaves strangely with some instruments, and you may experience 'held' or 'stuck' notes. I am still trying to find out why this happens... For your first testing, please use a percussive sound that decays to nothing relatively quickly, rather than a sound that sustains.

Remember that this is an experimental MaxForLive device, and it is not perfect. Some of the links below may provide more robust, similar and more advanced versions of the effects that MIDIdelA3 produces, and should be researched if you want to explore this type of MIDI delay further.

Update

Since version 0.03 was published, I have spent a lot of time trying to find out why sustained notes caused so much trouble to this plug-in. Here's what I found...

The development of this MaxForLive plug-in started out as an experiment to see what it was like to have delay, transpose, and probability in a single device. Somewhere in there, the idea of putting feedback around it came up, and so I added the velocity scaling in an attempt to ensure that it would be stable. Adding feedback revealed some interesting things that I hadn't noticed up until that point: first, my bright idea to scale the velocity each time a note went round the delay loop, so that it would stop the device from running away, worked, but it didn't do quite what I thought it would. (My assumption (never assume anything!) had been that when the velocity value got scaled down to 1, then eventually a subsequent repeat would have the value zero, which is a note off, and that this would then stop the audio neatly. What actually happened was that it got down to a velocity value of 1, and then sat there, repeating over and over again.

This sort of situation often happens in programming, and there's a great temptation to just fix that aspect. Yep, that's what I did. I added extra code so that when the Note On MIDI message happened, the next note would have a velocity value of zero,  (which is the same as a Note Off MIDI message (, and hoped that everything would be fine. the problem with is is that the Note Off message is still in the pipe objects somewhere, and so you get two Note Off messages. And we know that Note Off messages are ignored...

There's a trap here. This is no longer a delay. It has become a Note Off message generator - and those Note Off messages just go round and round and round the feedback loop. And here's where I made the big mistake. I added more code to fix the problem that I had just created. I detected when a velocity value of 1 or less occurred, and then killed that whole message, so that Note On message never got turned into a Note Off message.

What I didn't test was what happened when a note was played that was shorter than the delay time. When I did test this in detail, I discovered that I got hanging notes because the Note Off messages were missing! And why were they missing? Because I was killing Note Off messages! The difficulty here is that Note On and Note Off messages should always be in pairs, and if you start to remove Note Off messages, then you have too many Note On messages and you get hanging notes. Worse still, I was turning Note Ons into Note Offs, so I had no way of keeping track of pairs of On and Off messages. There's no difference between a Note Off message and a Note Off message that used to be a Note On, except that one of these should be followed by a Note Off, and the other should not be!

If I removed all of the Max code that messed around with turning On messages into Off messages, then everything was fine when the Loop was turned off, but as soon as I turned the Loop on, then I got messages going round and round the feedback loop, eventually getting the velocity scaled down to zero, and then the Ons became Offs... For one moment, I did consider putting in a switch connected to the Loop button, so that when Looping was off, I didn't mess about with the Note Ons, but when looping was on, I did mess about. Then I realised that this would probably create a device that created hanging notes only when Loop was on...

At this point, I realised that I was trapped inside the loop of 'You have created unwanted behaviour by fixing unwanted behaviour...'.

A little bit of SWOT analysis told me that the expected behaviour of an echo with feedback was that it would go wrong if there was too much feedback. Unexpected behaviour was that an echo would cause hanging notes. Unexpected behaviour is bad, and so I ditched it. I took out all of the additional Max code that tried to remove the 'runaway' effect when you turned up the feedback too far. And this is version 0.04.

Oh, and I also fixed a few bugs in the horrendously complicated switching - you know those three diagrams that show the three ways of connecting the three processing sections together? Well, surprise surprise, there were bugs in there! For a single, relatively simple device, it is quite impressive that I could get so many things so wrong... 

I think version 0.04 should have less hanging notes...   

Other MIDI processing devices may exist...  

One thing that I have now noticed in other MIDI processing devices is that some of them only operate on the MIDI Note On messages, and so you have to pre-define the length of the notes that are produced. This way of doing MIDI processing had never occurred to me! It avoids any requirement for the processing of Note Off messages, and this should simplify the coding task, I think. If I ever get the time, then MIDIdelA3F may one day get released!                       

Links

Stratus, from Spitifre Audio, is probably the leading edge of current 'smart delay' technology, and combines it with a sophisticated sample library.
Midihub, from blokas.io, is a very nice MIDI event processor, patchbay and interface. (Yes, I know it should be MIDIhub, but they never asked me.)
BomeBox, from Bome Software, is a sophisticated MIDI processing, mapping and patching interface that can link a computer and MIDI devices over 5-pin DIN, USB, Ethernet and Wifi, and is also a MIDI host.

Getting MIDIdelA3

You can get MIDIdelA3 here:

     https://maxforlive.com/library/device/6400/mididela3mr

Here are the instructions for what to do with the .amxd file that you download from MaxforLive.com:

     https://synthesizerwriter.blogspot.co.uk/2017/12/where-do-i-put-downloaded-amxd.html

(In Live 10, you can also just double-click on the .amxd file, but this puts the device in the same folder as all of the factory devices...)

Oh, yes, and sometimes last-minute fixes do get added, which is why sometimes a blog post is behind the version number of MaxForLive.com... and pictures may not always be the current version... but Schrodinger's cat's status is permanently uncertain...

Modular Equivalents

In terms of basic modular equivalents, then implementing MIDIdelA3 can be approached from two different directions. A purist will use MIDI processing utilities to delay, transpose, probability-ise, and velocity scale the MIDI information, then connect it to a modular sound generation chain. A pragmatist will use three delays plus some additional processing and work in the analogue domain. Purists will require 3 or maybe 6 MIDI processing utility modules and may need to write some code for some solutions, giving an ME of 3 or 6. Pragmatists will require about three sets of 4 modules (voltage processor for transpose and velocity scaling, delays for the delay, utility for the probability, and a switch for the loop button), giving an ME of 12.

---

If you find my writing helpful, informative or entertaining, then please consider visiting these links:


Synthesizerwriter's StoreSynthesizerwriter's Store


Wednesday, 13 May 2020

Minimalistic octave remapper plug-in in Max For Live for Ableton Live

Gregory Taylor's article for Cycling'74, where he talks about 'One Big Knob' effects plug-ins, made me think...You might have noticed that I'm not exactly a 'minimalistic' user interface person - some might say that I provide too many controls. So I'm trying an experiment...

Recently, I released MIDIchromatixN, a 128x128 MIDI note number remapper that has quite a few controls... Well, I have just released the exact opposite, a remapper with one big rotary control, and one small rotary control! It does something different with remapping, but the core code for doing the remapping is identical - the differences are all in the fine detail of the controls and what they do. Because I really wanted to boil it down to a single 'big knob', but failed, I have called it MIDIchromatixONE, in an attempt to distract you from the two controls.

MIDIchromatixONE


MIDIchromatixONE creates inversions of notes or chords in sequence clips - musical transformations of some of the notes, and not the 'invert' function where low notes become high and vice-versa. There are two controls (but you already knew that!); a big 'Map' rotary control that selects from the initial  20 presets, and a smaller 'Pitch' rotary control that 'tunes' the internal mapping to suit different input notes. Preset number 1 on the Map rotary control is a 'Thru' setting, where notes pass through unchanged, so it is more accurate to say there are 19 presets (at the moment) that do stuff other than nothing. The presets are arranged in 5 groups, based around modifying in groups of twelve notes, six notes, four notes, three notes or two notes. In each of the groups, the mapping starts out sparse and open, and gets more complex and thicker for higher numbered presets. So 'Preset 5 : Six Notes 1' is simple, whilst 'Preset 8 : Six Notes 4' is complex. The best thing to do is to put some notes from a clip through it, and listen to the presets.

The Pitch control shifts the internal mapping by up to +/- 24 semitones. This doesn't mean that it pitch shifts the output, it means that the way that the remapping is done can be shifted by 2 octaves up or down. I did wonder if I should call it 'Tune' instead of 'Pitch', but the word 'Tune' sounded too vague - this is one of the 'not fully nailed down yet' bits of the design, so it may still change in the future. Again, the best way to see what it does is to put some notes through it and to listen. Kind of what you might do with a plug-in with just 'One Big Knob', really.

Note really a control, the '!' button is a 'Panic' button that attempts to clear up any hanging notes, and also sends an 'All Notes Of' MIDI Controller message. I did think about restricting the Map button to changes only when the Ableton Live transport was stopped, but discovered that using an LFO to change the presets was rather cool, so I didn't put any limits on it - which means that if you change the Map button whilst a chord is held, then you may get held notes... Take care!

Inside

Inside MIDIchromatixONE, there are lots of lookup tables, kind of 'hand crafted' by myself, using assistance from a variety of tools that I wrote in Max For Live. (Which may or may not be a good thing - there's certainly quite a lot of 'tool artefact' in most of the presets... This might end up in a blog post one day - how do you avoid your tools affecting what you do?) I used source note clips from monophonic 'synth' sequences and polyphonic orchestral arrangements, and deliberately went for a range of effects, rather than just choosing the most complex ones - kind of how you would create presets for a real device...


The screenshot above shows part of the development environment for MIDIchromatixONE, where I'm using my 'Huge Noter' tool devices to show the input and output notes. Eagle-eyed viewers will also spot that I'm still in my 'Muted Impure' phase...


And above you can see just one or two of the simple tools that I use to assist me... Normally, you never get to see what happens behind the scenes... One programmer that I know told me that his tool-to-release ratio was about 100:1, so he wrote one hundred times as much code for the tools that he wrote to enable him to write the one final device that he then released.

Sometimes tools and utilities DO get released - examples from me on MaxForLive.com include the following:

- Aud Colours (inspired by Adam Neely @adamneelybass)
- Huge Noter (big display of notes, as used in this blog post!)
- DLS Helper N (Explore MIDI DLS...)
- MIDI cc tool (MIDI Continuous Controller message analysis...)
- MIDI cc  (simulation of a MIDI Continuous Controller...)
- Wavetable Creator ('512 sample' wavetables are increasingly becoming 'retro', these days...)

Regular readers may have spotted that one of these is closely related to my 'should be famous' M4L device which still has zero downloads!

Demo

There's a demo on SoundCloud here. It starts off with 16 bars of plain source material, then fades out and is followed after a pause of one second, by the same material processed by MIDIchromatixONE with a slow LFO running gradually through all of the presets - even the 'Thru'. There's also a bit of probability-based note pruning and some added random velocity from my MIDIprobNV plug-in. they sound gratifyingly different, at least to my ears. The material is not quite in 'Lamb of God' territory... and it isn't done using the Spitfire Audio BBC Symphony Orchestra Discover! Instead it uses an edited version of one of my 'mrOrchestra' Instrument Racks, and so exploits some of the articulation capabilities very nicely. (which is based on 'Quick_Arranger', which is still available...) I really should do another blog post about the 'Quick_Arranger' Instrument Racks...

In Use

MIDIchromatixONE doesn't do anything other than a few note transpositions, which sounds easy and trivial until you look at all of those lookup tables. My advice would be to start with Preset 1: Thru to create your clip, and then to audition the presets and find one that you like the sound of. There's a tiny bit of influence from the MiniMoog front panel design for waveshape selection, because the presets tend to get more complex and thicker as you go to the higher values. This doesn't mean that Preset number 20 is the best, of course! Don't forget to explore fine-tuning things with the 'Pitch' control, and remember that the effect it has depends on the source material, so don't expect huge changes!

One important thing to remember is that MIDIchromatixONE is not your standard effect plug-in. It is perfectly possible that many of the presets will have little or no effect on most of the MIDI Notes that you pass through it. Conversely, it can change notes in ways that would take quite a lot of manual editing time. Finally, the presets are my first pass through creating ways of using the underlying transposition engine - I intend to make more presets (probably less than 107 more!) for a future update when I have time, and these might use the tools less and be be done with more manual editing of the tables - I did worry that the tools were doing too much of the driving...

A final thought: the presets so far are very tame: chromatic and very constrained inversions. If you look at MIDIchromatixN, then there's lots more power lurking in the underlying engine... In the 107 available preset slots that are left (can you figure out why?) then there is space for more 'challenging' presets, but would people like something that would produce discordant outputs? For a while I have been considering releasing some of the 'broken' abandoned devices that don't, and in many instances, can't work properly, or whose output is imperfect in some way. Maybe MIDIchromatixOOPS will get released one day...

Getting MIDIchromatixONE_mr

You can get MIDIchromatixONE_mr here:

     https://maxforlive.com/library/device/6273/midichromatixone

Here are the instructions for what to do with the .amxd file that you download from MaxforLive.com:

     https://synthesizerwriter.blogspot.co.uk/2017/12/where-do-i-put-downloaded-amxd.html

(In Live 10, you can also just double-click on the .amxd file, but this puts the device in the same folder as all of the factory devices...)

Oh, yes, and sometimes last-minute fixes do get added, which is why sometimes a blog post is behind the version number of MaxForLive.com... and pictures may not always be the current version... but Schrodinger's cat's status is permanently uncertain...

Modular Equivalents

In terms of basic modular equivalents, then implementing MIDIchromatixONE_mr is just about as awkward as MIDIchromatixN, even though the transpositions are much simpler. The 'mapping' of the 128 MIDI notes is the problem, unfortunately, and I still haven't found a neat solution. The Make Noise 'Maths' module starts to get somewhere close, but not entirely. The Expert Sleepers 'Disting mk4' also gets close, and maybe the Quantizer can be tweaked suitably, or possibly the Waveform Animator, maybe. But I couldn't find a direct equivalent. This means, of course, that I will get a comment pointing me to a classic module that I have overlooked, or never heard of, or forgotten, or didn't know about - there are lots of modules out there. Anyway, until then, I don't have an ME for this device...

The obvious solution goes outside of a purist interpretation of 'Modular' and 'DAWless' synthesis, and takes us into 'Hybrid' territory: use a dual DC-coupled 'audio' interface to connect Ableton Live into your modular system so that you can use MIDIchromatixONE (or N).

---

If you find my writing helpful, informative or entertaining, then please consider visiting this link:


Friday, 17 April 2020

Different Two - dual channel 'old school' step sequencer for parameter control sinking and sourcing

Sometimes you just don't see the wood for the trees. It happened to me when there was a question on the Facebook Max For Live Users group about a step sequencer. from Johan Wallen The OP wanted to control the slider values in a step sequencer with an external MIDI Controller. As it happens, one of the side effects of having a ready-made maxforlive object that does just about everything you might ever want in a step sequencer means that MaxForLive.com has many, many 'live.step'-based step sequencers available on it. But 'live.step' has limits (everything does!), and the question made me think - could you even do what was being asked for with live.step?

Bait taken. I was quickly in Max and testing out live.step, and it was true - you couldn't Apple/Cntrl-M map a MIDI controller to the sliders that control the pitch, velocity, etc. in live.step. Note that the intended usage for live.step is that you use the mouse to set the sliders, and then map the output to a parameter in another device. This was different - controlling the sliders themselves in live.step with a MIDI Controller. Challenge accepted.

Not using live.step was going to be interesting. Back to first principles...


The result is MIDIdifferentTWO, which is, of course, different to MIDI differentONE! TWO is deliberately 'old-school' in design, with rotary controls and big lights for each step, and is built without using live.step. So there's a classic 'counter' object to generate the steps, the rotary controls are scanned using an 8-way 'gate' object, and the lights are the standard 'blink' / 'bang' buttons. driven by a 'switch 8'object.  To complicate matters, the 'gate' object allows values to pass through it, but you have to send the value, and a rotary control only outputs a value when you change it (or bang it). My attempt at a solution was to use a 'message' object as a buffer between the rotary control and the 'gate' object, and this seems to work quite well, at the cost of quite a bit of wiring up of bangs...


I was wondering if I should use the buffer contents to replace the parameter value of the rotary controls, but decided in the end that this wasn't required. I also rejected the idea of using the buffer as the map target for the Ableton 'remote control' system 'control voltages', so that I could have the rotary controls set as 'hidden', but I'm leaving this as an option depending on feedback. The Ableton M4L Guidelines for hiding objects so that they don't overwhelm the Undo history seems to be incompatible with making controls map targets, so this design has some flexibility in terms of possible mitigations.

The Max For Live code above is simplified, and there's a missing connection! The step clock output from the counter should be connected to the left-hand input of the 'gate 8' object - but you can always look at the real code if you download the amxd from MaxForLive.com.

The initial design was just a rapid response to a Facebook 'Max For Live Users' group query, and so was me trying to see if I could make do without live.step. The result then went through several drafts to the latest release (so far) of 0.06, adding direction to the steps (the counter object makes this easy, shuffling of the order of the steps (via a look-up table), skipping of steps (using the pack object to remove/restore numbers in the look-up table, and adding a second channel synchronised to Live's transport. Having two channels, where one can be free-running (or driven by MIDI events in a clip, which probably counts as user-controlled-sync!) and the other is locked to the DAW transport gives two very different, contrasting sources of 'control voltages', plus it also looks good. For a single channel 8 step, un-synced step sequencer, then I might have been tempted to put the rotary controls in two rows to reduce the width of the device (M4L Guidelines again!), and I might even have thrown away the 'old school' look and used sliders, but two channels means that the width is going to be wide anyway, and stacking two sliders vertically doesn't work for me. 

Implementing the 'Skipping' of steps required additional map targets for each step, and I was thinking of a Novation Launch Control (or XL) when I was doing this, but there are lots of other MIDI Controllers available. The solution was to just use a toggle text object as the map target...  One complication in the Max For Live coding was how to deal with the number of steps when you could skip or un-skip steps, but once again, the 'counter' object makes changing the count maximum easy, and so I just used the look-up table length as the counter maximum, and it was sorted! I'm always intrigued by how some problems loom ahead as being major, maybe insurmountable  challenges, but when you actually start to code them, they kind of shrink and aren't as impossible as you anticipated. There again sometimes apparently simple things can take ages to figure out, so there's no certainties!

The blinking lights proved to be one of the most challenging things to get right... The 'button' object has a parameter called 'blinktime', which controls how long the light stays on once it gets a 'bang' signal. Unfortunately, when the rate at which you scan across the steps changes, then blinktime needs to change as well - ideally so that there is no overlap with other steps so two lights are both lit at once, and without any gaps where no light is lit at all. This turns out to be difficult! Now if the 'button' object would just light up for the whole of the time that a step was active, like an LED or even a bulb, then it would be easy. But initially I didn't want to mess about making a custom graphic object like that, although eventually I decided that I had to, and here's what I did...


I wrote a special object just to decode the step number to drive scrolling lights! As often happens with these things, (and as noted above!) when you sit down to do it, then it isn't as difficult as you expected. It turned out to be nothing more than a set of compares, but instead of using the 'button' object as the indicator, I used the live.toggle object, which shows one colour when you send it a one, and another colour when you send it a zero. So now the steps are shown by an indicator that lights up for the whole of that step, and is off the rest of the time. Neat and much better than my previous default indicator: the 'button' object. Sometimes being forced into a change is good for you...

Notice that this time the missing connection is missing no longer! So what do the comparisons look like inside the scroll_mr package?


As I said, all a bit obvious really. But it works very nicely!

Using MIDIdifferentTWO

For something that started out as about half an hour's coding in response to a Facebook query, the final result (so far) has quite a lot going on! So, as usual, here's a side-to-side detailed descriptoon of all of the controls and what they do:

First, notice that there are two separate step sequencers. The top one can be either free-running (with its own clock running at the 'Rate' speed when the 'Mode' selector is set to '=Not Synced=' (I'm never sure if there should be an 'h' in synced/synched...), or else triggered by one of five different MIDI Events from the clip in Ableton Live: Any MIDI Note, Any change of MIDI Note Number (so repeated notes trigger the step advance the first time, but not after that), Note number 0 (very low frequency!), Note Zero with a MIDI Velocity of zero (the lowest, quietest note in MIDI 1.0!), or any note with a MIDI Velocity of 1 (the quietest note in MIDI 1.0). Because these MIDI Events are in the clip on the track in Ableton Live, then they are synced to Live's transport, but there's nothing to stop you having all sorts of weird timing of those notes, and don't forget the 'ignore repeated note' mode. The lower step sequencer is always synced to Live's transport, but you can choose anything from the step advancing every 8 bars to every quarter beat, which is quite a big range.

Both sequencers have the same controls after the speed/sync section. After the step number and a little count-up indicator, downwards there is the Direction control, which allows selection of left-right (ascending through the numbered steps), right-to-left (descending), and back & forth (palindrome mode, as some say). Underneath are two tiny toggle buttons. '1-8' and 'Skips' forces the full 8 steps when it is showing '1-8', whilst in 'Skips' mode the step numbers can be clicked so that they turn into 'X's, and then that step will not happen (and the length of the sequence will be shorter). Sequences that are one step long are okay, but they aren't very interesting! As you click on the step numbers to change them to the 'X's, then you will see that a row of tiny numbers will change to show the missing number. The 'Shuffle' button changes the order that the sequencer plays the steps - and again the row of tiny numbers will change to reflect the new order. Each time you get the 'Shuffle' button then the order will change. The lowest controls are nudge '+/-' buttons for the sequence length, shown as a small blue number on the left side. The step length automatically changes when you set up skips.

The central section is 'old-school': rotary controls for setting the step values, and big indicators to show which step is playing. The modern twist here is that the step numbers (in the grey squares) can be used to skip steps, but there's another hidden twist - you can control the rotary controls and the skip buttons with Ableton Live's 'remote control' 'control voltage' system. To do this, you either use the Map button in an LFO or other device, and then click on the rotary control of the grey step number square in MIDIdifferentTWO, or you put Ableton Live into MIDI Learn mode (Apple/Control-M to get into the 'blue' mode), then click on a rotary control or a grey step number square and move a slider or press a button on an external MIDI Controller. If you did this is the right order then the rotary control or step number will show an indication of the note number of MIDI controller that you have mapped to that control in a small grey box, and a line will appear in the 'Mapping' table at the upper left of Ableton's screen.

For testing, I used a Novation Launch Control to control the skips:


In the photo above you can see that the four lit buttons on the Novation Launch Control have turned steps 5,6,7, and 8 on the upper sequence into 'X's, and so those steps will be skipped. Also note that the sequence length has changed to 4 steps (the little number on the left). When I took the phot I was just about to map the rotary controls on the Launch Control to the rotary controls for the step values in MIDIdifferentTwo, so that I could control the sequence from the external MIDI Controller. You could, of course, use just about any MIDI Controller to control the sequencers inside MIDIdifferentTWO... Using an external MIDI Controller like this crosses the line from DAWless to 'DAWed', of course, but using a MIDI Controller definitely looks 'DAWless'!

After the eight sets of step  controls, the section on the right hand side deals with the output values of the step sequencers. The large blue numbers are the current output value - there's a label that says so! Underneath this is a 'Normal/Invert' toggle button, which inverts the value (so 127 becomes zero, and zero becomes 127). Next on the right are three rotary controls. 'Offset' adds to the value of each step, and can be used as a way to shift all of the values at once. If you are controlling a filter with the step sequencer, then this would behave just like the cut-off frequency control in the filter, for example. The 'Depth' rotary control scales the step values. At zero it scales the values down to nothing, so you won't hear any effect. At 100% the output is the values shown on the rotary controls. At 200%, the output is scaled to twice the values shown on the rotary controls - which means that the output value may well 'max out' at 127! The final rotary control is the 'Smooth' control, which is like the 'Slew' control on modular synths, and it turns abrupt jumps of value into more gentle slower 'slides' - it 'smoothes' the output!

Finally, there are two 'Map' buttons and their inverses, 'Unmap' buttons. You use these to map the output values of the two step sequences to other instruments, effects, or utilities inside Ableton Live. Controls that are being controlled generally go grey to indicate that they are being controlled from somewhere else (LFO, MIDI Controller, etc.), and their value moves on its own! To unmap and select another control, you use the 'Unmap' button.

Sinking and sourcing?

These are electronics terms for outputs and inputs respectively. In lots of electronic interfaces, an output is a source of current flow (it 'sources' current is the colloquial phrase), and an input is a sink of current flow (it 'sinks' it is the colloquial phrase). So for the MIDIdifferentTWO device, the step rotary controls and the grey step number squares are sinks, and an LFO or MIDI Controller that is controlling it via Ableton's 'remote control' control voltage' system would be a source. At the output of MIDIdifferentTWO, the two big 'Map' buttons are sources, and whatever they control would be sinks. Jargon, that's all.

In use


One thing to try is to change the cut-off frequency of a filter (a well-worn cliche that you can also do with the stock/factory 'Auto Filter' effect), or change the time delay of Delay (there isn't a stock/factory effect that does this!), or change the Depth in the Saturator effect to give an interesting rhythmic 'bite' variation. Basically, whatever your favourite 'control to tweak' is, you can now apply a shimmering, rhythmic version of it automatically, and free up that hand for something else, like pitch bend, or a mod wheel, or mousing, or adjusting knobs on outboard gear, or anything else. Now I know that I already have a device called '3rd Hand' (look it up on MaxForLive.com), but this is a bit like having a third hand!

Getting MIDIdifferentTWO_mr

You can get MIDIdifferentTWO_mr here:

     https://maxforlive.com/library/device/6160/mididifferenttwo

Here are the instructions for what to do with the .amxd file that you download from MaxforLive.com:

     https://synthesizerwriter.blogspot.co.uk/2017/12/where-do-i-put-downloaded-amxd.html

(In Live 10, you can also just double-click on the .amxd file, but this puts the device in the same folder as all of the factory devices...)

Oh, yes, and sometimes last-minute fixes do get added, which is why sometimes a blog post is behind the version number of MaxForLive.com...

Modular Equivalents

In terms of basic modular equivalents, then implementing MIDIdifferentTWO_mr is just two step sequencers, giving an ME of 2. The ability to control step values and skips may vary with the specific sequencer, but if implemented, then it is just more patch cables. Perhaps MEs should also include some sort of measure for the number of patch cables that are required?

---

If you find my writing helpful, informative or entertaining, then please consider visiting this link:


Thursday, 9 April 2020

Completing the 'Smooth' Suite - Max For Live plug-ins for Ableton Live

It started with MIDIrandomA, which provided several different type of 'constrained randomness' triggered by either MIDI events or a built-in LFO, and then allowed it to control parameters in other Ableton Live devices using what they call 'remote control' but most people associate with the 'Map' button. Blog reader hems suggested that it would be good if this could produce more than one mappable output, which is how MIDIrandomABC was conceived. But then, after further reflection,  the smoothing function that happens in MIDIrandomA seemed to be useful in a broader context, and so I produced MIDIsmoothR, where you can input any 'control voltage' rather than solely random noise, and so smooth/process any LFO or MIDI Controller...


However, MIDIrandomA and MIDIsmoothR are big, complex, flexible, versatile Max For Live devices. They can be daunting for a new user because there's a lot to tweak! So although MIDIsmoothRRR with three mappable outputs was an obvious follow-up, it seemed like this was a good time to also release the opposite: simple, minimalistic utility devices that just do the 'smoothing' function, plus offsetting and scaling. And so, the 'Smooth' Suite was born:

- MIDIsmoothR - single mappable output, sophisticated 'control voltage' smoothing and processing.

- MIDIsmoothRRR - three mappable outputs of sophisticated 'control voltage' smoothing and processing.

- MIDIsmoothY - single mappable output, smoothing only.

- MIDIsmoothD - just a scrolling display of the 'control voltage'.

- MIDIsmoothYD - single mappable output, with the scrolling display in the background.

These last four devices complete the Suite. MIDIsmoothD allows any 'remote control' 'control voltage' to be viewed graphically, and MIDIsmoothY is small and easy to use. For those people who like stuff to look cool, then there is MIDIsmoothYD's scrolling background.


In the (imperfect!) screen capture above, the LFO waveform is sent to the three 'Smooth' Suite devices: first MIDIsmoothY, then MIDIsmoothYD, and finally MIDIsmoothD.

MIDIsmoothRRR

MIDIsmoothRRR doesn't just add two extra mappable outputs. The B and C processing channels are augmented as well, so there's quite a bit of divergence from the MIDIrandomA original.


The B channel now has separate 'Thin' power-law controls for the Up and Down segments of the waveform, unlike the 'affects both segments' 'Thin' rotary control in channel A. You should explore the way that the Up and Down smoothing controls and the associated Thin rotary controls affect the output waveshape - note that the two pairs of controls work (mostly) independently.

The C channel now has a 'Thin' power-law rotary control added after the 'Delta' rotary control. The Delta control removes any samples in the waveform that are less than the set value, which isn't immediately obvious if you use a triangle or sawtooth input waveform, so it is very different to the A and B channels - the scrolling doesn't happen at the same rate because of the missing samples, for instance.

The design of the processing in the three channels is deliberately very different. As with the original MIDIrandomA, I wanted to provide three very different outputs with as little overlap as possible. As a bonus, you also get two new variations on random-ness in channels B and C when you replace the 'Input' with 'Random'.

Map

Here's a simple infographic showing all of the members of the 'Smooth Suite':


In use


The screen capture and diagram above shows a LFO controlling the 'CV in' rotary control of MIDIsmoothRRR via 'remote control' mapping. The triangle wave is turned into a rather nice 'shimmery flame' waveshape by the B channel, and this is then sent to the MIDIsmoothD device to display it.

There's an additional 'hidden in plain sight' function in R, RRR, Y and YD: if you don't map the 'CV in' rotary control, then you can use it as a controller to produce processed outputs to control othr devices. Just click on it and move it!

Documentation

There was one previous blog post covering the first device in the 'Smooth Suite' - MIDIsmoothR. But this was a variant of an earlier series of devices: the 'Random' series.

MIDIsmoothR

MIDIrandomABC

MIDIrandomA

Downloads

In the past, I produced a 'dark' and 'light'-themed UI version of a delay effect, just to see which was more popular. The downloads so far (to 10th April 2020) are:

                   Dark       Light
KeyMon              400         348
Field Echo         1293         870
Sine3Generator      941         629
SpecD/PanEcho      1371        1225

For the 'shim' 'Smooth Suite' utility devices, the initial downloads indicate that the 'bare-bones' MIDIsmoothY is the most popular, then the 'background display' MIDIsmoothYD, and the 'display only' MIDIsmoothD has had the fewest downloads. Of course, none of these come close to one of my devices, which has had no downloads at all, ever!

Getting the devices in the 'Smooth' Suite.

You can get MIDIsmoothR_mr02 here:

     https://maxforlive.com/library/device/6116/midismoothr

You can get MIDIsmoothRRR_mr02 here:

    https://maxforlive.com/library/device/6127/midismoothrrr

You can get MIDIsmoothY_mr01 here:

    https://maxforlive.com/library/device/6129/midismoothy

You can get MIDIsmoothYD_mr01 here:

    https://maxforlive.com/library/device/6132/midismoothyd

You can get MIDIsmoothD_mr01 (the display only) here:

    https://maxforlive.com/library/device/6130/midismoothd

Here are the instructions for what to do with the .amxd file that you download from MaxforLive.com:

     https://synthesizerwriter.blogspot.co.uk/2017/12/where-do-i-put-downloaded-amxd.html

(In Live 10, you can also just double-click on the .amxd file, but this puts the device in the same folder as all of the factory devices...)

Oh, yes, and sometimes last-minute fixes do get added, which is why sometimes a blog post is behind the version number of MaxForLive.com...

Modular Equivalents

In terms of basic modular equivalents, then implementing MIDIsmoothR_mr02 requires some quite sophisticated processing of a random noise source, so it probably isn't straightforward to do from off-the-shelf analogue modules, and is probably easier to do digitally. Assuming that a maths/data processing module can do the required computation, then there's one noise generator, one processing module, some triggering logic, an LFO for the free-running version, and a sequencer for parameter storage, giving an ME of 4 or 5!

MIDIsmoothRRR is just additional CV scaling and offsetting, plus two more patch cables! So an ME of 7.

MIDIsmoothY, MIDIsmoothD, and MIDIsmoothYD require only three modules: a slew rate limiter, a CV scaler and offset processor module, and an oscilloscope module. So the ME is 3.

---

If you find my writing helpful, informative or entertaining, then please consider visiting this link: