Showing posts with label Device. Show all posts

Wednesday, 13 May 2020

Minimalistic octave remapper plug-in in Max For Live for Ableton Live

Gregory Taylor's article for Cycling'74, where he talks about 'One Big Knob' effects plug-ins, made me think...You might have noticed that I'm not exactly a 'minimalistic' user interface person - some might say that I provide too many controls. So I'm trying an experiment...

Recently, I released MIDIchromatixN, a 128x128 MIDI note number remapper that has quite a few controls... Well, I have just released the exact opposite, a remapper with one big rotary control, and one small rotary control! It does something different with remapping, but the core code for doing the remapping is identical - the differences are all in the fine detail of the controls and what they do. Because I really wanted to boil it down to a single 'big knob', but failed, I have called it MIDIchromatixONE, in an attempt to distract you from the two controls.

MIDIchromatixONE


MIDIchromatixONE creates inversions of notes or chords in sequence clips - musical transformations of some of the notes, and not the 'invert' function where low notes become high and vice-versa. There are two controls (but you already knew that!); a big 'Map' rotary control that selects from the initial  20 presets, and a smaller 'Pitch' rotary control that 'tunes' the internal mapping to suit different input notes. Preset number 1 on the Map rotary control is a 'Thru' setting, where notes pass through unchanged, so it is more accurate to say there are 19 presets (at the moment) that do stuff other than nothing. The presets are arranged in 5 groups, based around modifying in groups of twelve notes, six notes, four notes, three notes or two notes. In each of the groups, the mapping starts out sparse and open, and gets more complex and thicker for higher numbered presets. So 'Preset 5 : Six Notes 1' is simple, whilst 'Preset 8 : Six Notes 4' is complex. The best thing to do is to put some notes from a clip through it, and listen to the presets.

The Pitch control shifts the internal mapping by up to +/- 24 semitones. This doesn't mean that it pitch shifts the output, it means that the way that the remapping is done can be shifted by 2 octaves up or down. I did wonder if I should call it 'Tune' instead of 'Pitch', but the word 'Tune' sounded too vague - this is one of the 'not fully nailed down yet' bits of the design, so it may still change in the future. Again, the best way to see what it does is to put some notes through it and to listen. Kind of what you might do with a plug-in with just 'One Big Knob', really.

Note really a control, the '!' button is a 'Panic' button that attempts to clear up any hanging notes, and also sends an 'All Notes Of' MIDI Controller message. I did think about restricting the Map button to changes only when the Ableton Live transport was stopped, but discovered that using an LFO to change the presets was rather cool, so I didn't put any limits on it - which means that if you change the Map button whilst a chord is held, then you may get held notes... Take care!

Inside

Inside MIDIchromatixONE, there are lots of lookup tables, kind of 'hand crafted' by myself, using assistance from a variety of tools that I wrote in Max For Live. (Which may or may not be a good thing - there's certainly quite a lot of 'tool artefact' in most of the presets... This might end up in a blog post one day - how do you avoid your tools affecting what you do?) I used source note clips from monophonic 'synth' sequences and polyphonic orchestral arrangements, and deliberately went for a range of effects, rather than just choosing the most complex ones - kind of how you would create presets for a real device...


The screenshot above shows part of the development environment for MIDIchromatixONE, where I'm using my 'Huge Noter' tool devices to show the input and output notes. Eagle-eyed viewers will also spot that I'm still in my 'Muted Impure' phase...


And above you can see just one or two of the simple tools that I use to assist me... Normally, you never get to see what happens behind the scenes... One programmer that I know told me that his tool-to-release ratio was about 100:1, so he wrote one hundred times as much code for the tools that he wrote to enable him to write the one final device that he then released.

Sometimes tools and utilities DO get released - examples from me on MaxForLive.com include the following:

- Aud Colours (inspired by Adam Neely @adamneelybass)
- Huge Noter (big display of notes, as used in this blog post!)
- DLS Helper N (Explore MIDI DLS...)
- MIDI cc tool (MIDI Continuous Controller message analysis...)
- MIDI cc  (simulation of a MIDI Continuous Controller...)
- Wavetable Creator ('512 sample' wavetables are increasingly becoming 'retro', these days...)

Regular readers may have spotted that one of these is closely related to my 'should be famous' M4L device which still has zero downloads!

Demo

There's a demo on SoundCloud here. It starts off with 16 bars of plain source material, then fades out and is followed after a pause of one second, by the same material processed by MIDIchromatixONE with a slow LFO running gradually through all of the presets - even the 'Thru'. There's also a bit of probability-based note pruning and some added random velocity from my MIDIprobNV plug-in. they sound gratifyingly different, at least to my ears. The material is not quite in 'Lamb of God' territory... and it isn't done using the Spitfire Audio BBC Symphony Orchestra Discover! Instead it uses an edited version of one of my 'mrOrchestra' Instrument Racks, and so exploits some of the articulation capabilities very nicely. (which is based on 'Quick_Arranger', which is still available...) I really should do another blog post about the 'Quick_Arranger' Instrument Racks...

In Use

MIDIchromatixONE doesn't do anything other than a few note transpositions, which sounds easy and trivial until you look at all of those lookup tables. My advice would be to start with Preset 1: Thru to create your clip, and then to audition the presets and find one that you like the sound of. There's a tiny bit of influence from the MiniMoog front panel design for waveshape selection, because the presets tend to get more complex and thicker as you go to the higher values. This doesn't mean that Preset number 20 is the best, of course! Don't forget to explore fine-tuning things with the 'Pitch' control, and remember that the effect it has depends on the source material, so don't expect huge changes!

One important thing to remember is that MIDIchromatixONE is not your standard effect plug-in. It is perfectly possible that many of the presets will have little or no effect on most of the MIDI Notes that you pass through it. Conversely, it can change notes in ways that would take quite a lot of manual editing time. Finally, the presets are my first pass through creating ways of using the underlying transposition engine - I intend to make more presets (probably less than 107 more!) for a future update when I have time, and these might use the tools less and be be done with more manual editing of the tables - I did worry that the tools were doing too much of the driving...

A final thought: the presets so far are very tame: chromatic and very constrained inversions. If you look at MIDIchromatixN, then there's lots more power lurking in the underlying engine... In the 107 available preset slots that are left (can you figure out why?) then there is space for more 'challenging' presets, but would people like something that would produce discordant outputs? For a while I have been considering releasing some of the 'broken' abandoned devices that don't, and in many instances, can't work properly, or whose output is imperfect in some way. Maybe MIDIchromatixOOPS will get released one day...

Getting MIDIchromatixONE_mr

You can get MIDIchromatixONE_mr here:

     https://maxforlive.com/library/device/6273/midichromatixone

Here are the instructions for what to do with the .amxd file that you download from MaxforLive.com:

     https://synthesizerwriter.blogspot.co.uk/2017/12/where-do-i-put-downloaded-amxd.html

(In Live 10, you can also just double-click on the .amxd file, but this puts the device in the same folder as all of the factory devices...)

Oh, yes, and sometimes last-minute fixes do get added, which is why sometimes a blog post is behind the version number of MaxForLive.com... and pictures may not always be the current version... but Schrodinger's cat's status is permanently uncertain...

Modular Equivalents

In terms of basic modular equivalents, then implementing MIDIchromatixONE_mr is just about as awkward as MIDIchromatixN, even though the transpositions are much simpler. The 'mapping' of the 128 MIDI notes is the problem, unfortunately, and I still haven't found a neat solution. The Make Noise 'Maths' module starts to get somewhere close, but not entirely. The Expert Sleepers 'Disting mk4' also gets close, and maybe the Quantizer can be tweaked suitably, or possibly the Waveform Animator, maybe. But I couldn't find a direct equivalent. This means, of course, that I will get a comment pointing me to a classic module that I have overlooked, or never heard of, or forgotten, or didn't know about - there are lots of modules out there. Anyway, until then, I don't have an ME for this device...

The obvious solution goes outside of a purist interpretation of 'Modular' and 'DAWless' synthesis, and takes us into 'Hybrid' territory: use a dual DC-coupled 'audio' interface to connect Ableton Live into your modular system so that you can use MIDIchromatixONE (or N).

---

If you find my writing helpful, informative or entertaining, then please consider visiting this link:


Thursday, 9 April 2020

Completing the 'Smooth' Suite - Max For Live plug-ins for Ableton Live

It started with MIDIrandomA, which provided several different type of 'constrained randomness' triggered by either MIDI events or a built-in LFO, and then allowed it to control parameters in other Ableton Live devices using what they call 'remote control' but most people associate with the 'Map' button. Blog reader hems suggested that it would be good if this could produce more than one mappable output, which is how MIDIrandomABC was conceived. But then, after further reflection,  the smoothing function that happens in MIDIrandomA seemed to be useful in a broader context, and so I produced MIDIsmoothR, where you can input any 'control voltage' rather than solely random noise, and so smooth/process any LFO or MIDI Controller...


However, MIDIrandomA and MIDIsmoothR are big, complex, flexible, versatile Max For Live devices. They can be daunting for a new user because there's a lot to tweak! So although MIDIsmoothRRR with three mappable outputs was an obvious follow-up, it seemed like this was a good time to also release the opposite: simple, minimalistic utility devices that just do the 'smoothing' function, plus offsetting and scaling. And so, the 'Smooth' Suite was born:

- MIDIsmoothR - single mappable output, sophisticated 'control voltage' smoothing and processing.

- MIDIsmoothRRR - three mappable outputs of sophisticated 'control voltage' smoothing and processing.

- MIDIsmoothY - single mappable output, smoothing only.

- MIDIsmoothD - just a scrolling display of the 'control voltage'.

- MIDIsmoothYD - single mappable output, with the scrolling display in the background.

These last four devices complete the Suite. MIDIsmoothD allows any 'remote control' 'control voltage' to be viewed graphically, and MIDIsmoothY is small and easy to use. For those people who like stuff to look cool, then there is MIDIsmoothYD's scrolling background.


In the (imperfect!) screen capture above, the LFO waveform is sent to the three 'Smooth' Suite devices: first MIDIsmoothY, then MIDIsmoothYD, and finally MIDIsmoothD.

MIDIsmoothRRR

MIDIsmoothRRR doesn't just add two extra mappable outputs. The B and C processing channels are augmented as well, so there's quite a bit of divergence from the MIDIrandomA original.


The B channel now has separate 'Thin' power-law controls for the Up and Down segments of the waveform, unlike the 'affects both segments' 'Thin' rotary control in channel A. You should explore the way that the Up and Down smoothing controls and the associated Thin rotary controls affect the output waveshape - note that the two pairs of controls work (mostly) independently.

The C channel now has a 'Thin' power-law rotary control added after the 'Delta' rotary control. The Delta control removes any samples in the waveform that are less than the set value, which isn't immediately obvious if you use a triangle or sawtooth input waveform, so it is very different to the A and B channels - the scrolling doesn't happen at the same rate because of the missing samples, for instance.

The design of the processing in the three channels is deliberately very different. As with the original MIDIrandomA, I wanted to provide three very different outputs with as little overlap as possible. As a bonus, you also get two new variations on random-ness in channels B and C when you replace the 'Input' with 'Random'.

Map

Here's a simple infographic showing all of the members of the 'Smooth Suite':


In use


The screen capture and diagram above shows a LFO controlling the 'CV in' rotary control of MIDIsmoothRRR via 'remote control' mapping. The triangle wave is turned into a rather nice 'shimmery flame' waveshape by the B channel, and this is then sent to the MIDIsmoothD device to display it.

There's an additional 'hidden in plain sight' function in R, RRR, Y and YD: if you don't map the 'CV in' rotary control, then you can use it as a controller to produce processed outputs to control othr devices. Just click on it and move it!

Documentation

There was one previous blog post covering the first device in the 'Smooth Suite' - MIDIsmoothR. But this was a variant of an earlier series of devices: the 'Random' series.

MIDIsmoothR

MIDIrandomABC

MIDIrandomA

Downloads

In the past, I produced a 'dark' and 'light'-themed UI version of a delay effect, just to see which was more popular. The downloads so far (to 10th April 2020) are:

                   Dark       Light
KeyMon              400         348
Field Echo         1293         870
Sine3Generator      941         629
SpecD/PanEcho      1371        1225

For the 'shim' 'Smooth Suite' utility devices, the initial downloads indicate that the 'bare-bones' MIDIsmoothY is the most popular, then the 'background display' MIDIsmoothYD, and the 'display only' MIDIsmoothD has had the fewest downloads. Of course, none of these come close to one of my devices, which has had no downloads at all, ever!

Getting the devices in the 'Smooth' Suite.

You can get MIDIsmoothR_mr02 here:

     https://maxforlive.com/library/device/6116/midismoothr

You can get MIDIsmoothRRR_mr02 here:

    https://maxforlive.com/library/device/6127/midismoothrrr

You can get MIDIsmoothY_mr01 here:

    https://maxforlive.com/library/device/6129/midismoothy

You can get MIDIsmoothYD_mr01 here:

    https://maxforlive.com/library/device/6132/midismoothyd

You can get MIDIsmoothD_mr01 (the display only) here:

    https://maxforlive.com/library/device/6130/midismoothd

Here are the instructions for what to do with the .amxd file that you download from MaxforLive.com:

     https://synthesizerwriter.blogspot.co.uk/2017/12/where-do-i-put-downloaded-amxd.html

(In Live 10, you can also just double-click on the .amxd file, but this puts the device in the same folder as all of the factory devices...)

Oh, yes, and sometimes last-minute fixes do get added, which is why sometimes a blog post is behind the version number of MaxForLive.com...

Modular Equivalents

In terms of basic modular equivalents, then implementing MIDIsmoothR_mr02 requires some quite sophisticated processing of a random noise source, so it probably isn't straightforward to do from off-the-shelf analogue modules, and is probably easier to do digitally. Assuming that a maths/data processing module can do the required computation, then there's one noise generator, one processing module, some triggering logic, an LFO for the free-running version, and a sequencer for parameter storage, giving an ME of 4 or 5!

MIDIsmoothRRR is just additional CV scaling and offsetting, plus two more patch cables! So an ME of 7.

MIDIsmoothY, MIDIsmoothD, and MIDIsmoothYD require only three modules: a slew rate limiter, a CV scaler and offset processor module, and an oscilloscope module. So the ME is 3.

---

If you find my writing helpful, informative or entertaining, then please consider visiting this link:


Monday, 23 March 2020

Swapping MIDI Note Number and Velocity Value in a Max For Live plug-in for Ableton Live

When I produced the MIDI Note Filter recently, I realised that the internal processing would allow some other interesting MIDI processing functions to be carried out. One thing that I have always wanted to experiment with spans across two different topic areas: music and steganography (hiding data in other data), and it builds on my recent explorations of Note On and Off messages, as well as a recent twitter message that talked about security.

(I have also been busy producing material for Christian Henson's 'Pianobook Pianoday 2020' collaborative 'systems music' project due to be released on the 28th March 2020 as 'Music by 300 Strangers'. Search for '#pianobookpianoday2020' on YouTube to see some of the contributions... This has put me in a more experimental and explorative mode than my usual analytical one, so what follows is not my usual type of Max For Live plug-in... but this is a good thing!)


MIDIswapNVmr01 is a Max For Live plug-in that swaps the note number and the velocity value in MIDI Note On messages that pass through it, and it works with the implied Note Off messages that occur when the velocity value is zero. A button is provided that toggles between 'Swap' mode and 'Thru' mode, and the usual '!' panic button is also there to stop hanging notes (I have called it 'ANO' here because it flushes out hanging notes, but note that it does not send a MIDI 'All Notes Off' message - Ableton Live does that when you press 'Stop', which is why the dark blue ANO is shown by the monitor...). Yep, a minimal user interface!

One thing which I hadn't thought about until I created the MIDIfilterNOTEmr plug-in was what happens when you turn off a Max For Live plug-in using the 'Power' button in the top left hand corner. It turns out that if you turn a M4L plug-in off, then it is bypassed, so you can use the power button as a kind of secondary 'Thru' button. So I have included this in the screenshots!

Screenshots


The screenshot above shows the plug-in swapping note numbers and velocities. I have put two MIDI Monitor utilites before (on the left side) and after (on the right side) so that you can see what is happening. Looking at the very last note (just before the dark blue 'All Notes Off' ANO MIDI message), then you can see a Note On (shown as 'NON' in the Monitor utility) for E3 with a velocity of 65 goes through the plug-in and comes out as a Note On for F3 with a velocity of 64. You won't be surprised if I reveal that F3 is the note that corresponds to note number 65, so the incoming velocity of 65 has been converted to a note number (F3) as intended. The E3 incoming note is note number 64, and so this turns into the velocity of the outgoing note as 64.

Let's pause for a moment here whilst you get your head around this. The incoming note is E3 (65) with a velocity of 65. The outgoing note from the plug-in is F3 (64) with a velocity of 64. So the note number and the velocity value have been swapped.

A quick note about note offs. As I've mentioned several times recently, a MIDI Note On message with zero velocity is treated as if it is a Note Off message. So in MIDIswapNVmr01, a Note Number of 0 (C-2) turns into a velocity of zero, which means that whatever the value of the velocity of an incoming note, if the note number is zero (C-2), then the output will appear to be a Note Off message. As it happens, the 'hanging note' suppression mechanism that I use ignores Note Off messages that haven't ever had a preceding Note On, and so nothing comes out of the plug-in!


I wasn't sure how to capture 'nothing' happening, so for the screenshot above I played several C-2s and then an A-2, and then C-2 again. As you can see, the only output from the plug-in is an E6 with a velocity of 9, which is because the incoming note's A-2 is note number 9, and the incoming note's velocity of 100 maps to  E6 when it gets turned into a note number. The C-2 notes thus turn into pairs of 'Note Ons messages with zero velocity acting as Note Off messages', which are then stripped away by the hanging note protection, and so never even make it out of the plug-in.

So there's a caveat / warning / note for this plug-in:

If you input a C-2 into this plug-in, it will never get out!


The screenshot above shows the inputs and outputs in the 'Thru' mode - so the MIDI messages pass through with no changes.


And the 'Power Off' mode, where the power button in the top left hand corner is clicked to turn off the plug-in. This gives the same result as the 'Thru': the MIDI messages are not affected.

As an interesting extra, here's what happened when I tried the MIDI Monitor from the Max for Cats 'Gratis Hits' bundle pack of free Max For Live devices:


As you can see, the MIDIswapNVmr01 plug-in is disabled (powered off) and so the MIDI messages are unchanged, but the Monitor utility on the right has added an octave to each note number: C3 becomes C4, C4 becomes C5, and C5 becomes C6. I'm very used to seeing different octave numbers in MIDI software because there are various interpretations of the standard, and I tend to use whatever the software uses, which in the case of Ableton Live and Max is C3=60, so this has probably been fixed in an update, and I just don't have that update! One area that I steer well away from are any discussions about Middle C and MIDI.

Because this post has talked a lot about MIDI Note Numbers, then this seems like a good place to share two charts that I use a lot when I'm playing/programming. The first is a classic that you have probably seen in various forms before:


So the table above has notes along the top, and caves up and down, and lets you find the note number of any of the 128 MIDI notes. You can also use it in reverse - look up a number in the grid, and then read the note and octave from the two axes.

The second is more unusual...


This is a kind of 'inverted' version of the first table. It has decades (10s (tens)) on the vertical axis, and units (1s (ones)) on the horizontal axis. So to look up 65 (note F3 from earlier) you go down to the row that starts with 60, and then go across that row until you are in the column with 5 at the top. For 65 you get F 3 in the two boxes (note/octave). What is interesting about this are the patterns that you get when you take the usual '2 and 3' pattern of accidentals that you see on a normal music keyboard and wrap it around decimal numbers. The columns have either 3 and 3, or 2 and 4 patterns of notes, and the diagonals have more patterns: 3 and 4 and 2 and 3. if you are into patterns, then the last row of blocks of 2 always repeat the octave in the cell underneath, whilst blocks of 4 repeat the octave value of the cell above the first row. Block of 3 do different things depending on if they contain accidentals or not! If you are familiar with chess, then 'Knight's moves' on this table give you the cycle of fifths...

If you have ever seen one of my Tweets about cryptography, then my fascination with patterns now probably makes more sense. Music and cryptography both contain a lot of maths underneath, and so patterns are not unexpected!

Controllers and control

Swapping the note number for the velocity value renders makes it very difficult to play keyboards and MIDI controllers because the velocity value is often difficult to control with the same amount of precision as you would find on a keyboard where each key produces a specific note number. Velocity is determined by the rate at which the key is pressed down, and so is based on a time measurement. By swapping these two values, keyboards and MIDI controllers gain precise control over velocity (what used to be pitch control is now velocity control!), but lose the precision of pitch control.

Steganography


Steganography is all about hiding information in places where it is not visible. One example is in JPEG picture files, where it is possible to hide data inside them by spreading it across the whole picture in ways that are not obvious. So there might be slight and gradual changes to brightness, colours, levels of noise or other parameters, that are not visible o the human eye, but that can be detected.

In this case, MIDIswapNVmr01 increases the precision with which changes can be made to the velocity value, but the pitch becomes less precise - in fact, trying to control pitch by how quickly you press a key spreads out pitch control into a very imprecise form! In graphical form, this might be represented by the amount of blurring (as a metaphor for the spreading out of data):

So a conventional music keyboard has precise control over pitch, so the word 'Pitch' is in focus, whilst the velocity control is less precise, and so the word 'Velocity' is blurred.


What MIDIswapNVmr01 does is swap the blurring - so now the word 'Pitch' is blurred, whilst 'the word 'Velocity' is in focus.


At Synthfest UK 2019, I spoke to Paul Ward about some of the FM sounds that I had programmed anonymously for the UK DX Owners' Club (many of which are widely available in various Public Domain collections - one set of my sounds have distinctive titles like : '-=[V]=- 1', for example), where there was a high amount of velocity sensitivity built into many of them. Controlling them can be tricky for fast runs of notes, and so Paul said that he preferred to use controllers like Mod Wheels to give more precise control.


What MIDIswapNVmr01 provides is precise velocity control from a keyboard, but sacrifices pitch control. With a fixed velocity from a keyboard, then MIDIswapNVmr01 only outputs one pitch, but you have precise control over velocity - and in fact, even a 88-note keyboard is going to give you access to only part of the full 1-127 velocity range (in exactly the same ways as it only normally lets you play 88 of the 0-127 range of MIDI note numbers!).

Which is why I said right at the start that this was for experimental purposes. I'm not expecting a sudden change in workflow so that people enter pitches very precisely (as usual!) and then use MIDIswapNVmr01 to enable them to add precise velocity as well. But my thinking is that given recent developments with MPE, and with sophisticated controllers like the Roli Seaboard, Haken Continuum and Expressive E Osmose or Expressive E Touche (others are available!)  then it might make people think more about additional control other than the pitch, timing and a very imprecise velocity value that you get from a traditional music keyboard.

Real-world instruments often have a lot of ways that the timbre can be influenced in real-time, and their players know how to exploit this - so I reckon that electronic musical instruments should be controllable in multiple dimensions as well. One very interesting illustration of this is in sample libraries of sounds produced using FM synthesis - what you get are very nicely sampled 'snapshots' of specific timbres, but you lose a lot of the subtle velocity control that programmers like myself put into sounds, and so the timbral variation is missing. I always remember when the first mass-market sampled pianos came out in the 1980s (Technics et al) that they were described by many players as sounding like:

'A very good recording of a piano, but not a piano.' 

Inside

As I mentioned, this plug-in is based on the MIDI processing core of the MIDIfilterNOTEmr utility, so let's see how it works:


As usual, I have tidied my normally untidy code in the screenshot above. The right hand side is very similar to the MIDIfilterNOTEmr code, with the 'select' object switching between two values depending on the incoming value. But here the 'swap' object at the top is used to change the note number and velocity over (as well as changing their 'right=-to-left' processing order), and so the velocity value does the same switching depending on 'Note On' or 'Note Off', but now switches the note number value because that is what will end up in the middle 'velocity' input of the 'note out' object.

On the left hand side, the 'select' object is again doing switching, but this time it is actually making sure that the velocity value is stored. The velocity value that comes out of the 'swap' object contains two values, the velocity value from the incoming notes, or zeroes from the Note Off messages. So the left hand side is all about capturing the non-zero velocity value, and making sure that it is stored when the zero velocity is output by the 'swap' object. So the two grey message boxes are just two stores in series, and the trigger for the storing is produced by the 'select' object when it detects a Note On or Note Off message. Finally, that captured and stored velocity value is fed into the left hand 'Note number' input of the 'note out' object. 

This approach could be extended to longer serial chains, and might open up additional possibilities for doing more complex MIDI processing. Because some previous posts have talked about Max's sample-level lower-level programming, then the message box approach used here could be thought of as being kind of half-way between ordinary Max and Gen: MIDI-event-level, perhaps? 

Fun!

One unintentional side effect of MIDIswapNVmr01 is that it makes playing a music keyboard in the conventional way almost impossible... So if you are every visited by a highly skilled concert pianist, and they want to play one of your keyboards, then using MIDIswapNVmr (to swap the MIDI note number and the velocity value of their playing) will considerably impede them...

Alternatively, sometimes, changing a familiar constraint (like pitch control from a keyboard and changing it to being controlled by velocity) can break you out of creative road-blocks... Inverted keyboards are another way to do this, and I have produced a Max For Live plug-in that does 'proper' inverted MIDI keyboard mappings and lots more!), but just using a Scale utility over an octave can achieve a similar 'writer's block' mitigation.

Actually, combining the ideas in the previous paragraph - adding a Scale utility after MIDIswapNVmr01 so that the MIDI notes are constrained to a specific scale - is a very practical and useful way of using many of my weirder plug-ins (like my MIDI note range expander/compressor and offset utility). What the Scale utility is doing is constraining the variability from the velocity measurement, which takes us to the several variations of 'constrained randomness' in another of my plug-ins.

I'm wondering if I can find time to do a 'how to use my plug-ins in combination' tutorial...

Getting MIDIswapNVmr01

You can get MIDIswapNVmr01 here:

     https://maxforlive.com/library/device/6081/midiswapnvmr

Here are the instructions for what to do with the .amxd file that you download from MaxforLive.com:

     https://synthesizerwriter.blogspot.co.uk/2017/12/where-do-i-put-downloaded-amxd.html

(In Live 10, you can also just double-click on the .amxd file, but this puts the device in the same folder as all of the factory devices...)

Oh, yes, and sometimes last-minute fixes do get added, which is why sometimes a blog post is behind the version number of MaxForLive.com...

Modular Equivalents

In terms of basic modular equivalents, then implementing MIDIswapNVmr01 depends on your MIDI/keyboard interface. If that produces CV outputs for Note Number (Pitch) and Velocity, then a couple of patch cables crossed over and connected to the output (with a gate cable as well) will do this directly, giving an ME of 1! This is the lowest modular equivalent so far, if my memory serves me correctly...

Links from this post:


Roll Seaboard (Company web-site)

Haken Continuum (Company web-site)

Expressive E Osmose (Company web-site)

Expressive E Touche (Company web-site)

MIDIfilterNOTE (MaxForLive.com)

MIDIfilterNOTE (Blog post)

Christian Henson (YouTube channel)

#pianobookpianoday2020 (YouTube search)

---

If you find my writing helpful, informative or entertaining, then please consider visiting this link:


Friday, 14 December 2018

TR2gen Revisited - resulting in a Probabilistic Chord Utility for Ableton Live

In 2017, I published a free two-step, two-bar triad generator that made simple chord progressions very easy to produce, and the main feedback was that people loved it and wanted more steps and more chords.

After thinking about this for a year, and having produced lots of devices that utilise probability (the 'Probably' series), then I came up with a way of extending TR2gen into something that included 'more': and it is called ProbablyCHORD.


ProbablyCHORD

ProbablyCHORD takes a lot of inspiration from ProbablyR, the latest monophonic sequencer in the Probably series - it has the same style of probabilistic grids, the same generative control, the same separation of notes and octaves,  and the same rainbow colour coding of sections (which seems to be becoming fashionable in commercial plug-ins too!). Underneath, the core is TR2gen, expanded and with new features to make it more flexible, more powerful, and more powerful. In summary, the same but 'more'! (And still FREE!)

The 'elevator pitch' goes something like:

'ProbablyCHORD is a free multi-step, clip-event triggered, generative and probabilistically controlled chord generator plug-in device for Ableton Live, implemented in MaxForLive.' 

It can be thought of as the 'chord' companion to the 'melody' ProbablyR sequencer. (and any following devices in that series...)

Although it looks very simple, there's actually a lot going on, and you need to do some setup before ProbablyCHORD will work properly when you first use it. So the following instructions are deliberately detailed so that you get familiar with how it works and what it can do for you.

(I probably need to warn you that music theory is not my strongest skill set, and so some of the stuff on chords that follows may not be 100% correct...)

From left to right, the sections are:


Root and Control

The top part of this section is the 'Octave' grid. The two default 'white' (which can also mean 'highlighted with the vertical scrolling colour bar') cells mean no transposition - as indicated by the +2...-2 labels on the right hand side of the section. If you click on any of the cells above or below then you will get a new white cell for that step, and a note will be generated when the sequencer reaches that step - or rather, the note that is output at that step will be either of the notes represented by the cells that are white. So if the '-1' cell and the default '0' cell are both white, then half of the time the root note will be produced, and half of the time a note one octave down will be produced.

At the bottom of the section are two slightly larger white boxes that control the root note - and they default to white. As the sequencer steps through, the coloured bars scroll across each grid - in the screenshot above, step 1 is playing, and so the root note white box is highlighted in red. If you click on either of these root cells so that it goes grey, then the root note will not play (even if you have a white 'octave' cell in the octave grid above). The Octave Grid is always over-ridden by the note grids in the lower pat of each section.


The big number selector in the centre of this section is the Step selector. In the screenshot this is 2, which means that there are two steps in the sequence. To the right is another selector, which shows 'A' for automatic - this controls the note length, and can be fixed (to a variety of values: 1 = short, 9 = long) or automatic. Automatic should be fine for your initial explorations...

The 'Step->' button advances the sequence by one step each time you click on it, and causes notes to be generated so that you can hear the result of adding white cells to the grids. ProbablyCHORD doesn't use Live's timing directly, but instead it uses note events in clips to tell it when to generate a chord, and how to pitch that chord. So one of the first tasks is to generate a clip that has four monophonic notes on beats, in the track that ProbablyCHORD is in.


Here's probably the simplest clip contents: four C1s on the beats, and a very boring chord progression. I would recommend leaving John Coltrane's 'Giant Steps' for a little later on! Note that the pitch of the notes on the grid transposes the chords, so this clip will cause C1s to be played as the root of the chords that ProbablyCHORD produces. You could try changing the notes and see what happens... Remember that this clip MUST be monophonic: one note at once!

Once the clip is done, then starting the clip should move the vertical colour bars across the grids in ProbablyCHORD, and depending on what white cells are present in the grids, and assuming that you have added an instrument after ProbablyCHORD, then you may get some notes. By default you should get the root note from the 'Root' section. A 'piano' type sound is good for the instrument that you have in the track, although I have a personal weakness for using cello sounds for chord progression development. What you should notice is that although there are four notes in the clip, there are only two steps in the sequence, and so ProbablyCHORD will repeat the steps twice for each repeat of the clip.

If you go to the 'Step' selector and choose '4' steps, then the number of notes in the bar will be the same as the number of steps, and so they will be kind of aligned, although not necessarily starting at the same time. You can click on the left circle just above the root note grid to advance the step sequence (same as clicking on the 'Step->' button), or click on the right circle to restart the sequence from step 1. The left circle will also flash with each step... I'm still trying to refine the synchronisation of the start of the step sequencer, and making it more controlled is one of the goals for future releases.
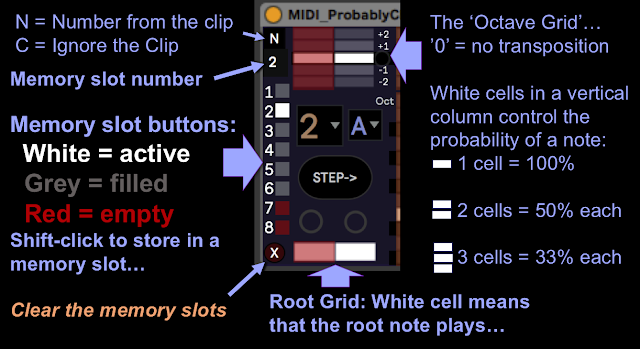

Whilst your attention is on the clip, you might like to try naming it with a number, and restarting the clip to play: '1' is a good value to try. At the very top left corner of this section is a letter 'N' or 'C' - this is a toggle button that controls how clip names affect ProbablyCHORD. If 'N' is displayed, then the clip name (which must be a number) will select the step sequence that ProbablyCHORD will play. So the number immediately below the 'N' (or 'C') is the current step sequence number, and the square below this are the step sequence memory slot buttons. In the screenshot above, the clip named '2' is playing, and so memory slot number 2 has been selected. (shown by the number 2, and the white highlighted memory slot button) If you don't put a number in the clip name, then nothing will happen - although you can always click on the memory slot buttons to recall a memory, of course.
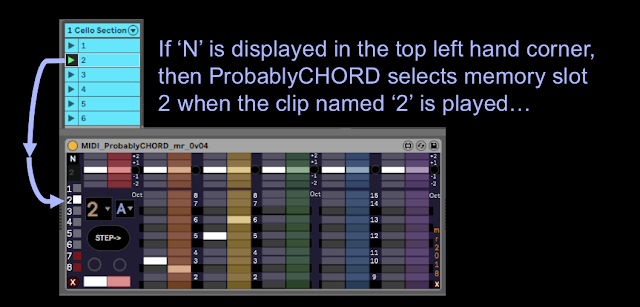

To store the settings in the grids in ProbablyChord into a memory slot, then you just shift-click on one of the memory slot buttons. Empty memory slots are dark red. Memory slots with saved grids inside them are grey (or gray). The currently recalled memory slot will be highlighted in white. If you save to a memory slot then you will lose whatever was in there before you saved! Finally, at the lower left hand side, below all the memory slot buttons, there is a dark red button with 'X" on it. This CLEARS all of the memory slots - they will go dark red and will all be empty. Use this with care - it is a good idea to use this 'clear' function when you first use ProbablyCHORD in a track, and then once you have stored a step sequence in a memory slot, you should save your Live Set, which will save the memory slots as well.

First Octave


I'm calling the octave above the Root note the 'First Octave', mainly because there's another octave grid higher up, which we will come to later...

As with the Root section, the upper part is for octave grids, and the lower part is for note grids. In this section, there are three pairs of grids: one for each note that we add above the root note in a chord. So in the screenshot above, the root section is playing the root note, and this is transposed based on the note that is in the clip. So in the clip that was shown earlier, the root will be C. In the octave above that C, the grid with the orange scrolling bar plays a note above the root, and the 'yellow' grid plays another note above the root. So the combination of the root section, plus the first two grids in this first octave, gives us a triad: the root plus two other notes. The third grid in this section is for any extra note that you want to have above the root, and remember that the note grid over-rides the octave grid, so if there aren't any white cells in the note grid, then no note will be generated, regardless of what the white cells in the octave grid might suggest.

The note grids in this section are numbered as intervals from 1 to 8, where 1 is the note above the root (which is zero (0)), 2 is a 'second' interval, 5 is a fifth, etc. So the dark gap between 2 and 3 is a flattened third, or a sharpened second.


If we look at the orange grid, then there are two white cells: the first step has a white cell in the third, and the second step has a white cell in a flattened third. The yellow grid has a white cell in the fifth for the first step, and a 6th for the second step. If we look at each step in turn, then the first step has the root, plus a third, plus a fifth - which gives us a major triad, and if the root is C, then it is C Major.
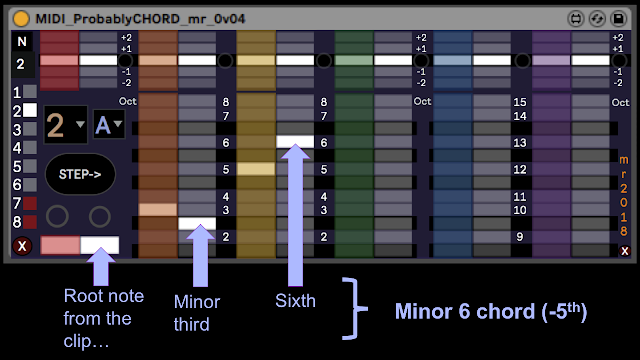

For the second step, then the root is the same,  but the third is flattened, and you would normally expect a fifth to give a minor chord, but I have changed the interval to give a Minor 6 chord without the fifth, which I like the awkward jarring sound of, but which isn't going to be to everyone's taste. If the fifth was present in this second step then ProbablyCHORD would be producing exactly the chords that TR2gen would produce when playing a Major/minor sequence, but ProbablyCHORD has no such imitations, and this illustrates that you are free to do whatever you like with making chords.

This also illustrates an important part of the design of ProbablyCHORD. What happens if the clip looked like this instead of just repeated C notes?


With this clip, then the root for the first step is C, but for the second step then it is D. So although the layout of the notes looks like it is in the key of C, this is just to make entering chords easy, and it also keeps the graphics from becoming mind-bendingly complex. All you need to know is what intervals make up the chords that you want to use, and you then enter them in the key of C into the grids. The clip then sets the root note, and so whilst the first step produces a C Major chord as before, the second step now produces a D minor 6 chord. (or a D Minor if you have used a fifth instead.)

ProbablyCHORD thus enables you to enter chords easily, without needing to know anything more than the intervals that are inside them, and the clip the sets the root. Ordinary triads are going to have the same thirds, flattened thirds and fifths, and they are always going to be in the same place on the grid, because the clip will cause the transposition of the root. The output of ProbablyCHORD is not just what you see in the grids - it is a combination of the grid plus the transposition in the clip.

Because this simplifies the entry of chords, I have resisted the temptation to provide a drop-down menu that inserts pre-prepared chords into a step (there are plenty of apps that do this already!). The simple entry of intervals enables you to concentrate on the sound of the chords, instead of the names, and the clip transposition means that you never have to think about the structure of chords in any key other than C. If you want to look up the structure of chords in books, then feel free to do so and put their intervals into the grids - there are a number of useful low-cost apps for mobile phones and tablets that can provide the same information in electronic form.

The third grid in the first octave is green, and could be used to add additional notes to the triads - sevenths for example.

Second Octave


The second octave is two octaves up from the root, and can be used to add notes with intervals like 9ths, 11ths and 13ths.

There's a tiny little 'X' button at the lower right of this section. This clears all the grids, and is probably something you should click when you first start up ProbablyCHORD...

Probability

Up until this point, the grids have been used to produce single notes, but these are probabilistic grids! If there is more than one white cell in a vertical column, then the probability of that white cell causing a note to be output is distributed across all of the white cells. If there are two white cells in a vertical column, then each will occur about half of the time, on average - the actual choice happens randomly. If there are three white cells, then each possibility happens about a third of the time...

If we go back to the original 4 sep clip, and change the steps to 4, then ProbablyCHORD and the clip are in bar sync. Let's add some white cells to the note and octave grids in the first octave section, and see what effect having more than one white cell in a vertical column actually has on the output.
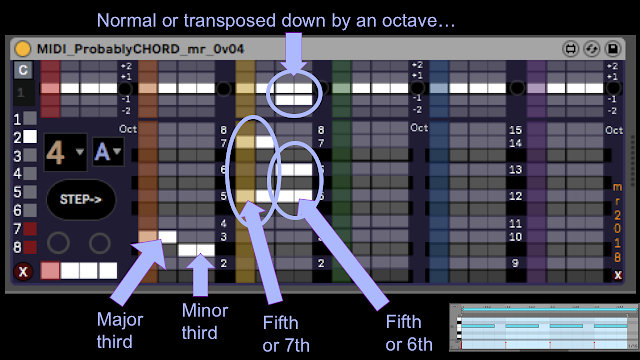

For the orange grid, then we have a third in the first two steps, followed by flattened thirds in steps 3 and 4 (so suggesting a major chord followed  by a minor chord), and there is only one white cell in each vertical column, so the output will always have these notes at these steps. But for the yellow grid, then steps 1 and 2 have fifths or sevenths, and steps 3 and 4 have fifths or 6ths. So for steps 1 and 2, we will get either a fifth or a seventh to accompany the third, giving either a Major chord or a 'kind of' Major 7 chord (without the fifth). For steps 3 and 4, then the output will be either a fifth or a 6th, and so the output will be either a minor chord, or that minor 6 chord that I like again.

But don't forget the octave grid for steps 3 and 4 in the yellow grid. There are now two white cells in the vertical columns: one in the default cell, but two more in each column for the -1 octave transposition. This means that at random, the notes in steps 3 and 4 in the yellow grid will be transposed down by one octave - about half of the notes in any time period will be one octave down, and half will not be affected. In terms of what this does to the chord, then it gives an inversion of the chord - the fifth or sixth notes in the yellow grid might be transposed an octave down, below the root note. You could put similar 'inversion controls' in the orange octave grid if you wanted, and this would allow you to control when the thirds were transposed, giving other inversions. In other words, whilst it may be called an 'Octave' grid, it is actually used mainly to control inversions of the chords. If we think back to TR2gen, then that had a much simpler control that didn't give this degree of flexibility.

More clips

Up until now, the clips have been very simple, but ProbablyCHORD just uses them as events that control the transposition, and so you aren't limited to straightforward 'on the beat' notes, nor are you limited to simple transpositions. Here are some other possible clip contents:


This clip has F as the root for step 1, C# as the root for step 2, B for step 3, and finishes with D for step 4. If the grids were set up with a simple two steps Major, two steps minor sequence, then this would give an output of F Major, C# Major, B minor and D minor.


This clip has twice the number of note events in the bar, and so the output of ProbablyCHORD will be at that rate, so a 4 step sequence will play twice per clip bar. The output chords will jump up and don by octaves every two notes.


Not quite a Coltrane cycle, but this clip runs through five different roots in the bar, and with the 8 step sequence in ProbablyCHORD, then this clip will also trigger two runs through the sequence per clip bar.


Finally, let's throw away 'on the beat' timing, and trigger the chord generation in a somewhat less 'dance-floor friendly' way...

Velocity

Ableton Live's factory device called 'Velocity' is very useful for manipulating the velocity of MIDI notes (an under-utilised function of Live, I would say...). You can put the Velocity device between ProbablyCHORD and the Instrument that you use to make sound...


In the screenshot above, I have deliberately compressed the MIDI velocity values so that the Cello Section has lots of drive, and to provide 'voicing' of the chords I have added randomness to the velocity values. The SoundCloud demo uses a variation of this setup, with LFOs driving the articulation. 'Three Steps from L(ive)' territory, in some ways...

Comparison

How does ProbablyCHORD compare to TR2gen? Well, here are the controls for TR2gen mapped onto two-thirds of the first octave grid in ProbablyCHORD:


The above screenshot shows the default TR2gen 'inversion' settings - which produce no inversions at all, when the R, 3 and 5 buttons are all highlighted. The 'MAJ' button is like the 3rd white cells in steps 1 and 2 of the orange grid, and the 'min' button is like the flattened 3rd white cells in steps 3 and 4 in the orange grid.


The '- button produces inversions where the Root, third and 5th are transposed down by an octave, and these are like the white cells in the octave grid. Only the mappings for the 3rd are shown here to keep things simple. The octave grid in the yellow grid controls the inversions for the 5ths.


The '+' button is for inversions where the Root, 3rd and 5th are transposed up by an octave. The equivalent in ProbablyCHORD is again the octave grid, and once again, only the thirds are shown.


The'+-' buttons in TR2gen control inversions where the transpositions can be up or down by an octave (or no transposition at all). This is like having white cells up and down an octave in the octave grid in ProbablyCHORD.

Note that ProbablyCHORD provides extra control over the transposition of the notes, so you can have an inversion mode that is not possible in TR2gen, where the notes are transposed up or down an octave with 50% probability - this is done by removing the white cells in the middle '0' default row in the octave grid, and only having white cells in the +1 and -1 rows. Also ProbablyCHORD allows notes other than the 3rd and fifth to be added to chords. Finally, ProbablyCHORD can have steps other than 2! Up to 9, in fact. (although the gird is quite small when this is the setting...)

Inversions

At the risk of too much music theory, here are some screenshots of the various inversions for a basic three note triad:


The basic Major triad has the Root, the 3rd and the fifth. This is the default, with the 'Octave' grids all showing just the middle position, and so the chord is exactly as defined by the note grids, and doesn't change. A little bit repetitive..

ROOT


The three screenshots above show the Root section (Red) with the octave grid rows for +1 and -1 filled in with white cells. The three shots show: the basic chord with the root not transposed; the root transposed one octave up, and the root transposed one octave down. With these settings, each of these chords will be equally likely, and so each will happen about one third of the time, on average.

THIRD


The above three screenshots show the orange grid, which has white cells in the note cell for the 3rd interval, so this is making the middle note of he basic triad. The octave grid has +1 and -1 white cell rows added, and the three shots show the third in: the normal position; one octave down; and one octave up.

FIFTH


The above set of screenshots show the yellow grid, which has a row of white cells producing a fifth interval in the output chord, corresponding to the fifth in the basic triad. The octave grid again has the +1 and -1 rows filled with white cells. The screenshots show: the basic triad with no inversions; the fifth transposed up one octave; and the fifth transposed down one octave. As before, with these settings, each of these chords will occur with about 33% probability on average, over time.

Finally, here's a shot of all of the possible notes that can be produced using if the octave grids for these three notes are all set to +1, 0 and -1. In reality, only particular sets of three of these notes will ever sound at once - this is a composite of all the possibilities:


Determinism

ProbablyCHORD tries to abstract a lot of detail behind what looks like a very simple user interface (like forcing everything to be rooted by a 'C' that can be any note, or making it event-driven instead of being tied to repetitive timing), and the idea behind making almost every control probabilistic via the grids is to introduce variation and unpredictability into music. But if you only put one white cell into a vertical column, then you are in direct/unambiguous control of that parameter - it becomes deterministic. So whilst you can use ProbablyCHORD to generate music with randomness inside it, you can also use it to generate exactly what you want, without variations, where it plays the same every time.


Here's an example of using ProbablyCHORD purely as a deterministic chord generator. Can you figure out what famous piece of music these are the first four bars of?

ProbablyCHORD

That completes this quick introduction to ProbablyCHORD. I hope that you can understand what it does, and how it does it! Most of all, I hope that you can see how it might help you to make music by allowing you to explore chord progressions with minimal effort and yet have a lot of flexibility.

You can find an example of ProbablyCHORD driving a simple Instrument Rack inside Ableton Live (I love using LFOs to control articulation, and I often use the 'Velocity' MIDI effect for adding random velocity so that the voicing of the chords varies) on Soundcloud.

I am preparing videos showing ProbablyCHORD in action.

Getting Probably Chord

You can download ProbablyCHORD for free from MaxForLive.com.

Here are the instructions for what to do with the .amxd file that you download from MaxforLive.com:

     https://synthesizerwriter.blogspot.co.uk/2017/12/where-do-i-put-downloaded-amxd.html

(In Live 10, you can also just double-click on the .amxd file, but this puts the device in the same folder as all of the factory devices...)

Modular Equivalents

In terms of modular equivalents, then reproducing this functionality in my modulars seemed like it should be simple, because all it requires is a 9-step sequencer and some logic, but coding up all of the logic isn't as easy as you think, and quickly eats up modules, and you rapidly get to the point where you want to step outside of the 'basic modules only' rule and go into custom programmable specialist modules. So my estimate is that full functionality is going to require a step sequencer, clock source, a random generator per grid, and then a couple of utility logic modules per grid, which quickly gets us to about 20 ME.

Buy me a coffeeBuy me a coffee

