Showing posts with label Probabilistic. Show all posts

Thursday, 13 June 2019

Documentation for the 'Probably' series of M4L devices - Illustrated!

The recent release of ProbablyR 0v14 reminded me that the documentation needs writing at some stage... So here's a promoted part of the blog post for that, but as a separate blog post to make it easier to find, and with added graphics to give it extra 'eye-candy'-ness. Not quite a square coffee-table book full of nice glossy photos, but you never know...

Documentation for Probably

The MIDIprobablyR(S,Z...) series is getting to the point where it needs a proper manual, but this may take some time, so, in the meantime, here are links to all of the blog posts covering the various versions of the Probably step sequencer. (and related devices) 

The Probably... step sequencer


Probably was the first (and simplest) of the 'Probably' series of step sequencers. This blog post is a good place to start.

Probably blog post                  The first in the series (four grids, limited panel colouring)


ProbablyZ blog post               The second iteration (added the time-warping 'Order grid/panel)


ProbablyS blog post               The third iteration (added the sub-sequencer 'Memory' grid/panel)


ProbablyR 0v11 blog post      The fourth iteration (added 16 step sub-seq, warp fills, and Step length)


ProbablyR 0v14 blog post      The fifth iteration (added 'Swing' panel and 'Nudge' buttons)

Latest ProbablyR on maxforlive.com


Somewhere along the line, the breathlessly-annotated 'white and light purple' advert style got stuck in my mind, and I have used it ever since. Love it or hate it, it is immediately recognisable...

Other 'Probably...' devices

After Probably, there were some other devices that added extra letters to the end. The 'step sequencer' series adds a single letter: S, Z, R - the other devices add more than one letter. The release sequence for 'Probably the step sequencer'  is: Probably, then ProbablyZ, then ProbablyS, then ProbablyR (current).


ProbablyLFO


ProbablyLFO blog post           Outputs probabilistic (variable) waveforms  


ProbablyLFO blog post2         Extra sync additions and time warping               On maxforlive.com

Most people glance at the pixelated sine wave in the 0v03 screen-shot and say something like: 'Yuk - a pixellated sine-wave!' and ignore it. What they miss is an LFO that allows you to make arbitrary waveforms that change shape probabilistically and over time (the noise-warping is really cool, even if I say so myself!). Also, the pixelation can be smoothed out, and actually, having a little bit of it sounds good! - if you were raised in the 'S&H filter modulation era' then it is like a more sophisticated version of that. First impressions are not always reliable, and I've not even mentioned really unusual features like the 'Note' mode, where the LFO waveform is 'triggered' by notes in a clip, which one user described as 'genious'!


ProbablyGEN


ProbablyGEN blog post          A poly-rhythmic drum sequencer, plus...  

     
ProbablyGEN blog post2        Extra asynchronous additions...                           On maxforlive.com

ProbablyGEN is pure timing madness. Each of the three horizontal rows is independently timed (synced or free of Live's transport) and so you can do truly free-form poly-rhythms. This is the sort of thing that really ought to be a module for a modular synth...


ProbablyCHORD


ProbablyCHORD blog post     Probabilistic chord generator ('Sergeant...')        On maxforlive.com

ProbablyCHORD is interesting because it brings together several idea into one place. The TR2gen to-step chord generator puts two chords in sequence and provides inversions, and then lets you automate and add probability to it. So it adds polyphony to the monophonic step sequencing from ProbablyR (and in fact, the variable 'step length' pop-up menu was tested here first, then added to ProbablyR 0v11). But it is also shown to its best advantage when paired with an 'articulated' sound using velocity, and you can learn more about this in two ModeAudio interviews/tutorials.


There is more on Ableton instrument racks here:

- Macro controls in Instrument Racks In Ableton Live

And an example of a more sophisticated multi-layered articulated sound (implemented in an Instrument Rack in Ableton Live) is here:


In the pipeline is a blog post on additional articulations that you can do inside Instrument Racks, which may also have other spin-offs...


ProbablyCHORD blog post2 - coming soon!


There are updates and more devices in the pipeline, of course. Watch this blog!


All free!

Everything here is free, of course, but donations are always welcome!


Tuesday, 11 June 2019

Generative non-linear step sequencer - new 'Swing' panel, and more!

This was going to be a quick post to describe a new panel for my 'ProbablyR' generative, probabilistic sequencer, but it seems to have grown into a longer tome because version 14 has made rapid progress... So this post will cover:

1. The new 'Swing' panel
2. The new 'time manipulation' facilities in the 'Order' panel
3. The new 'Nudge' buttons in most of the panels

As always with a new release of ProbablyR, don't forget to send it a MIDI note (from the keyboard emulation on a laptop, or from MIDI In), click on the 'D' default button to get a clean setup, and then save the settings using the little 'floppy disk' icon in the top right hand corner so that you get a saved .adv file in your library. Then explore the new stuff!

Oh, and I suppose that I should use my new naming scheme, so this updated device is really called: 'MIDIprobablyR 0v014'.


The Swing panel

The 'Swing' panel adds the ability to set the length of each step in the sequence in 64th note intervals. Note that ProbablyR already lets you set the length of the generated note at each step in the sequence,  so the 'Swing' allows you to control the time between steps, which is somewhat unusual in step sequencers.

I'm using the term 'swing' here because that seems to be the most commonly used term in the DAW industry, and I'm very aware that 'Swing', 'Shuffle', 'Groove', and 'Nudge' are all terms that can be used for similar parameters. Now, having been using the amazingly excellent Novation Circuit for the last couple of months, I have to say that 'nudge' was my first choice, but that was already taken for a completely different new feature. (Of course, these days, maybe what I should be doing, is putting a picture up on Facebook in a DAW group that asks: ''Swing', 'Shuffle', 'Groove', or 'Nudge': Which is the right word?' and waiting for comments...)


The 'Swing' panel is the slightly purply, dark blue one (not the re-coloured teal one for 'Note Length' that used to be 'the dark blue one') on the far right of ProbablyR, and uses the same probabilistic grid that I have been using for all of the major control functionality in the Probably series. (Time usually goes horizontally, each white cell vertically is selected at random.) So, yes, the horizontal axis is time: 18 steps maximum in this version (the UI is holding me up for more steps...), whilst the vertical axis sets the number of 64th notes between each step, with fastest (1/64th) at the top of the panel, and the slowest (64/64ths) at the bottom of the panel.

Now, following my usual trend of not doing things in the conventional way, the 'swing' control presented here is rather different to the more usual percentage value from 50% (Straight or 'even' timing, where, for example, every 16th note is the same time after the preceding note - so they are evenly spaced in time) to 70%, or even 85% (Not straight timing at all, but 'swing'-timing, where (typically = there are variations!) each second note is moved in time so that it is not the same time after the preceding note as that preceding note was for the one before that.) Instead, the probability grid allows you to set the thing of any of the 16th notes backwards or forwards in increments of 1/64th notes. In the Ableton Live manual, they describe 'groove' in terms of having a piece of elastic for the timing, instead of a fixed metronomic grid. So in ProbablyR, the probability grid provides exactly that sort of timing flexibility, but it also allows probabilistic control, so the swing is not necessarily the same for each note, or each bar, or each repetition... Now this is quite an unusual ability, even these days, unless you have ever programmed something like a Roland MC500. (where each note's timing can be controlled individually!)


Since ProbablyR's timing runs on 16th notes, then the default horizontal row is the 4/64ths line, which is a 16th note. This row is highlighted in dark grey, with the rows above and below in lighter grey. If you let ProbablyR run with the default '4' setting of white cells for each step, then there is no effect: each step is 16th of a note, as usual. The very top row is coloured red to indicate that it is very fast, so fast that on some slower computers the timing might not be exactly as you would expect. This is a result of the way that ProbablyR gets timing information from Live, and I suspect that a better programmer than me (Gregory Taylor from Cycling'74, for example) would be able to improve upon it. Having been raised in a world where the limits of analogue devices were very evident (anyone who has tuned a Yamaha CS-80 will know what I mean), then I'm very gratified that digital devices  also have limitations and wrinkles, albeit sometimes very different ones. And, as they say, 'limitations are the spurs to creativity'!

First half fast (so middle note is early), and second half slow - on average!

But adding an extra white cell at the start and middle of the sequence (the left hand side and the middle of the grid in the panel) can change the timing - quite radically if you want, or reasonably subtly if you prefer. The timing is altered 'per step', so you can have different timing for each step in the sequence if you wish, although this can be quite challenging to minds and ears that are mostly acquainted with regular 4/4 at 120 bpm. The 'Swing' panel uses the same probabilistic control as the rest of ProbablyR, so if you have more than one white cell in a vertical column, then the probability of that value being used is the reciprocal of the number of cells. In other words, if you have 1 white cell, then it happens with a probability of 1/1, which is 100% of the time. If you have 2 white cells, then each cell has a probability of happening of 1/2, which is 50%. Three cells is 33% each, four cells 25% each, and so on. The mathematical term for assigning probability weights to events is 'Bayesian', so if I was a marketing person, I would be calling this a 'Bayesian step sequencer with weights of 50%, 33%, 25%, 20%...'. But you get the idea - the more white cells there are in a vertical column, the more 'spread out' the chance of each one happening becomes. So an alternative way of thinking about the white cells is that they 'spread' the chance of that value happening: one cell doesn't spread it at all, whereas 10 white cells means that each one is only going to happen 10% of the time, on average.

So what happens when we add a white cell to the default row of '4'? Well, in step 1, the length of the step will be either 3/64ths of a note, or 4/64ths of a note. Each of these will happen half of the time, but randomly - so it won't be 3 followed by 4 followed by 3 followed by 4 each time, it could be more like: 3, 4, 4, 3, 3, 3, 4, 3, 3, 4, 4, 4... but where the 3s and 4s are randomly distributed over time. If you listen for 3 minutes and count them, then each of the counts would be pretty close to being half of the total number. It's a bit like tossing a coin: long-term, it will land on 'heads' 50% of the time, but this doesn't mean that if you get 10 heads in a row the next toss will have to be tails ('to even things out' is what people tend to say). Nope, each and every time that you toss the coin it will give heads or tails independently of the previous tosses, which is why the long-term results are going to be very close to 50% heads, 50% tails. (I am aware that it is possible, with practice, for people to deliver heads or tails on demand, but I'm assuming here that the people tossing the coins are not trained specialists at coin tossing! Or dice throwers, or whatever other 'random choice' mechanism you care to use...)

The step in the middle is going to be either 4/64ths or 5/64ths of a note, so this is slightly longer in time. So the two white cells alter the 'elastic' timing of the step sequence so that the first half of the bar is up to 1/64th note faster, while the second half is slower by up to 1/64th of a note. I write 'up to' because the grid is probabilistic, and so the two white cells in a vertical column mean that the average speed-up or slow-down will be half of 1/64th note (1/128th note). In the UI, white cells above the '4' row make things go faster, whilst white cells below the '4' row make things run slower.

I'm going to stop talking about probability right here, because this is sounding increasingly like a TED talk!

Anyway, back to music and the 'elastic' time concept. The 'Swing' grid allows you to assign any time interval for each of the steps - from 1/64th to 16/64ths (which is a 1/4 (quarter) note). Now if you set all of the notes to 1/64th notes then the whole grid is going to take 16/64ths of a note for all 16 steps (assuming we are using the 16 steps per grid default setting), which is 1/4 of a note - so the whole grid runs at 4x speed and what should be a whole note plays in a quarter note's time. At the opposite extreme, setting all of the steps to 16/64ths gives 1/4 notes per step, and 16x 1/4 notes is 4 whole notes, so the grid runs at 1/4 speed. Okay, so the grid runs faster or slower, but the bars are still in time. Unfortunately, these are ideal cases...

Suppose we leave all of the white cells in the Swing grid in the default '4' position (4/64ths = 1/16th notes, one for each of the 16 steps in a 16 step sequence), except for one. Let's make that 3/64ths, which is 1/64th shorter in time. The whole grid will now take 63/64ths of a whole note to play, which means that it jumps forward in time by one step for each repetition (and so it is not in sync), and after 64 bars we will be back in sync again. Whilst this can be useful for polyrhythms, it would be nice if there was a way of knowing when the Swing grid is going to take the sequence out of sync with
Live's transport, and that is what the large number on the right hand side of the grid is used to indicate (for a 16-step sequence, it will be showing '64' when we are in sync) - the number just above the black box with a 'G' or '4' in it. When the '64' is green, then ProbablyR is going to be playing at the same speed as Live's transport - and don't forget you can always click the Grey "Resync' circle button in the 'Memory' panel if you need to get ProbablyR back in sync with Live. But when the number shows anything other than '64' in red (in the example described just now, it would be showing '63'), then you can immediately see that ProbablyR is going to be slipping or dragging in time. So the number going green is something to look out for if you want to have ProbablyR running in sync.

First quarter of the bar is fast, the second quarter is slow, the third quarter is fast again, and the fourth quarter is slow again - on average.

When you edit the Swing grid live, you will find that the number goes red or green depending on where the white cells are, and it is easy to get out of sync. To enable you to edit the grid and not lose sync, there's a special button that enables you to make changes in the background, check that they add up to '64' (for a 16 step sequence) when the number goes green, and then apply the new swing all at once. It is the 'G'/'4' black box - when you click on it so that it shows '4', then the default 4/64ths '4' setting of swing will be applied to the whole grid, regardless of what the grid actually shows. So you can click and put/remove white cells and check that you get a green number, and then click on the '4' in the black box so that it changes to 'G', and now the Grid will be active and you will get the swing settings that you have chosen applied to the grid step timing. You may need to practice this so that the process of

[ '4', then edit the grid, then check for green, then 'G' to Go with the Grid ]

is fixed in your mind (and fingers), and you will be able to change the swing during live performance without losing sync. If you have seen the fist ProbablyR video then you may not have noticed that it is a live recording and that I never stopped ProbablyR running - it just plays the whole time, live. Well, the 'G/4' button is designed to enable you to make changes to the swing whilst ProbablyR is running and in sync with Live.

Putting a speed-up just after the first note in the bar, then a slow-down just before the middle beat, then a speed-up for the third beat, and a slow-down at the end of the bar

Of course, if you do not want to stay in sync, then go for red numbers and don't bother with the 'G/4' button! I'm hoping that some people will do this live, so please let me know if you are using ProbablyR 0v14 in this way! There is another feature for people who want to do 'off sync', and this is the smaller number just lower down from the black 'G/4' box - this number shows the running average number of steps that ProbablyR has played over the last few repetitions. So if you set the 63/64ths swing grid from earlier, then this will go from 64.0 to 63.0, going through 63.9, 63.8... etc. on the way. And if you go back to 64/64ths (or click on the 'G' black box - just reminding you!), then this 'running average' will gradually go back to 64.0. This is intended to give the performer who wants to go 'off sync' a way to see when they are back in time with Live's transport, or maybe when they need to click the grey 'Resync' circle in the Memory panel to get properly back in sync. With a little practice, you can be in complete control of where ProbablyR is in relation to Live's transport.

Editing the Swing grid whilst the '4' button is active - so the timing is even across the whole bar.

Once the 'G' button is shown, the timing variation is alive. Here the middle beat is late by 1/64th of a note, and the rest of the bar is slightly faster to compensate. Note that there are no vertical columns with two white cells, so this timing is always constant and the sequencer should stay in sync...

The 'Time Manipulation' facilities in the 'Order' panel 

The 'Order' grid sets the order in which all of the other panels happen, and the default is just the lower left-to-upper-right diagonal, which gives the 'linear' time that you expect. The first step is followed  by the second step, then the third, and so on (the cursor lines move from left to right across the panels). If you click on the '-1' button, then you get the opposite diagonal (upper left to lower right) and now time runs backwards in the panels - the cursor lines go from right to left!


Now, whilst you can do a lot with the Order panel, it often requires lots of clicking to clear and set white cells, and so the first new feature is the 'Inc' control number. This sets the number of steps that the sequencer advances across the grid for each step - known as the 'Increment'. Previously this was fixed at 1, and so the default diagonal meant that the cursor moved from left to right one cell at a time. Editing the grid to change the diagonal is possible, but the 'Inc' increment button makes it very quick and easy to change the number of steps. The default is 1, as expected, but if you set it to 2 then the Order grid cursor will jump across the grid two cells at a time, and so the grid takes half the time to complete, assuming that you are using the default 16 steps per bar for the Order grid. But the interesting setting is 3, because now the cursor jumps from cell 0 to 3, then to 6, 9, 12, 15, and then to cell 2, then 5, and ending up at 14, followed by cell 1, then across again, and finally back to cell 0. So the cursor scans across the grid three times, and ends up where it started (assuming 16 steps is set!). Setting Inc to 4 goes across very fast, but 5 is another 'multiple scans for a complete bar', and all of the odd numbers do the same re-ordering of the notes in the Pitch panel, when you have 16 steps set. So why did I include the odd numbers?

Okay, the even numbers are there for when you use an odd number of steps: 15 is a good starting point. You need to change the 'Max' control number to '15' - it will no longer be green (assuming you have the Steps selector in the 'Length' panel is set to 16). The Order grid is now only 15 steps across, and so if you use an Increment (inc) setting of 2, then you now get two scans across the grid for one bar. Now, whilst the Order grid is 15 steps long, assuming that you have left the Steps pop-up menu at 16 (the default), then all the other grids will still be 16 steps long - but only the first 15 of them will now be available to the Order grid. So the Order grid will scan back and forth (depending on the Inc value) and the cursors in the other grids will follow along, but step 16 will never be reached. If you want to use step 16 then you set the 'Min' control number to 2, and Max to 16, and now the Order grid will scan from step 2 to step 16.

In other words, the Max and Min control numbers set the width of the Order grid, and this can be anywhere from 2 cels to 16 cells (as set by the 'Steps' pop-up menu in the 'Length' panel. This allows you to set up several different orders in the Order grid, and choose them by setting the Max and Min control numbers, or control the scanning across the Order grid by using the Inc control number. And I haven't mentioned that the Order grid is probabilistic yet, so that makes things even more interesting. Basically, my recommendation is that you should proceed in this way in order to get familiar with what the new features can do:

1. Play with the Order grid with the default settings of Inc=1, Min=1 and Max =16 using one white cell per vertical column.
2. Then try two or more white cells per vertical column.
3. Then try the 'Inc' increment control number.
4. Then use the 'Max' and 'Min' control numbers to choose a part of the Order grid to control the same part of the other grids. Yes, with Inc=1 and Min and Max set not to overlap, then a basic setup might have two 8 step sequencers on two different Memory slots, or four 4 step sequences, or even two 5 step sequences and an 8 step sequence (with the 'Steps' pop-up menu in the Length panel set to 18 steps). And when you have all of these sub-sequences set-up, then don't forget that the 'Inc' control number will allow you to quickly change the order that the grid plays, or changing Min or Max will change the boundaries of the sub-sequences, and you can overlap them if you want. There's a lot to explore here!

 The 'Nudge' buttons

The Order, Probability, Velocity and Length panels all gain four new buttons plus some associated control numbers, whilst the Pitch and Octave panels both gain two extra buttons. The buttons are Nudge buttons for the grids, and they allow you to move the contents of the grid up, down, left or right. For the Pitch grid this means that you can either use notes in a Clip to control the transposition, or you can do it live using the Up/Down Nudge buttons, or store the nudged grid in a Memory slot. For the Octave grid it speeds up choosing the range of the instrument sound.


But the real fun is the Nudge control numbers. These automatically click the associated Nudge buttons according to the number in them. The default '1' setting doesn't do anything, but if you set the left nudge control number to 16 (and the steps are set to 16...) then the grid will scroll to the left by one cell each 16 steps (each bar). So if you have a probability grid or velocity grid or length grid that is controlling which notes are playing and how they are being articulated, then you can move these independently in time.


I like to have a velocity grid with an up and down wiggle and set to be nudged 1 step less than the number of steps in the bar, so that the grid moves horizontally, but each note gets a different value for 16 bars, and then it repeats. (You can hear this happening on the demo on SoundCloud). If you want, you can set more than one Nudge control number, and then the grids will slide about all over the place. There's huge amounts of control to explore here! (And you can always add more automation using Live's internal facilities as well, of course!)

SoundCloud demo

I'm working on a video, but that takes a long time, so, in the meantime, there's a demo up now on SoundCloud. This is a live recording of a single instance of ProbablyR, plus a drum pattern, and has too much reverb on it. (But it IS a demo, and they always have too much reverb, so that's how you know it is a demo!) The demo has velocity nudging, swing time manipulation, and uses the modulo scanning of the Order grid to give interesting variations of the note pool in the Pitch grid. Hopefully, if I've done it well enough, it should sound like someone improvising on the Marimba, and they are slightly imperfect in their timing... But it isn't anything like that, of course. It is produced by one of those 'boring, static step sequencers that monotonously repeats exactly the same notes...,' except that ProbablyR isn't that kind of sequencer. Not at all.

The MIDIprobablyR(S,Z...) series is getting to the point where it needs a proper manual, but this may take some time, so, in the meantime, here are links to all of the blog posts covering the various versions of the Probably step sequencer. (and related devices) 

The Probably... step sequencer

Probably was the first (and simplest) of the 'Probably' series of step sequencers. This blog post is a good place to start. 

Probably blog post                  The first in the series (four grids, limited panel colouring) 
ProbablyZ blog post               The second iteration (added the time-warping 'Order grid/panel)
ProbablyS blog post               The third iteration (added the sub-sequencer 'Memory' grid/panel)
ProbablyR 0v11 blog post      The fourth iteration (added 16 step sub-sea, warp fills, and Step length)   
ProbablyR 0v14 blog post      This post! The fifth iteration (added 'Swing' panel and 'Nudge' buttons)

Latest ProbablyR on maxforlive.com

Other 'Probably...' devices

After Probably, there were some other devices that added extra letters to the end. The 'step sequencer' series adds a single letter: S, Z, R - the other devices add more than one letter. The release sequence for 'Probably the step sequencer'  is: Probably, then ProbablyZ, then ProbablyS, then ProbablyR (current).

ProbablyLFO blog post           Outputs probabilistic (variable) waveforms    
ProbablyLFO blog post2         Extra asynchronous additions... ('swing-like?')   On maxforlive.com

ProbablyGEN blog post          A poly-rhythmic drum sequencer, plus...         
ProbablyGEN blog post2        Extra asynchronous additions...                           On maxforlive.com

ProbablyCHORD blog post     Probabilistic chord generator ('Sergeant...')        On maxforlive.com
ProbablyCHORD blog post2 - coming soon!

There's now a 'coffee-book' illustrated version of this section in a separate new blog post:

    Probably documentation

Hardware Sequencing

If you make hardware sequencers and are busy taking notes from this blog as potential ideas for your next release, then perhaps we should talk. I would love to help someone make a proper advanced hardware sequencer that goes 'beyond' the current 'state of the art', and hopefully ProbablyR (and the other M4L devices in the Probably series) vividly illustrate that I may be useful to you.

Getting MIDIprobablyR 0v014

You can get MIDIprobablyR on http://www.maxforlive.com/library/device/5529/midiprobablyr

Here are the instructions for what to do with the .amxd file that you download from MaxforLive.com:

     https://synthesizerwriter.blogspot.co.uk/2017/12/where-do-i-put-downloaded-amxd.html

(In Live 10, you can also just double-click on the .amxd file, but this puts the device in the same folder as all of the factory devices...)

Oh, yes, and sometimes last-minute fixes do get added, which is why sometimes the blog post is behind the version number of MaxForLive.com...

RAM and CPU in Live

This MaxForLive device uses quite a lot of CPU and RAM, because it is doing quite a lot of work behind the scenes. This is also a very 'wide' device, but I'm cautious about doing a pop-up window (and not very good at programming them!).

Modular Equivalents

In terms of basic modular equivalents, then ProbablyR V14 would require several sequencers in series/parallel to give the same functionality, plus quite a lot of utility logic to do the linking, the probability functions and the nudging, as well as a dedicated 'clock' sequencer just to do the swing function, giving a total of about 16 ME.


Friday, 14 December 2018

TR2gen Revisited - resulting in a Probabilistic Chord Utility for Ableton Live

In 2017, I published a free two-step, two-bar triad generator that made simple chord progressions very easy to produce, and the main feedback was that people loved it and wanted more steps and more chords.

After thinking about this for a year, and having produced lots of devices that utilise probability (the 'Probably' series), then I came up with a way of extending TR2gen into something that included 'more': and it is called ProbablyCHORD.


ProbablyCHORD

ProbablyCHORD takes a lot of inspiration from ProbablyR, the latest monophonic sequencer in the Probably series - it has the same style of probabilistic grids, the same generative control, the same separation of notes and octaves,  and the same rainbow colour coding of sections (which seems to be becoming fashionable in commercial plug-ins too!). Underneath, the core is TR2gen, expanded and with new features to make it more flexible, more powerful, and more powerful. In summary, the same but 'more'! (And still FREE!)

The 'elevator pitch' goes something like:

'ProbablyCHORD is a free multi-step, clip-event triggered, generative and probabilistically controlled chord generator plug-in device for Ableton Live, implemented in MaxForLive.' 

It can be thought of as the 'chord' companion to the 'melody' ProbablyR sequencer. (and any following devices in that series...)

Although it looks very simple, there's actually a lot going on, and you need to do some setup before ProbablyCHORD will work properly when you first use it. So the following instructions are deliberately detailed so that you get familiar with how it works and what it can do for you.

(I probably need to warn you that music theory is not my strongest skill set, and so some of the stuff on chords that follows may not be 100% correct...)

From left to right, the sections are:


Root and Control

The top part of this section is the 'Octave' grid. The two default 'white' (which can also mean 'highlighted with the vertical scrolling colour bar') cells mean no transposition - as indicated by the +2...-2 labels on the right hand side of the section. If you click on any of the cells above or below then you will get a new white cell for that step, and a note will be generated when the sequencer reaches that step - or rather, the note that is output at that step will be either of the notes represented by the cells that are white. So if the '-1' cell and the default '0' cell are both white, then half of the time the root note will be produced, and half of the time a note one octave down will be produced.

At the bottom of the section are two slightly larger white boxes that control the root note - and they default to white. As the sequencer steps through, the coloured bars scroll across each grid - in the screenshot above, step 1 is playing, and so the root note white box is highlighted in red. If you click on either of these root cells so that it goes grey, then the root note will not play (even if you have a white 'octave' cell in the octave grid above). The Octave Grid is always over-ridden by the note grids in the lower pat of each section.


The big number selector in the centre of this section is the Step selector. In the screenshot this is 2, which means that there are two steps in the sequence. To the right is another selector, which shows 'A' for automatic - this controls the note length, and can be fixed (to a variety of values: 1 = short, 9 = long) or automatic. Automatic should be fine for your initial explorations...

The 'Step->' button advances the sequence by one step each time you click on it, and causes notes to be generated so that you can hear the result of adding white cells to the grids. ProbablyCHORD doesn't use Live's timing directly, but instead it uses note events in clips to tell it when to generate a chord, and how to pitch that chord. So one of the first tasks is to generate a clip that has four monophonic notes on beats, in the track that ProbablyCHORD is in.


Here's probably the simplest clip contents: four C1s on the beats, and a very boring chord progression. I would recommend leaving John Coltrane's 'Giant Steps' for a little later on! Note that the pitch of the notes on the grid transposes the chords, so this clip will cause C1s to be played as the root of the chords that ProbablyCHORD produces. You could try changing the notes and see what happens... Remember that this clip MUST be monophonic: one note at once!

Once the clip is done, then starting the clip should move the vertical colour bars across the grids in ProbablyCHORD, and depending on what white cells are present in the grids, and assuming that you have added an instrument after ProbablyCHORD, then you may get some notes. By default you should get the root note from the 'Root' section. A 'piano' type sound is good for the instrument that you have in the track, although I have a personal weakness for using cello sounds for chord progression development. What you should notice is that although there are four notes in the clip, there are only two steps in the sequence, and so ProbablyCHORD will repeat the steps twice for each repeat of the clip.

If you go to the 'Step' selector and choose '4' steps, then the number of notes in the bar will be the same as the number of steps, and so they will be kind of aligned, although not necessarily starting at the same time. You can click on the left circle just above the root note grid to advance the step sequence (same as clicking on the 'Step->' button), or click on the right circle to restart the sequence from step 1. The left circle will also flash with each step... I'm still trying to refine the synchronisation of the start of the step sequencer, and making it more controlled is one of the goals for future releases.
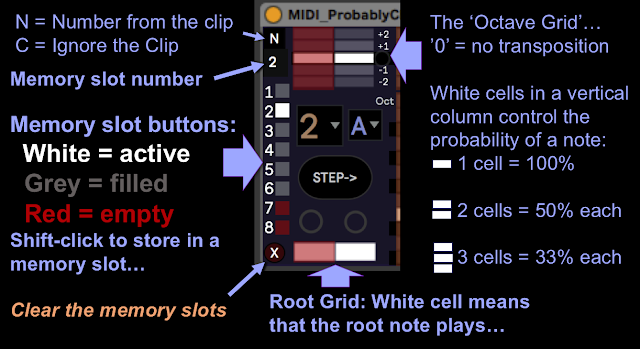

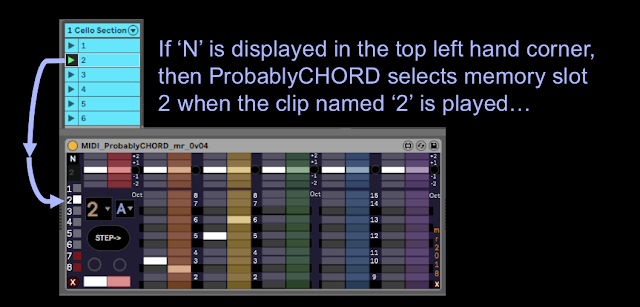
Whilst your attention is on the clip, you might like to try naming it with a number, and restarting the clip to play: '1' is a good value to try. At the very top left corner of this section is a letter 'N' or 'C' - this is a toggle button that controls how clip names affect ProbablyCHORD. If 'N' is displayed, then the clip name (which must be a number) will select the step sequence that ProbablyCHORD will play. So the number immediately below the 'N' (or 'C') is the current step sequence number, and the square below this are the step sequence memory slot buttons. In the screenshot above, the clip named '2' is playing, and so memory slot number 2 has been selected. (shown by the number 2, and the white highlighted memory slot button) If you don't put a number in the clip name, then nothing will happen - although you can always click on the memory slot buttons to recall a memory, of course.

To store the settings in the grids in ProbablyChord into a memory slot, then you just shift-click on one of the memory slot buttons. Empty memory slots are dark red. Memory slots with saved grids inside them are grey (or gray). The currently recalled memory slot will be highlighted in white. If you save to a memory slot then you will lose whatever was in there before you saved! Finally, at the lower left hand side, below all the memory slot buttons, there is a dark red button with 'X" on it. This CLEARS all of the memory slots - they will go dark red and will all be empty. Use this with care - it is a good idea to use this 'clear' function when you first use ProbablyCHORD in a track, and then once you have stored a step sequence in a memory slot, you should save your Live Set, which will save the memory slots as well.

First Octave


I'm calling the octave above the Root note the 'First Octave', mainly because there's another octave grid higher up, which we will come to later...

As with the Root section, the upper part is for octave grids, and the lower part is for note grids. In this section, there are three pairs of grids: one for each note that we add above the root note in a chord. So in the screenshot above, the root section is playing the root note, and this is transposed based on the note that is in the clip. So in the clip that was shown earlier, the root will be C. In the octave above that C, the grid with the orange scrolling bar plays a note above the root, and the 'yellow' grid plays another note above the root. So the combination of the root section, plus the first two grids in this first octave, gives us a triad: the root plus two other notes. The third grid in this section is for any extra note that you want to have above the root, and remember that the note grid over-rides the octave grid, so if there aren't any white cells in the note grid, then no note will be generated, regardless of what the white cells in the octave grid might suggest.

The note grids in this section are numbered as intervals from 1 to 8, where 1 is the note above the root (which is zero (0)), 2 is a 'second' interval, 5 is a fifth, etc. So the dark gap between 2 and 3 is a flattened third, or a sharpened second.


If we look at the orange grid, then there are two white cells: the first step has a white cell in the third, and the second step has a white cell in a flattened third. The yellow grid has a white cell in the fifth for the first step, and a 6th for the second step. If we look at each step in turn, then the first step has the root, plus a third, plus a fifth - which gives us a major triad, and if the root is C, then it is C Major.
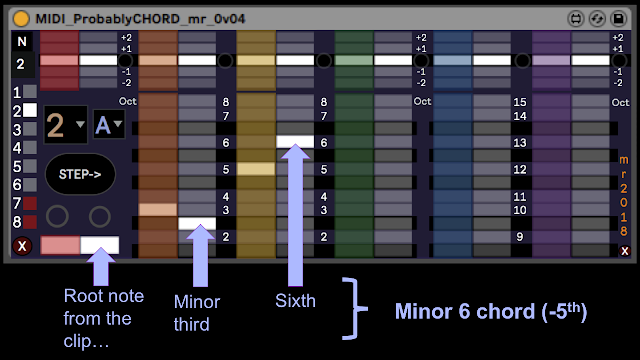

For the second step, then the root is the same,  but the third is flattened, and you would normally expect a fifth to give a minor chord, but I have changed the interval to give a Minor 6 chord without the fifth, which I like the awkward jarring sound of, but which isn't going to be to everyone's taste. If the fifth was present in this second step then ProbablyCHORD would be producing exactly the chords that TR2gen would produce when playing a Major/minor sequence, but ProbablyCHORD has no such imitations, and this illustrates that you are free to do whatever you like with making chords.

This also illustrates an important part of the design of ProbablyCHORD. What happens if the clip looked like this instead of just repeated C notes?


With this clip, then the root for the first step is C, but for the second step then it is D. So although the layout of the notes looks like it is in the key of C, this is just to make entering chords easy, and it also keeps the graphics from becoming mind-bendingly complex. All you need to know is what intervals make up the chords that you want to use, and you then enter them in the key of C into the grids. The clip then sets the root note, and so whilst the first step produces a C Major chord as before, the second step now produces a D minor 6 chord. (or a D Minor if you have used a fifth instead.)

ProbablyCHORD thus enables you to enter chords easily, without needing to know anything more than the intervals that are inside them, and the clip the sets the root. Ordinary triads are going to have the same thirds, flattened thirds and fifths, and they are always going to be in the same place on the grid, because the clip will cause the transposition of the root. The output of ProbablyCHORD is not just what you see in the grids - it is a combination of the grid plus the transposition in the clip.

Because this simplifies the entry of chords, I have resisted the temptation to provide a drop-down menu that inserts pre-prepared chords into a step (there are plenty of apps that do this already!). The simple entry of intervals enables you to concentrate on the sound of the chords, instead of the names, and the clip transposition means that you never have to think about the structure of chords in any key other than C. If you want to look up the structure of chords in books, then feel free to do so and put their intervals into the grids - there are a number of useful low-cost apps for mobile phones and tablets that can provide the same information in electronic form.

The third grid in the first octave is green, and could be used to add additional notes to the triads - sevenths for example.

Second Octave


The second octave is two octaves up from the root, and can be used to add notes with intervals like 9ths, 11ths and 13ths.

There's a tiny little 'X' button at the lower right of this section. This clears all the grids, and is probably something you should click when you first start up ProbablyCHORD...

Probability

Up until this point, the grids have been used to produce single notes, but these are probabilistic grids! If there is more than one white cell in a vertical column, then the probability of that white cell causing a note to be output is distributed across all of the white cells. If there are two white cells in a vertical column, then each will occur about half of the time, on average - the actual choice happens randomly. If there are three white cells, then each possibility happens about a third of the time...

If we go back to the original 4 sep clip, and change the steps to 4, then ProbablyCHORD and the clip are in bar sync. Let's add some white cells to the note and octave grids in the first octave section, and see what effect having more than one white cell in a vertical column actually has on the output.
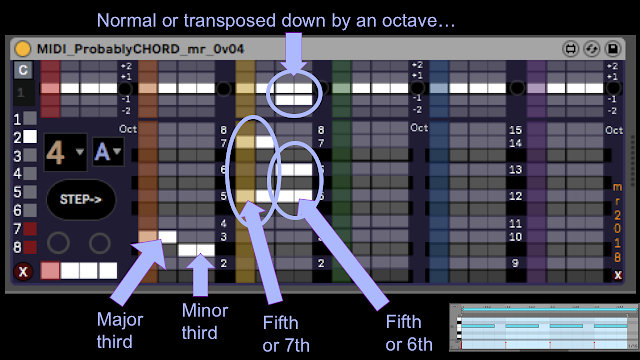

For the orange grid, then we have a third in the first two steps, followed by flattened thirds in steps 3 and 4 (so suggesting a major chord followed  by a minor chord), and there is only one white cell in each vertical column, so the output will always have these notes at these steps. But for the yellow grid, then steps 1 and 2 have fifths or sevenths, and steps 3 and 4 have fifths or 6ths. So for steps 1 and 2, we will get either a fifth or a seventh to accompany the third, giving either a Major chord or a 'kind of' Major 7 chord (without the fifth). For steps 3 and 4, then the output will be either a fifth or a 6th, and so the output will be either a minor chord, or that minor 6 chord that I like again.

But don't forget the octave grid for steps 3 and 4 in the yellow grid. There are now two white cells in the vertical columns: one in the default cell, but two more in each column for the -1 octave transposition. This means that at random, the notes in steps 3 and 4 in the yellow grid will be transposed down by one octave - about half of the notes in any time period will be one octave down, and half will not be affected. In terms of what this does to the chord, then it gives an inversion of the chord - the fifth or sixth notes in the yellow grid might be transposed an octave down, below the root note. You could put similar 'inversion controls' in the orange octave grid if you wanted, and this would allow you to control when the thirds were transposed, giving other inversions. In other words, whilst it may be called an 'Octave' grid, it is actually used mainly to control inversions of the chords. If we think back to TR2gen, then that had a much simpler control that didn't give this degree of flexibility.

More clips

Up until now, the clips have been very simple, but ProbablyCHORD just uses them as events that control the transposition, and so you aren't limited to straightforward 'on the beat' notes, nor are you limited to simple transpositions. Here are some other possible clip contents:


This clip has F as the root for step 1, C# as the root for step 2, B for step 3, and finishes with D for step 4. If the grids were set up with a simple two steps Major, two steps minor sequence, then this would give an output of F Major, C# Major, B minor and D minor.


This clip has twice the number of note events in the bar, and so the output of ProbablyCHORD will be at that rate, so a 4 step sequence will play twice per clip bar. The output chords will jump up and don by octaves every two notes.


Not quite a Coltrane cycle, but this clip runs through five different roots in the bar, and with the 8 step sequence in ProbablyCHORD, then this clip will also trigger two runs through the sequence per clip bar.


Finally, let's throw away 'on the beat' timing, and trigger the chord generation in a somewhat less 'dance-floor friendly' way...

Velocity

Ableton Live's factory device called 'Velocity' is very useful for manipulating the velocity of MIDI notes (an under-utilised function of Live, I would say...). You can put the Velocity device between ProbablyCHORD and the Instrument that you use to make sound...


In the screenshot above, I have deliberately compressed the MIDI velocity values so that the Cello Section has lots of drive, and to provide 'voicing' of the chords I have added randomness to the velocity values. The SoundCloud demo uses a variation of this setup, with LFOs driving the articulation. 'Three Steps from L(ive)' territory, in some ways...

Comparison

How does ProbablyCHORD compare to TR2gen? Well, here are the controls for TR2gen mapped onto two-thirds of the first octave grid in ProbablyCHORD:


The above screenshot shows the default TR2gen 'inversion' settings - which produce no inversions at all, when the R, 3 and 5 buttons are all highlighted. The 'MAJ' button is like the 3rd white cells in steps 1 and 2 of the orange grid, and the 'min' button is like the flattened 3rd white cells in steps 3 and 4 in the orange grid.


The '- button produces inversions where the Root, third and 5th are transposed down by an octave, and these are like the white cells in the octave grid. Only the mappings for the 3rd are shown here to keep things simple. The octave grid in the yellow grid controls the inversions for the 5ths.


The '+' button is for inversions where the Root, 3rd and 5th are transposed up by an octave. The equivalent in ProbablyCHORD is again the octave grid, and once again, only the thirds are shown.


The'+-' buttons in TR2gen control inversions where the transpositions can be up or down by an octave (or no transposition at all). This is like having white cells up and down an octave in the octave grid in ProbablyCHORD.

Note that ProbablyCHORD provides extra control over the transposition of the notes, so you can have an inversion mode that is not possible in TR2gen, where the notes are transposed up or down an octave with 50% probability - this is done by removing the white cells in the middle '0' default row in the octave grid, and only having white cells in the +1 and -1 rows. Also ProbablyCHORD allows notes other than the 3rd and fifth to be added to chords. Finally, ProbablyCHORD can have steps other than 2! Up to 9, in fact. (although the gird is quite small when this is the setting...)

Inversions

At the risk of too much music theory, here are some screenshots of the various inversions for a basic three note triad:


The basic Major triad has the Root, the 3rd and the fifth. This is the default, with the 'Octave' grids all showing just the middle position, and so the chord is exactly as defined by the note grids, and doesn't change. A little bit repetitive..

ROOT


The three screenshots above show the Root section (Red) with the octave grid rows for +1 and -1 filled in with white cells. The three shots show: the basic chord with the root not transposed; the root transposed one octave up, and the root transposed one octave down. With these settings, each of these chords will be equally likely, and so each will happen about one third of the time, on average.

THIRD


The above three screenshots show the orange grid, which has white cells in the note cell for the 3rd interval, so this is making the middle note of he basic triad. The octave grid has +1 and -1 white cell rows added, and the three shots show the third in: the normal position; one octave down; and one octave up.

FIFTH


The above set of screenshots show the yellow grid, which has a row of white cells producing a fifth interval in the output chord, corresponding to the fifth in the basic triad. The octave grid again has the +1 and -1 rows filled with white cells. The screenshots show: the basic triad with no inversions; the fifth transposed up one octave; and the fifth transposed down one octave. As before, with these settings, each of these chords will occur with about 33% probability on average, over time.

Finally, here's a shot of all of the possible notes that can be produced using if the octave grids for these three notes are all set to +1, 0 and -1. In reality, only particular sets of three of these notes will ever sound at once - this is a composite of all the possibilities:


Determinism

ProbablyCHORD tries to abstract a lot of detail behind what looks like a very simple user interface (like forcing everything to be rooted by a 'C' that can be any note, or making it event-driven instead of being tied to repetitive timing), and the idea behind making almost every control probabilistic via the grids is to introduce variation and unpredictability into music. But if you only put one white cell into a vertical column, then you are in direct/unambiguous control of that parameter - it becomes deterministic. So whilst you can use ProbablyCHORD to generate music with randomness inside it, you can also use it to generate exactly what you want, without variations, where it plays the same every time.


Here's an example of using ProbablyCHORD purely as a deterministic chord generator. Can you figure out what famous piece of music these are the first four bars of?

ProbablyCHORD

That completes this quick introduction to ProbablyCHORD. I hope that you can understand what it does, and how it does it! Most of all, I hope that you can see how it might help you to make music by allowing you to explore chord progressions with minimal effort and yet have a lot of flexibility.

You can find an example of ProbablyCHORD driving a simple Instrument Rack inside Ableton Live (I love using LFOs to control articulation, and I often use the 'Velocity' MIDI effect for adding random velocity so that the voicing of the chords varies) on Soundcloud.

I am preparing videos showing ProbablyCHORD in action.

Getting Probably Chord

You can download ProbablyCHORD for free from MaxForLive.com.

Here are the instructions for what to do with the .amxd file that you download from MaxforLive.com:

     https://synthesizerwriter.blogspot.co.uk/2017/12/where-do-i-put-downloaded-amxd.html

(In Live 10, you can also just double-click on the .amxd file, but this puts the device in the same folder as all of the factory devices...)

Modular Equivalents

In terms of modular equivalents, then reproducing this functionality in my modulars seemed like it should be simple, because all it requires is a 9-step sequencer and some logic, but coding up all of the logic isn't as easy as you think, and quickly eats up modules, and you rapidly get to the point where you want to step outside of the 'basic modules only' rule and go into custom programmable specialist modules. So my estimate is that full functionality is going to require a step sequencer, clock source, a random generator per grid, and then a couple of utility logic modules per grid, which quickly gets us to about 20 ME.

Buy me a coffeeBuy me a coffee

