Showing posts with label Ableton Live. Show all posts

Saturday, 4 June 2022

Outreach - What I try to do for education...

Yep, I do other things! This blog is only part of my outreach activities...

Synthesizerwriter at the Suffolk Show 2022 (The badge is deliberate - the 2020 and 2021 shows didn't happen for some reason...)

For the last day of May, and the first day of June, 2022 (that's the 31st of May and the 1st of June, just to be sure...), I was at the Suffolk Show, on the 'Innovation Martlesham' technology innovation stand (huge thanks to BT (the telco, not Brian Transeau)), trying to inspire young minds to take up a career in technology. My aim was to get kids to think about sound in a different way, and so I had a ‘3D Sound Box’ interactive exhibit, where you put your hands into a box, moved a controller around, and put some headphones on (with other people listening in on other headphones (parents, siblings, etc.)). As you moved the controller, the sound changed in subtle and complex ways, and the reaction was uniformly amazing - eyes opened wide, smiles appeared on faces, and parents ended up dragging the kids away some time later. ‘Cool!’ was the standard comment.

People totally comprehended that when you moved the controller so that it pointed in a particular direction, you get a particular sound, and that you could blend from one sound to another by moving the controller to another position. Several people said that they were expecting just a few sounds and a simple mix between them, and they were not expecting a complex morphing from one sound to another...

Behind the scenes, a DJ Tech Tools MIDI Fighter 3D provided the position controller, with two additional infra-red position sensors providing Left-Right and Backwards/Forwards control. The position vectors were fed into Ableton Live, where a custom MaxForLive script changed the rather strange outputs into more understandable controls suitable for controlling parameters (The MIDI Fighter 3D is designed for finger drumming!). These parameters were then used to control the positioning of the four source units in the convolution triangle in Phobos from Spitfire Audio (and BT, (Brian this time!)!) (I use a lot of stuff from Spitfire Audio!). Ableton was sending a C3 drone note to Phobos, and it was set up to produce very different sounds for each of the extreme positions, with Ableton also adding a controlled low pass filter on one axis. The output of Phobos was then tweaked further, ending up in the Envelop Spatial audio plug-in, and the final audio was delivered to stereo headphones using binaural processing. The convolution synthesis in Phobos was a key part of making this different to ‘four sounds in space that you mix between’ - which is what was apparently expected. (A couple of people wanted the standard ’sound rotating around your head’ binaural demo, so I had a Live Set for that as well!)

The MIDI Fighter 3D

The DJ Tech Tools MIDI Fighter 3D MIDI Controller

The MIDI Fighter 3D is a finger drumming MIDI controller that has 16 expensive, high quality, 'arcade-console' style buttons/switches that are designed for long life and consistent operation in punishing situations - several millions of pushes (5 million+ in this case). Elektron have similar switches on their gear where the buttons are going to be 'mashed' a lot in normal use. In contrast, ordinary 'click' switches are small, very low cost, and are made of a metal dome that collapses when you press it, and have a life of a few tens of thousands of clicks for the cheapest, with over a hundred thousand clicks for the more expensive versions. 

(The rubbery buttons that you find on a lot of gear are called membrane switches, and here the flexible bit deforms when you press it, which pushes a piece of conductive plastic (containing lots of carbon, so it looks black) onto a printed circuit board, and so makes a connection. These are very low cost, are easy to light up with LEDs, and are easy to replace (you just replace the sheet of flexible stuff and all those little blobs of conductive plastic), which is a good thing because they can wear out with a lot of use, and they don't like dust or ash or powders, and they are not very consistent in operation - you know how some of them can deform is strange ways, and sometimes get stuck? As for computer keyboard switches, then that's a whole topic all to itself!)

But this isn't a blog on switches! What the MIDI Fighter 3D also has, and the reason for the '3D' part of the name, is a 3D accelerometer which can detect movement on 3 axes: x, y and z. There are several modes of operation, but the one I used was the 'Edge Tilt' mode.In this mode, if you tilt the MIDI Fighter 3D, then it outputs MIDI Continuous Controller / Control Change (CC) messages that indicate how much it has been tilted relative to each of the four bottom edges. 

Rotation on the right hand edge...

So for the right hand edge, CC0 (zero) outputs a value of 0 (zero) when the MIDI Fighter 3D is horizontal (on a table, for example), and 127 when rotated clockwise by 90 degrees, so it is vertical.

Rotation on the left hand edge...

The left hand edge is similar, except that this time it is CC2, and it is anti-clockwise rotation that outputs a value of 0 (zero) when horizontal, and 127 when vertical. There is a small 'dead zone' (settable in the Utility software (Mac and Windows) that lets you set a range where small tilts from the horizontal do not output CC messages. 

For finger drumming applications, where you place the MIDI Fighter 3D on a surface and tap the buttons, then tilting the box along one of the edges feel very natural, and the box has rounded rubber feet that make this very easy to accomplish. But if you pick up the MIDI Fighter 3D, then you can tilt it in any direction, and so having the edges as the reference points doesn't make much sense. Also, you can tilt it either way because there isn't any surface getting in the way. There isn't a 'free space' mode, although there is a mode where you can also detect rotation, but that requires you to press a button each time you want to know what the orientation of the MIDI Fighter 3D is... 

So, I wrote a little utility, in MaxForLive, that takes the CC messages, and processes them so that when you hold it in your hands instead of being on a surface, then it combines the 4 controller messages (CC0, 1, 2, and 3) so that they are combined into just a pair of messages where you can go from vertical, through horizontal and back to vertical again with a single continuous clock-wise (or anti-clockwise) movement, and the result is a 'Composite' controller message that goes from o to 127 (with a small 'dead zone' as it goes through horizontal). This works for left and right, as well as forward and backwards, so you get two composite controllers.

A Composite CC made up of CC0 and CC2 (or 1 and 3)

The 'inverse' composite controllers are also output from the Utility, so you get pairs of CC messages that go from 0-127, and 127-0, simultaneously, depending on how much you have tilted the MIDI Fighter 3D away from the horizontal. Not only does this feel 'right' when you hold it in your hands, but it allows you to control two different parameters as if the MIDI Fighter 3D was a cross-fader - but one that works in two dimensions instead of just one. 

The MIDIccTWEAK Utility written in MaxForLive...

The MaxForLive Utility, MIDIccTWEAK, will work with any source of CC messages, and provides offset and gain control, plus inversion for the basic CC messages, then the paired 'composite' controllers, and finally paired 'composite' controllers using the 'other' pairing - for this application, it uses position sensors at 90 degrees to each other, instead of being on opposite sides of the MIDI Fighter 3D. That's 12 mappable outputs from the four CC sources. 
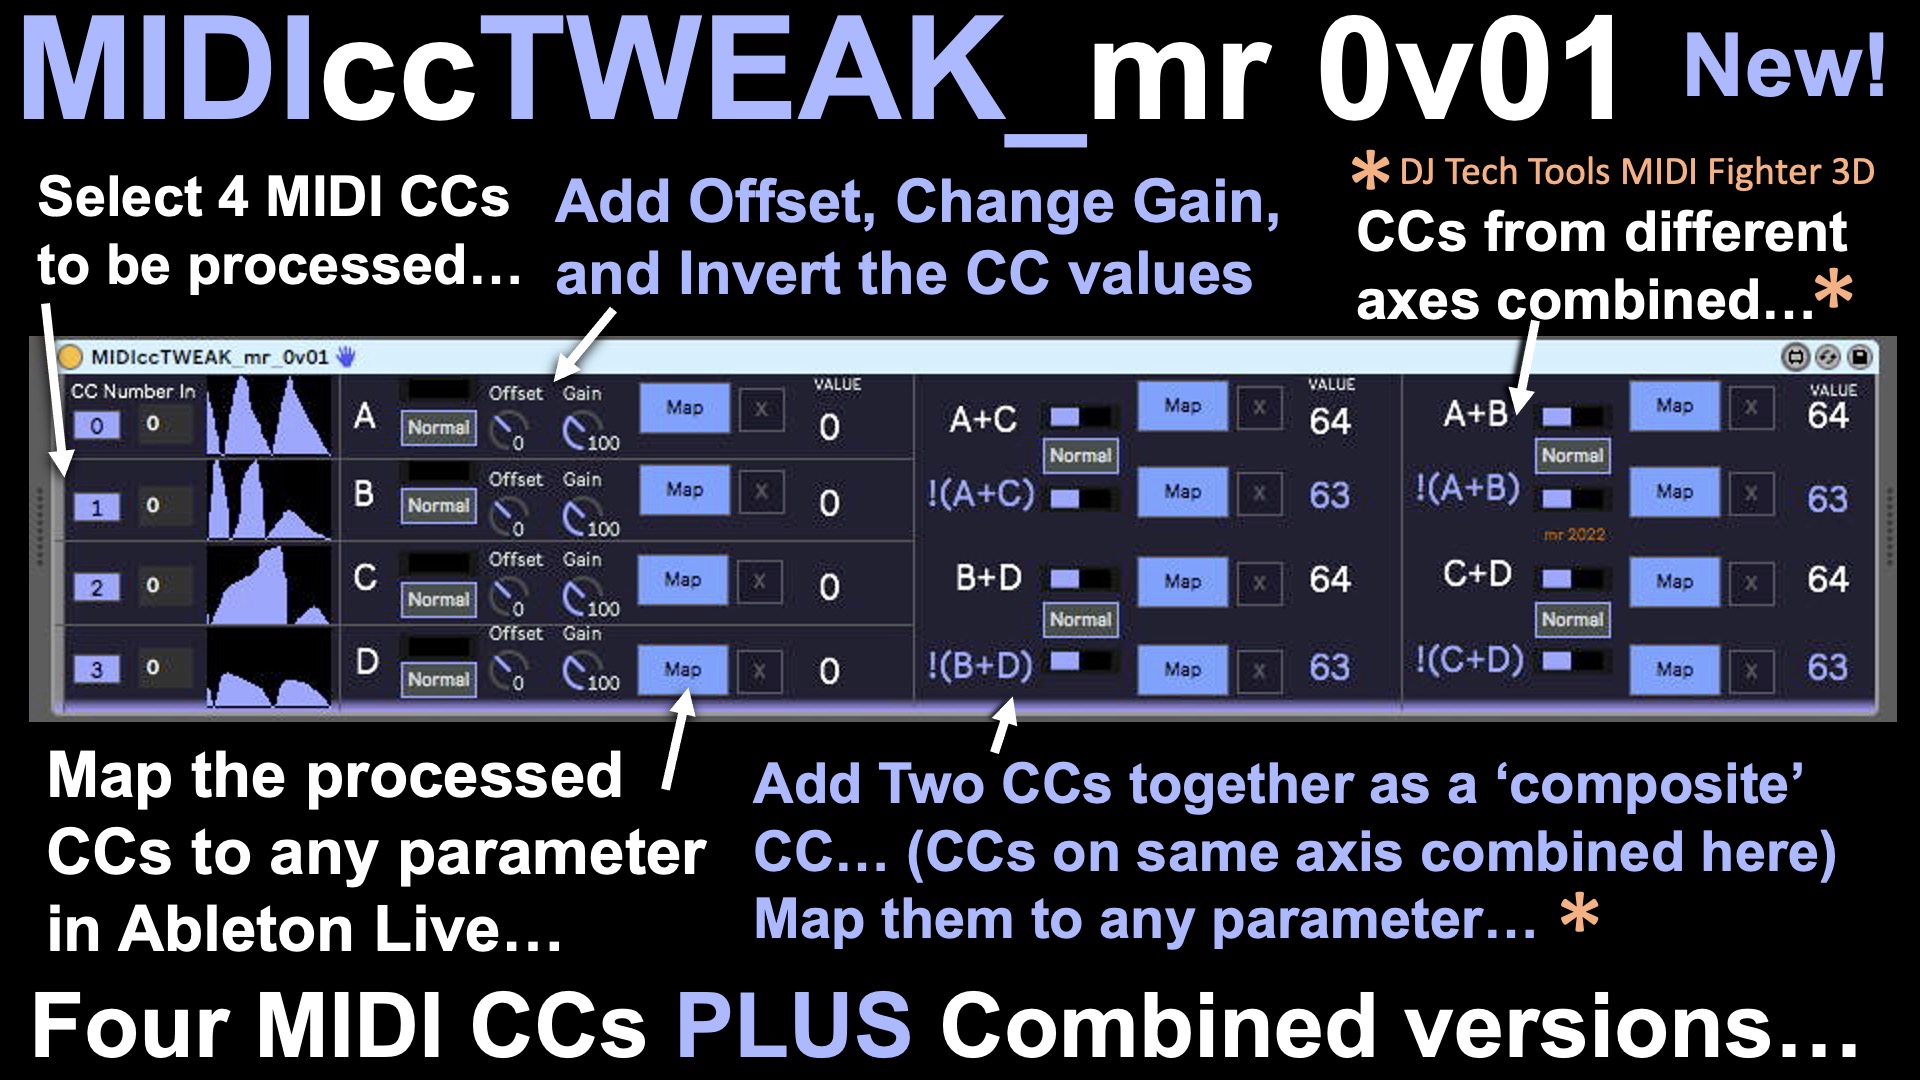
What can the MIDIccTWEAK Utility do?

The MIDIccTWEAK Utility can be downloaded from MaxForLive.com...

Inside the M4L code...

A couple of interesting things came up whilst programming MIDIccTWEAK, although neither of them are clever or unusual, which is usually when I include more details. Nope, in this case it was an interesting option and a potential trap for the unwary. Here's a fragment of the M4L code:
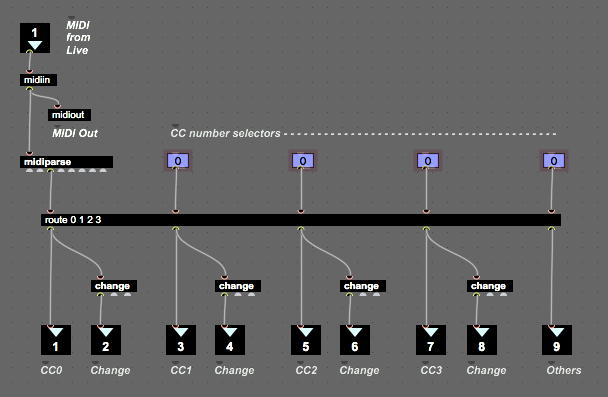
Part of the M4L 'code' for MIDIccTWEAK...

Now, most of this is perfectly ordinary: a MIDI In (...and an Out to provide a 'Thru' to the next MIDI device in the chain...), a MIDI Parse object to decode the MIDI messages, and a Route object to extract just the MIDI CCs that we are interested in. But note those 'change' objects - this was me testing out an idea to try to ensure that the MIDI bandwidth consumed by Controllers was minimised. The 'change' object filters out any repetitions of the same number, and so this code was imported from a prototype M4L device where I was monitoring several MIDI Controller hardware devices to see what their outputs looked like... 

I was expecting to see some repetitions of the same controller value in the Controller Messages, and yes, I know that the alternative name for Continuous Controller messages is 'Control Change' messages, but I was still curious to see what actually happened. It turns out that everything that I looked at sent streams of messages of changes to MIDI Control values, and even when the faders, rotary controls, levers, and other physical controls where moved very slowly, then repetitions were still filtered out just about all of the time. In the past, I have seen at least one Mod Wheel where careful positioning of the wheel would produce continuous messages with two slightly different values, but not recently. I have talked about this before in this blog, but it is always interesting to see just what the difference in values (the 'delta') is in reality. Theoretically, it should be one, but this uses lots of MIDI bandwidth, and rapid changes of controller value are going to create long streams of controller messages that will just clog things up. So a more sensible approach would be to send controller messages at fixed intervals of time, so that there is lots of detail for slow movements, and less detail for fast movements. I suspect there is a 'rule of thumb' set of values for timing, but I have never done deep enough research into this. let me know if you want me to revisit MIDI Controllers and look at this aspect of them. 

What ought to be useful about the 'route' object is the final output, where any messages that don't match a CC number are dumped - an 'else' or 'other' or 'default' output (it depends on which programming languages you are familiar with!). But I haven't ever needed a 'Controllers you haven't selected' detector. I suppose you could use it to look for unusual activity from controller numbers that shouldn't be outputting anything, but it just seems to be something that should have a use, but I haven't stumbled across it yet.

More interesting, and not restricted to only this M4L object, is a potential trap for then unwary. Look at the right most input and output - at the top, you have the number box for selecting which controller the 'route' object should be matching, and underneath, you have the 'Other' output, for when no Controller number message matches the specified numbers. Whoa! 

A potential trap for the unwary...

Actually, those number boxes, which control the matches that appear at the outputs, are offset by one horizontally - to the left (because of the input on the top of the 'route' object). The second input determines what comes out of the first output of the 'route' object, and so on across the object. Lots of MaxForLive object are like this, when you look for it, and it is one of the things that you need to watch out for, especially when you extend object boxes very wide, as here (or wider!), so that you can keep all of the parallel output paths nest and tidy. If the left hand edge is off-screen, and you only look at the right hand edge, then the number box looks like it ought to be controlling the output underneath it - so the implied connection inside the yellow circle is not correct!

The MIDIccTWEAK Utility can be downloaded from MaxForLive.com...

Multiple controls

Inside the '3D Sound Box' used in the interactive exhibit, there are additional infra-red position sensors that are used to detect side-side movement (used to control left-right panning), and vertical (up/down) movement (used to control the overall tone of the audio), so there are at least four separate independent ways that you can control things just by picking up the MIDI Fighter 3D and moving it around inside the box.

The 3D Sound Box...

You can just see the MIDI Fighter 3D resting on the raised floor of the 3D Sound Box in the photo above. 

Sound Generation

There was quite a lot of sound design behind the sounds that were produced. I wanted something subtle, sophisticated and very controllable, and I definitely didn't want to have a 'sound going round your head'-type of binaural demonstration, because those have always felt gimmicky and not very real world - I can't recall a real musical performance where position was that important or centre stage, with the exception of Tim Souster's 0dB concert at the Royal Northern College of Music in Manchester, in the late 1970s (and I was there!), where there was a lot of performing 'in the round'...

Instead, I chose a drone sound, and mapped the MIDI Fighter and the up/down sensor to changing the timbre of that sound. I used the Spitfire Audio / BT 'Phobos' polyconvolution synthesis virtual instrument to generate the sounds, inside Ableton Live. Four Source Units provided the inputs to three convolution synthesizers, with the controllers moving the four sources around in the convolution triangle. I also added a filter control so that anti-clockwise rotation changed the cut-off frequency of a low-pass filter (a cliche, I know, but it was very popular!), and added in some percussive sounds when the controller was tilted all the way backwards. All in all, there were lots of different timbres and smooth blends between them as you moved the MIDI Fighter 3D around inside the box.

I added a little bit of reverb to provide additional spatialisation, and then passed the various audio outputs into the headphones via Envelop binaural plug-ins. I used a Studiospares HAR-60 six channel headphone amplifier to drive six pairs of headphones - and Studiospares gave me an amazing deal for buying Mackie closed-back headphones in bulk!

People rapidly got how it worked! There's something about moving your hands making a sound change that activates a kinetic spatial memory thingy inside your head, and when the changes are complex and involving, then you get lost inside the soundscape. In a world where people don't seem to listen hard to music any longer, it was amazing to see people concentrating on what they were hearing. one pair of headphones was used by the 'driver', whilst the other headphones allowed other people (parents, friends, etc.) to listen in. In many cases, passive listening resulted in them wanting to 'have a go' as well!

Talking to parents, they were expecting 120 bpm, 4/4 EDM, and were totally surprised that someone would instead demonstrate something which was subtle, deep, sophisticated and sounded high quality - I explained that the core of the sound came from one of the top sample library companies in the world… So the sound design that I did worked very nicely. Kids (and their parents) loved the exhibit - one family said that it was the best thing they had seen (heard!) all day! 

Outreach

The success of an interactive exhibit like this is about reaction at the time, and then about follow ups. In the two days, I got huge numbers of smiles ('This is the first time I've seen a smile like that for ages!' was one parent's comment...) and a universal 'Cool!' reaction from just about everyone, especially young kids. I have been invited to schools to do more demos, asked by a local media group if I would be interesting in a collaboration, and the local university is also interested in talking to me more about this type of interaction and how to programme it. 

So, my grateful thanks to Spitfire Audio and BT for Phobos, because it was a key part of a very successful exhibit that may well have influenced more than 100 young minds into thinking about sound in a different way. Also thanks to Ableton for Live, and especially MaxForLive, a toolkit that I use all the time! Thanks to the amazing guys at DJ Tech Tools for their MIDI Fighter 3D controller. Thanks to Studiospares for a beautifully thought-out headphone amplifier. And finally, thanks to Envelop for making spatial audio so accessible in Ableton Live! Oh, and thanks again to BT (the telco) and Innovation Martlesham for making this all possible!

---

If you find my writing helpful, informative or entertaining, then please consider visiting this link:

Synthesizerwriter's Store (New 'Modular thinking' designs now available!)

Buy me a coffeeBuy me a coffee (Encourage me to write more posts like this one!)... or...

Buy Me a Coffee at ko-fi.com (Encourage me via a different route entirely...)

Or just tell someone else that there's this amazing blog about hi-tech music...


Saturday, 17 July 2021

A Doubly Virtual Talk...

I recently gave a talk to my local tech network. You.know, those things that used to be get-togethers and networking events for tech people, entrepreneurs, start-up people, innovators, inventors, etc., and that people discovered you could do using Zoom during the pandemic. And they obviously work, because we are still doing them.

Anyways, a casual comment I made at one of these tech chats turned into a talk about one of the things that I do, inspired by by soundtrack entry in the famous Westworld competition organised by Spitfire Audio a couple of years ago. It seems that there's a lot of interest in how current technology can make working with audio and music a lot easier than it was in the previous century, and so I just basically did a bit of show and tell...

Remember 'big presentations? Photo by Sigmund on Unsplash

Now when I say 'show and tell', I do mean exactly that. I never wanted to do yet another boring slide presentation full of slides with bullet points. But just watching someone share their screen for an hour is also not so great - I've been in quite a few zoom calls where person after person shared their screen and worked on software, and after watching someone else tweaking MaxForLive for a while, you kind of want to do some programming yourself. Probably my least favourite calls have been the ones where a series of musicians talk for about 30 seconds on some of their techniques, and then spend 20 minutes doing DAWless improvisation. It's the inevitability of it - you get 30 seconds of interesting information, and just when you start to learn about a technique that might be useful, they say: '...and here's a track I put together using a different approach...'. Cue 20 minutes of doodling...

So, no slides, no bullet points, and not too much boring screen sharing. It's a challenging recipe. So I used online videos (mostly YouTube, although I subscribe to Nebula and love it, but YouTube has the advantage of being accessible (and I'm struggling to think of any other advantage...)), web-pages instead of photos 'from the internet', and yes, some screen sharing where I avoided any code and concentrated on showing interactive arranging stuff. 

At the end of it, I thought that I should capture it, so that others could have a similar experience, and so the rest of this blog is just the resources that I used, minus the potentially boring screen sharing where I probably droned on about doing music for pictures. So you get just the good stuff to browse through as you wish, and that's all upside, as far as I can tell... 

(When I type: 'Just the good stuff', there's a caveat, but you probably know that already - you have to wade through me adding all of these explanatory words. Unless you just ignore my words and click on the videos, of course...)

"And now, over to Martin..." <screen goes black>

Resources...

To set the scene, I used an opening music clip - 'Journey across the Red Planet', an excellent piece of music from Paul Thomson, which demonstrates some of the sounds from the Spitfire Audio 'Abbey One library. (Paul is one of the two founders of Spitfire Audio, a cutting-edge UK ‘sample library’ company: https://www.spitfireaudio.com ) I explained that 'everything you are hearing is produced by a computer, using recordings of real instruments'.

I suggested that they should close their eyes for a minute or so, listen(!), then open them and look for the connections between what was happening on the screen and what they could hear. The video shows a DAW (Logic) playing the music, and so you can get some sense of how a DAW uses lots of individual tracks of virtual instruments to reproduce music, and there were piano rolls and MIDI Controller editing shots that illustrate that there's a lot of fine detailed control. Overall, the linkage between the music and the video is pretty effectively shown, but then Spitfire Audio do make vey good videos. So, yes, I started with virtually an advert for Spitfire Audio, but then I do have quite a few of their libraries, LABS instruments and a lot of the associated Pianobook.co.uk instruments, so I'm slightly biased. If you've read this blog for any time, then you will have seen that I've been to various events at their HQ (back before Pan Demic and her band put the world on pause for a while...) and I've met Christian Henson and Paul Thomson... (But do they remember me?)

Anyways, the music and the video serve as that all-important bridge, where you leave the real world, and enter the artificial world of 'the talk'. I've never liked the idea that putting up a slide that shows the title of your talk, followed by another slide that tells your life achievements in bullet points, is the perfect way to move people out of their default mind-set and into one where they are ready for fully engaging in a presentation. Closing your eyes and listening helps too, and it often puts any older members of the audience to sleep, so they can't ask tricky questions about DIN sync in the 1970s.

Anyways, I introduced virtual instruments, and how they replayed recordings of real instruments. Or unreal instruments, and so I showed them my BankOSC MaxForLive device that makes 32-oscillator drones and sweep sounds, and basically makes it sound like you have a humungous hardware modular synth, when actually you must have Ableton Live and a free bit of software that I published on MaxForLive.com.


I explained that quite a lot of the non-orchestral sounds that I used in my Westworld competition entry were produced using BankOSC, and I then talked very briefly about MaxForLive, and then Ableton Live.

I've already mentioned adverts, so you won't be surprised that I told them they could read more about the sound generator in my blog:

BankOSC

I found some good links that explain MaxForLive and Ableton Live, curiously made by Ableton themselves:

MaxForLive 

Ableton Live 

I explained that there are many types of software applications for working with audio, but the terminology that they will probably often hear in music technology circles is ‘DAW’ which stands for Digital Audio Workstation. I said that a DAW is a general purpose music composition and arranging tool that works a bit like a multi-track tape recorder – which is what used to be used in recording studios in the 80s…  I'm quite sure that some of the audience had no idea what a multi-track tape recorder was, whilst some others were probably reminiscing about the 80s and remembering 'Duran Duran' music videos...

For comparison with how you might generate that sort of 'big oscillator' sound in hardware, I should have introduced one of the leading lights of the YouTube ‘Synthesizer’ community, giving an introduction to the vast world of hardware modular synthesis:


But I have the advantage of being able to incorporate it seamlessly here, and no-one will know the difference.

I quickly introduced more relevant terminology in a bot more depth:

Sample Libraries 

(Collections of pre-recorded sounds, where each note that a musical instrument can produce has been captured by a computer, whilst playing it in various ways: soft to loud, different intonations and playing techniques, etc.)


Virtual Instrument 

(The software that plays the sounds of a musical instrument in a sound library.)


And finally, I got to the Westworld competition – where the task was to score a short excerpt from Season 3 of the TV series.


I mentioned my entry:


And I mentioned the winner:


I then revealed that if they were intrigued by just how accessible making music on a computer can be, then a good starting point is an orchestral library (Because the results are probably going to impress parents, friends, colleagues, maybe even ordinary people!) – and some of them are free:


Okay, so I mentioned another free (or low cost) Spitfire Audio product. But I bought Discover, and I like it. There are other free (and non-free) orchestral libraries, of course. 

I closed by reminding them that, whilst laptops (and other computers) may be busy making a lot of music, orchestras are also very occupied doing live tours (often of music produced by computers), making sample libraries - and just making music. And let's hope that as the world learns to live with Covid, 'music' and 'live' and 'performance' can happen in the same sentence once again. 

And that's it. A virtual presentation, made from other virtual presentations. This may be the future...

---

If you find my writing helpful, informative or entertaining, then please consider visiting this link:

Synthesizerwriter's Store (New 'Modular thinking' designs now available!)

Buy me a coffeeBuy me a coffee (Encourage me to write more posts like this one!)


Tuesday, 24 November 2020

DJ Tech Tools MIDI Fighter Twister - Showing Bank Titles and Labels via Max For Live in Ableton Live

In the run-up to Black Friday, lots of companies now do previews of prices, and so I recently visited my usual 'go to' source of coloured cables and knobs: DJ Tech Tools, to see what they had. I ended up buying some neon orange 'Chroma Caps' replacement knob caps, plus a MIDI Fighter Twister to join my MIDI Fighter 3D that I bought at a previous preview. (Dangerous things, previews!).

Now if I didn't already have a 'button masher' MIDI Fighter 3D (and wanted to have a 'matching pair'!), then my fallback solution for 'lots of rotary MIDI controllers in a box' would have been the Faderfox EC4. The EC4 is more expensive, but has little OLED displays for each control, so that you can label them. Which set me thinking...

After a bit of programming, I produced a new Max For Live plug-in, with the snappy title of 'MIDImftLABELSfloat' that provides a floating window in Ableton Live which gives you named banks and named labels for each rotary control, plus a way to set the colour of the little colour-bars in the window. (- and ONLY the window. I didn't manage to decode the colour mapping that the MIDI Fighter Twister uses, and so sending the commands to set the colours in the MIDI Fighter Twister will have to be a future enhancement, if I ever find the time...). 

To set the colours LOCALLY in the plug-in, you use the little grey number next to the coloured rounded box under each almost-square box (with the user-editable text inside!). Select it and use the cursor keys to change the colour, or drag it up and down with the mouse (as you can do with all Ableton values...). What I do is set them to more or less the same colours as on the Twister itself, and this also serves as a useful indicator of which rotary controls are active. The mapping of colours to numbers is not obvious, and although I'm sure there is a simple algorithm that drives it, I haven't been able to find out what it is, so this version gives you the default mapping... Sorry.

As a not-very-well-hidden additional control, the little grey number on the left hand side, nestled at the end of, and in-between the second and third rows of boxes, is a 'global colour' control. Select it and use the cursor keys, or drag it up and down with the mouse, and all of the 16 colour boxes will change. Now, if I was Pioneer DJ (okay, now kind of Toraiz as well), then I would take a cue from the SP-16 and make these boxes really big and bright...

In the course of developing this plug-in, I discovered something that I didn't know about how Ableton Live handles MIDI messages, and had to solve some interesting problems in Max For Live. 

MIDI Routing...

I tend to be an experimentalist rather than a documentation reader, probably as a result of many years of discovering that hardware data sheets often have errors. So the first thing I did was decode the MIDI messages that the MFT (henceforth abbreviated to MIDI Fighter Twister in this post) sends when you move between banks using the little middle buttons on the sides of the MFT. The documentation says that the MFT sends a MIDI Controller 0 off message, followed by a MIDI Controller 1 On message when you switch from Bank 1 to Bank 2, etc. So I initially unpacked the MIDI Controller Output of a 'MIDIparse' object, and then tried to figure out how to detect pairs of numbers like the 0 0, 1 127 sequence that I mentioned previously. Eventually I realised that automatically unpacking the pairs of numbers wasn't the best approach, and I removed the 'unpack' object and used my new favourite object, the 'zl compare' string comparison object. one thing that I don't like about the 'zl compare' object is the need to send a bang to message boxes to get an output from the zl, and so I over-use 'button' indicator objects as usual. 

The final patch is shown above, although it is encapsulated in the real thing. Showing everything in one place makes it easier to see what is happening. The 'sel 1' object converts the 'zl compare' output into a bang which forces a '1' out of the message object and this goes into another message box that is usdto display the Bank number. The middle part (around the 'zl compare') is repeated four times to detect 0 127, or 1 127, or 2 127 or 3 127 for the four bank switches. I know that I should have detected the full Off and On sequence of messages, but this worked okay. Actually it doesn't work perfectly because Ableton Live rechannelises all incoming MIDI to Channel 1, and so if you do too much rotary controls twisting in Bank 1, then you can confuse the plug-in. I tired in vain to figure out how to detect the full 0 0, 1 127 sequence, but didn't have any success. I may drop Cycling '74 a support question about how to do this, because I couldn't get it to work...

I also decoded the 16 rotary control MIDI Controller messages so that I could indicate which rotary control was being twisted... I used '% 16' modulo arithmetic to decode all four banks, but then I ran into my standard 'display' problem. I've talked about this before with the dual step sequencer, but in this case I needed a variation: something that would highlight a 'panel' object border when that rotary control was being twisted, and that would un-highlight it when any other rotary control was twisted. The standard technique to achieve this is to have two different message objects that send the highlight and un-highlight commands to the 'panel' object. So here's the essential parts of the encapsulation that I produced:


As before, I'm only showing two of the 16 sections. As I've rediscovered many times, there's a 'trap' in the 'sel' object - the left hand output sends a bang when the input matches the number following the 'sel', but the right hand output is the number that doesn't match, not a bang! I know with absolute certainty that I will forget this again, because I keep doing it! So that's why I use a 'button' indicator object to convert the number into a bang so that it triggers the message output. As it turns out, for many applications, having the number as the 'doesn't match' right output is very useful, and actually that's what some of the 'zl' comparison objects do... 

With the bank selection and control decoding done, I then mapped a few of the rotary controls to some parameters, and the decoding of the controls stopped working - just for the mapped controls. Now I have never looked at the Ableton M4L documentation in great detail, so I did some confirmation, and realised that when a MIDI Controller is not mapped to a parameter, then it appears in Max For Live, but when it IS mapped, then it does't appear in Max For Live. I bet this is in the documentation! Anyway, here's some diagrams that explain it in pictures (I like pictures!):


 Above is what I was doing when I first tested the decode patch. The MIDI Controller messages go into Ableton Live, and then into Max For Live...


 Above is what seems to happen when a parameter is mapped to the MIDI Controller - it no longer gets sent to Max For Live (or at least, it doesn't for me!). 

Doesn't Do Anything!

Yep, that's more or less correct. Apart from the Bank select tracking, the colour indicators, and the rotary control decoding, the MIDImftLABELSfloat plug-in doesn't do anything other than show a floating window with some user-editable text in it. In terms of MIDI or audio functionality, it is probably the least functional M4L plug-in that I have made, but I find it useful, because I'm always forgetting what I have mapped to what with all of my MIDI Controllers when I come back to a project some time later. I may make more versions of it for my other MIDI Controllers... 

Plus, whenever my mind spends time with something, it tends to come up with something different, and that's exactly what has happened here. So expect something eventually... I'm struggling with an M4L project at the moment - it is much harder than I thought, and I've been trying to find ways to do stuff in M4L that I haven't done before... But that's another story and another blog post, and there's part 4 of the 'Single Cycle Waveforms' series to finish as well...

Getting MIDImftLABELSfloat

You can get MIDImftLABELSfloat here:

     https://maxforlive.com/library/device/6726/midimftlabelsfloat

Here are the instructions for what to do with the .amxd file that you download from MaxforLive.com:

     https://synthesizerwriter.blogspot.co.uk/2017/12/where-do-i-put-downloaded-amxd.html

(In Live 10, you can also just double-click on the .amxd file, but this puts the device in the same folder as all of the factory devices...)

Oh, yes, and sometimes last-minute fixes do get added, which is why sometimes a blog post is behind the version number of MaxForLive.com...

Modular Equivalents

In terms of basic modular equivalents, then implementing MIDImftLABELSfloat is quite tricky - there's very little applicable functionality to translate across. You could use a MIDI processor to detect the Bank Select or rotary control messages, but I'm not aware of any obvious ways to store general text messages. So I'm going to declare this as an ME of zero. Pencil and paper storage is probably the way to go for modular, (and definitely 'analog' as well!) or maybe a mobile phone photo as 'instant documentation'.  

---

If you find my writing helpful, informative or entertaining, then please consider visiting this link:


Synthesizerwriter's StoreSynthesizerwriter's Store
 (New 'Modular thinking' designs now available!)


Tuesday, 29 September 2020

Selecting different effect paths in an Ableton Live MIDI Effects Rack...

The 'Racks' in Ableton Live are very neat solutions that contain a lot more functionality than you might think at first glance. The obvious application for the Audio or MIDI Racks is to put several effects in series into a rack, and then assign Macro Controls to specific important parameters in those effects, and then hide the effects leaving just the macro panel visible.

A simple example first...

Here's exactly this process for a very common set of MIDI Effects. 

The first effect is the 'Random' MIDI effect, which is being used to add an offset of -12 or +12 semitones to the incoming MIDI note number, with a 50% probability (so half of the time, the incoming note will be unchanged, and half of the time it will be transposed up or down by 1 octave). 

This is followed by the 'Velocity' MIDI effect, which is adding a random number (up to 29) to the MIDI velocity of the incoming MIDI note. 

The overall result of these two MIDI effects is to produce random inversions of chords (or transpositions of individual notes), with random 'voicing' (relative differences in timbre or volume caused by the velocity). This is very useful for string or synth pads, making it sound like the part, and the playing of that part, is much more complex than the contents of the source clip! 

To store these two MIDI effects as a single device, you just insert a blank MIDI Effect Rack into the track strip:


The MIDI Effect Rack will initially have no effects in it (just a grey bit in the middle), so you just add the two effects to the empty 'Drop MIDI Effects Here' area in the middle.:


Which gives us a neatly encapsulated effects 'chain' that can be named and saved, and re-used whenever pad 'sweetening' is needed. 

On the left hand side, there are some button that control which parts of the MIDI Effect Rack are visible. If we turn on the top button:

...then the left hand side opens up and we see the Macro Controls:

The Macro Controls have all been mapped here. So let's look at how that works. Some of the controls in the effects on the right hand side have a small green dot, and this means that they are actually controlled by one of the Macro Controls. 

All that you do ito set this up s click on the control on the right hand side (four little corners appear around the control) and then right-click on it. A pop-up menu appears, and you just select the appropriate Macro Control:

Because the mapping to the Macro Control is already set up, the highlighted option here says: 'Unpam from Chance'. If you were doing this from scratch, then it would say 'Map to Macro 1', much like some of the other menu options shown.

Once you have mapped the effects controls to Macro Controls, you can colour and name the Macros. If  you click on the middle button on the left hand side, you will see this:


The middle button unhides the middle section of the window, and it contains some buttons, then a large box called 'Chain', which represents the chain of effects over to the right, and then another empty grey space with 'Drop MIDI Effect Here' - just like where we added the two MIDI Effects right at the beginning of this blog post. Clicking on the middle button again will hide this centre section.

Finally, you can click on the lowest little button on the left hand side, and the effects will be hidden:


(You can see that the lowest button on the left hand side is no longer yellow!). 

And that's it! Two MIDI Effects turned into a useful composite effect that you can grab from Live's browser and insert on any pad track that needs inversions and velocity processing.

There's more...

But there are more advanced ways to use Racks, and this is where people seem to have problems. The metaphors used in the Racks appear to have been strongly influenced by the way that samplers manage samples: velocity switching ('Vel'), and the note range that a sample is assigned to ('Key'). But the 'Chain' button uses a different mind-set - kind of like multiple Racks that you can switch between. 

Now I have already used the word 'chain' to describe those two MIDI effects placed one after the other in the Rack - 'in series' is how techies describe this arrangement. But MIDI Effect Racks allow you to have more than one chain inside them...

Remember how the middle section had a 'Drop MIDI Effects Here' underneath the large 'Chain' box? Let's see what happens when we do that...

I'm not going to repeat the previous effects. Instead let's start by just making some chords:


This chain of two MIDI Effects uses the 'Chord' MIDI effect to generate a triad of three notes to make a Major chord based on the root note input from the Clip, followed by the same 'inversion generator' effect as before, using the 'Random' MIDI Effect. The 'Random' MIDI Effect is polyphonic, so when you pass the three note from the chord through it, it will apply the random inversion to each of the three notes separately. After the Rack, there's one of my MaxForLive note monitors, showing an inverted C Major chord, and then a Collision Instrument to make a sound.  

If we now click on that middle button, the middle section unhides, and we get the 'Chain' box with the 'Drop MIDI Effects Here' grey area underneath:


I have renamed 'Chain' to 'Major' because that box represents those two MIDI Effects that are producing inverted Major chords.

Next let's alter one of the MIDI Effects:


Above is another chain showing the same two MIDI Effects, but this time with the 'Chord' MIDI Effect set so that it produces a Minor chord. If we drop these two MIDI Effects into the grey 'Drop MIDI Effects Here' area, then we get this:

A second large box appears underneath the 'Major' box that used to be called just 'Chain'. I have renamed this new box 'Minor' because it contains the 'Chord' MIDI Effect that creates minor chords. I have also mapped across the Chance and Sign controls to Macro Controls on the left, and aded some colour. I have also added a 'Chord Maj Min' control because that seems like what we want to end up with... but what do we map to it?

Before we look at that, let's see what is happening inside this MIDI Effect Rack... 


In the above diagram, I have shown the two large chain boxes (Major and Minor) and how they map to the two chains of MIDI Effects. You don't actually ever see a view like this, but it shows how there are two chains in parallel.

What do those two chains do, and what are those controls to the right of the large boxes with 'Major' and 'Minor' in? There seems to be a loudspeaker button, a 'Solo' button, a 'Refresh' button, and a bar-graph like the ones in MIDI tracks. If the Major chain is soloed:


Then the output of the Rack is Major chords.

If the Minor chain is soloed:


Then the output of the Rack is Minor chords.

So only one chain can be active at any one time, which makes sense! But how do we control these two chains. Mapping the solo buttons doesn't work, of course!

The answer lies in the 'Chain' button. As I noted earlier, the 'Key' and 'Vel' buttons seem to be influenced by samplers, since in other Racks they deal with key ranges and velocity switching, but clicking on the 'Chain' button opens a similar looking section to the ones for 'Key' and 'Vel'...


Now it isn't immediately obvious what to do, but it looks a lot like the 'Key' range control, so if we assign the two ranges to 'Major' and 'Minor' then it looks like this:


Unlike the 'Key' section, the numbers at the top go from 0 to 127, which looks like a MIDI range, and there's a light blue highlighted box for the '0' (zero) position. If you right-click on this box then you get  a pop-up:


'Chain Selection Filters MIDI Ctrl' tells us that this is a control for that 0-127 range. Also notice the 'Distribute Ranges Equally' - you can use this to set the ranges like this if you want... If we map this to that pre-defined Macro Control (Macro 5), then we get a result that looks like this:


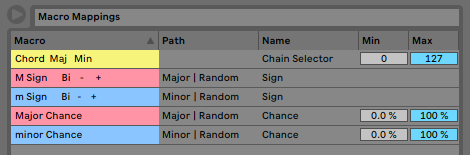
Here are the mappings that have been added:

So the 0-127 horizontal bar in the 'Chain' view is for a 'Chain Selector', which means that when the value is from 0-63, then the Major MIDI Effect chain is active (soloed), and when the value is from 64-127 then the Minor MIDI Effect chain is active (soloed!).

So now we have a MIDI Effect rack which produces Major or Minor chords, with random inversions. But how can we automate the Major/Minor selection? You could map an LFO to Macro 5, but another way is to use a Clip Envelope (My Favourite!):


This Clip Envelope is mapped to 'Chord Major Minor', which is the mapping name for Macro 5, that controls the Chain Selector. So this clip envelope plays a Major chord first, then a Minor chord. You can, of course, change the clip envelope to suit when you want the chord type...

More chains!

Adding more chains just requires more dropping of MIDI Effects in the 'Drop MIDI Effect Here' area, and the setting of separate ranges in the 'Chain' view. Here's an example I prepared earlier:

Again, this isn't what you would actually see on screen!

Files


Downloads for the example Racks featured in this blog post (plus previous Racks) are available here.

---

If you find my writing helpful, informative or entertaining, then please consider visiting this link:


Synthesizerwriter's StoreSynthesizerwriter's Store
 (New 'Modular thinking' designs now available!)


Friday, 10 July 2020

16 steps is not Old School...

The Liverpool Empire theatre - a classic rock venue in the North of England (which is kind of in the middle of the UK, curiously...). The 1970s. An impressionable teenager goes to see Tangerine Dream. Dry ice, mist curtains. LOUD! Edgar Froese does a guitar solo and maybe, almost maybe, acknowledges the headbanging crowd of long-haired, bejeaned youths. The lasers are turned on the mirrorball and the audience gets the full 'spoke effect'! Oh, and there's a lot of 8-bit sequences. Yep, that was me. It was a very different world to the one we inhabit now.

Different? Well, we have 16-step sequencers now, and so it gives me great pleasure to announce the release of MIDIdifferentTWO16, which doubles the number of steps, shuffles and skips, turning the 'Old School' 8-ness into 21st Century 16-ness. Oh, and we now have DAWs, and putting a sequencer inside a DAW is allowed. Oh yes, is it allowed! Dit dit dit dit boom tizz dit dit boom tizz dit dit... (Did you know that Zang Tumb Tumb came much earlier, as well as later, as ZTT...)

16 steps to heaven...

There's a hidden difference in this dual step sequencer from version 0.07 of the 8 bit original. It now has two rotary controls to set the lengths of the sequences. The previous version used up/down nudge buttons and looked cool. I loved it (or I lived it, as my iPhone auto-corrects it to). But then I realised (sinking stomach) that it was tricky to map what Ableton call a 'control voltage' to the Step Length, because I had used the live.tab object to implement the nudginess. Rotary controls are sometimes better!

8 steps to heaven..
And yes, I do know that Ableton's MaxForLive developer guidelines do say that devices should not be wide! But my Probably sequencer is way wider than either of these...

The Advert


Hopefully, by now, this style is starting to take on a life of its own. I've made quite a lot of versions of this infographic up to now, and there are more on the way...

Getting MIDIdifferentTWO16

You can get MIDIdifferentTWO16 here:

     https://maxforlive.com/library/device/6443/mididifferenttwo16

Here are the instructions for what to do with the .amxd file that you download from MaxforLive.com:

     https://synthesizerwriter.blogspot.co.uk/2017/12/where-do-i-put-downloaded-amxd.html

(In Live 10, you can also just double-click on the .amxd file, but this puts the device in the same folder as all of the factory devices...)

Oh, yes, and sometimes last-minute fixes do get added, which is why sometimes a blog post is behind the version number of MaxForLive.com...

Modular Equivalents

In terms of basic modular equivalents, then implementing MIDIdifferentTWO16 is just two step sequencers, giving an ME of 2 if you can find 16-step sequencers, or 4 if you can only find (or afford) 8-step. It all depends on how GAS affects you, I suppose. The ability to control step values and skips may vary with the specific sequencer, but if implemented, then it is just more patch cables. As I said for the 8-step version: perhaps MEs should also include some sort of measure for the number of patch cables that are required?

---

If you find my writing helpful, informative or entertaining, then please consider visiting this link:


Synthesizerwriter's StoreSynthesizerwriter's Store
 (New 'Modular thinking' designs now available!)