
Showing posts with label Spitfire Audio. Show all posts

Saturday, 4 June 2022

Outreach - What I try to do for education...

Yep, I do other things! This blog is only part of my outreach activities...

Synthesizerwriter at the Suffolk Show 2022 (The badge is deliberate - the 2020 and 2021 shows didn't happen for some reason...)

For the last day of May, and the first day of June, 2022 (that's the 31st of May and the 1st of June, just to be sure...), I was at the Suffolk Show, on the 'Innovation Martlesham' technology innovation stand (huge thanks to BT (the telco, not Brian Transeau)), trying to inspire young minds to take up a career in technology. My aim was to get kids to think about sound in a different way, and so I had a ‘3D Sound Box’ interactive exhibit, where you put your hands into a box, moved a controller around, and put some headphones on (with other people listening in on other headphones (parents, siblings, etc.)). As you moved the controller, the sound changed in subtle and complex ways, and the reaction was uniformly amazing - eyes opened wide, smiles appeared on faces, and parents ended up dragging the kids away some time later. ‘Cool!’ was the standard comment.

People totally comprehended that when you moved the controller so that it pointed in a particular direction, you get a particular sound, and that you could blend from one sound to another by moving the controller to another position. Several people said that they were expecting just a few sounds and a simple mix between them, and they were not expecting a complex morphing from one sound to another...

Behind the scenes, a DJ Tech Tools MIDI Fighter 3D provided the position controller, with two additional infra-red position sensors providing Left-Right and Backwards/Forwards control. The position vectors were fed into Ableton Live, where a custom MaxForLive script changed the rather strange outputs into more understandable controls suitable for controlling parameters (The MIDI Fighter 3D is designed for finger drumming!). These parameters were then used to control the positioning of the four source units in the convolution triangle in Phobos from Spitfire Audio (and BT, (Brian this time!)!) (I use a lot of stuff from Spitfire Audio!). Ableton was sending a C3 drone note to Phobos, and it was set up to produce very different sounds for each of the extreme positions, with Ableton also adding a controlled low pass filter on one axis. The output of Phobos was then tweaked further, ending up in the Envelop Spatial audio plug-in, and the final audio was delivered to stereo headphones using binaural processing. The convolution synthesis in Phobos was a key part of making this different to ‘four sounds in space that you mix between’ - which is what was apparently expected. (A couple of people wanted the standard ’sound rotating around your head’ binaural demo, so I had a Live Set for that as well!)

The MIDI Fighter 3D

The DJ Tech Tools MIDI Fighter 3D MIDI Controller

The MIDI Fighter 3D is a finger drumming MIDI controller that has 16 expensive, high quality, 'arcade-console' style buttons/switches that are designed for long life and consistent operation in punishing situations - several millions of pushes (5 million+ in this case). Elektron have similar switches on their gear where the buttons are going to be 'mashed' a lot in normal use. In contrast, ordinary 'click' switches are small, very low cost, and are made of a metal dome that collapses when you press it, and have a life of a few tens of thousands of clicks for the cheapest, with over a hundred thousand clicks for the more expensive versions. 

(The rubbery buttons that you find on a lot of gear are called membrane switches, and here the flexible bit deforms when you press it, which pushes a piece of conductive plastic (containing lots of carbon, so it looks black) onto a printed circuit board, and so makes a connection. These are very low cost, are easy to light up with LEDs, and are easy to replace (you just replace the sheet of flexible stuff and all those little blobs of conductive plastic), which is a good thing because they can wear out with a lot of use, and they don't like dust or ash or powders, and they are not very consistent in operation - you know how some of them can deform is strange ways, and sometimes get stuck? As for computer keyboard switches, then that's a whole topic all to itself!)

But this isn't a blog on switches! What the MIDI Fighter 3D also has, and the reason for the '3D' part of the name, is a 3D accelerometer which can detect movement on 3 axes: x, y and z. There are several modes of operation, but the one I used was the 'Edge Tilt' mode.In this mode, if you tilt the MIDI Fighter 3D, then it outputs MIDI Continuous Controller / Control Change (CC) messages that indicate how much it has been tilted relative to each of the four bottom edges. 

Rotation on the right hand edge...

So for the right hand edge, CC0 (zero) outputs a value of 0 (zero) when the MIDI Fighter 3D is horizontal (on a table, for example), and 127 when rotated clockwise by 90 degrees, so it is vertical.

Rotation on the left hand edge...

The left hand edge is similar, except that this time it is CC2, and it is anti-clockwise rotation that outputs a value of 0 (zero) when horizontal, and 127 when vertical. There is a small 'dead zone' (settable in the Utility software (Mac and Windows) that lets you set a range where small tilts from the horizontal do not output CC messages. 

For finger drumming applications, where you place the MIDI Fighter 3D on a surface and tap the buttons, then tilting the box along one of the edges feel very natural, and the box has rounded rubber feet that make this very easy to accomplish. But if you pick up the MIDI Fighter 3D, then you can tilt it in any direction, and so having the edges as the reference points doesn't make much sense. Also, you can tilt it either way because there isn't any surface getting in the way. There isn't a 'free space' mode, although there is a mode where you can also detect rotation, but that requires you to press a button each time you want to know what the orientation of the MIDI Fighter 3D is... 

So, I wrote a little utility, in MaxForLive, that takes the CC messages, and processes them so that when you hold it in your hands instead of being on a surface, then it combines the 4 controller messages (CC0, 1, 2, and 3) so that they are combined into just a pair of messages where you can go from vertical, through horizontal and back to vertical again with a single continuous clock-wise (or anti-clockwise) movement, and the result is a 'Composite' controller message that goes from o to 127 (with a small 'dead zone' as it goes through horizontal). This works for left and right, as well as forward and backwards, so you get two composite controllers.

A Composite CC made up of CC0 and CC2 (or 1 and 3)

The 'inverse' composite controllers are also output from the Utility, so you get pairs of CC messages that go from 0-127, and 127-0, simultaneously, depending on how much you have tilted the MIDI Fighter 3D away from the horizontal. Not only does this feel 'right' when you hold it in your hands, but it allows you to control two different parameters as if the MIDI Fighter 3D was a cross-fader - but one that works in two dimensions instead of just one. 

The MIDIccTWEAK Utility written in MaxForLive...

The MaxForLive Utility, MIDIccTWEAK, will work with any source of CC messages, and provides offset and gain control, plus inversion for the basic CC messages, then the paired 'composite' controllers, and finally paired 'composite' controllers using the 'other' pairing - for this application, it uses position sensors at 90 degrees to each other, instead of being on opposite sides of the MIDI Fighter 3D. That's 12 mappable outputs from the four CC sources. 
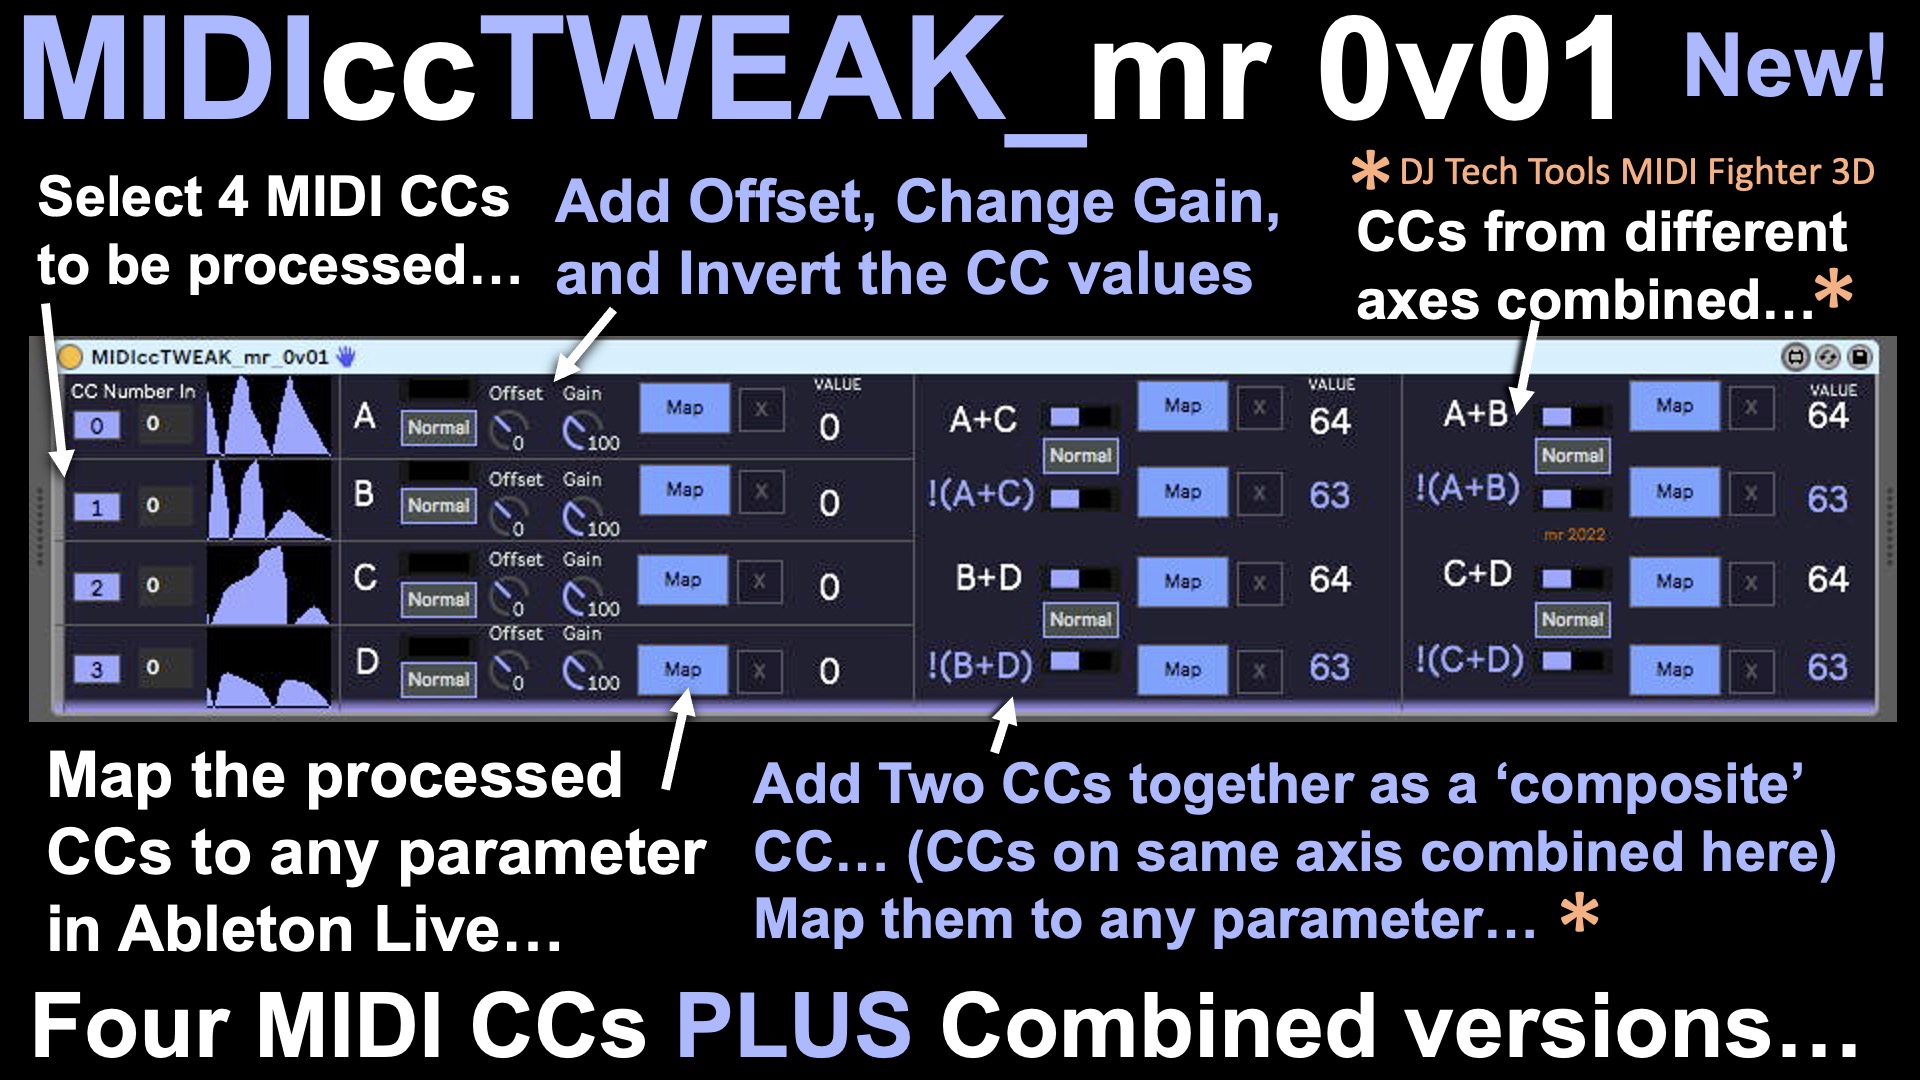
What can the MIDIccTWEAK Utility do?

The MIDIccTWEAK Utility can be downloaded from MaxForLive.com...

Inside the M4L code...

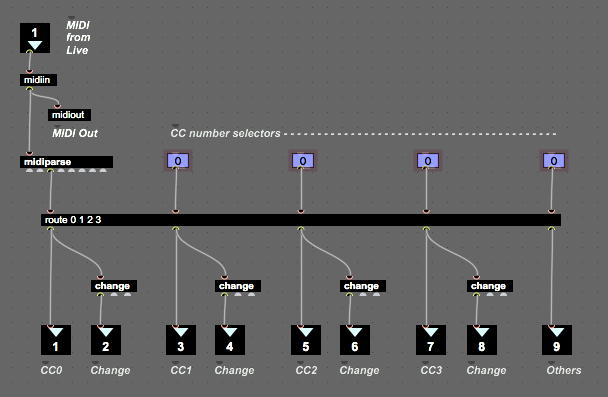
A couple of interesting things came up whilst programming MIDIccTWEAK, although neither of them are clever or unusual, which is usually when I include more details. Nope, in this case it was an interesting option and a potential trap for the unwary. Here's a fragment of the M4L code:
Part of the M4L 'code' for MIDIccTWEAK...

Now, most of this is perfectly ordinary: a MIDI In (...and an Out to provide a 'Thru' to the next MIDI device in the chain...), a MIDI Parse object to decode the MIDI messages, and a Route object to extract just the MIDI CCs that we are interested in. But note those 'change' objects - this was me testing out an idea to try to ensure that the MIDI bandwidth consumed by Controllers was minimised. The 'change' object filters out any repetitions of the same number, and so this code was imported from a prototype M4L device where I was monitoring several MIDI Controller hardware devices to see what their outputs looked like... 

I was expecting to see some repetitions of the same controller value in the Controller Messages, and yes, I know that the alternative name for Continuous Controller messages is 'Control Change' messages, but I was still curious to see what actually happened. It turns out that everything that I looked at sent streams of messages of changes to MIDI Control values, and even when the faders, rotary controls, levers, and other physical controls where moved very slowly, then repetitions were still filtered out just about all of the time. In the past, I have seen at least one Mod Wheel where careful positioning of the wheel would produce continuous messages with two slightly different values, but not recently. I have talked about this before in this blog, but it is always interesting to see just what the difference in values (the 'delta') is in reality. Theoretically, it should be one, but this uses lots of MIDI bandwidth, and rapid changes of controller value are going to create long streams of controller messages that will just clog things up. So a more sensible approach would be to send controller messages at fixed intervals of time, so that there is lots of detail for slow movements, and less detail for fast movements. I suspect there is a 'rule of thumb' set of values for timing, but I have never done deep enough research into this. let me know if you want me to revisit MIDI Controllers and look at this aspect of them. 

What ought to be useful about the 'route' object is the final output, where any messages that don't match a CC number are dumped - an 'else' or 'other' or 'default' output (it depends on which programming languages you are familiar with!). But I haven't ever needed a 'Controllers you haven't selected' detector. I suppose you could use it to look for unusual activity from controller numbers that shouldn't be outputting anything, but it just seems to be something that should have a use, but I haven't stumbled across it yet.

More interesting, and not restricted to only this M4L object, is a potential trap for then unwary. Look at the right most input and output - at the top, you have the number box for selecting which controller the 'route' object should be matching, and underneath, you have the 'Other' output, for when no Controller number message matches the specified numbers. Whoa! 

A potential trap for the unwary...

Actually, those number boxes, which control the matches that appear at the outputs, are offset by one horizontally - to the left (because of the input on the top of the 'route' object). The second input determines what comes out of the first output of the 'route' object, and so on across the object. Lots of MaxForLive object are like this, when you look for it, and it is one of the things that you need to watch out for, especially when you extend object boxes very wide, as here (or wider!), so that you can keep all of the parallel output paths nest and tidy. If the left hand edge is off-screen, and you only look at the right hand edge, then the number box looks like it ought to be controlling the output underneath it - so the implied connection inside the yellow circle is not correct!

The MIDIccTWEAK Utility can be downloaded from MaxForLive.com...

Multiple controls

Inside the '3D Sound Box' used in the interactive exhibit, there are additional infra-red position sensors that are used to detect side-side movement (used to control left-right panning), and vertical (up/down) movement (used to control the overall tone of the audio), so there are at least four separate independent ways that you can control things just by picking up the MIDI Fighter 3D and moving it around inside the box.

The 3D Sound Box...

You can just see the MIDI Fighter 3D resting on the raised floor of the 3D Sound Box in the photo above. 

Sound Generation

There was quite a lot of sound design behind the sounds that were produced. I wanted something subtle, sophisticated and very controllable, and I definitely didn't want to have a 'sound going round your head'-type of binaural demonstration, because those have always felt gimmicky and not very real world - I can't recall a real musical performance where position was that important or centre stage, with the exception of Tim Souster's 0dB concert at the Royal Northern College of Music in Manchester, in the late 1970s (and I was there!), where there was a lot of performing 'in the round'...

Instead, I chose a drone sound, and mapped the MIDI Fighter and the up/down sensor to changing the timbre of that sound. I used the Spitfire Audio / BT 'Phobos' polyconvolution synthesis virtual instrument to generate the sounds, inside Ableton Live. Four Source Units provided the inputs to three convolution synthesizers, with the controllers moving the four sources around in the convolution triangle. I also added a filter control so that anti-clockwise rotation changed the cut-off frequency of a low-pass filter (a cliche, I know, but it was very popular!), and added in some percussive sounds when the controller was tilted all the way backwards. All in all, there were lots of different timbres and smooth blends between them as you moved the MIDI Fighter 3D around inside the box.

I added a little bit of reverb to provide additional spatialisation, and then passed the various audio outputs into the headphones via Envelop binaural plug-ins. I used a Studiospares HAR-60 six channel headphone amplifier to drive six pairs of headphones - and Studiospares gave me an amazing deal for buying Mackie closed-back headphones in bulk!

People rapidly got how it worked! There's something about moving your hands making a sound change that activates a kinetic spatial memory thingy inside your head, and when the changes are complex and involving, then you get lost inside the soundscape. In a world where people don't seem to listen hard to music any longer, it was amazing to see people concentrating on what they were hearing. one pair of headphones was used by the 'driver', whilst the other headphones allowed other people (parents, friends, etc.) to listen in. In many cases, passive listening resulted in them wanting to 'have a go' as well!

Talking to parents, they were expecting 120 bpm, 4/4 EDM, and were totally surprised that someone would instead demonstrate something which was subtle, deep, sophisticated and sounded high quality - I explained that the core of the sound came from one of the top sample library companies in the world… So the sound design that I did worked very nicely. Kids (and their parents) loved the exhibit - one family said that it was the best thing they had seen (heard!) all day! 

Outreach

The success of an interactive exhibit like this is about reaction at the time, and then about follow ups. In the two days, I got huge numbers of smiles ('This is the first time I've seen a smile like that for ages!' was one parent's comment...) and a universal 'Cool!' reaction from just about everyone, especially young kids. I have been invited to schools to do more demos, asked by a local media group if I would be interesting in a collaboration, and the local university is also interested in talking to me more about this type of interaction and how to programme it. 

So, my grateful thanks to Spitfire Audio and BT for Phobos, because it was a key part of a very successful exhibit that may well have influenced more than 100 young minds into thinking about sound in a different way. Also thanks to Ableton for Live, and especially MaxForLive, a toolkit that I use all the time! Thanks to the amazing guys at DJ Tech Tools for their MIDI Fighter 3D controller. Thanks to Studiospares for a beautifully thought-out headphone amplifier. And finally, thanks to Envelop for making spatial audio so accessible in Ableton Live! Oh, and thanks again to BT (the telco) and Innovation Martlesham for making this all possible!

---

If you find my writing helpful, informative or entertaining, then please consider visiting this link:

Synthesizerwriter's Store (New 'Modular thinking' designs now available!)

Buy me a coffeeBuy me a coffee (Encourage me to write more posts like this one!)... or...

Buy Me a Coffee at ko-fi.com (Encourage me via a different route entirely...)

Or just tell someone else that there's this amazing blog about hi-tech music...


Friday, 1 October 2021

Behind the scenes of the 'Straight Maths' Virtual Instrument on Pianobook.co.uk

I have been exploring the possibilities of mis-using a sample player recently. Dave Hilowitz's excellent 'Decent Sampler' is, imho, not only much better than merely 'decent', but it has also allowed me to go slightly outside the usual territory of samples and to become an intrepid explorer. Huge thanks also to the team behind Pianobook.co.uk - a great contribution to the world of sampling, created by Christian Henson.

So here is a quick recap of the design thinking behind two of my recent releases on Pianobook.co.uk.

Parallel Inversions

'Parallel Inversions' was my first really developed idea that isn't just a sample replay. It deliberately breaks the rules to produce an 'alien' instrument. In a 5 star review, Michael Milburn said; 

'I don’t understand what these are, but do enjoy the sounds.'

The user interface is the first thing that hits people with this virtual instrument. The top row of controls has 23 vertical faders that look a bit like the 'Mic' sliders that you see in many sample players - except that instead of 2 or 3, or maybe 5, or (extreme) 7 or higher, there are almost two dozen of them! They are split into four sections, and there are some subtleties in the way that these are put together.

The most important section is the one that has the 0 to 4 'Mic' sliders in it. The 'Zero' slider is set at about 75% in the default preset, so that you know it is important. This slider plays the 'fundamental' frequency that is played by Decent Sampler, or rather, it plays that frequency sometimes - the XML code that Decent Sampler uses to specify how samples are played allow all sorts of manipulations, and I'm exploiting this here. So the 'Zero' / '0' slider plays three different octaves, using a random 'Round Robin' assignment. So if you play a C3, then you will actually get a C3, or a C4, or a C5. The ratios are set asymmetrically, with the 'octave down' option half the probability of the others. So for every chord that you play, you may get that chord, or you may get a biased inversion of it instead (a 'bass-light' inversion). This isn't how many instruments work! (But it is an 'alien' instrument...)

The 1 to 4 Mic sliders are actually pitched in semitones up from the 0 (zero), which is why they are arranged in the staggered 'piano keyboard' arrangement. This is immediately obvious if you increase the '1' slider, because you get a C / C# discord! So the 0 to 4 section controls parallel pitches, which (again) isn't how many conventional instruments work - organ drawbars are a bit like this, but...).

The next section to the right is from 5 to 11, and again these are parallel semitones up from the 0 (zero) pitch. The '5' (fifth) slider is set at about 75% in the default preset so that you know it is important (just as with the 0 (zero) slider. So the default preset plays two sine waves, a firth apart, and in both cases, the pitches are inverted (or not) at random, with a preference for one octave up instead of down. All of the inverted pitches are slightly detuned relative to the fundamental pitch, which gives a more interesting tone. All of these 'Parallel & Inverted' sliders are centred in the stereo image.

The combination of fixed parallel intervals (the default 5th is just intended as a hint to get you started) and random inversions kind of breaks 'the rules', and gives this instrument an interesting and unusual character. Have fun breaking all those conventions that you are supposed to follow, and embrace performances that are never the same twice!  

On the far left, there is a single '-12' slider, which was supposed to play a pitch one octave down from the fundamental. Unfortunately, I'm not the world's greatest programmer, and so it actually plays the same pitch as the '0' (zero) slider, except that the random inversions mean that most of the time it plays a different octave. Although Parallel inversions has had 3 versions, I have left this defect in there, because serendipitously, it sounds good. 

The A to K sliders are different again. This time they are panned either hard left or hard right, and they are distorted sine waves, instead of the purity of 0 to 11 and -12. So the A to K sliders add timbre and broaden the stereo image. Again, this isn't how normal instruments tend to work, but...

Finally, the lower row has more 'synthesizer'-type controls than is normal, with a full ADSR 'envelope' control, and I recommend the 'Attack' control for giving gravitas, and the 'Decay' control (with 'Sustain' set to near zero) for adding a 'Radiophonic' or synthetic character that sounds like it is from the 1970s. 

Straight Maths

'Straight Maths' has a busy user interface, but it extends some of the ideas in Parallel Inversions. The left hand side has 48 'Mic' sliders (yep, a lot!), whilst the right hand side has the extended 'synthesizer' controls, but in a more compact vertical format.

The three rows on the left are devoted to three different types of sound source. 

S - Top Row - additive synthesis

The top row (S) is sine waves (with twists) to provide simple Fourier additive synthesis. The '0' (zero) slider is again set as a hint that it is the fundamental in the default preset, but it does tend to get lost with all the other sliders! 

The three blocks of four Mic sliders on the top row have, from left to right:

- a Sine wave (0, 1 or 2 octaves up, shown as 0, 1 or 2), panned to the centre,

- a hollow-sounding, slightly square waveform (-), panned to the centre,

- a slightly bright, slightly sawtooth'y waveform (N (get it?)), panned to the centre, and 

- a detuned stereo 'sweetener' sine waveform (s) that adds a bit of interest and broadens the stereo image. If you want, you can ignore the 's' sliders and add your own preferred chorus effect via VST or outboard...

Yes, there's a bug with the 'S' in the two octaves up section, but that's part of the charm of the user interface, and does not affect the tone! 

The '-2' and '-1' mic sliders are sub-octave sine waves that can add low end to sounds. Use with care! 

As with all additive synthesizers, you mix and match the sliders to give you the combination of harmonics that you want, and then use the ADSR controls to give the sound a bit of shape in time. 

M - Middle Row - Karplus-Strong physical modelling

The second row has 16 different samples of metallic-sounding decaying sounds, derived from the Karplus-Strong hammered/plucked string physical model. '13' is my personal favourite, but it is way too strident for most purposes, and so just the merest hint of it is usually plenty! I resisted the temptation to arrange the sliders in any sort of order (previously I tried a 'tone-to-noise' arrangement), mainly because when I have tried to do this, I have rediscovered just how difficult it is to arrange multi-dimensional differences into a linear order. So I'm afraid that you will just need to play with the sliders until you get used to the sounds. Oh, and 10 and 11 ARE different, but not as different as I wanted! 

The 16 sliders are all tuned slightly differently, and are all stereo. This means that you can use combinations to add harmonics and detuning

My preference is to use the middle row to add a little bit of metallic 'bite' to sounds that are mainly top-row additive at their core. You can completely ignore this and do your own thing, of course!

W- Lower Row - Risset physical modelling

This row mis-uses Risset's work on synthesizing drum sounds, and adapts it to producing 'woody' sounding fast-decaying thumps and clunks to add percussive starts to the higher row sounds. There are four sets of sounds, arranged with the left-most sound in each set being the thickest (three sounds at once) and the others just single sounds. The detuning is toned back for most of these samples. These sounds are in mono, centered in the stereo image. I did play with stereo samples, but at low frequencies there isn't much to gain. To show how self-contradictory I can be, my '9126 Sawtooths' instrument on Pianobook.co.uk has way too much stereo bass!

It is quite fascinating how just a brief 'blip' of woodiness at the start of a sound that is all sine waves can totally change the character and timbre that you perceive. (Oh, and too much reverb is always a good idea!) This low row is influenced by the clicks found in old tone-wheel organs (the idea of adding percussive starts is not 'new' in any way!) and by the rather novel use of samples of the starts of instruments that Roland used in their D-50 synthesizer to augment a simpler digital synthesis technique for the sustained sounds. Roland called this mix of samples and synthesis 'Linear Arithmetic', so 'Straight Maths' is my way of paying homage to a classic 'personal favourite' synthesizer from the 80s. Okay, so now you know where the name comes from!

As before, the lowest row is used to add a little extra bit of character to the sound. The default preset  deliberately adds too much 'W' so that your first experience of 'Straight Maths' is 'Wow!'. Maybe that what the 'W' really stands for? But remember that subtlety is often the best approach, and too much 'W' may take you into cheesy territory...

Trivia

The rows were going to be labelled as: J, AK and C, for Joseph, Alexander, Kevin and Claude, but I thought this might be too obscure. What is interesting is that you now know a famous 'Kevin' - although Karplus still sounds uber-cool to me!

Letiti gave 'Straight Maths' a 5 star review, which is much appreciated, including this comment:

'One of the most innovative and unusual Pianobook entries'

For which I am enormously grateful!

---

If you find my writing helpful, informative or entertaining, then please consider visiting this link:


Synthesizerwriter's Store (New 'Modular thinking' designs now available!)

Buy me a coffeeBuy me a coffee (Encourage me to write more posts like this one!)


Saturday, 17 July 2021

A Doubly Virtual Talk...

I recently gave a talk to my local tech network. You.know, those things that used to be get-togethers and networking events for tech people, entrepreneurs, start-up people, innovators, inventors, etc., and that people discovered you could do using Zoom during the pandemic. And they obviously work, because we are still doing them.

Anyways, a casual comment I made at one of these tech chats turned into a talk about one of the things that I do, inspired by by soundtrack entry in the famous Westworld competition organised by Spitfire Audio a couple of years ago. It seems that there's a lot of interest in how current technology can make working with audio and music a lot easier than it was in the previous century, and so I just basically did a bit of show and tell...

Remember 'big presentations? Photo by Sigmund on Unsplash

Now when I say 'show and tell', I do mean exactly that. I never wanted to do yet another boring slide presentation full of slides with bullet points. But just watching someone share their screen for an hour is also not so great - I've been in quite a few zoom calls where person after person shared their screen and worked on software, and after watching someone else tweaking MaxForLive for a while, you kind of want to do some programming yourself. Probably my least favourite calls have been the ones where a series of musicians talk for about 30 seconds on some of their techniques, and then spend 20 minutes doing DAWless improvisation. It's the inevitability of it - you get 30 seconds of interesting information, and just when you start to learn about a technique that might be useful, they say: '...and here's a track I put together using a different approach...'. Cue 20 minutes of doodling...

So, no slides, no bullet points, and not too much boring screen sharing. It's a challenging recipe. So I used online videos (mostly YouTube, although I subscribe to Nebula and love it, but YouTube has the advantage of being accessible (and I'm struggling to think of any other advantage...)), web-pages instead of photos 'from the internet', and yes, some screen sharing where I avoided any code and concentrated on showing interactive arranging stuff. 

At the end of it, I thought that I should capture it, so that others could have a similar experience, and so the rest of this blog is just the resources that I used, minus the potentially boring screen sharing where I probably droned on about doing music for pictures. So you get just the good stuff to browse through as you wish, and that's all upside, as far as I can tell... 

(When I type: 'Just the good stuff', there's a caveat, but you probably know that already - you have to wade through me adding all of these explanatory words. Unless you just ignore my words and click on the videos, of course...)

"And now, over to Martin..." <screen goes black>

Resources...

To set the scene, I used an opening music clip - 'Journey across the Red Planet', an excellent piece of music from Paul Thomson, which demonstrates some of the sounds from the Spitfire Audio 'Abbey One library. (Paul is one of the two founders of Spitfire Audio, a cutting-edge UK ‘sample library’ company: https://www.spitfireaudio.com ) I explained that 'everything you are hearing is produced by a computer, using recordings of real instruments'.

I suggested that they should close their eyes for a minute or so, listen(!), then open them and look for the connections between what was happening on the screen and what they could hear. The video shows a DAW (Logic) playing the music, and so you can get some sense of how a DAW uses lots of individual tracks of virtual instruments to reproduce music, and there were piano rolls and MIDI Controller editing shots that illustrate that there's a lot of fine detailed control. Overall, the linkage between the music and the video is pretty effectively shown, but then Spitfire Audio do make vey good videos. So, yes, I started with virtually an advert for Spitfire Audio, but then I do have quite a few of their libraries, LABS instruments and a lot of the associated Pianobook.co.uk instruments, so I'm slightly biased. If you've read this blog for any time, then you will have seen that I've been to various events at their HQ (back before Pan Demic and her band put the world on pause for a while...) and I've met Christian Henson and Paul Thomson... (But do they remember me?)

Anyways, the music and the video serve as that all-important bridge, where you leave the real world, and enter the artificial world of 'the talk'. I've never liked the idea that putting up a slide that shows the title of your talk, followed by another slide that tells your life achievements in bullet points, is the perfect way to move people out of their default mind-set and into one where they are ready for fully engaging in a presentation. Closing your eyes and listening helps too, and it often puts any older members of the audience to sleep, so they can't ask tricky questions about DIN sync in the 1970s.

Anyways, I introduced virtual instruments, and how they replayed recordings of real instruments. Or unreal instruments, and so I showed them my BankOSC MaxForLive device that makes 32-oscillator drones and sweep sounds, and basically makes it sound like you have a humungous hardware modular synth, when actually you must have Ableton Live and a free bit of software that I published on MaxForLive.com.


I explained that quite a lot of the non-orchestral sounds that I used in my Westworld competition entry were produced using BankOSC, and I then talked very briefly about MaxForLive, and then Ableton Live.

I've already mentioned adverts, so you won't be surprised that I told them they could read more about the sound generator in my blog:

BankOSC

I found some good links that explain MaxForLive and Ableton Live, curiously made by Ableton themselves:

MaxForLive 

Ableton Live 

I explained that there are many types of software applications for working with audio, but the terminology that they will probably often hear in music technology circles is ‘DAW’ which stands for Digital Audio Workstation. I said that a DAW is a general purpose music composition and arranging tool that works a bit like a multi-track tape recorder – which is what used to be used in recording studios in the 80s…  I'm quite sure that some of the audience had no idea what a multi-track tape recorder was, whilst some others were probably reminiscing about the 80s and remembering 'Duran Duran' music videos...

For comparison with how you might generate that sort of 'big oscillator' sound in hardware, I should have introduced one of the leading lights of the YouTube ‘Synthesizer’ community, giving an introduction to the vast world of hardware modular synthesis:


But I have the advantage of being able to incorporate it seamlessly here, and no-one will know the difference.

I quickly introduced more relevant terminology in a bot more depth:

Sample Libraries 

(Collections of pre-recorded sounds, where each note that a musical instrument can produce has been captured by a computer, whilst playing it in various ways: soft to loud, different intonations and playing techniques, etc.)


Virtual Instrument 

(The software that plays the sounds of a musical instrument in a sound library.)


And finally, I got to the Westworld competition – where the task was to score a short excerpt from Season 3 of the TV series.


I mentioned my entry:


And I mentioned the winner:


I then revealed that if they were intrigued by just how accessible making music on a computer can be, then a good starting point is an orchestral library (Because the results are probably going to impress parents, friends, colleagues, maybe even ordinary people!) – and some of them are free:


Okay, so I mentioned another free (or low cost) Spitfire Audio product. But I bought Discover, and I like it. There are other free (and non-free) orchestral libraries, of course. 

I closed by reminding them that, whilst laptops (and other computers) may be busy making a lot of music, orchestras are also very occupied doing live tours (often of music produced by computers), making sample libraries - and just making music. And let's hope that as the world learns to live with Covid, 'music' and 'live' and 'performance' can happen in the same sentence once again. 

And that's it. A virtual presentation, made from other virtual presentations. This may be the future...

---

If you find my writing helpful, informative or entertaining, then please consider visiting this link:

Synthesizerwriter's Store (New 'Modular thinking' designs now available!)

Buy me a coffeeBuy me a coffee (Encourage me to write more posts like this one!)


Wednesday, 20 May 2020

A Synthesizer Programmer looks at Spitfire Audio's BBC Symphony Orchestra Discover plug-in...

What started out as a short review of Spitfire Audio's BBC Symphony Orchestra Discover has grown somewhat. Below you will find a review, followed by how I produced an unusual demo, and then some deeper synthesis explorations. I will start with an intro...

I've programmed a few sounds for synthesizers (including the E-mu Morpheus, Vintage Keys, Yamaha DX7, SY77, SY99, TG33, FB-01, TX81z, AN200, DX200, SY200, RY30, Kawai K5, Peavey DPM3, Korg Wavestation, Roland D-50, Novation Circuit, MonoStation, and lots of virtuals: Sprike, Amazing Noises Pulsor (I also wrote the 'Alternative Manual' for the Pulsor...), and lots more for Ableton Live software instruments, plus all the ones that I can't talk about...). Sample library wise, these days I tend to make my own, using Ableton's Sampler/Simpler inside Instrument Racks, or Native Instrument's Kontakt.


So it was quite a departure when I got tempted by the advertising from Spitfire Audio for their BBC Symphony Orchestra Discover - the lowest cost option of the three versions of the BBCSO sample libraries. Previously I had dabbled with the amazing LABS samples from Spitfire Audio, as well as the astonishing Pianobook.co.uk library, but this was the first time I had actually bought a real product from them - they normally target film and tv composers, so I'm perhaps a little outside of their usual customer base (Although the BT 'Phobos' synthesizer does look very interesting!) So this 'Purchasing from Spitfire' experience was a first for me, despite having been to several 'music industry' events at Spitfire Audio's HQ in Tileyard, north of King's Cross in London, England.

It has been quite a few years since I last did a review for Sound On Sound magazine, so bear with me as I warm up for a blog post review... Here's how it went from here, plus what I did with Discover, and more...

The Purchase Experience

The first shock I got was the 'Welcome to the Family' email, which thanked me for buying a Spitfire Audio product, and giving me links to videos and other support material. (including a fascinating article from the in-house 'Composer' magazine about scoring the Lego 'Builder's Journey' mobile phone game.) It felt very much like the opening page of a synthesizer owner's manual! I also got an email which told me that my purchase was ready for download, and this was when things diverged from what usually happens - there wasn't a download link in the email! (Deliberately, of course!)

Instead you go to the Spitfire Audio web-site and download their App, which is a special download manager just for Spitfire Audio products that runs on Mac or Windows computers. (I asked Spitfire Audio Customer Support about Linux, and Luke said: 'I'm afraid Linux is not supported currently, though whether this will be supported in the future I am uncertain!') The Spitfire Audio App is small (the installed app occupies a mere 22.1 Megabytes on my SSD), and graphically straight-forward (crisp clean and minimalistic - with graphics only were it needs them: for libraries!):


As you can see on the screen-shot above, you log into the app with the same details that you used to create an account on their web-site, and the App then shows you what products you can download, and handles all the downloading, plus repairs to libraries or plug-ins, as well as downloading and maintaining the LABS freebie samples.


Here is the screen that shows the free LABS content - all the graphics is used for the content, not the User Interface. From the buttons (or lack of them) it is possible to infer that I have installed the 'Choir' and 'Frozen Strings', that I need to update the 'Amplified Cell Quartet', ad that I can install the 'Charango' (a type of guitar), the 'Drums', the 'Dulcimer', the 'Electric Piano' and the 'Hand Bells'. Did I mention that these are free? Did I mention that there are more free samples on Christian Henson's 'Pianobook.co.uk' website?

Note that this use of sample management software in the App means that you need to run the App on a computer that is connected to the Interweb (aka the Internet), so if you have a 'music' computer that is deliberately 'isolated' then you will need to connect it temporarily... Also note that there isn't any messing about with serial numbers or authorisations - all of that is handled by the App, and you don't need anything other than the App and your log-in details.


The 'My Products' page is just a little bit sparser (I would love to buy all of their libraries!), although I think that Spitfire are missing a trick by not having another tab for a Wish List, because that would be full to bursting for me - there's a particularly interesting product from BT (Brian Transeau, the 'make one loop per day' guy) which is a novel synthesizer that uses lots of carefully curated samples and a lot of processing. Almost a perfect match for my interests in every way, and I wish that I had the money!

The Spitfire Audio App is an interesting decision that says a lot about the way that Spitfire value and understand their customers. Providing a single 'sample library management tool' to people streamlines the install, update and maintenance overhead, particularly if you have lots of large sample libraries, and it must simplify the customer support as well.


When you are used to just getting a download link and downloading a zip file, then finding it, unziping it and then trying to figure out exactly where you put the expanded contents, then this was definitely different - very Professional, and very 'Supportive'. Quite a contrast to my experience with installing software from some other campanies, I can say! The downloads didn't take very long - and as you can see in the screen-shot above, the library download is under 200 MB (yes, that's an orchestra plug-in in there!), and the plug-in download is well under 200 MB as well, and the App then installed the files into the proper locations, and that was that. Possibly one of the least demanding installs I have done in quite a while!

The cog-wheel menus on the right hand side of the window are interesting - they reveal more of the 'not just a downloader' philosophy behind the App: Repair for fixing those samples that mysteriously acquire errors (Gamma particles? Aliens?, Wear-and Tear?, Just one of those things?...), Locate for when you need to find where you stored that sample library, Optimise for, well, optimising, and Reset for when repair fails and you need to download a fresh copy again. Again, I suspect that many customer support queries are probably resolved using this menu...


Opening Ableton Live, the Plug-ins part of the Browser now contained BBCSO Discover VST and AU plug-ins, and so I dropped the AU plug-in into a new track, got the usual plug-in widget in the Clip View (what I think of as the 'track strip'...), and clicked on the 'Spanner' icon to open the plug-in window...

The Plug-In

The BBCSO Discover plug-in window has a big graphic of the layout of an orchestra, which is used to select instruments, and various other controls, menus and buttons. This serves as a simple metaphor, but the white background and primary colour look also differentiates Discover from the Core (Grey) and Pro (Black) versions which don't have this graphic at all. The window is re-sizable, but some of the text is very small, especially on a very old MacBook Pro screen with not very many pixels on it! The resizing wasn't obvious at first glance, but there's a tiny button with the usual double-ended diagonal arrow symbol on it, and that minimised the window, at which point the lower right hand corner acquired a set of diagonal lines to indicate that you could drag it to re-size the window. I reported this as a potential bug, of course, and I will update this blog post with progress.


After everything so far going pretty smoothly, it was a little disappointing to see that there are two 'settings' menus in the upper right hand corner of the window... One is the 'ellipsis' three-dots that usually means something like 'more', whilst the other is the more obvious cog or gear-wheel icon.


Having the setup spread across two different menus is a little awkward, and I couldn't find out how to save settings so that my MIDI Velocity mapping preferences didn't need setting again every time I added the plug-in to a new track, but I'm sure there must be a way, and if not, then I will suggest it as a 'new feature request'.


The user interface is clean and mostly clear, and although there are some unusual icons, pop-up explanations appear in the lower left hand corner if you hover over them hesitantly with your mouse.


The large colourful graphic shows the section of an orchestra, and a click on any of the sections selects you that instrument, plus the available techniques for playing it. If you select Strings: Violins 1, then you get four techniques: 'Long', 'Spiccato', 'Pizzicato', and 'Tremolo', complete with the music score symbology (Over the whole library there are 47 techniques available). If you click on the drop-down menu at the top of the screen then you get a more detailed screen that shows a more text-oriented (and accessible) way to choose from the 33 instruments.


On the left hand side of the window there are two vertical sliders: Volume ('Expression') on the left, and 'Dynamics' on the right.


The dynamics slider controls the velocity switching layers, except that in Discover there is only one layer of sample - to get more layers you need to move to the Core or Professional versions (More money gives you more layers, techniques, microphone positions, round robins, etc. Plus there's a 'Mode Switching' feature which means that you can play MIDI files from any of the versions on any of the other versions - with mapping for where techniques, layers or microphone positions are missing...).


I didn't mention it earlier, but the Discover version is only £49, $49, or 49 Euros - and if you are willing to fill in a form and wait two weeks, then it is free. So in Discover, the Dynamics slider acts as a volume control, and in the '...' settings menu there are four options to control how dynamics is mapped to incoming MIDI velocity or the modulation wheel. Yep, this isn't a synthesizer, and so the mod wheel isn't automatically defaulted to LFO vibrato! Instead, the mod wheel (MIDI CC 1), or your favourite MIDI Controller, is used to control the dynamics. As I mentioned before, the default mapping of the least velocity sensitivity isn't my preference, but I couldn't find out how to set my preference, although I will ask Spitfire Audio's customer support. As an aside, having downloaded quite a lot of the free LABS samples, Spitfire Audio's support has always been excellent, even for free stuff!


Over to the right of the two sliders is a big rotary control (something of a feature of all Spitfire Audio user interfaces, it seems...) that controls the reverb level. Yes, this sample set was recorded at London's famous Maida Vale studios (the BBC will relocate most of the recording operations to Olympic Park in Stratford by 2023-ish) and so the samples in the Discover set do have some room ambience in them even with the control set to zero, but at 100% then you get a very nice real reverb from Studio One at Maida Vale sound studios. So you don't seem to get a completely dry 'close mic' signal in Discover,  but it sounds very usable! As always, if you want 'more' (mic positions in this case), then you should upgrade to the Core (£399, although currently on offer at £250.01 (!) until 31st May 2020) or Professional (£899, although currently on offer at £630 until 31 May 2020) versions.

After that, it's just fine detail at the top of the window, and we enter territory where pro reviewers devote paragraphs to describing each and every button and menu. I'm not going there! Suffice it to say that there seems to be plenty of control and you get a very strong impression that Discovery is just a carefully crafted 'essentials' sub-set of a much larger, more detailed product, and not an incomplete teaser. Exactly what you would expect from a company with huge experience of making orchestral (and related) sample libraries for composers! Which takes me to the next phase of this post: trying it out...

Using It

Spitfire Audio have lots of support material on their web-site, and the very first one that you are directed to post-purchase is a YouTube video where Christian Henson, one of the two founders of Spitfire Audio, shows how to turn an Erik Satie piano piece into an orchestral version. There's a lot of good advice in there about how to do orchestral arrangements 'Anyone can do it!', but I decided to ignore all of it, have some fun, and approach using Discover as if it was a synthesizer library. Here's just some of what I did wrong...

I decided that I definitely wasn't going to take a MIDI file of a classical piece and orchestrate it - even though many synthesists have done that at various times. Nor was I going to play a piano piece and then convert that. Nope. Instead I went 'old school' DAW, and started with a blank canvas and just made up a bass part. Nothing complicated, and I defer to Tantacrul for his far superior expertise in this particular area of music theory. (His YouTube channel is very good too!)


My attempt at simple and not clever or subtle was just five notes (C F A G D), evenly spread out over 10 bars. Yep, deliberately breaking the 'every 8 bars' rule with my first phrase! I used the Strings: Basses playing with the 'Long' technique because I have always had a weakness for Double Basses!


For the percussion, I avoided the 4/4, 120 bpm, four-to-the-floor bass and snare cliche, and instead went for minimalism: a single Tubular Bell hit, and again, I broke and followed convention simultaneously by having it happen at an interval of '1 bar and 1 beat' , but with a 4/4 120 bpm clock. So every 5th beat, the tubular bell hit happens, as 10 bars of bass slowly grind in the background. Not formula pop, and nowhere near the heights of Ultravox's Vienna.

A synthesizer pad was next, and here I actually followed Christian's advice about using monophonic lines per instrument. I did a descending set of four very obvious notes (C A G F) derived from the bass line, and assigned them to Strings: Violins 1, playing the 'Long' technique again.


Next I assigned an arpeggio to Strings: Celli (or Cellos) playing using the (wait for it) 'Long' technique, and yes, it is a startlingly unoriginal arpeggio in just about every way, not jazzy, no rhythmic variation, no velocity variation (more on this later) and lazily quantised. The Interweb probably already has lots of guides called something like: 'How not to create muzak in a DAW', and I just ignored every bit of potential advice I could think of...


The arpeggio is eight notes, and lasts exactly one bar. Looking back at this, then I now think that I should have made this longer or shorter than a bar, (which is bound to turn up in a 'How to do amazing things in Ableton Live!' YouTube video...) but there's always another version to be explored later! From the previous note choices, you won't be surprised to see C D F G A and B in there.


For the second pad track, I set the length at 3 bars, and broke the monophonic line rule (and several other conventions) by doing octaves, and by using the Strings: Violins 1 playing the 'Long' technique yet again. (No! No! No! Use another section!) C D and A are used here, surprising absolutely no-one!


Finally, the lead line, which (Gosh!) used Woodwinds: Flutes a3 (meaning 3 flutes at once instead of a solo flute, apparently) and which lasts 13 bars (!) that kind of only loosely follow bar divisions, and there's a sudden twiddly bit in the middle.


Rather than spend a long time hand-crafting the velocity (mapped to that 'Dynamics' slider which is a volume control in this layerless version), I cheated and used the stock/factory Velocity plug-in to add a bit of random velocity to the fixed velocities that the eagle-eyed amongst you will have spotted in the clip piano rolls.


Above you can see the simple automation applied using the Volume controller. Slow fades in and out everywhere. With this in mind, I synthesized a slow video accompaniment, and you can see the result:


Think of it as my lament for the deprecation of Quartz Composer from macOS - a wonderful technology that sadly never got the attention it deserved. (And a shout-out for Vuo, in case anyone is looking for an alternative...)

The end result highlights how well-crafted the Spitfire Audio BBCSO Discover sample library is. To me, it sounds like an orchestra playing a poorly-composed piece of music without the aid of a conductor! Which is what it is, of course! But whilst the music is bad, the sound is good, although it could be so much better with a little tweak here and there. Now when a sample library can take lazily-thrown-together muzak and make it sound good, then I'm impressed.

(This is an interesting point. Just about every demo that I've ever seen in the music business features a player with alarmingly strong musical ability showing that if you spend years learning your instrument, weeks programming, days building up muscle memory, minutes learning shortcuts, seconds memorising timings and milliseconds acquiring several other arcane expertises, then you can make the product sound truly amazing for about thee minutes! (And then people get bored and go to the next demo...) For me, I'm far, far more impressed when a product manages to make uninspired, lazy throw-away sequences of notes sound good.)

One final thing about what Spitfire Audio have done here. Yes, there are lots of orchestral sample libraries out there on the Interweb, but the ability to take music produced in a £$49 Euro (or Free) Discover version and play it using the Core or Pro versions, with much the same sound (less refined, and with some techniques missing, etc.) should enable a lot of learning, sharing, demoing and collaborations that previously might never have happened because of the problems of finding common resources. And that is both a good thing, and a potential game changer...

Explorations

I'm not known for leaving things alone. All samples are merely things to be pulled apart, twisted, tweaked, processed and then used as raw material for synthesis. And I'm afraid that the Spitfire Audio BCBSO Discover library is no exception. Having used just a few of the instruments and techniques to produce an exploratory demo, I then moved to seeing what those samples could become with a little more tweaking. Here's what I did...


My first exploration looked at the single layer limitation. The composite screen-shot above shows one way to get around this. I worked on the Strings: Violin 1 sound that was heavily over-used in the demo. At the top is the velocity fading/switching pane, splitting the 1-127 range into three slightly overlapping layers. Underneath the velocity screen-shot, the layers are shown in full so you can see them all at once. In the top layer, I added the stock/factory Saturator plug-in to add additional harmonics to reflect the higher velocity, but because of intermod distortion, this only works well with monophonic clips! (Another good reason for creating multiple monophonic lines...) The middle layer is left alone, and the lower level has a filter added to reduce the brightness - Yes, I could have used EQ, but I was raised on subtractive synthesis back in the 60s, and so I prefer a simple low-pass filter with optional resonance as a quick-and-dirty way to take the top end off and maybe add a bit of selectivity. Putting three instances of Discover inside an Instrument Rack may seem slightly unusual, but I create a lot of virtual instruments using Racks, and the results can be well worth it.

Synthesizing missing velocity layers necessarily involves only subtle changes to the sounds, so I then looked at finding some more radical changes (Which could be put into a velocity-layered virtual instrument like the one above, of course! Oops, another secret given away! My advice would be to create an Instrument Rack like the one shown above, and to play with putting different Discover instruments inside it, any maybe even going beyond orchestral sounds by layering in the odd synth sound or two...).


Changing the saturation transfer function (the blue waveshape) beyond the preset 'distortion' settings can produce more complex changes. Asymmetric transfer functions like the one above start out just adding brightness, but as you go to higher Drive settings, then the sound gets fuzzier and the variations in timbre in the 'Long' Violin 1 sound can start to break up. It stops sounding like a violin and becomes more like a guitar through an overdrive pedal, and not in a good way. What is particularly interesting here is that putting synthetic sounds through this sort of transfer function can sound very good, but for samples of real sounds then it isn't as effective - or, given the way that modern pop does all sorts of things that I always thought of a 'just plain wrong', then maybe I should write: 'isn't as effective in some contexts, but may be exactly right for some others'. The takeaway here is thus to use Saturator with care as a way to add a little bit of edge to the sound, but not to go too far. Which could actually be a pull-out quote, since it is good advice:

Use effects to add a little bit of edge to a sound, but don't go too far!

There isn't a choir section in Discover, but this doesn't mean that you can't get similar timbres from it. By using the Corpus physical modelling plug-in, you can use resonance to get some tones that can be very useful. One useful tip is to use the note indicator to set a suitable frequency for the resonance, and you will notice that this is set to just over C3 - if you set it slightly sharp or flat, then you get a nice detune effect - very reminiscent of detuning the oscillators on a subtractive analogue synthesizer.


I used the Strings: Violins 1 as the source material again - but there is nothing to stop you exploring the use of the other instruments! The 'Membrane' preset gives nice results, and just switching to the 'Tube' preset with the settings shown in the screen-shot above is a good starting point for more vocal-like tones - although there is more 'selectivity' in 'Tube' so you get 'tube'-influenced sounds when the input frequency is close to the 'Tune' value, and more of the source sample the further away you go. One very good illustration of where it doesn't work is to use the Percussion: Percussion: Timpani as the source sample for the Tube preset, and you get something which is too far away from a timpani and too much 'tube'-sound. Now when I say 'doesn't work' and follow it with 'too far away from a timpani' then that's the danger with transforming sounds - go too far and you lose the connection with the original sample, and the listener just hears an unusual, unfamiliar sound. Putting some of the original back with the 'Wet/Dry' control can restore some of the sense of the origin of the sound, but it may still sound like distortion, or you may find that getting the Wet/Dry balance right is very difficult.

Two of the staples of synthesized music are pads and stabs: thick sounds with very different envelopes, and in the case of stabs, a rather cliched vibrato. But the rich, thick sound is very useful in all sorts of circumstances, and so I investigated if a similar timbre could be obtained from the source material in Discover.


To achieve this type of sound, I used one of the often overlooked stock/factory plug-ins in Ableton Live:  'Overdrive'. As the screen-shot shows, the filter is set to cut out the lower frequencies and the Drive is full on, whilst the Tone is at just below middle. For the Strings: Basses this gives a timbre which is bright and harsh, and starts to cross over into 'synthetic'. Adding the 'Auto Filter' allows the harshness to be controlled, and below about 1 kHz, you get a thickened version of the Basses. The screen-shot shows the pizzicato 'stab' version, but when you use the 'Long' then there's a fascinating accentuation of the slight changes of tone and you get almost a loop sound instead of the smooth bass sound you might have expected. Putting this underneath a more conventional sound gave it a depth and extra thickness that was not as synthetic in sound as I expected. I must check the result of using this approach instead of the Saturator for the high velocity layer of the Instrument Rack that I showed earlier. I probably tend to think of Saturator as a more subtle effect, but in this context, maybe I need to do more A/B comparisons.

For the opposite kind of thickness: low end grumbles, I just reversed the filter curve:


This produces something which has a mixture of Double Bass growl, with a synthesized fullness - so full that you probably need to EQ it to leave room for other instruments! Once again, you can see my roots coming through here - I'm turning the orchestral sound into something that is a hybrid of real and synthetic.


Adding chorus to the Tremolo technique might seem to be a strange thing to do, and merging vibrato and tremolo ought to give a Leslie speaker effect. But the effect of the chorus accentuates some of the dense high frequency scraping sounds of the violin bow on the string, and it starts to sound rather alien. Replace the Chorus effect with a Flanger and some settings well below the usual resonant tube effect will give weird clunking and knocking sounds that are very non-violin!


Compressing the Pizzicato Violin 1 can accentuate the room ambience amazingly and remove most of the tell-tale characteristics that make a Pizzicato sound like it does. It's a bit like pitch shifting a triangle sample - any pitch other than the correct one doesn't sound like a triangle! Well here, some heavy compression gives an early reflection type of sound, which gets stronger when you layer several notes on top of each other, and with octaves and rapidly repeated notes, it sounds like there's a big echo plug-in. Repeat short notes very rapidly and you start to get nice interesting glassy textures and long reverb tails, and all of this with the Reverb set to zero! With the Reverb set higher then you can get some nice sharp metallic sounds that are well removed rom Pizzicato Strings.

I have always been a fan of repetition processes like flamming, reverse flamming, FOF and granular... So I then filled a bar with repeated short notes (just over two hundred of them...) with uneven spacing to stop it sounding too mechanistic, and tried the Pizzicato and Spiccato techniques, copied the notes to three other bars and did some pitch shifting of a few semitones per bar..


Switching to the Strings: Basses with the Pizzicato technique and transposing the whole clip downwards a few octaves produced a very nice sound indeed, although I did need to drop the Volume control in the Discover plug-in to about 50%. I also added some ping-pong echo to smear out the resulting drone-like atmosphere even further...  Oooh!


As you can see in the Compressor plug-in in the screen-shot above, this processing produces a complex output that has moved quite a way from the orchestral pizzicato Bass origin of the sound. But this hand-crafted variation on FOF (Okay, so it isn't really that because it isn't using sine wave granules!) or granular (Which often seems to be too clinical and clean) is using quite a lot of processing power, but once you sample it, then you have a hybrid sound that has elements of real and synthetic, and that's a very interesting place to be...

A selection of these explorations is available on SoundCloud (link below), but I strongly encourage you to do your own processing rather than just repeat what I have done.


What is particularly significant in all of these explorations is that the natural origin of the samples is often reflected in the way that the processing affects them. I found unexpected sonic details and quirks that I don't normally find in synthesized sounds, and this has set me along a new and unexpected path of research. Discover may turn out to be the start of something much more expansive and exploratory indeed!

Conclusion

My exploration of Spitfire Audio's BBC Symphony Orchestra Discover sample library started as a review, segued into a demo from a synthesist's viewpoint, and then went all exploratory when I started to use Discover as the sound source for deeper sound creation and synthesis. I'm pretty hooked into several aspects of this sample library, and it definitely has possibilities that far exceed its price and intended area of use. Basically, I'm impressed - far more than I thought I would be. Congratulations to Spitfire Audio for making an even more amazing/stunning product than I expected.

---

If you find my writing helpful, informative or entertaining, then please consider visiting this link: