The world on which we live is precious, unique, too often taken for granted, fragile, not loved enough, beautiful, amazing... and continually astounds me.
I have always had the crazy idea that if I make a user interface that is totally obvious to me, then it must also be intuitive to everyone else as well. Sometimes (Well, my Probably M4L sequencer is a good example), I am very wrong. Actually, reset that word 'sometimes'. Just about every time I think this, it seems that I get it wrong. My user interfaces work for me, but not for everyone. For this I apologise. I'm not perfect, and neither are my user interfaces.
To try and fix it, here's the 'Words & Pictures' part of a series of resources that I'm producing with the aim of making my user interfaces for my virtual instruments on Pianobook.co.uk easier for people to get their heads around, and use!
Mattress
As you can see from the screenshot above, I'm going to use my 'Mattress' virtual instrument as the example. I've uploaded it to the review queue on the newly re-launched Pianobook.co.uk version 3.0 web-site, so it should be available there for download at some stage. My 'Spoken Pads' virtual instrument (Sample Pack) went from upload to being published in a couple of hours just before the launch event, but the site seems to have slowed down a little since then.
A quick shout-out for Rachel K Collier, whose YouTube channel just released a 'How to do a remix' video featuring Mary Spender's latest 'predictive' single (Adele, not John Mayer, this time), and this rather distracted me. I did make the third comment though, so I was a little early. I'm going to use the 'amazing' word again for both of these amazing musicians!
Yes, I'm using my current favourite, Decent Sampler, again. As you can see, there are two major parts to the user interface. On the left: Timbre controls. On the right: Synthesizer controls.
Timbre Controls
My interfaces have two (sometimes three) horizontal rows of controls. They are essentially little mixers, made out of the 'Mic' sliders that you sometimes find in sample players for choosing microphone polar pattern/response shapes and characteristics, plus their positioning. So you might have a cardioid close up to capture an 'intimate' close-up sound, and an omni far away to pick up the room. And no, a 'shotgun' microphone is not used to pick up the sound of guns!
To give some leeway in levels, I deliberately set the volumes of my samples so that a slider setting of about half-way is okay for most purposes. You can set it higher to make something stand out, but overall, about half-way is good. Too many maximum settings may well overload things, which is either what you want, or what you don't want - your choice.
Sometimes, for samples that are minor, special 'tiny' 'Mic' sliders are used, typically half the width of the ordinary 'Mic' sliders. These work the same way - they just take up less room, and are less important!
When there are two (or three) horizontal rows of 'Mic' sliders, then the intention behind the design is then same - you choose one or more 'Mic' sliders from each row, and set them to about half-way (don't overload things, remember?).
One exception to this would be those tiny 'Mic' sliders, where you can add them to the main, big, 'Mic' sliders! Remember that they are small because they have one, special purpose - often sine waves or noisy sounds.
The basic 'initial' preset usually has the left-most 'Mic' sliders set to about half-way up. The idea is that you work your way across to the right, auditioning 'Mic' sliders until you find the ones that give you the sound you want.
Here's another reminder about those levels. Half-way is fine!
The rows are often organised into smaller blocks, sometimes internally arranged in pairs. There is often a gradual change from left to right - so 'Pure' sounds on the left might gradually change into 'Noise' sounds on the right. Sometimes the left to right arrangement is octaves: sine waves are often low pitched to the left, and higher pitched as you go to the right.
Synthesizer controls
On the right hand side are the 'synthesizer' controls, which change how you can use the timbre that you have set using the controls on the left hand side. These are more about 'shaping' the sound, rather than setting the timbre itself.
The very first control would traditionally be on the far right hand side in most classic 70s and 80s synthesizers - the volume control. But in a sample player, then the major use for this control is very different - it isn't used to set the output volume of the synthesizer and then never touched again during performance (which is why it is way on the right (or sometimes the left in 21st century synths)). Instead, this control is used for 'Expression' - the minor changes in volume that a performer makes all the time with a real instrument.
People who use MIDI to sequence music often use velocity for this purpose, because when you play a synthesizer with both hands, then you don't have any hands left to move an Expression control. Now, this isn't the case for a traditional pipe organ player, where their hands are playing at the same time as their feet are playing bass on those long wooden 'keys', or even controlling volume (Expression) using a foot pedal. For some reason, synthesizer players don't seem to use volume pedals very much, perhaps because at least one of their feet is controlling the sustain footswitch. And it seems that very few multi-dextrous pipe organ players move over to playing synthesizer. If you do see a synth player who uses expression pedals, then they are probably special!
If you are programming orchestral instruments in a DAW, then velocity is a strange way of controlling a violin, flute or oboe. Instead, the Expression control (MIDI Controller 11, usually) is a good way of having a continuous controller on the DAW screen that shows the 'volume' of that part as a line. Velocity of notes is normally shown as individual events, and it is harder to see trends, as well as being harder to edit. Some instruments ARE more suited to using velocity: pianos, double basses, brass instruments, and percussion are some examples.
Anyways, in sample players, the Expression control is one of the most important ways of controlling the ebb and flow of an instrument relative to all the others in an arrangement. In DAWs, you will see people record the notes first for a violin or woodwind part, and then go into that track and adjust the expression by editing MIDI Controller 11 to give the 'feel' that they want. You will also then see the same person record a piano part using velocity to control the 'expression' or volume. Just as in a real orchestra, the way you perform music with different instruments varies.
So the 'Expression' control is lots more important to orchestral composers who work in DAWs, and they tend to be the people who use lots of virtual instruments. Keyboard players who normally use velocity and record MIDI into a DAW and then edit the velocities, are probably not going to use the Expression control anything like as much. (Unless they know about this and deliberately exploit velocity AND expression...) This, by the way, is the sort of knowledge that expensive courses on arranging and orchestrating sell you...)
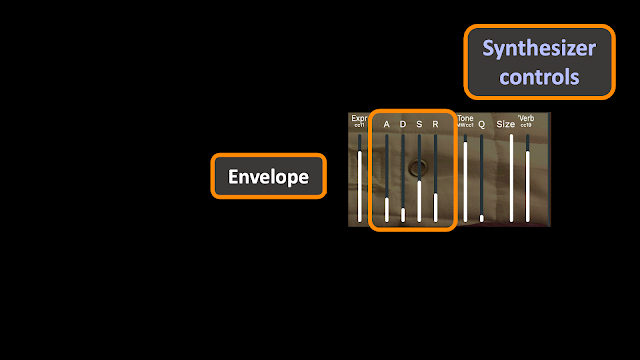
The Expression control affects volume on the grand scale. At the opposite end, the 'Envelope' controls affect the volume of each note over the time it plays. Historically, there's a very popular way of representing how the volume of a note changes over time: the start bit, where the note goes from silence to being heard, is called the Attack; the next bit where the sound falls back to a lower level, is called the Decay; the level that the note stays at is called the Sustain level; and the final bit, where the sound falls back down to silence again, is called the Release. These tend to get abbreviated to ADSR, and some manufacturers have the Release and the Decay set to the same value, but the models is more or less the same in all cases: three times (ADR) and one level (S). Of course, if you set the Sustain level to the maximum, then no Decay can happen and the sound just goes to the maximum and then falls when you let go of the keys - an AR envelope (and yes, it should be ASR, but conventionally, that isn't done!).
One of the things that confuses people who don't know that the envelope is three times and one level, is that the shape made by the envelope controls (especially sliders) isn't what the envelope actually looks like. So in the example above, you could be forgiven for thinking that the note would start out loud, then go quieter, then go louder again, and then go quieter again. What those slider positions really mean is that the sound takes some time to do the Attack 'segment' of the note (i.e. it isn't a fast abrupt start, but it isn't a slow laboured one either), then decays slightly faster to a middle 'Sustain' volume, and then dies away slightly slower than the initial Attack.
If you haven't use an envelope before, then set the Sustain all the way to the top, ignore the Decay control, and play with the Attack and Release controls. When you understand how the A and R controls affect the 'shape' of each note, then set the Sustain to the minimum, and then try adjusting the Decay control, plus the Attack and Release as before. When you have got that figured out, then set the Sustain to half-way up (or down) and listen to what the ADR controls do this time. You shouild now have a good feel for how envelope controls work.
If you listen to most musical instruments, then the start and end of notes is not linear. Notes start quite quickly, but seem to take longer and longer to get to the maximum. When a note ends, then it drops away quite quickly at first, but then it seems to take a long while to vanish altogether. You can see this in the shape of envelopes that are used on screens and in diagrams - the segments are curves, not straight lines (in most cases!).
As a further complication, whereas the Sustain control generally work as you would expect, the relationship between the 'time' controls and what happens in reality may be different. Some synthesizers and sample players can require moving the control almost to the very maximum to get a really slow Attack, Decay or Release, and some can only do fast ADR when they are very near to the minimum. This can vary a lot. Taking a few minutes to get a 'feel' for what positions of the ADR controls does what in terms of time can be very useful.
To reinforce the importance of 'what the sliders show is NOT the envelope shape', the two envelopes above show this very clearly. If you have spent time learning the controls, then this should now make more sense to you.
The next controls affect the tone of the sound that is produced. For historical reasons, many synthesizers (and sample players) tend to use a low-pass filter for controlling the tone. 'Low-pass' means that when the frequency control is set to a low value, then the only low frequencies can pass through the filter, and as you increase the value of the frequency control, then more and more higher frequencies can pass through the filter. So a low-pass filter 'cuts-off' high frequencies - and so the frequency control is called the 'Cut-off' frequency.
In sample players, the Tone control is often assigned to the Modulation Wheel (MIDI Controller 1), so moving the mod wheel up opens up the filter and makes the sound brighter, whilst moving the mod wheel down makes the sound darker and bassier. In most synthesizers, the mod wheel usually controls the amount of LFO modulation (hence the name) to the Pitch of the notes or the Filter cut-off - or many other parameters. Once again, sample players and synthesizers differ slightly in the eay that they are controlled. In a virtual instrument from a Sample Pack that you have downloaded from Pianobook.co.uk, then it will probably have the controls of a sample player, so the Low-pass filter cut-off frequency (the 'Tone') will be controlled by the Modulation Wheel as MIDI Controller 1.
The other control over tone is the 'Q' control, which comes from radio terminology. A more musically appropriate word here would be 'resonance'. At low values of Q, there is no strong resonance in the filter, and so as you increase the cut-off frequency control, higher frequencies can pass through the filter, so it gets brighter and brighter in tone. But as you increase the Q control, the the filter becomes more and more resonant, and so it emphasizes the frequencies at the cut-off frequency. This makes the harmonics in sounds stand out more, and gives a characteristic 'Weeyaheeoouuh' sound (you can do this when you open and close your mouth and make a sound).
The final two controls on the right would be unusual in a 70s or 80s synthesizer: reverb. But again, in a sample player, reverberation is very common in the 21st Century.
Again, there are two controls. The 'Size' control sets how large the reverberant space is, and so changes how big it feels, as well as how long the reverb lasts.
The other control, shown in my user interface as 'Verb', is just the Wet/Dry mix of the reverb. So the higher the control value, the more reverberation you will hear. This is assigned to MIDI Controller 19 in my virtual instruments, but this can vary with manufacturer for other sample players.
Summary
And that's how the user interface for my Pianobook.co.uk virtual instruments in Sample Packs are intended to work. Some of the instruments have variations of the controls (older instruments may have rotary controls instead of the new linear ones in the latest ones), but the principles remain the same, and the idea is that you should move sliders around, listening as you go, and gradually home in on the sound you want. Decent Sampler lets you save any sounds you particularly like by using the Developer>Save Preset... menu options. This is how I made the presets which come with some Sample Packs.
One thing that maybe isn't immediately obvious is that I try to ensure that each of my instruments contains a lot of different timbres and sounds. Even simple sounds like the
Synthfest UK Water Bottle have multiple controls that change the mix of the separate timbral components. Or '
Parallel Inversions', where what might initially sound like an organ is something much stranger than you think, with all sorts of tricky detunes and autos... It is nice to see people discovering the unexpected details in their reviews - and I love reviews! You probably won't be surprised to know that my favourite
Spitfire Audio product is
BT Phobos, which is much the same idea: give people lots of possibilities and lots of control, and let them find their own sounds! So maybe I should call them 'Sample Libraries' instead of 'Sample Packs'.
I hope that you enjoy using my Sample Pack virtual instruments. A lot of time and effort goes into producing the samples and the instruments, and there is often special thought given to the musicality of the user interface and the sounds. There are even some minor Easter Eggs in the form of inverse controls or ranges or pairings, just to surprise the unwary. I also can't praise enough the amazing people who produce the Pianobook.co.uk Demos - they are experts at extracting the maximum musicality out of virtual instruments, and you should definitely listen and learn from what they produce.
YouTube
There is also
a video of this topic, with the same diagrams, but without any distracting text, and no voice-over!
---
If you find my writing helpful, informative or entertaining, then please consider visiting this link:





 Posts
Posts

