Showing posts with label LFO. Show all posts

Monday, 15 April 2019

Spectral auto-panning in MaxForLive for Ableton Live

My two recent MaxForLive audio devices have both been based around having 6 processing sections - hence the 'hex' in their names. But I realised that there was a much simpler device that uses the hex pan section, which could be used in many ways, and this blog post is devoted to it: a hex spatializer!

AUDhexSPATIAL 


AUDhexSPATIAL moves parts of sounds around in the stereo field. That's all. It is quite straightforward, but don't let that fool you into thinking that you can't do much with it.

The input audio is passed through three parallel filters, and then the outputs are auto-panned across the stereo image. The three filters can be used in several ways, but the most obvious way is to use them to split the audio into three separate bands: The high-pass filter outputs the high frequencies, the low-pass filter outputs the low frequencies, and the band-pass filter outputs the middle frequencies.

Each filter output can be panned to hard left or hard right, or can be Auto-panned - controlled by a three position switch: L/Auto/R. But the frequencies of each filter are independent, so there's nothing to stop you putting the high-pass filter below the low-pass, or the band-pass anywhere from low to high.

The filters are there just to provide different blocks of frequencies to the output section where the panning happens. And the three [X] toggle switches allow you to turn the outputs on and off, so if you want to have just the high-pass filter output, then just enable that toggle switch and turn off the others. The two stereo channels are separate, so if you want different filters and pans for left and right, then that is completely possible.

Naming

After a lot of agonising, I have finally decided to use a new and consistent naming scheme for my M4L plug-ins. From now onwards, and if I update anything, then I will strive to use three prefixes:

- AUD for Audio processing devices (aka effects)
- MIDI for MIDI devices (this took ages to figure out!)
- GEN for devices that generate audio

Of course, in an imperfect world, I may not always succeed in trying to be consistent, but I will try. Please let me know if I falter!

Applications

OK, so your imagination is probably your main limitation here. If you want to have the left channel quickly auto-panning the top end of a piano sound, whilst the right channel slowly pans the bass around and both channels have two different resonant filters panning at different speeds, then that's fine.

But there's more. Try putting AUDhexSPATIAL in front of a Ping-Pong Echo, or put it in between two Ping-Pong Echoes... It is very interesting to experience just how complex a simple sequence can sound when it goes through this sort of processing.

Limitations

You can't adjust the panning width directly - adding two extra rotary controls would make the centre section way too big, I reckon. (But let me know if you really want this, and I might schedule a '+' version...) You get full left-to-right panning, or else hard left or hard right. Of course, you could make a rack and use the Utility object to restrict the pan width of multiple AUDhexSPATIALs...

There are only 3 filters and three panners per channel. Making a version with more channels is not in my current plans, and my main concern would be trying to find a way to fit everything into the user interface...

Oh, and the filters are not animated - they are fixed graphics! Sorry...

MaxForLive

Recent blog posts have included details of what is happening inside my M4L devices, and this is no exception. This time, I'm going to look at the three-position switch that has been added to the output section.

Max and MaxForLive have a lot of ways of routing numbers, messages and signals around. There are lots of objects, with names like Gate, Switch, Route, Selector, Matrix, and more. Sometimes the objects that route signals around have different names, and work slightly differently to the objects that route numbers or messages, and they can work slightly differently. It's quite a lot to get your head around, and one of these days, I'm going to try to do a guide (a bit like the one I did on squeezing controls into limited spaces!). But in the meantime, here's the first of a little mini-series where I look at a few interesting ways to route stuff.

The three-position switch does two things simultaneously: it allows you to select between hard left and hard right pan positions, or it selects the auto-pan. These are very different things, although if you look at AUDhexECHO or AUDhexFrequencyShifter then you will see that by slowing the LFO to 'stopped' then the result is fixed pan positions. But that isn't a very practical approach for a three position switch. There is also the complication that the output of the LFO that does the auto-panning is a signal (so it has the yellow-striped connections in Max), whilst the more usual way to control a panner is with numbers, so there's going to be a conversion somewhere.

First off, let's look at the context. Here's the relevant part of the Max code for the audio output of  AUDhexSPATIAL:


And here's the 'pan_mr' object expanded out (this is a cheat to make things clear - in reality, you don't see the controls that are connected to the input ports, but I have removed the ports and added the rotary control and the 3-position switch control to make it obvious how things are connected):


The main audio processing is on the left hand side. Input port 1 (the square box with '1' in it) is the audio signal that is going to be 'panned'. It goes to two signal multipliers (notice the '~' after the '*') that are driven in anti-phase using the '!- 1.' inverter shorthand that I've mentioned before. (The formula inside the object just subtracts whatever you feed into the object from 1, so it really means '1-the_number', and so it inverts the value, so if you put 0 in then you get 1 out, and if you put 1 in, then you get 0 out, and linearly for all other values...). The pan value goes from 0 to 1 to pan from left to right, and so centre is a value of 0.5.

On the far right hand side, you can see how the left and right values re stored in message boxes that are triggered every time that the switch is changed. The 'LED" object with the round circle is a useful way to convert changes into 'bangs' that also shows you what is happening when you are debugging. The '0' and '1' messages that the message boxes output when they receive a bang are converted into signals using the 'sig~' objects.    

In the middle, starting from the rotary control, there is a 'cycle~' object that does the sine-wave LFO function, followed by a bit of maths to get the output into the 0<->1 range that is required by the multipliers that do the panning. The 'scaled and offset' sine-wave is then connected to the middle input of a 'selector~' object, which is a special switch for routing signals. The other two inputs are from the signals from the message boxes. So the selector switch can output:
- a signal representing 'left'
- a signal that is an LFO sine-wave
- a signal representing 'right'


And that's how you can make a three-position switch that has fixed values on two of the settings, and an LFO signal on the other.

Getting AUDhexSPATIAL

You can download AUDhexSPATIAL for free from MaxForLive.com.

Here are the instructions for what to do with the .amxd file that you download from MaxforLive.com:

     https://synthesizerwriter.blogspot.co.uk/2017/12/where-do-i-put-downloaded-amxd.html

(In Live 10, you can also just double-click on the .amxd file, but this puts the device in the same folder as all of the factory devices...)

Oh, yes, and sometimes last-minute fixes do get added, which is why sometimes the blog post is behind the version number of MaxForLive.com...

Modular Equivalents

In terms of basic modular equivalents, then AUDhexSPATIAL requires six filters, six LFOs, six VCAs, and a mixer, plus some switching for the fixed pan positions, giving a total of about 20 ME.


Saturday, 27 October 2018

Flamming, Fluttering and just plain echoes...

Lots of other people have already noted the 'slightly less immediately obvious' devices inside the Ableton Live 'Max For Live Essentials' pack (for Live9!), but there is often an interesting alternative angle, and that's where I come in. In particular, Note Echo caught my eye, because it is a MIDI-domain echo, and it is programmed in MaxForLive...

Here's what I'm working towards in this post:


But first, some more background... 

Note Echo looks very similar to the long-established, factory default 'Audio Effect' called 'Simple Delay', but instead of processing in the audio domain, it processes the MIDI messages that control the production of the audio itself. So instead of having an Instrument produce a note that then gets echoed, Note Echo gets the Instrument to play several notes, delayed in time. So the echo happens before the audio is produced (which makes me think of the amazing fictional substance called thiotimoline...). 

Sometime during my Live9 to Live 10 updates, I got two versions of Note Echo. (Notice that the two Note Echo devices are MIDI Effects, so they go BEFORE the Instrument, whereas Simple Delay is an Audio Effect, and so goes AFTER the Instrument):


Producing echoes in the MIDI-domain enables some interesting special effects that aren't easy to achieve in the audio domain. The 'Feed Delay' rotary control in Note Echo allows you to control the amount of the incoming note's velocity parameter that is used in the delay section, and if timbre is influenced by velocity, then this means that the echoes that are produced are going to sound different depending on the velocity! In the audio domain, then an echo can merely work with whatever audio it receives at its input, but Note Echo transcends that limitation. I often program lots of velocity sensitivity into my sounds, and so I tried a few of my more extreme DX7 FM sounds that use velocity to make radical changes to the timbre, and these sounded really interesting when driven by Note Echo.

Another advantage of doing delay in the MIDI-domain is that you can control precisely what it is applied to. A few edits (Note Echo is programmed in MaxForLive) later, and I had a stripped down version of Note Echo that only affects a single MIDI note and had the pitch shift removed. After adding an LFO and a control mapper, I had an M4L device that does flutter echoes, but only on a single chosen MIDI note number. Now, you could use a separate track with just a single note on it, and process that using 'Simple Delay', but having a purpose-built device that works on an ordinary track is much quicker and more convenient, and I quite like both of those features!

My grateful thanks go to Ableton and Cycling '74 for Live and Max For Live - having example devices like Note Echo are a great inspiration for further exploration, and the ability to extend/enhance/tweak existing devices is wonderful!

Drum Flammer - as shown up at the top of this post!

What I found my quickly-hacked-together device very good for was producing 'flams', something which I hadn't really used since back in the 1990s, when drum machines first started to have enough polyphony to allow clusters of time-overlapping sounds.  Back then I used to create flams by manually editing MIDI Notes to give notes that rapidly repeated, in a brute-force approximation of the drumming technique where the name 'flam' comes from - which is kind of a cue for some of the flam rudiments...


There's quite a lot going on in that user interface, so here's the same thing split out into the major sections:


As you can see, the left hand side is very similar to the source M4L device, Note Echo. I have added the lower set of electors, which control the range of time change that the LFO can make, plus at the very top, there is the incoming MIDI note number indicator (on the left), then a 'Copy' button, and then the 'Note Selector' (with the blue triangle) that lets you choose which note will be echoed. The 'Copy' button just lets you set the chosen MIDI note number to be the one that is being displayed. So you just play a MIDI controller or keyboard to send the appropriate MIDI Note On message, and then click on the 'Copy' button. (I first used the technique in my MIDIQuantCC controller quantiser... But this was for MIDI Controller numbers, of course!)

The middle section is the LFO. Having produced some wild and totally-over-the-top LFOs recently ( example 1, example 2 ), this one is rather ordinary by comparison. Perhaps the only feature of note is the 'Random' waveform, where I haven't used the traditional Sample-and-Hold waveform, but instead I have used a rate-multiplied piecewise-linear waveform that seems to give good results in this application (and now that I have it done and dusted, I may well use it when I next revisit my other LFOs...).

The right hand side is just the standard parameter mapping controls that I have gradually been adding to my devices. It allows you to use the LFO to control the internals of the device itself, AND to control another parameter somewhere else in Live. This can be very useful for all sorts of interesting and unusual effects.

User Tips

For flams, turn the Offset rotary control (in the middle of the device) almost all the way anti-clockwise ( the shortest times) and set the time buttons on the left to '1'. Use a little bit of LFO Depth to give some movement to the sound, and set the two feedback rotary controls as far clock-wise as you dare. You will find that Drum Flammer can eat up processing power, so you may find that little bar in the upper right hand corner of Ableton Live is higher than you normally see!  

For flutter echoes, then higher values of Offset and the time buttons will suffice. Even slower times will give echoes, but without many of the artefacts that you normally associate with delays. I have to say that Note Echo is a wonderful device, and well worth the processing power that it can consume sometimes - and Drum Flammer is slightly more specialised, but I love the way it can add all sorts of unexpected variability to sounds.

Despite the name, Drum Flammer can also be used for non-drum sounds! There's an example on my SoundCloud pages that very eloquently shows how you can bury an interesting sound in way too much echo... Blame it on my formative years being spent adding too much reverb to synths. 

The best tip is to get familiar with Ableton's 'Note Echo' device first. It can do some very cool effects on its own. Me, I just like to go that little bit further...

Examples

Here are links to two SoundCloud examples of Drum Flammer in action.


Coming Up

Yes, there's a typo in the UI. I will fix it in the next update. 

Getting Drum_Flammer_mr_0v01

You can download Drum_Flammer_mr_0v01 for free from MaxForLive.com.

Here are the instructions for what to do with the .amxd file that you download from MaxforLive.com:

     https://synthesizerwriter.blogspot.co.uk/2017/12/where-do-i-put-downloaded-amxd.html

(In Live 10, you can also just double-click on the .amxd file, but this puts the device in the same folder as all of the factory devices...)

Modular Equivalents

In terms of modular equivalents, then reproducing this functionality in my modulars just required the sort of MIDI note mapping to 'round-robin' synth 'voices' that is quite widely available, plus a digital delay, an LFO, and the usual Utility modules. Overall, the core is about 4 ME, but that flamming is going to eat up synth voice modules, so you would need to add 1 ME for a simplistic synth voice module per overlapping flam note... At a minimum, that would be 2 extra ME, making 6 ME in total.


Sunday, 1 July 2018

An 'Extreme' Multiplying LFO for MaxforLive


LFOLFO is an experimental 'Multiplying' LFO. It is based on the idea that being able to switch the range of an LFO can be used to generate a number of interesting audio effects, and so the design is optimised to enable easy control of the Rate and Multiply controls. The prototype was produced as a response to a question posed by Russell Alderton on the 'Max For Live Users' Group on Facebook, and it has undergone extensive development since then.

The Rate (Frequency) of the LFO can be modulated via two controls: Rate and Multiply. The Rate control is a conventional frequency control, whilst the Multiply control has four modes that provide several ways to affect the frequency. A multiply value of 'x 1.' produces an output frequency as shown on the Rate control, whilst a multiply value of 'x 0.5' produces an output frequency of half the value shown on the Rate control, and a multiply value of 'x 2.' produces an output frequency of twice the value shown on the Rate control.

The Rate and Multiply controls both have their own dedicated Sub LFOs, which can be used to modulate them, and this is shown graphically in a display underneath the controls. The LFO output waveform is shown as a backdrop to the whole MaxForLive device, thus providing a 'history' of recent changes to the waveform.

Each Sub LFO has multiple output waveforms, and the waveform selection of Sub2 can be controlled by Sub1. The output waveform of the LFO itself can be selected using a vertical selector, or via two modulation modes: one that counts the number of cycles that have been output, and a second mode that uses a third Sub LFO (Sub3). Both modulation modes use a probability grid that can provide sophisticated control over the sequencing of output waveforms.

The output waveform can be further processed by three controls: Smooth, S&H and Decimate (which do what their titles suggest). Finally, Offset and Depth controls. plus an Invert button allow fine tuning of the range of effect on the controlled parameter - which is selected using the 'Map' button.

Sync

Conventional Digital Audio Workstation (DAW) LFOs are either free-running, or synched to the DAW transport. LFOLFO provides a different type of sync that is intended to explore an alternative approach. A selection from a number of timing sources can be used to reset the LFO waveform, and this provides an 'Event Sync' that gives a number of interesting ways working with musical events instead of being rigidly locked to a timebase.

The UI from left to right

LFOLFO has a lot of controls that it uses to provide a wide range of advanced functionality. The settings above are a good starting point for learning - they are a kind of 'Neutral' setting. From left to right, the controls are:

Storage

LFOLFO provides 9 'memories' that can be used to store and recall the state of all the controls. To store a setting, hold down the SHIFT key and click on one of the 9 boxes. Grey boxes are empty. Purple boxes contain a saved setting. The white box is the currently selected setting. If you over-write a box then the previous contents cannot be recovered - this is colloquially known as a 'face-palm' error.

Event Sync

The large selection box enables the selection of 'events' that can be used to reset the LFO output phase. The reset phase is set using the 'Phase' retry control that is underneath the selection box. The top selection is '=Not-Synched=' and this is the Free-Running mode. The next selection options are for MIDI Notes in the track clip:

- AnyNote resets the phase for any MIDI Note.
- AnyChange resets the phase for any new MIDI Note. Any repeated notes are ignored.
- Note0 only resets the phase for Note 0, the lowest MIDI Note. This note is not used very often...
- Note0Velo1 only resets the phase for a Note 0 MIDI Note with a Velocity of 1. A velocity value of 1 is very quiet.

The next selection options use the Sub LFOs. Sub1, Sub2 or Sub3 can be used to reset the phase of the LFO, as well as a special reset that uses Sub3 and the waveform cycle Count (shown on the far right hand side).

The reset happens as soon as the event is processed by the device, and the value can be set using he 'Phase' control. If the event frequency is less than the 'Rate' then one or more cycles of the output waveform will be output. If the event frequency is higher than the 'Rate' then cycles will not be completed because the reset will happen before the cycle can complete.

Sub1

The first sub LFO can be used to modulate the 'Rate' control. The 'Sub1' rotary control affects the rate of the Sub LFO, whilst the 'Depth' rotary control affects the amount of modulation. The selector box sets the output waveform. When Sub1 is used to modulate the 'Rate' control then a graphical display behind the rotary control will show the modulation.

The Sub1 LFO can also be used to control the output waveform of the Sub2 LFO. If the frequency of Sub1 is greater than Sub2, then Sub2 will output incomplete cycles of its waveform. The selection of the output waveform is in sequence, from top to bottom, and then repeats. No other waveform sequences are available in this version... The button has two settings: 'Off' has no effect on the Sub2 output waveform, whereas 'Mod' will repeatedly sequence through the four waveforms.

Sub1's modulation of the 'Rate' control can be used for a number of effects. Using a Sine waveform produces traditional smooth 'up and down' variation in the frequency of the LFO. The triangle waveform gives a more abrupt change of direction and gives a more synthetic effect. The two sawtooth waveforms are particularly good when Event Sync is used, because they can produce a number of 'rise' or 'drop' effects, where the frequency of the LFO rises or falls linearly. Note that one of the advantages of using Event Sync is that when the frequency of the events is less than the LFO 'Rate', then several cycles of the output waveform will be produced, whereas if the event frequency is greater than the 'Rate', then less than cycle of the waveform will be produced. So by adding MIDI Note events into the track clip, very precise control of the LFO output can be obtained. 

Sub2

The second sub LFO can be used to modulate the 'Multiply' control. The 'Sub2' rotary control affects the rate of the Sub LFO, whilst the 'Depth' rotary control affects the amount of modulation. The selector box sets the output waveform. When Sub2 is used to modulate the 'Multiply' control then a graphical display behind the rotary control will show the modulation.

There are four modulation modes for the Multiply rotary control, selected using the horizontal selector box on the lower edge of the device:

- Linear is a conventional modulation where the modulation increases linearly.
- Power increases the modulation in powers of 2.
- PowerHalf increases the modulation in quantised half powers of 2.
- PowerQnt increases the modulation in quantised powers of 2 (0.25, 0.5, 1, 2, 4 8, 16...)

Rate

The Rate road control is the main control of the frequency of the LFO. The output frequency is shown in Hertz. The modulation is shown graphically underneath the control.

Multiply

The Multiply control is a secondary control for the frequency of the LFO. It is rather like a 'range' control, but it can be modulated, and the rate and character of the jumps in LFO frequency can be controlled via the waveforms and the Sub1-Sub2 modulation button. Careful use of the Multiply control is the key to making the most of the functionality provided by a Multiplying LFO. Yes, you can use LFOLFO to vary a parameter with slow, smooth up and down changes, but this does not exploit the device to its full potential.

Try increasing the Multiply rotary control in each of these modes to see the effect on the 'Multiply' value. The 'PowerQnt' mode is specifically designed to change the rate in powers of 2: x .125, x .25, x .5, x 1, x 2, x 4, x 8, x16...

Vertical bar

The vertical bar shows the LFO output at the current time, and is not a control.

Waveform

The large selector box in the centre of the device serves two purposes, dependent on the mode set by the 'Waveform Mode' selector on the right - which has three modes: Select, which allows direct control of the LFO's output waveform via the selector box; plus Count and Mod3, which both use the grid in the middle of the device to choose waveforms, and the selector box then becomes an indication of which waveform is currently being output. In the Select mode, the grid, plus the Columns, Sub3 and Count rotary controls all do nothing. In the Count mode, the Columns and Count controls set the number of columns in the grid, and the number of cycles of waveform output that need to happen before the waveform changes (controlled by the cursor moving across the grid). In the Mod3 mode, then the Columns and Mod3 rotary controls are active, setting the number of columns and the rate at which the cursor moves across the grid.

The Grid

The grid is only active in Count and Mod3 modes, and allows the sequencing of waveforms to be specified. White squares indicate which waveform will be output when the cursor is in each column, an the vertical Waveform selector box shows which waveform is currently being output. If more than one square in a vertical column in the grid is white, then the output is randomly chosen from the white squares. So if there are two white squares in a vertical column, then the corresponding waveform will be chosen 50% of the time, on average. If there are three white squares, then each waveform will be output 33% of the time, on average. In the example shown above, there is just one white square in each of the two active columns, and so the corresponding waveform is chosen 100% of the time. This means that in Count or Mod3 modes, the first waveform to be output will be the Saw Down, followed by the Saw Up.

If you draw a line of white squares from the top left hand corner of the grid to the lower right hand corner, then each waveform will be played in sequence, just as in version 04. If you draw the opposite line, then the sequence will be reversed. The grid allows you to specify any sequence of waveforms, plus it allows probabilistic control over waveforms, which allows long complex waveform outputs. In summary, LFOLFO provides humungous power for creating output waveforms!

Once the waveform has been controlled using one of the three modes, then further processing can be carried out on it. This happens in the darker vertical box containing the 'Smooth', 'S&H' and 'Decimate' rotary controls. 

Smooth

The Smooth rotary control is a low pass filter that removes the sharp edges in the output waveform, but it also reduces the amplitude - so you may need to use the 'Depth' control to increase the size of the LFO output waveform. Remember that the 'Depth' control affects the output amplitude of the LFO waveform before the Smooth control.

S&H

The S&H rotary control adjusts the rate at which the LFO outputs its waveform. This has the interesting side effect of slowing down the scrolling speed of the background waveform display - but it does not change the rate or frequency of the LFO!

Decimate

The Decimate rotary control adjusts the resolution of the LFO output waveform. In the '0' position, then the LFO waveform is smooth, whilst increasing decimation values makes the output increasingly jagged until at '2.0' then there are only two values (maximum and minimum). You can still use the Smooth and S&H controls on a decimated waveform, so these three controls should be seen as a flexible way of adjusting the output waveform to your specific requirements.

Once the final waveform has been set, then the final section (on the right) does the mapping of the LFO waveform to the parameter that is going to be controlled by the LFO.

'Normal' or 'Invert' button

This button controls how the parameter is controlled by the LFO output. 'Normal' is the same as the vertical bar, whilst 'Invert' is turned upside down, so that high values of the vertical bar give low parameter values.

Offset

The Offset rotary control adjusts the output of the LFO. Normally this will be left in the default '0' position, but some parameters and other settings may require it to be changed. The output waveform display that forms the background to the device is the key to using the Offset control - you should adjust the offset so that the waveform is not clipped at the top of the bottom. (although you can use this as a deliberate effect if you wish)

Depth

The Depth rotary control adjusts the size of the LFO output (which is why it is the right-most control!), and 100% is at the middle position, so you can deliberately output larger values that will be clipped. The Depth and Offset controls will often be used together to get the exact parameter changes that are required. 

Unmap and Map

The Unmap button is only available when a parameter has been mapped using the Map control. The Map button is easy to use - just click on it and then select the parameter that you want the LFO to control. A good starting point is filter cut-off frequency in the 'Auto Filter' device. When you have correctly mapped a parameter then the name of the parameter will replace the 'Map' text in the button, and the 'Unmap' button will become available. If you click on the 'Unmap' button then the mapping to that parameter will be lost - and the only way to remap it is to carry out the mapping process again.

Getting LFOLFO

You can download LFOLFO 0v06 for free from MaxForLive.com.

Here are the instructions for what to do with the .amxd file that you download from MaxforLive.com:

https://synthesizerwriter.blogspot.co.uk/2017/12/where-do-i-put-downloaded-amxd.html

Modular Equivalents

In terms of modular equivalents, then reproducing this functionality in my modulars took anything from 10 to 14 separate 'basic' modules, with lots of patch chords (and some limitations and compromises), so I would rate this version as being about 12 ME.


Buy me a coffeeBuy me a coffee


Tuesday, 24 April 2018

Irregular timing in a MaxForLive LFO...

Previously I have described the design of ProbablyLFO, my 'alternative' LFO for Ableton Live, built using MaxForLive. Since the first release, I have gradually added extra timing sources, and until now, these have all used the MIDI input so that the LFO timing was driven by MIDI notes in the clip. "Genious" was how one user described the use of MIDI note events to drive an LFO...

But recent experiments with Max's 'random' and 'metro' objects have resulted in a new timing mode that extends the functionality of ProbablyLFO in another direction. I have added a timing source that uses the 'Free' mode asynchronous oscillator but uses that to drive a noise generator that clocks the LFO probability grid. The result is an LFO that doesn't output the waveform at a regular rate, but it kind of jerks along across the grid. By altering the 'Smooth' control you can calm it down or make it more jagged, which aren't the kind of words that you normally see used to describe an LFO...


As with all the other timing sources, there is an indicator 'light' that shows when that timing source is generating a clock. The rate of the 'Noise' timing is the same as the 'Free' mode, which wasn't easy to achieve - I had to make two 'metro' objects running at different rates in order to keep the rate the same, and I have to admit that I cheated and set the parameters experimentally, rather than doing the maths. Entropy and probability ain't my strong points. 

So what does this give you in terms of control? Well, conventional LFOs output a waveform where each cycle takes the same time, and the shape of that waveform tends to stay the same - so a sine wave always has the same shape, a sawtooth is always a sawtooth... By using random noise to time the movement across a grid that controls the waveform, ProbablyLFO lets you have waveforms that can vary per cycle, and that have an average rate rather than exactly the same time for every cycle. Depending on what the random noise does, some cycles might be short, while others might be longer, and the progress across the grid can vary within the cycle. 

Let's look at the output of an unsmoothed sawtooth from ProbablyLFO with 'Free' timing:


So the sawtooth is the same each cycle, and each cycle takes the same time.

And now, the output with the same unsmoothed sawtooth with 'Noise' timing (several examples):


As you can see, cycles vary in their length, and the ramp isn't a nice straight line any longer because the progress across the grid is driven by random timing. The only thing that is the same is the average rate - over a long period of time, the same number of cycles will hap[pen as in the first sawtooth example.

( Note that this is using a fixed waveform in the grid. ProbablyLFO's grid allows you to set the probability of different outputs, and this isn't being used here - this is just the 'Noise' timing. ) 

Musically, this gives you an LFO where the parameter you are controlling does not change repeatedly with exactly the same timing and waveform. Instead you get a much more variable timing and output - less metronomically predictable...

Downloading MIDI ProbablyLFO 0v06

You can download MIDI ProbablyLFO 0v06 from MaxForLive.com 

Here are the instructions for what to do with the .amxd file that you download from MaxForLive.com:

https://synthesizerwriter.blogspot.co.uk/2017/12/where-do-i-put-downloaded-amxd.html


Buy me a coffeeBuy me a coffee


Thursday, 30 November 2017

Probabilistic flexible LFO for Ableton Live

ProbablyLFO is not an ordinary LFO, although it can be used to produce the usual simple repetitive, predictable modulations that are expected from this type of slow modulation oscillator. But it goes much further than that, into more unusual areas, and so it allows deep, complex and often unexpected and unpredictable control over parameters in ways that can be very musically useful.

LFOs normally provide a speed control and a waveform selector, and LFOs for use in Ableton Live add a way of mapping the output to a parameter. ProbablyLFO has all of these, but the way it approaches each of them is intended to extend and enhance what it does. So there are four ways to control the speed, a small number of preset waveforms which can: be edited live; have random values added; can be filtered/smoothed; and output, in various ways. The most conventional bit is the parameter mapping, which works exactly the same as in any other LFO - and that's because that bit of code is taken from the Ableton example M4L LFO!

ProbablyLFO?


ProbablyLFO is part of the Probably series, and is a companion plug-in to all of the step sequencers (Probably, ProbablyZ, and ProbablyS have been released so far). The common feature is probabilistic control, and so the sequencers do not produce static repetitions of the same sequence (unless you set them to do so, of course) - instead you can control how they produce variations in pitch, octave, probability of a note event happening, velocity and length (and more...). ProbablyLFO brings probability to LFOs...

So what does ProbablyLFO do differently?

The speed of an LFO sets the timing of the modulation that it controls. So a typical use might be the  vibrato of an oscillator, or a slow sweep of a filter or phaser. ProbablyLFO has four sources for its basic underlying 'Speed':
- a free-running oscillator (i.e asynchronous to Live's tempo clock)
- a synced divided version of Live's tempo clock (i.e. synchronous)
- Note events (so each incoming note from a clip causes the LFO to run)
- Poly events (the LFO runs faster or slower depending on how many notes happen at once)

The 'Free' setting is the simplest. There is a 'Speed' control that sets the basic frequency (in Hertz or cycles per second) that the LFO runs at. (You will see why I call it the 'basic' frequency later on...) This speed is not synced to the main Ableton Live tempo clock (i.e. it is asynchronous) and so can b used when you want a modulation to happen with no connection to the main tempo - slow sweeps are one example that work well.

The 'Sync' setting allows you to synchronise to the main Ableton Live tempo clock, but you can control the division ration - so the control is called 'Divide'. If you set the 'Divide' control to 1:1, then ProbablyLFO runs at the same speed as the Ableton Live tempo clock. Set it to 2:1 and it runs at twice the speed of Live (the fastest is 4:1, which is 4 times Live's tempo). Conversely, if you set it to 0.5:1 then it runs at half the tempo of Live, and you can go all the way down to 0.125:1, which is one eighth of the tempo of Live. There are other ratios as well between these limits, but they are all locked to Live's tempo.

The 'Note' setting has no control - or rather, the control is in the incoming MIDI notes. It takes any note events in the clip on the track, and uses them to run the LFO. So the more notes there are, the faster the LFO goes. So this is another type of 'sync' - the LFO is locked to the notes, but if you add extra notes to the clip, then the LFO reflects that by running faster. Simultaneous notes count as one note when using this setting.

The 'Poly' setting also has no front-panel control, and is a variation on the 'Note' setting. In 'Poly' the number of notes that are present simultaneously controls how quickly the LFO runs, so chords make it run faster than single notes. Once again, this is 'synced', but it is another type of sync.

The 'Note' and 'Poly' modes can be very useful musically, because the LFO is tracking the occurrence of notes, and it not tied directly to time or tempo. You may need to spend some time getting used to these two settings, because this type of sync may be quite unusual (I've not seen it anywhere else before, but I haven't seen everything!).

Waveforms

LFOs traditionally have  predictable selection of waveforms (or wave shapes: LFOs arguably have wave shapes, whereas audio oscillators should have waveforms, but this is just semantic detail, and waveform is often used interchangeably with waveshape): sine, triangle, sawtooth, square, pulse and some sort of random or 'sample & hold' waveform (and sometimes a 'draw-your-own' waveform as well...).

ProbablyLFO has a similar selection of waveforms provided as presets, but has a much larger possible set of waveforms (very large numbers of them: many millions). The waveforms are provided as starting points for you to edit to suit your own purposes, and so some of them may appear weird at first.

The 'Flat' waveform is the first unusual waveform. It looks like a thick line across the screen, and you may be wondering why it is included at all.

To understand what is happening, then you need to know what is happening in the waveform grid. The 16x16 grid in the middle of ProbablyLFO shows time horizontally, and value vertically. Single white cells in a column produce that value as the output, but when there is more than one white cell in a vertical column, then the output value will be chosen randomly from those values. In this case, there are three rows of white cells, and so the output waveform can be any of those three values...

So the 'Flat' waveform is actually anything but flat: it is a sequence of values chosen from the middle three: a kind of random ripple. You can change the smoothness of the ripples using the 'Smooth' control (sorry about the obviousness of the naming here!): lower values make the output 'jagged and step, whilst higher values smooth it out. But take care: if you apply too much smoothing then you will miss the peaks and troughs. You can see the smoothed output of the grid on the right hand side of the grid - in the big vertical bar.

To hear this modulating a parameter, you will need to use the 'Map' button on the right hand side of ProbablyLFO to select a parameter. It is normally a good idea to 'undo' or 'clear' any pre-existing mapping by clicking on the 'X' button first, an then clicking on the 'Map' button, followed by the parameter that you wan to control. When you have selected a parameter to control, then the name of hat parameter should appear in the 'Map' button. The final things you may need to tweak are the 'Offset' and 'Depth' controls, which set how the smoothed output value from the grid affects the parameter. The best starting point is to set the Offset to zero, and the Depth to 100%, and see how this affects the parameter you have chosen. Starting with a filter frequency parameter in a synth is a good starting point for exploring how these controls work. You can invert the way that the value goes by using the 'Normal/Invert' button. The 'Flat' setting can be a bit subtle, so you may not hear much effect on the filter, so you could try increasing the filter resonance, or you could click the little '+R' button to add some randomness and give you more range of values in the output.

Clicking on 'Flat' again will give you the original, clean waveform again, and you've probably already clicked on the '-R' button to see if that removes white cells - which it does. 'Clear' clears the whole grid. Hopefully, you've just realised that there are a huge number of possible waveforms in ProbablyLFO, and exploring them all could take a long, long time...

The 'Both' waveform looks like just slight ripples at the top and bottom of the range of values. But, in practice, this produces an output which makes big jumps up and down, or little jumps in the ripples. You can control the smoothness and size of the jumps with the 'Smooth' control, of course. This tends to sound a bit like the 'Sample & Hold' or 'Random' waveforms that you get in conventional LFOs, depending on the setting of the Smooth control.

'SineH' is the traditional sine waveform that you were expecting to find in an LFO, except that it is horribly quantised! The 'Smooth' control can remove as much of the blockiness as you want, so the grid is slightly misleading. 'SineV' is not normally found in LFOs, and gives an interesting output: not random, but structured, and with lots of variation each time it repeats.

'RampU' (Up) and 'RampD' (Down) are the usual sawtooth waveforms, but they also provide a good opportunity to explore some additional controls. The 'Direction' controls on the right hand side shows '<', '<>' and '>', and ProbablyLFO normally defaults on first use to '>', which equates to 'forwards' or moving from left to right across the grid. If you select '<' then the cursor line moves across the grid 'backwards' from right to left, and if you select '<>' then it 'loops' back and forth from left to right, and the sawtooth or ramp waveform becomes a triangle waveform at half the speed. You may have already figured out that if you want a full speed triangle, then you click on 'Clear' and then draw in a single cycle and select '>' or '<'...


'Rect' provides various rectangular waveforms: from square to pulse. Just keep clicking on the button until you get a waveform you like. (I did consider making all of the 'waveform' preset buttons work this way, but decided against it in this version. I also wondered if I should make all of them 'add' without clearing... I'm still considering the best UI to use in a future version...)


'Bars' gives you four vertical bars, whilst 'Blobs' gives four blobs. These are intended (as all the presets are) as starting points for editing, or adding (or removing) random white cells with '+R' or '-R'.


The final control in this version is the Columns control, which sets the number of columns in the grid. This is normally set to 16, but you can set it to smaller values if you want to change the length and waveform that the grid produces. The final parameter-affecting version of the grid output, after smoothing, offset and depth, is the small vertical bar on the far right hand side.

And that concludes this quick description of ProbablyLFO. I hope that you like and enjoy exploring its many and varied creative modulation control possibilities (and probabilities).

MaxForLive.com

ProbablyLFO is available, for free, from MaxForLive.com.

You will get a '.amxd' M4L device file. You need to add this to Ableton Live so that you can add it to the track device chain.

How do I add it to Ableton Live?

Live 9 provides two ways to add a .amxd M4L device file:

1) Drag the .amxd device file into a track, and then click on the save icon (right: floppy). This will automatically save the device to your ‘User Library’ folder in ‘Places’ (the ‘head outline’ icon)

2) Put the .amxd device in a folder you have allocated to M4L devices, then add that folder to the Browser. Just scroll down to the bottom of ‘Places’ and click on ‘Add Folder’ . Then select the folder where you have saved the .amxd device file. (The ‘power user’ technique is to just drag that folder into ‘Places’)


Buy me a coffeeBuy me a coffee


Sunday, 24 July 2016

Altering parameters inside an Echo Effect...

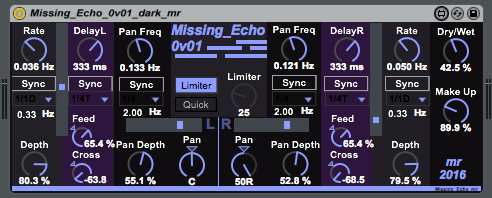
In several of my MaxForLive effects, I have examined what happens if you modulate a parameter that is normally not associated with that type of control. So there's a Limiter with an LFO, an Echo effect where the modulation of time is derived from Random Noise, and my most recent effect, 'Missing Echo' allows the feedback inside a delay line to be altered by an LFO.
You can do this manually, and there's a number of performance techniques based on this general principle. I've covered this before in my 'Dopplator' effect, but that was based on a rounded pulse as the LFO waveform, and didn't have any panning facilities. 'Missing Echo' is much more in the mainstream sequence of my effects, and so has dual syncable independent LFOs for panning, plus a Limiter to keep things under control if you require it, and dual syncable independent delay lines, as well as dual syncable independent LFOs to modulate the feedback. Yes, this is a lot of LFOs, but those always were the modules I ran out of first when I used to play with modular synths...
The LFO modulates the feedback in a slightly different way to the way that you might expect, and I'm still exploring things to find the optimum method. The current version first sweeps from zero feedback to the modulation setting for in-channel feedback and then back, and then sweeps from zero feedback to the modulation setting for the other-channel and then back to zero. So you get one half cycle of ordinary echo, followed by one half cycle of ping-pong echo, with all of the stereo imaging that you would expect from this arrangement. Add in the stereo auto-panning, and there's a lot that can be going on in that stereo image - if you want! As I said, I'm still trying to find the best way of controlling this, and a later version may add more facilities...

 'Missing Echo' can be downloaded from MaxForLive.com

 Because I have several different variations on the Echo effect available (from www.maxforlive.com) then I'm going to be adding a special easy selection page soon, so that it is easier to browse through the different variants on the echo effect that I have produced.

Monday, 12 January 2015

Refined Combing...

Things don't always go the way you intend. I had an idea for a phaser effect that was driven from a filtered noise source, and the end result was something rather different. Here's the story...

'Phasers' are just comb filters where the notch frequencies are modulated up and down in frequency by an LFO. (My previous Comber effect was nothing more than a few of these in one place.)
The audible effect for typical 'vibrato/tremolo' LFO rates sounds a bit like detuned oscillators, and so can be used as a simple 'chorus' effect (there are other ways of doing chorus effects as well). At slow LFO rates then the effect is more like several resonant filters sweeping up and down, which is exactly what is going on!

But whilst sine wave shaped LFOs are all very nice, there are many other possible alternative waveforms, and repetition can get a bit boring. So my idea was to got most of the way to the opposite extreme from the pure predictability of a boring sine wave and use noise instead. Filtered noise seemed like the right thing, and so I envisaged an array of resonant high-pass, band-pass and low-pass filters, and perhaps some sort of neat GUI control to create a final 'noisy' modulation for the comb filter.
Unfortunately, the end result was not as interesting as I hoped. High-pass filtered noise just gave a rapid tremolo effect, and not a particularly nice or useful one. Band-pass filtered noise was still too busy. The only really useful noise was heavily low-pass filtered noise, containing exactly the sort of frequencies that you would use for tremolo, vibrato or a phaser! After a bit of experimentation, it turned out that I didn't need any conventional filtering at all, and that just a bit of sample averaging (OK, primitive filtering) produced nice random wobbling that sounded ok - but it wasn't anywhere near as impressive as I'd been hoping.

So I wondered if something combining the LFO and the noise was a better idea, and I added a DJ cross-fade type control to mix between the LFO sine wave and the noise waveform. This seemed to liven up the result and make it a bit more interesting and unpredictable...
But then I realised that I had an alternative source of variation, and so I added a second LFO to drive a Sample/Hold circuit that sampled the original sine wave LFO. Sample/Hold circuits have always fascinated me, right from the days when you put high-input impedance op-amps on Teflon PCBs with polycarbonate capacitors and used reed-relays as input sampling switches, all in the analogue quest for long-term voltage storage (and you still got droop over time!). In the digital domain, things are different (and you add imperfections if you want to model the real world) and so a quick bit of M4L'ing later, I had an LFO with sine waves for high sample rates, and repeated complex patterns for lower sample rates. (The S/H samples when the indicator lights up yellow, btw.)
The DJ slider became a 'Randomness' control, and I added a red indicator to provide visual feedback for when the 'Freq' and 'Depth' controls needed to be adjusted (up and down respectively), and Comber V0.3 was born! I hope you find it a more versatile and inspirational effect for your music. 


Comber V0.3 is available, as always, for download from MaxForLive.com.

Related articles