Saturday, 4 June 2022

Outreach - What I try to do for education...

Yep, I do other things! This blog is only part of my outreach activities...

Synthesizerwriter at the Suffolk Show 2022 (The badge is deliberate - the 2020 and 2021 shows didn't happen for some reason...)

For the last day of May, and the first day of June, 2022 (that's the 31st of May and the 1st of June, just to be sure...), I was at the Suffolk Show, on the 'Innovation Martlesham' technology innovation stand (huge thanks to BT (the telco, not Brian Transeau)), trying to inspire young minds to take up a career in technology. My aim was to get kids to think about sound in a different way, and so I had a ‘3D Sound Box’ interactive exhibit, where you put your hands into a box, moved a controller around, and put some headphones on (with other people listening in on other headphones (parents, siblings, etc.)). As you moved the controller, the sound changed in subtle and complex ways, and the reaction was uniformly amazing - eyes opened wide, smiles appeared on faces, and parents ended up dragging the kids away some time later. ‘Cool!’ was the standard comment.

People totally comprehended that when you moved the controller so that it pointed in a particular direction, you get a particular sound, and that you could blend from one sound to another by moving the controller to another position. Several people said that they were expecting just a few sounds and a simple mix between them, and they were not expecting a complex morphing from one sound to another...

Behind the scenes, a DJ Tech Tools MIDI Fighter 3D provided the position controller, with two additional infra-red position sensors providing Left-Right and Backwards/Forwards control. The position vectors were fed into Ableton Live, where a custom MaxForLive script changed the rather strange outputs into more understandable controls suitable for controlling parameters (The MIDI Fighter 3D is designed for finger drumming!). These parameters were then used to control the positioning of the four source units in the convolution triangle in Phobos from Spitfire Audio (and BT, (Brian this time!)!) (I use a lot of stuff from Spitfire Audio!). Ableton was sending a C3 drone note to Phobos, and it was set up to produce very different sounds for each of the extreme positions, with Ableton also adding a controlled low pass filter on one axis. The output of Phobos was then tweaked further, ending up in the Envelop Spatial audio plug-in, and the final audio was delivered to stereo headphones using binaural processing. The convolution synthesis in Phobos was a key part of making this different to ‘four sounds in space that you mix between’ - which is what was apparently expected. (A couple of people wanted the standard ’sound rotating around your head’ binaural demo, so I had a Live Set for that as well!)

The MIDI Fighter 3D

The DJ Tech Tools MIDI Fighter 3D MIDI Controller

The MIDI Fighter 3D is a finger drumming MIDI controller that has 16 expensive, high quality, 'arcade-console' style buttons/switches that are designed for long life and consistent operation in punishing situations - several millions of pushes (5 million+ in this case). Elektron have similar switches on their gear where the buttons are going to be 'mashed' a lot in normal use. In contrast, ordinary 'click' switches are small, very low cost, and are made of a metal dome that collapses when you press it, and have a life of a few tens of thousands of clicks for the cheapest, with over a hundred thousand clicks for the more expensive versions. 

(The rubbery buttons that you find on a lot of gear are called membrane switches, and here the flexible bit deforms when you press it, which pushes a piece of conductive plastic (containing lots of carbon, so it looks black) onto a printed circuit board, and so makes a connection. These are very low cost, are easy to light up with LEDs, and are easy to replace (you just replace the sheet of flexible stuff and all those little blobs of conductive plastic), which is a good thing because they can wear out with a lot of use, and they don't like dust or ash or powders, and they are not very consistent in operation - you know how some of them can deform is strange ways, and sometimes get stuck? As for computer keyboard switches, then that's a whole topic all to itself!)

But this isn't a blog on switches! What the MIDI Fighter 3D also has, and the reason for the '3D' part of the name, is a 3D accelerometer which can detect movement on 3 axes: x, y and z. There are several modes of operation, but the one I used was the 'Edge Tilt' mode.In this mode, if you tilt the MIDI Fighter 3D, then it outputs MIDI Continuous Controller / Control Change (CC) messages that indicate how much it has been tilted relative to each of the four bottom edges. 

Rotation on the right hand edge...

So for the right hand edge, CC0 (zero) outputs a value of 0 (zero) when the MIDI Fighter 3D is horizontal (on a table, for example), and 127 when rotated clockwise by 90 degrees, so it is vertical.

Rotation on the left hand edge...

The left hand edge is similar, except that this time it is CC2, and it is anti-clockwise rotation that outputs a value of 0 (zero) when horizontal, and 127 when vertical. There is a small 'dead zone' (settable in the Utility software (Mac and Windows) that lets you set a range where small tilts from the horizontal do not output CC messages. 

For finger drumming applications, where you place the MIDI Fighter 3D on a surface and tap the buttons, then tilting the box along one of the edges feel very natural, and the box has rounded rubber feet that make this very easy to accomplish. But if you pick up the MIDI Fighter 3D, then you can tilt it in any direction, and so having the edges as the reference points doesn't make much sense. Also, you can tilt it either way because there isn't any surface getting in the way. There isn't a 'free space' mode, although there is a mode where you can also detect rotation, but that requires you to press a button each time you want to know what the orientation of the MIDI Fighter 3D is... 

So, I wrote a little utility, in MaxForLive, that takes the CC messages, and processes them so that when you hold it in your hands instead of being on a surface, then it combines the 4 controller messages (CC0, 1, 2, and 3) so that they are combined into just a pair of messages where you can go from vertical, through horizontal and back to vertical again with a single continuous clock-wise (or anti-clockwise) movement, and the result is a 'Composite' controller message that goes from o to 127 (with a small 'dead zone' as it goes through horizontal). This works for left and right, as well as forward and backwards, so you get two composite controllers.

A Composite CC made up of CC0 and CC2 (or 1 and 3)

The 'inverse' composite controllers are also output from the Utility, so you get pairs of CC messages that go from 0-127, and 127-0, simultaneously, depending on how much you have tilted the MIDI Fighter 3D away from the horizontal. Not only does this feel 'right' when you hold it in your hands, but it allows you to control two different parameters as if the MIDI Fighter 3D was a cross-fader - but one that works in two dimensions instead of just one. 

The MIDIccTWEAK Utility written in MaxForLive...

The MaxForLive Utility, MIDIccTWEAK, will work with any source of CC messages, and provides offset and gain control, plus inversion for the basic CC messages, then the paired 'composite' controllers, and finally paired 'composite' controllers using the 'other' pairing - for this application, it uses position sensors at 90 degrees to each other, instead of being on opposite sides of the MIDI Fighter 3D. That's 12 mappable outputs from the four CC sources. 
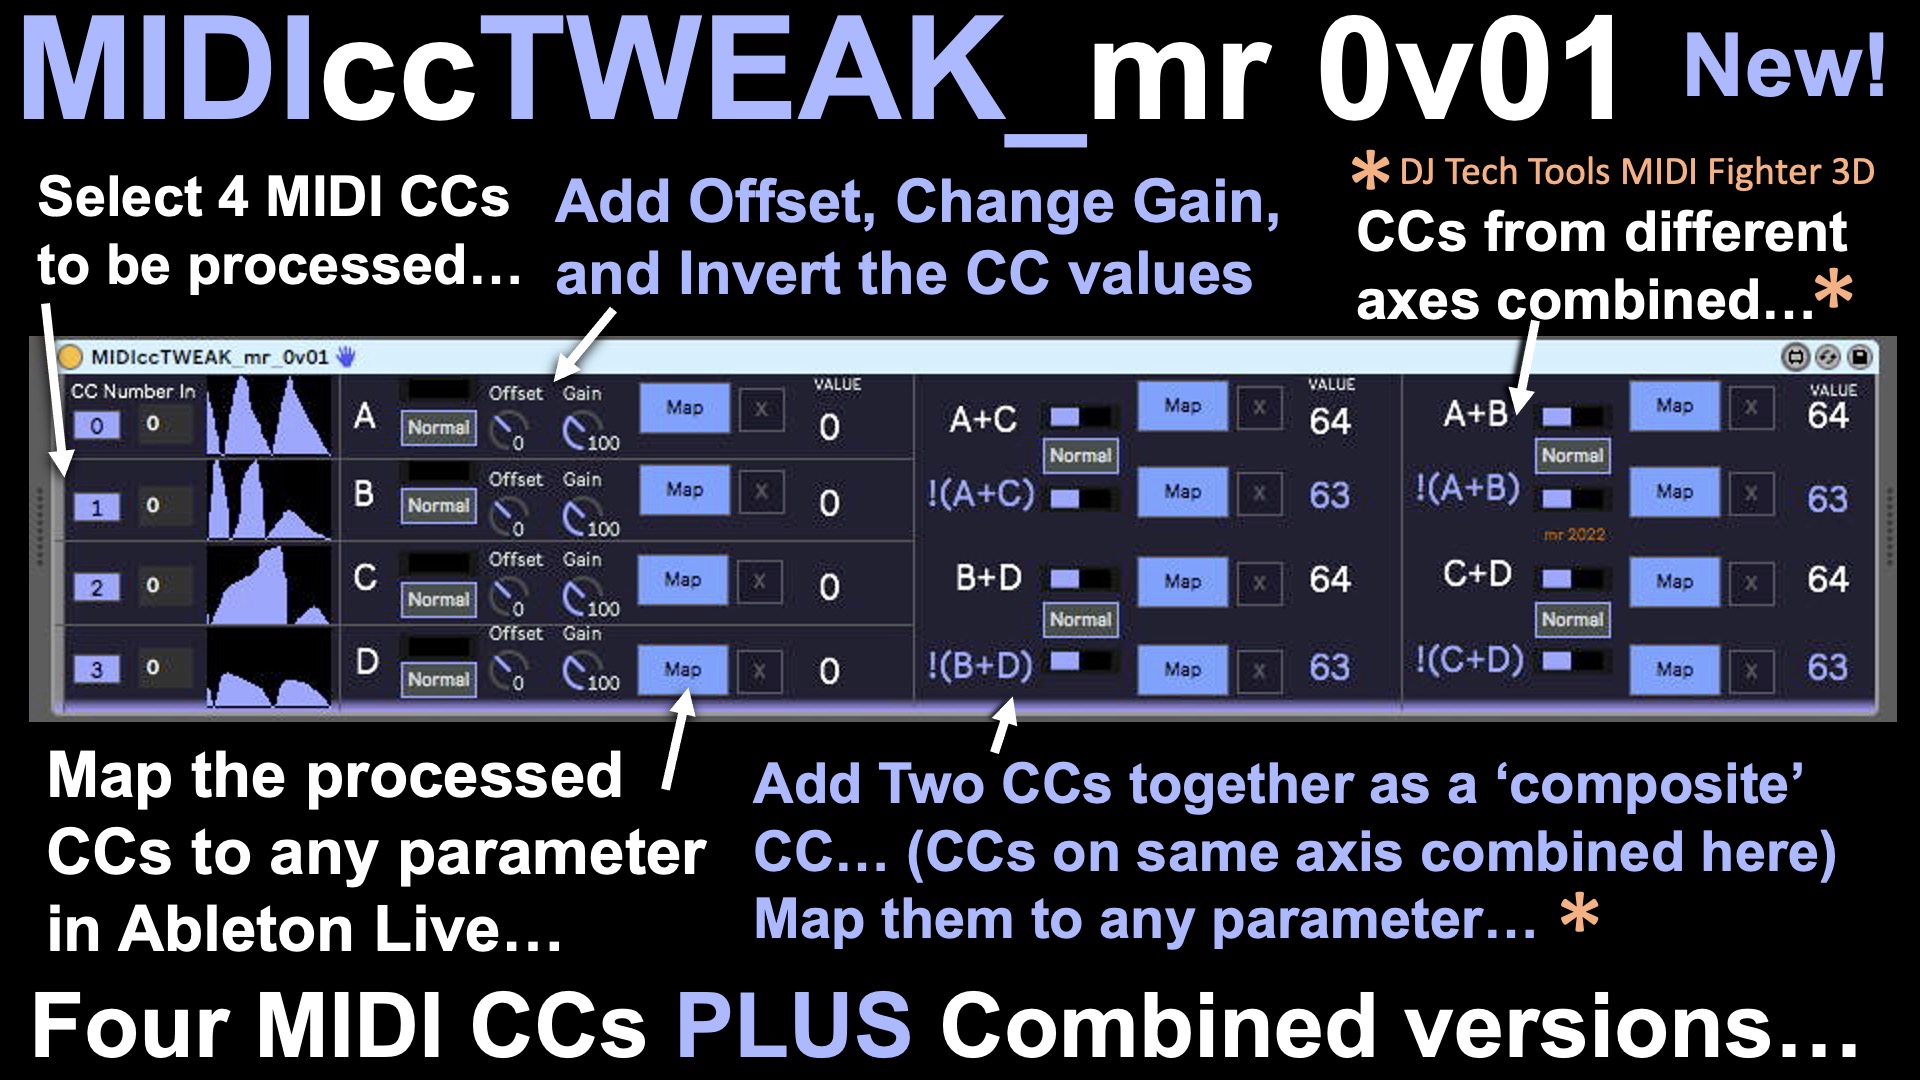
What can the MIDIccTWEAK Utility do?

The MIDIccTWEAK Utility can be downloaded from MaxForLive.com...

Inside the M4L code...

A couple of interesting things came up whilst programming MIDIccTWEAK, although neither of them are clever or unusual, which is usually when I include more details. Nope, in this case it was an interesting option and a potential trap for the unwary. Here's a fragment of the M4L code:
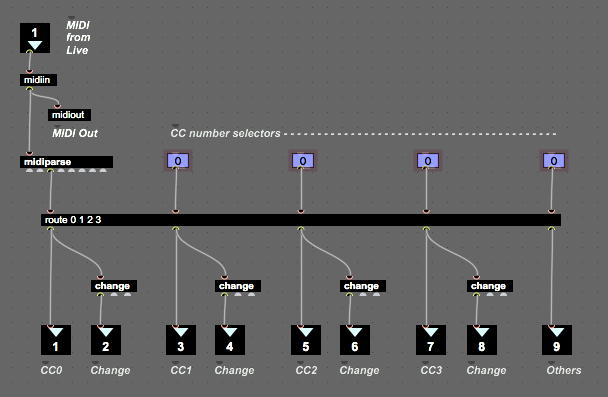
Part of the M4L 'code' for MIDIccTWEAK...

Now, most of this is perfectly ordinary: a MIDI In (...and an Out to provide a 'Thru' to the next MIDI device in the chain...), a MIDI Parse object to decode the MIDI messages, and a Route object to extract just the MIDI CCs that we are interested in. But note those 'change' objects - this was me testing out an idea to try to ensure that the MIDI bandwidth consumed by Controllers was minimised. The 'change' object filters out any repetitions of the same number, and so this code was imported from a prototype M4L device where I was monitoring several MIDI Controller hardware devices to see what their outputs looked like... 

I was expecting to see some repetitions of the same controller value in the Controller Messages, and yes, I know that the alternative name for Continuous Controller messages is 'Control Change' messages, but I was still curious to see what actually happened. It turns out that everything that I looked at sent streams of messages of changes to MIDI Control values, and even when the faders, rotary controls, levers, and other physical controls where moved very slowly, then repetitions were still filtered out just about all of the time. In the past, I have seen at least one Mod Wheel where careful positioning of the wheel would produce continuous messages with two slightly different values, but not recently. I have talked about this before in this blog, but it is always interesting to see just what the difference in values (the 'delta') is in reality. Theoretically, it should be one, but this uses lots of MIDI bandwidth, and rapid changes of controller value are going to create long streams of controller messages that will just clog things up. So a more sensible approach would be to send controller messages at fixed intervals of time, so that there is lots of detail for slow movements, and less detail for fast movements. I suspect there is a 'rule of thumb' set of values for timing, but I have never done deep enough research into this. let me know if you want me to revisit MIDI Controllers and look at this aspect of them. 

What ought to be useful about the 'route' object is the final output, where any messages that don't match a CC number are dumped - an 'else' or 'other' or 'default' output (it depends on which programming languages you are familiar with!). But I haven't ever needed a 'Controllers you haven't selected' detector. I suppose you could use it to look for unusual activity from controller numbers that shouldn't be outputting anything, but it just seems to be something that should have a use, but I haven't stumbled across it yet.

More interesting, and not restricted to only this M4L object, is a potential trap for then unwary. Look at the right most input and output - at the top, you have the number box for selecting which controller the 'route' object should be matching, and underneath, you have the 'Other' output, for when no Controller number message matches the specified numbers. Whoa! 

A potential trap for the unwary...

Actually, those number boxes, which control the matches that appear at the outputs, are offset by one horizontally - to the left (because of the input on the top of the 'route' object). The second input determines what comes out of the first output of the 'route' object, and so on across the object. Lots of MaxForLive object are like this, when you look for it, and it is one of the things that you need to watch out for, especially when you extend object boxes very wide, as here (or wider!), so that you can keep all of the parallel output paths nest and tidy. If the left hand edge is off-screen, and you only look at the right hand edge, then the number box looks like it ought to be controlling the output underneath it - so the implied connection inside the yellow circle is not correct!

The MIDIccTWEAK Utility can be downloaded from MaxForLive.com...

Multiple controls

Inside the '3D Sound Box' used in the interactive exhibit, there are additional infra-red position sensors that are used to detect side-side movement (used to control left-right panning), and vertical (up/down) movement (used to control the overall tone of the audio), so there are at least four separate independent ways that you can control things just by picking up the MIDI Fighter 3D and moving it around inside the box.

The 3D Sound Box...

You can just see the MIDI Fighter 3D resting on the raised floor of the 3D Sound Box in the photo above. 

Sound Generation

There was quite a lot of sound design behind the sounds that were produced. I wanted something subtle, sophisticated and very controllable, and I definitely didn't want to have a 'sound going round your head'-type of binaural demonstration, because those have always felt gimmicky and not very real world - I can't recall a real musical performance where position was that important or centre stage, with the exception of Tim Souster's 0dB concert at the Royal Northern College of Music in Manchester, in the late 1970s (and I was there!), where there was a lot of performing 'in the round'...

Instead, I chose a drone sound, and mapped the MIDI Fighter and the up/down sensor to changing the timbre of that sound. I used the Spitfire Audio / BT 'Phobos' polyconvolution synthesis virtual instrument to generate the sounds, inside Ableton Live. Four Source Units provided the inputs to three convolution synthesizers, with the controllers moving the four sources around in the convolution triangle. I also added a filter control so that anti-clockwise rotation changed the cut-off frequency of a low-pass filter (a cliche, I know, but it was very popular!), and added in some percussive sounds when the controller was tilted all the way backwards. All in all, there were lots of different timbres and smooth blends between them as you moved the MIDI Fighter 3D around inside the box.

I added a little bit of reverb to provide additional spatialisation, and then passed the various audio outputs into the headphones via Envelop binaural plug-ins. I used a Studiospares HAR-60 six channel headphone amplifier to drive six pairs of headphones - and Studiospares gave me an amazing deal for buying Mackie closed-back headphones in bulk!

People rapidly got how it worked! There's something about moving your hands making a sound change that activates a kinetic spatial memory thingy inside your head, and when the changes are complex and involving, then you get lost inside the soundscape. In a world where people don't seem to listen hard to music any longer, it was amazing to see people concentrating on what they were hearing. one pair of headphones was used by the 'driver', whilst the other headphones allowed other people (parents, friends, etc.) to listen in. In many cases, passive listening resulted in them wanting to 'have a go' as well!

Talking to parents, they were expecting 120 bpm, 4/4 EDM, and were totally surprised that someone would instead demonstrate something which was subtle, deep, sophisticated and sounded high quality - I explained that the core of the sound came from one of the top sample library companies in the world… So the sound design that I did worked very nicely. Kids (and their parents) loved the exhibit - one family said that it was the best thing they had seen (heard!) all day! 

Outreach

The success of an interactive exhibit like this is about reaction at the time, and then about follow ups. In the two days, I got huge numbers of smiles ('This is the first time I've seen a smile like that for ages!' was one parent's comment...) and a universal 'Cool!' reaction from just about everyone, especially young kids. I have been invited to schools to do more demos, asked by a local media group if I would be interesting in a collaboration, and the local university is also interested in talking to me more about this type of interaction and how to programme it. 

So, my grateful thanks to Spitfire Audio and BT for Phobos, because it was a key part of a very successful exhibit that may well have influenced more than 100 young minds into thinking about sound in a different way. Also thanks to Ableton for Live, and especially MaxForLive, a toolkit that I use all the time! Thanks to the amazing guys at DJ Tech Tools for their MIDI Fighter 3D controller. Thanks to Studiospares for a beautifully thought-out headphone amplifier. And finally, thanks to Envelop for making spatial audio so accessible in Ableton Live! Oh, and thanks again to BT (the telco) and Innovation Martlesham for making this all possible!

---

If you find my writing helpful, informative or entertaining, then please consider visiting this link:

Synthesizerwriter's Store (New 'Modular thinking' designs now available!)

Buy me a coffeeBuy me a coffee (Encourage me to write more posts like this one!)... or...

Buy Me a Coffee at ko-fi.com (Encourage me via a different route entirely...)

Or just tell someone else that there's this amazing blog about hi-tech music...


Sunday, 29 May 2022

The Zoom MS-70CDR MultiStomp Multi-Effects Pedal Arrived!

The pandemic must have been tricky for the Zoom Corporation (the web-site is at: https://zoomcorp.com/en/gb/ ), the Japanese manufacturer of a wide range of hi-tech audio devices from field recorders thru multi-track recorders to guitar multi-effects units. The world added a new verb: 'to zoom' to mean using videoconferencing, via the USA's Zoom Video Conferencing, Inc. (the web-site is at https://zoom.us ) company, and so there are now two 'Zooms': one for audio, and one for video. 

In the pro-audio world, Zoom is synonymous with field recorders (alongside Tascam, another Japanese company), and in the guitar effects world (plus synths at line level, of course!) for a range of multi-effects devices. If like me, you have also been using videoconferencing a lot more over the last couple of years, then the double use of the same word has probably been intriguing. At times like this, I refer back to one of those useful sayings:

'The Universe is NOT stranger than you can imagine. 

It is stranger than you are CAPABLE of imagining...'

Which puts me in my place very firmly. 

One thing which I was capable of doing was ordering a Zoom MS-70CDR multi-effects pedal as part of my ongoing investigation into obtaining a dual modulation effects pedal. It all started when I looked at the GFI System Synesthesia and was very impressed with what it could do, but I was intrigued that there wasn't a stereo version. The vast majority of my pedals are stereo, mainly because most of my synths and drum machines are stereo (with some glorious exceptions, of course!), and so except for specialist uses (my Yamaha TX7 processing via a Valeton GP-100 multi-pedal intended for guitars), I tend to only research stereo pedals when I'm looking to satiate my GAS (Gear Acquisition Syndrome, for which pedals are my 'relatively low-cost' mitigation... well, that's my rather weak excuse, at least...)...

There has been a lot of news about 'Supply Chain Difficulties' for several months now, and for a while, it looked like the Zoom MS-70CDR had been affected. My back order kept getting updated with a new 'slip' of a month or so, and it looked like I wouldn't be getting one until the end of June 2022, assuming that more slip didn't occur. So it was a very pleasant surprise when I got a package from Andertons (I have bought an alarming quantity of stuff from them, over the years...) in May, some time before their estimate. Excellent!

https://zoomcorp.com/en/gb/multi-effects/multistomp-pedals/ms-70cdr/

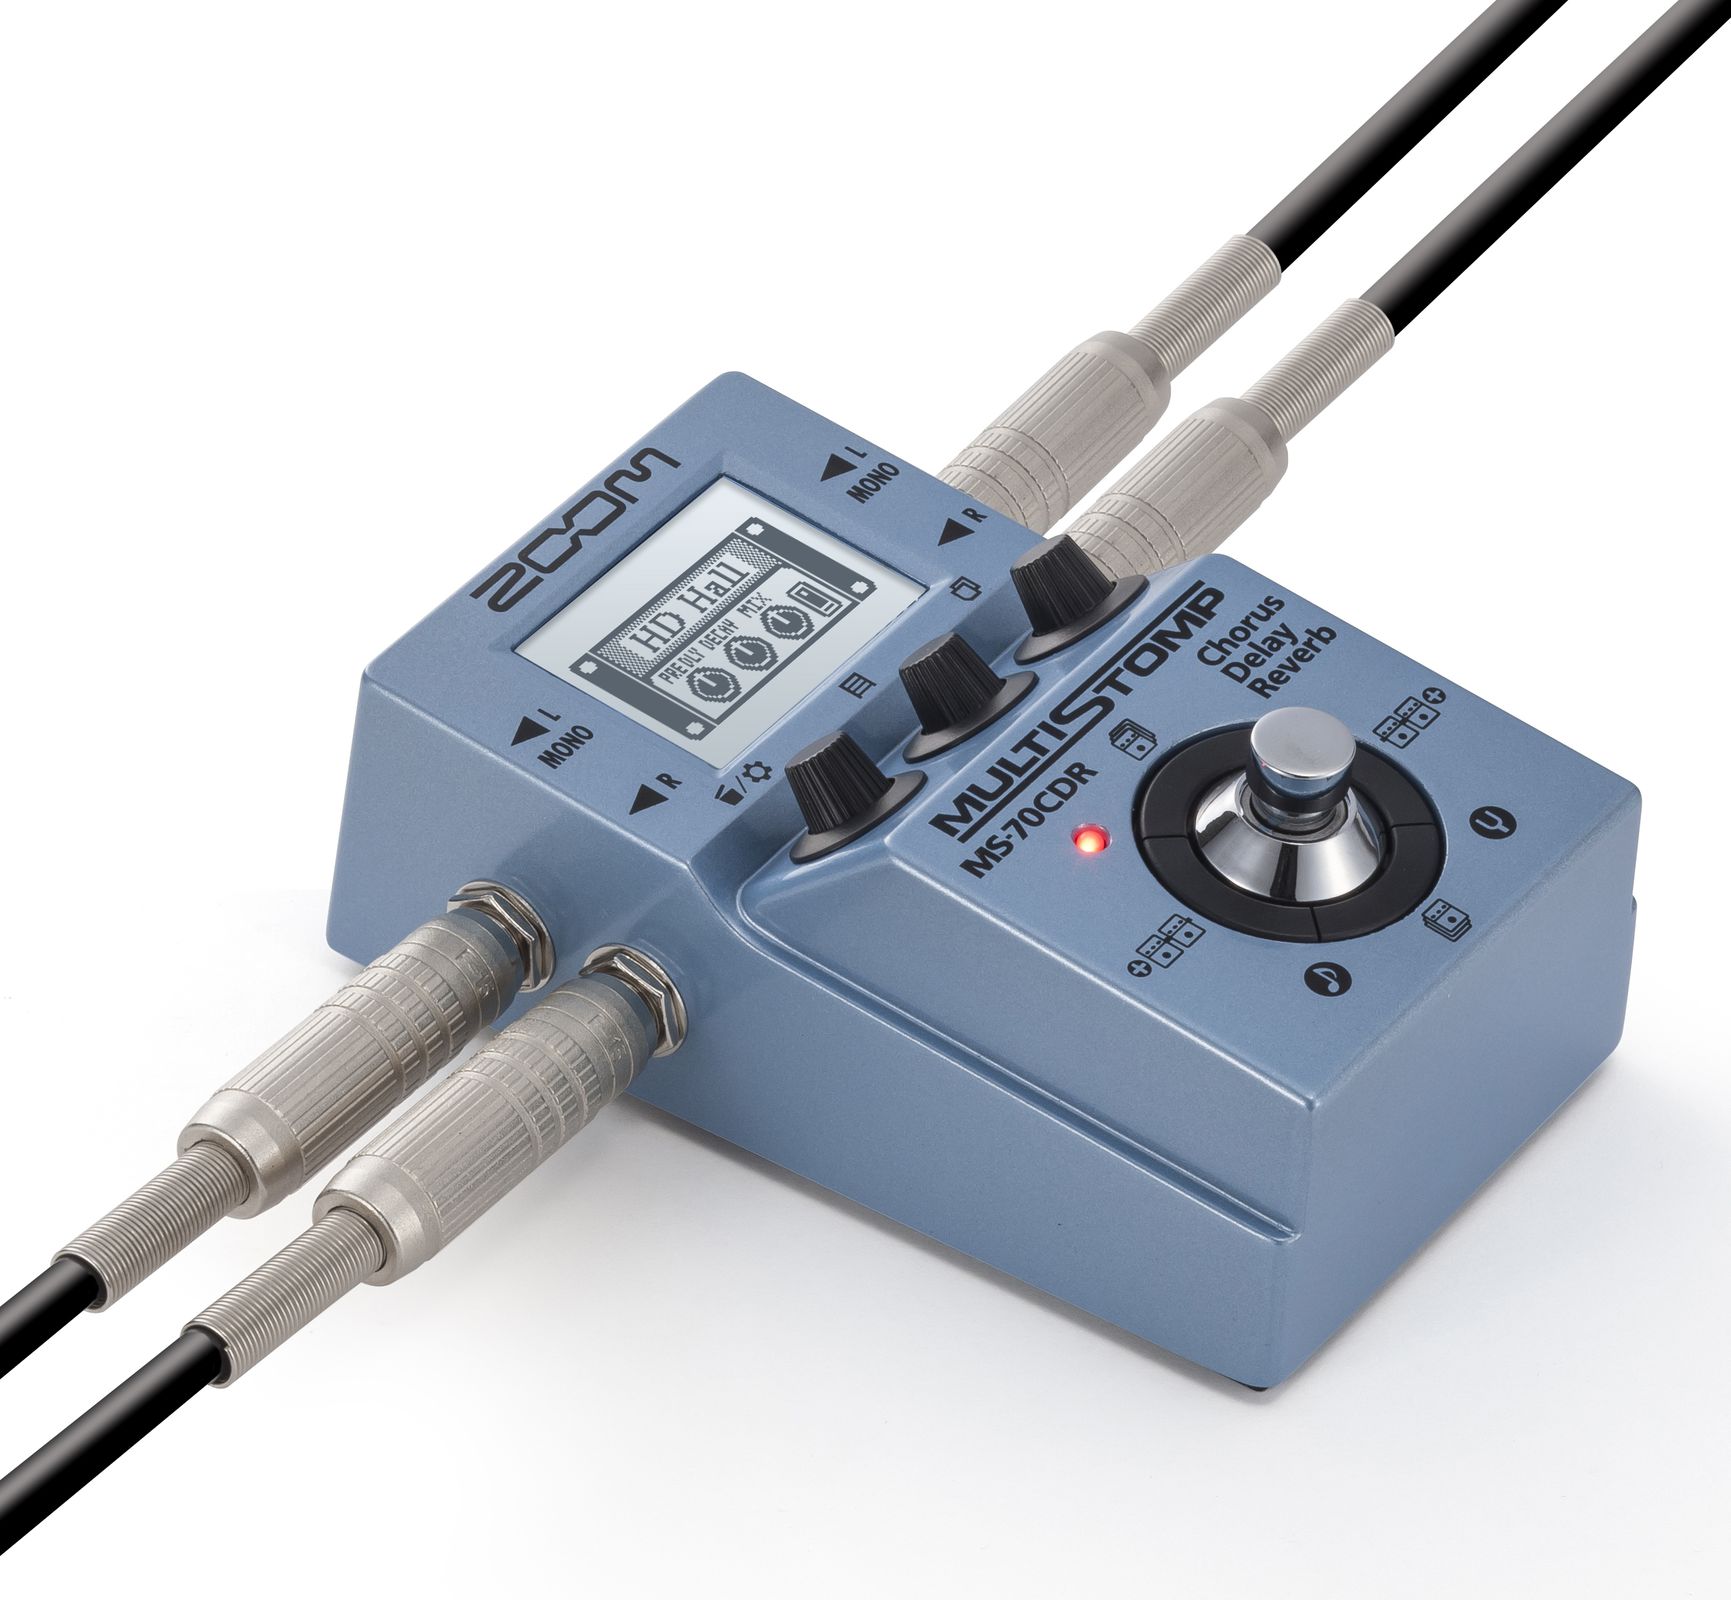
The Zoom MS-70CDR

The MS-70CDR 'MultiStomp' is pretty much a 'classic' in synthesizer circles. When I posted a Tweet on Twitter about my search for a dual stereo modulation pedal, then it was 'up front and centre' in the feedback that I got. Which is of course, why I ordered one! I should probably point out that this isn't me following the 'YouTube Influencer' Play-Book, because I'm nowhere near from getting even the required minimum number of subscribers and viewing time... I just think that when something is a 'classic', then it is probably worth looking at. As a subscriber to Ricky Tinez's YouTube Channel ( https://www.youtube.com/c/RickyTinez ), then I concur with his philosophy:

 'Share the Knowledge. Share the Love. Knowledge is Power. Peace.' 

(...and I've exchanged emails with him in the past - on a different topic...) 

I have to admit, the Zoom MS-70CDR is small, has an 'unusual 'User Interface', and is a complete bargain in comparison to most of my other 'boutique' pedals - it was only slightly more expensive than the 'budget' Joyo Vision pedal which I also really liked. Am I growing out of high-end pedals? 

The Zoom MS-70CDR (I'm already bored with typing that every time, so I'm going to shorten it to MS-70!) has an LCD display, which is unusual at the lower end of the market. The display tends to focus on graphics rather than text and numbers, which is refreshingly different - I'm kind of reminded of Elektron's use of graphics on displays (and the irony of the opposite end of the price spectrum doesn't escape me!). When you power it up, you get some animations, and end up at a box that shows the number and name of the current patch/preset ('patch' seems like the better word...). You then get a graphic representing the 'pedal' that is in one of the six 'slots' that the MS-70 provides - virtually of course. 

https://zoomcorp.com/en/gb/multi-effects/multistomp-pedals/ms-70cdr/

So the basic metaphor is a pedal-board, which is perfect for a multi-effect device that is effectively a pedal-board inside a pedal. Moving between 'pedals' in the pedal-board is done by using the buttons that are in a ring around the big chrome foot-switch that activates or bypasses the effect (of which more later). The box that he MS-70 came in has a sticker for version 2.0 of the firmware, which announces that there are 137 effects inside! This is a lot of effects, and is probably a response to the well-known 'secret' software that allows you to access effects from any of the Zoom MS pedal range (You can find out about it on YouTube...). More recently, 'ToneLib Zoom' provides online computer-editing and cloud storage of patches...

137 effects is a lot!

I mentioned six slots for effects, and this is where things move from advertising hyperbole to the slightly more mundane real world. One of those slots is used up for a Bypass/Effect 'Line Selector' function, so there are really five slots for effects - which is still a lot! If you don't have the Line Selector in your patch, then the effects is on all the time - until you select another patch. You could always have a patch stored which is just a bypass, of course. So let's call it 'six' slots, but five if you want a bypass. Of course, as with all digital pedals, there is a limit to how much processing can be achieved by the internal chips, and so that wonderful caveat of 'up to' applies to the six or five. If you use a complex effect that uses lots of processing power, then you may not be able to fill all five slots - but, having said that, I was able to put multiple chorus effects, reverbs and other effects, and the processing restriction warning didn't pop up very often. 

There are three rotary controls, of which the middle one is the 'Memory' or Patch Select control. This gives access to a list of the effects (you click to activate the rotary control, twist it to select an effect, and click to select the effect (and click again to exit back to the main 'pedal-board' view), so this is easy and quick - arguably faster and easier than some of my boutique pedals!) . The rotary control on the left is a traditional 'Menu' button, which gives access to various pedal management functions like settings, deleting effects or patches, etc. The rotary control on the right turns the display into a tabbed page view showing up to three named rotary control graphics (pie charts), which the rotary controls can control. 

https://zoomcorp.com/en/gb/multi-effects/multistomp-pedals/ms-70cdr/

Again, having a click on the rotary control itself is quick and very convenient. I've got very used to doing mental gymnastics with using multiple foot-switches to do things on my other boutique pedals, so this was a refreshing change! Everything you need to do with fine-tuning an effect is done with these three soft-controls (rotary plus click) and it works very nicely indeed! I'm explaining all of this because it really isn't obvious until you have used an MS-70, so all of the graphic labels make perfect sense when you know what they mean, but at fist glance, you may not understand what everything does - I certainly looked at lots of photos of MS-70s and didn't 'get' what was going on with the controls!

https://zoomcorp.com/en/gb/multi-effects/multistomp-pedals/ms-70cdr/


Power is from the standard barrel connector, USB (Mini!), or batteries!

https://zoomcorp.com/en/gb/multi-effects/multistomp-pedals/ms-70cdr/

I mentioned ToneLib Zoom, the freeware editor/librarian for macOS and Windows, and I have to say that I really liked it! I used version 4.3.1, and it was easy to use, and links to a forum/community of shared patches.

https://tonelib.net/tonelib-zoom.html

ToneLib Zoom is free, shows the complete chain of effects (all six slots), and the far right has all of the 137 official effects divided into three categories. I couldn't resist stretching the factory default 'C D R' patch with a bit more chorus, so above is my 'C D R !' patch where there are four 'StereoCho' stereo chorus effects in series, as well as the Delay and Hall Reverb.

https://tonelib.net/tonelib-zoom.html

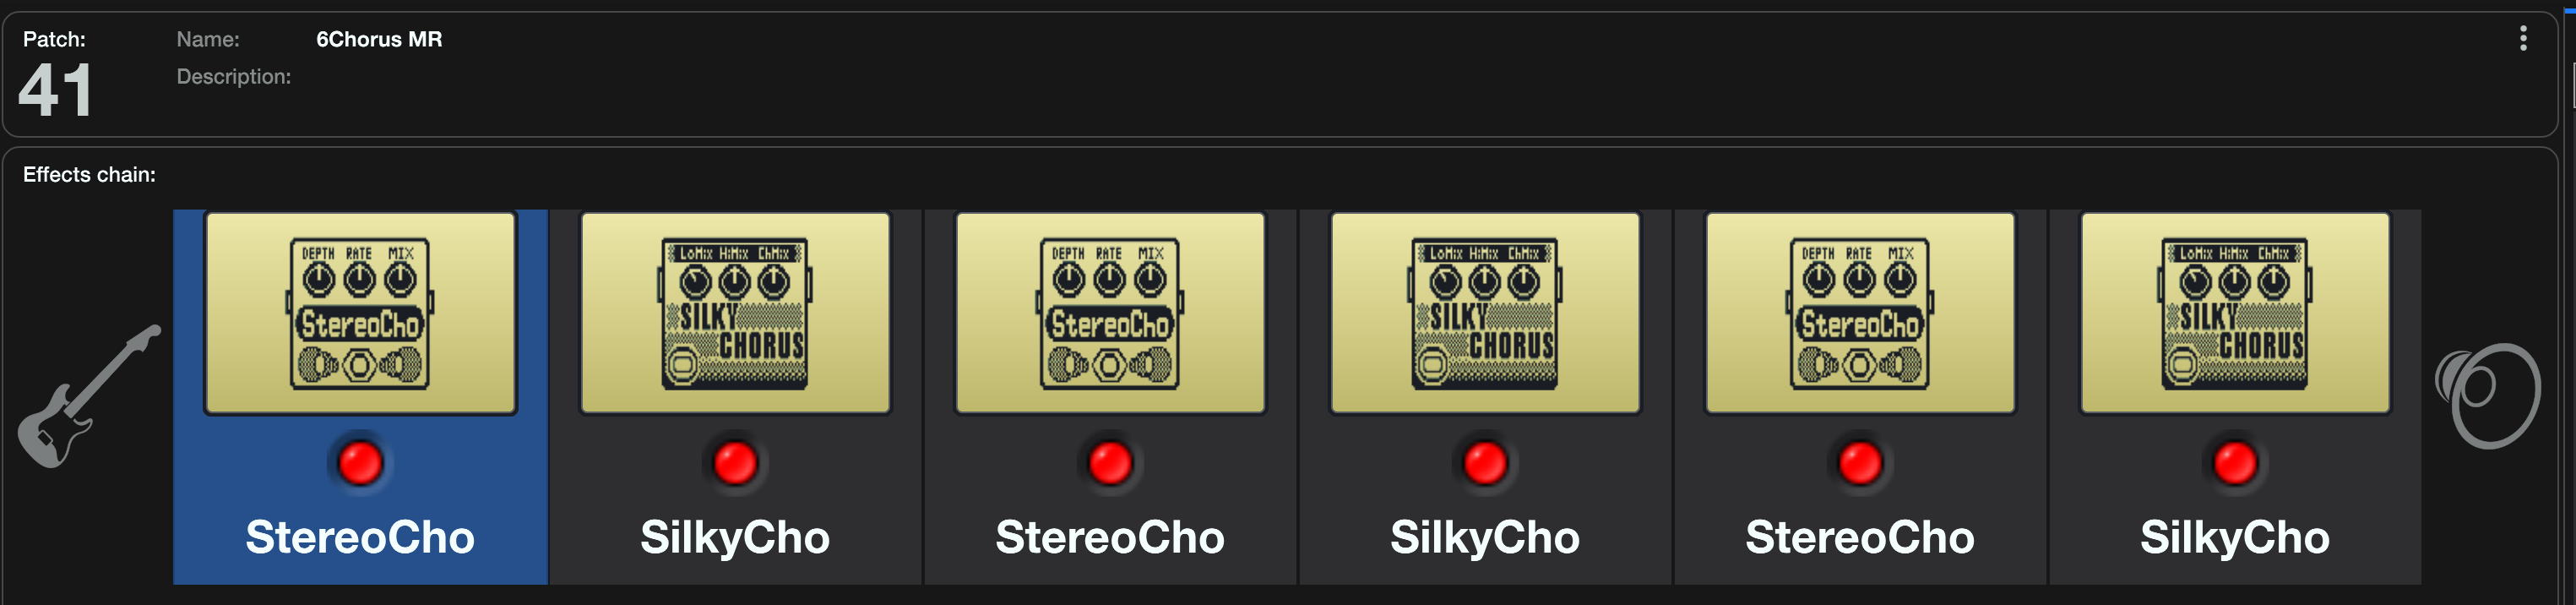
Here's another of my patches for the MS-70 that I edited in ToneLib Zoom. '6ChorusMR' has six chorus effects (two different effects in three pairs) and sounds amazing! I've always like chorus... 

https://tonelib.net/tonelib-zoom.html

Here's the 'C D R !' patch modified by replacing one effect with the 'LineSel' Bypass/Effect switcher, which enables the foot-switch. As I said, using the middle rotary control allows rapid selection of patches, including a bypass one if you program it, and so you don't need to have the LineSel in the chain of effects, and that sixth slot can be very useful!

There are three categories of effect in the MS-70CDR: Chorus, Delay and Reverb. Whilst I might have been distracted by the Reverb sections (with the ParticleR granular effect especially), it is the Chorus section that is most relevant to the Dual Stereo Modulation goal, and there are plenty of effects in this category: more than 40 chorus, tremolo, chopper, phaser, vibrato, detune, ensemble, flanger, pitch-shifter, ring-mod, panner, and rotary-speaker effects. So there is enormous scope for multiple modulation effects using the six (five) slots, especially as the modulation effects do nto seem to have high processing demands (unlike reverb!). 

I will save some of my effects patches to the ToneLib Zoom cloud storage area...

Size considerations

The Zoom MS-70CDR is small, but note those stereo jack sockets on either side (boutique pedals tend to put all the sockets on the rear panel...). If you put straight jack plugs into them, then you get this:

https://zoomcorp.com/en/gb/multi-effects/multistomp-pedals/ms-70cdr/

By the time you have factored in chunky jack plugs, decent strain relief, not over-stressing the cables by over-bending them (tight bend radii are bad!), and the MS-70CDR's 75mm width, then you are talking a total width of about 200mm, which is wider than my Empress Reverb! So you might like to consider some right angle jack plugs (note the close spacing of the sockets, which can rule out some right-angle jack plugs!) or some right angle jack-to-jack adapters - I bought some from Amazon and they help a lot in keeping things more compact, although the routing of the cables can require some planning...

Dual Stereo Modulation Effects Pedal

I started out looking for a dual stereo modulation effects pedal, and the Zoom MS-70CDR provides up to six effects, which is kind of 3x what I was looking for! Quality-wise, then the modulation and delay effects sound very good, whilst the reverbs are okay, but do not sound as sophisticated as some high-end pedals (like the Empress Reverb). But for the price, I didn't have any problem with the sound, and in fact, I rather liked using multiple chorus effects (six in a chain is shown above!) to get deep and complex chorus effects (beyond 'triple' chorus!), as well as reverbs (I chained 3 ModVerbs in series, for example) to get very thick sounding ambient reverb effects, and I went further into ambient 'smearing' territory by chaining the HD Reverb, ParticleR and DuoPhase to go full psychodelia! Sequencer plus synth plus Zoom MS-70CDR can equal a very full-sounding live rig, and actually, for some purposes, I really love the slightly imperfect reverbs. Maybe only using high-end reverbs is not the only way to sound different and have a broad palette of timbres... But for modulation, then I had no problems at all - there were plenty of good-sounding deep, effective chorus, flanger, tremolo, vibrato, detune effects to play with!

So that's a solid thumbs-up for the Zoom MS-70CDR and the ToneLib Zoom software. From a starting point of not being able to find what I wanted at the boutique end of the market, trying out budget alternatives has been a fascinating and illuminating journey - and I have even more timbres and effects  available now...

---

If you find my writing helpful, informative or entertaining, then please consider visiting this link:

Synthesizerwriter's Store (New 'Modular thinking' designs now available!)

Buy me a coffeeBuy me a coffee (Encourage me to write more posts like this one!)... or...

Buy Me a Coffee at ko-fi.com (Encourage me via a different route entirely...)

Or just tell someone else that there's this amazing blog about hi-tech music...


Monday, 25 April 2022

Some Templates for Decent Sampler Background Graphics Creation

When Decent Sampler first appeared, I created some graphics template files to help me create the background graphics for the User Interfaces (UI) that I am now notorious for... (Oh, and as a bonus, you get lots of helpful hints for the UI design as well. Double value today!)

This seems like a good time to share them, so that other people can make overly-detailed, cramped UIs so that mine look ordinary by comparison. The files can be downloaded from my Google Drive (links as the end).

Newest files first, then the archive of the pre Version 1.0.7 material (yep, I've been using Decent Sampler for quite a long time!)

Latest files


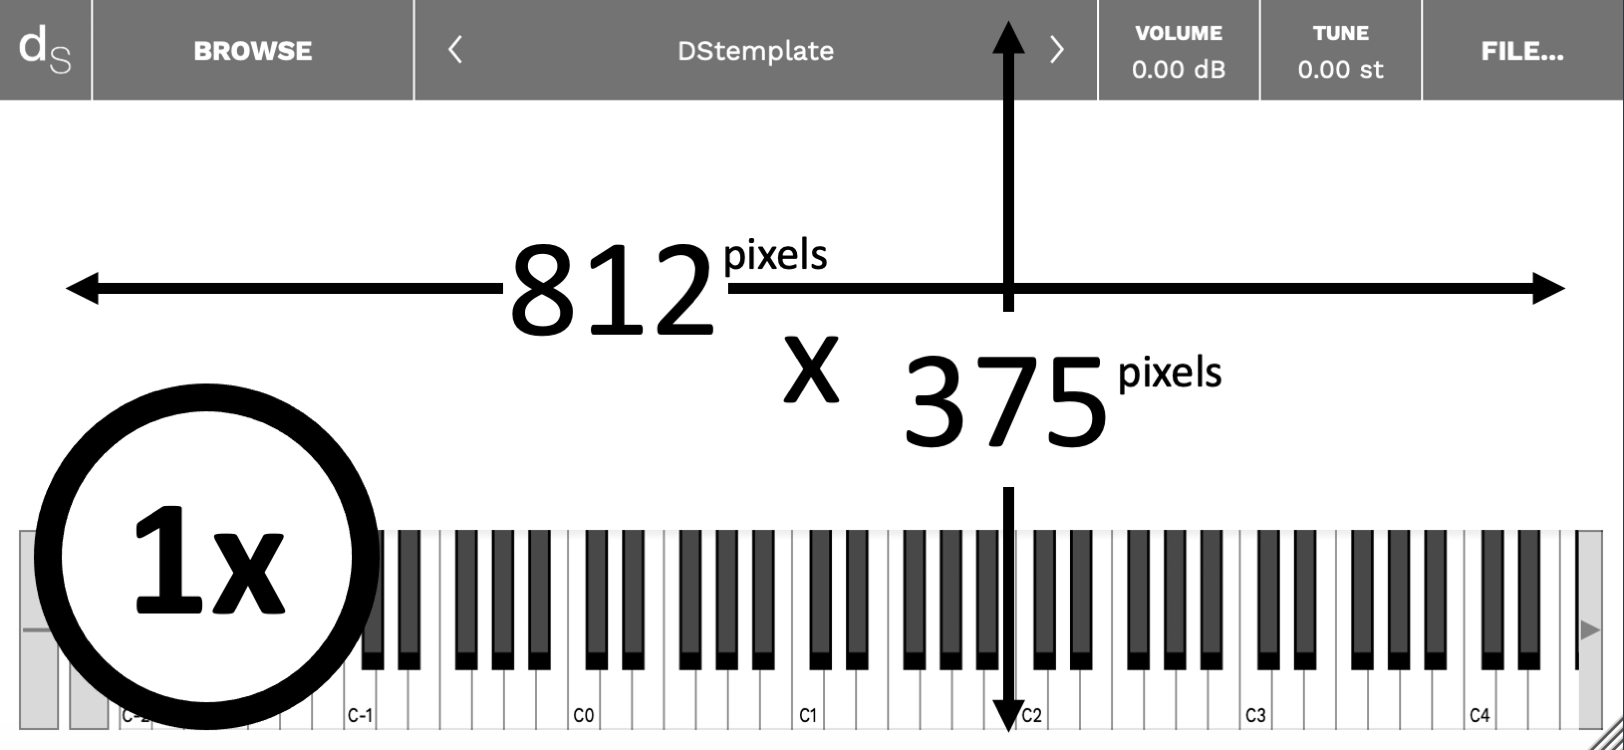
Background first. A .jpg or .png. A photo, or artwork. (Trying to get a moving background with a .gif is pointless, by the way, as are .mp4 videos!) So 812 x 375 is the space you have to work with, but note all that screen furniture that will obscure your artwork or photograph excellence. The '1x' is a clue that you can prepare your graphics either at 1:1, or at double size (1824 x 750) - Decent Sampler will adapt accordingly.


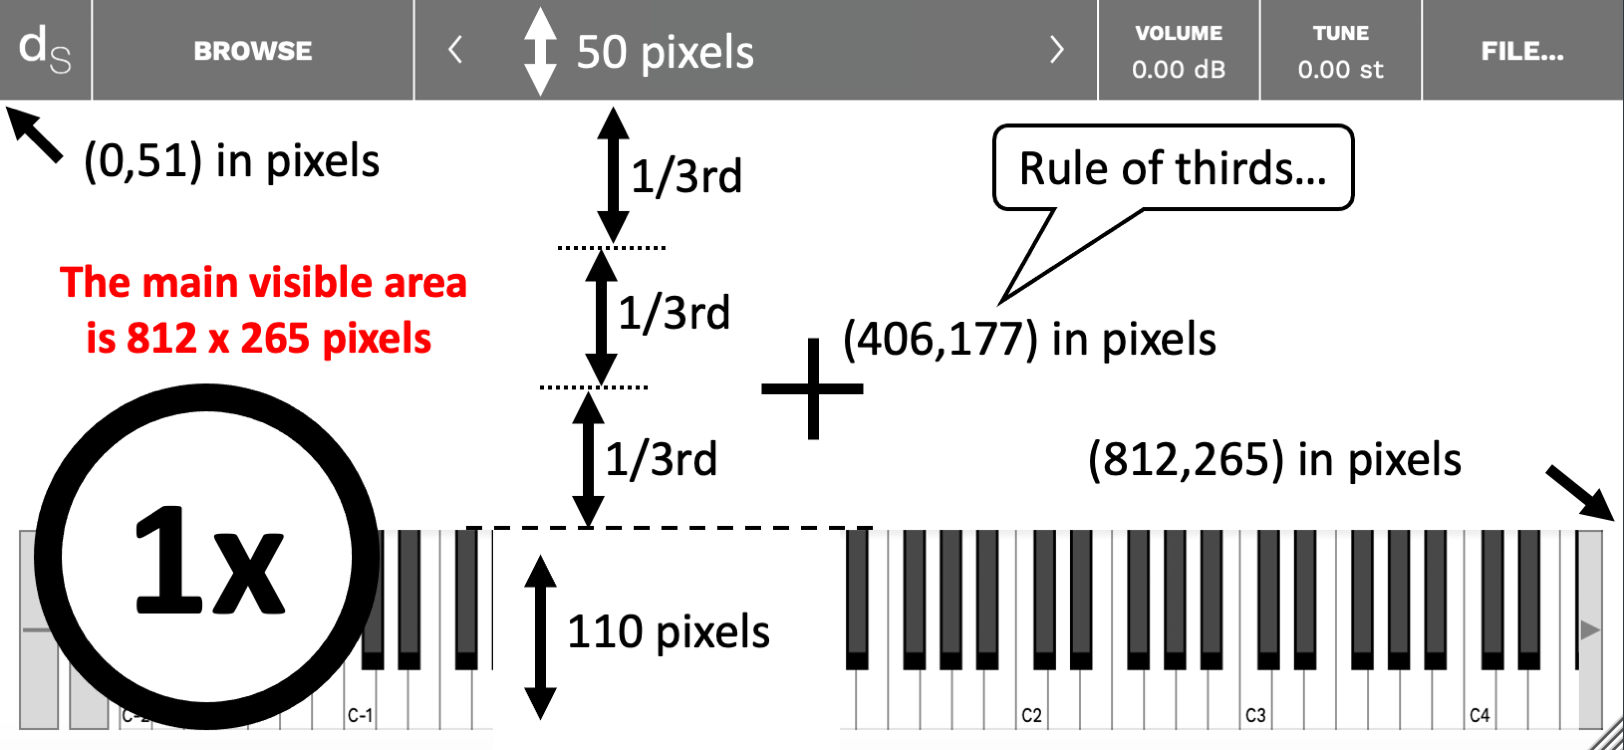
The top bar is 50 pixels tall, and the keyboard area at the bottom of the window is 110 pixles high. This gives a visible area of 812 x 265 pixels, plus a little border around the keyboard, pitch bend and mod wheels, and tiny little slivers in between those areas on the top bar. Oh, and the top bar is not totally opaque, so you will be able to see some of your graphics there, but not very clearly. 


Probably the most important thing when preparing your graphics or photo is that cross in the middle. The centre (center) of the visible area is at 406,158 - so that's where your should put your main focus if you want it in the obvious place. Alternatively, if you are into 'placement in photos should split the area into thirds', then you should put it at 812, 177, nineteen pixels lower, because that's two thirds of the way down the visible area. 

One place to avoid is when you split the whole 812 x 375 into thirds, because then it will be at 812, 250, which is only just above the keyboard. It feels more than a little cramped to me...

The Google drive folder contains additional files to make things easier: blank 1x and 2x .pngs, masks for the top bar and the keyboard in a variety of colours, plus alpha (is that a colour, or not?), and some fascinating examples where I have adjusted the levels to reveal some unwanted artefacts that are present in the Decent Sampler graphics. Probably for uber-geeks only, that stuff... 

User Interface


There are two bits of graphics to consider. The background can be prepped in your favourite photo editor (Graphics Converter for me), but the UI is specified in Decent Sampler's .dspreset file, and is XML code that places little bit of user interface (rotary controls, etc.) in the right place. 

Finding the right place for little bit of user interface is vital. You need a starting point first. Somewhere that you and Decent Sampler both know and agree is the corner of the universe. (When I was a kid, I lived only a couple of miles away from a place that was known locally as 'The Centre Of The Universe', so trust me, I know what I'm talking about!) Decent Sampler knows this point as (0,0), and it is just under the top bar, on the far left. Note that the actual top of the background graphics that you made earlier with the help of the diagrams above, is at 0,-50, and is hidden by the top bar. Try putting user interface bits there and you won't see them...


Decent Sampler's zero, zero, (epoch, starting point,...) is in the left corner, just below the top bar. The top bar is 50 pixels tall, but Decent Sampler knows this point as (0,0). So the actual top (hidden by the top bar) is at 0,-50). Try putting graphics there and you won't see them...

Note that you only have 812 x 214 UI Units to play with. I could call them 'pixels', but I'm going to use 'UI Units' since that makes them distinct from the pixels of the background image. For User Interfaces, then I think that the graphics should not be laid out in thirds, I prefer to use halves, and so this time, the actual centre is useful, and it is at 406, 107 in UI Units. If this was an analogue synthesizer, then that is where I would like to have the Cutoff Frequency control for the Resonant Ladder Low-Pass Filter, and in Decent Sampler, then your nearest equivalent might be the low-pass filter cutoff frequency, but the Expression control might be a close contender. 

For a 'Spitfire Audio' look, you could always nudge your main control across to the right a little bit - this is where they put their 'big rotary control' bit:

Spitfire Audio's User Interface (a tiny part of it) for Polaris...

Whilst I'm distracted by thinking of Spitfire Audio, I would like to put in a good word for Polaris, their 'orchestra/synth' melange that I rather like (Er, would it be too much for a 'Wow'! here?), but then I've always like synthesizers and processed audio, and so this joins their other BT project, Phobos' as two of my favourite virtual instruments. Take a look:

Spitifre Audio Polaris


All thoroughly recommended!

But back to User Interface thoughts. Here's a couple of diagrams showing one way to split up that 812 x 214 are into useful divisions:

Horizontal divisions...

Vertical divisions...

Again, and you already knew this, there are more files on the Google Drive, including ones that show how to derive these divisions. Here's the download link:

Tips

The biggest tip I can give for Decent Sampler is to use <control> and <label> elements instead of the <labelled-knob> element. Using <control> and <label> elements gives you much more precision and flexibility with the placement of the labels with respect to the control bit, so you have much more 'control' over how your UI looks and 'feels'. I haven't used a <labelled-knob> for a long time!

Tying together the background graphics and the User Interface bits is also a good idea. They should work together, not pull in two different directions. Recently, I have been playing with splitting the UI into sections by using dark and light areas of background:

The 'slightly busy' UI for 'Cyclic Transpositions 01...

Note that you can see the background purple graphics underneath the top bar, as well as in the border of the keyboard. 

---

Pre 1.0.7

Yep, not unlike Russian Doll Season 2, but this isn't quite a jump into the 1980s...

First off, there are some sized graphics files, in 2x (1624 x 750 pixels) and 1x (812 x 375 pixels):


These deliberately show the on-screen 'chrome' or 'UI furniture': the top bar and the keyboard, because these are areas that you will want to avoid with your background graphics.

---

Then there are the 'magic numbers' that aren't in any of the format documentation (as far as I could see, anyway):


Yep, the top bar is 51 pixels high, and the keyboard (plus the border) is 110 pixels high. They are both 812 pixels wide.

The zero, zero 'epoch' position for the graphics inside Decent Sampler is not the top- left hand corner! it is 51 pixels lower... 

The centre of the UI screen is at 406,107.

The far right hand lower corner is at 812, 214 (just above the keyboard). So your UI graphics have to fit into a rectangular area that is 812 x 214, although the border around the keyboard and underneath the semi-transparent top bar means that some of your graphics outside this area will be visible. 

---

Then there are plain white, precisely sized files that can be used as starting points, again in 2x (1624 x 750 pixels) and 1x (812 x 375 pixels):


The box is the keyboard position. The keyboard does not seem to be semi-transparent, so there's no real  point in putting graphics underneath it!

--- 

Decent Sampler scales graphics files (.png and .jpg files) that are larger that the default 812 x 375, so you can use 2x or larger if you want. This just increases the size of your sample pack and download time (ever so slightly!). 

---

Alongside these graphics files, it may also be worth creating some .dspreset 'template' XML files if you intend to do a UI once, and then publish multiple variants of it with different samples and graphics. 

---

The download area:


---

If you find my writing helpful, informative or entertaining, then please consider visiting this link:

Synthesizerwriter's Store (New 'Modular thinking' designs now available!)

Buy me a coffeeBuy me a coffee (Encourage me to write more posts like this one!)... or...

Buy Me a Coffee at ko-fi.com (Encourage me via a different route entirely...)

Or just tell someone else that there's this amazing blog about hi-tech music...


Sunday, 24 April 2022

A Decent Sampler Translation Table Cookbook...

Decent Sampler is slightly more than just a sample player. There are hidden depths if you go looking, and regular readers will know that I love deep products! So here are some hints, tips and ideas for getting the most out of the Translation Tables!

Translation Tables

Yes, I know, they aren't exactly going to be headline news, but there'a a lot that you can do with them.

The Power_Curve Spreadsheet

First off, I'm going to mention my newly updated spreadsheet (.xlsx and .ods versions are available) for creating exponential / power law curves instead of the default linear mapping that Decent Sampler uses:

The default settings are aimed at one of the first things that you will probably want to 'fix' with a translation table: the mapping between the control (slider, rotary...) and the values! At the low end, the control of cut-off frequency for the low-pass filter is a little bit abrupt - you can suddenly get loud sounds when you were not expecting them, especially when the Q control is set high. So the default curve takes about half of the travel of the control (slider, rotary) to get from 10 Hertz to 635 Hertz, which is a lot of low-end precision. The other half then goes from 635 Hz to 22kHz, which feels okay to my fingers.

The spreadsheet doesn't have any instructions, so here's a quick explanation of one way of working with it. 

The Power_curve spreadsheet

Start by setting the limits. 

Set 'Top' to the highest value you want to control - for the low-pass filter this will be 22kHz, so put '22000' into the 'Top' box. 

Then set 'Bottom' to the lowest value you want to control - for the low-pass filter this is 20Hz, so put '20' into the 'Bottom' box. 

You now need to choose the 'Power/Base' setting - putting '1' into the 'Power/Base' box will give a straight line, which is the default in Decent Sampler. Putting higher values into the 'Power/Base' box will make the curve more and more 'boomerang shaped (the bend in the curve will get more and more extreme!). The default value of '5' may be too much for you - I actually think that '3' is a good starting point for you to find what suits your fingers and your UI (rotary and slider controls feel different with different 'Power/Base' settings...).  

Note that a Power curve puts more detail at the lower end of the control's range, whilst a Log curve puts more detail at the higher end. 

The extreme values of 'Power/Base'...

Here are the limits to the curves: Power/Base set to 1 gives a straight line, whilst 25 gives a very abrupt corner! You can really see the piecewise linear approximations (straight lines) for the log curve. 

Once you have a curve that seems right, just copy and paste the long string of numbers above the graph and paste it into the translation table definition:

translationTable="0,10;0.1,10.2;0.2,16.4;0.3,58.6;0.4,214.7;0.5,634.7;
0.6,1564.4;0.7,6560.3;0.9,11813.9;1,20000"

Here's an example 'binding' that you might use inside a <control> element:

<binding
type="effect"
level="instrument"
position="0"
parameter="FX_FILTER_FREQUENCY"
translation="table"
translationTable="0,10;0.1,10.2;0.2,16.4;0.3,58.6;0.4,214.7;0.5,634.7;
0.6,1564.4;0.7,6560.3;0.9,11813.9;1,20000"
/>

Controlling Volume

Changing the 'feel' of rotary or slider controls isn't the only thing you can use Translation Tables for... Because you can put more than one <binding> element inside a <control> element, then you can make controls that do more than one thing at once!

One typical use would be to mix between two different sounds - you could have a sustained sample and a percussive sample, and you want to be able to give the user a continuous control of the mix between the two samples. Now you could use two separate controls to do this, but a single mix control is much neater, and if you make it a horizontal slider, then you could do a DJ Controller background...


The simplest way of doing a mix control would be to have two opposite tables, as shown above. 

The 'Second Volume Curve' is a straight line, but think of it as a curve that is straight rather than curvy... and it looks just like the linear table shown above. You can specify a table like this with just two points: one at the beginning and one at the end. This 'curve' starts out at zero (silence) and goes up to 1 (full volume) as the input controller moves from 0 to 127 (on a MIDI Mod Wheel, but it could also be 1 for a rotary or slider control...or any other value you define in the table...). 

In the diagrams, I have shown a Mod Wheel as the controller, so the minimum and maximum values are 0 and 127, but in the text I have used 0 and 1 as the controller values, because this is a more generic example.  

The 'First Volume Curve' is another straight line, but going the opposite way. So the volume starts out at maximum and ends up at silence as the input controller moves from 0 to 1 (or 127, or...). So one volume does the opposite of the other. In Decent Sampler, this is just two <binding> elements inside a <control>:

<control x="195" y="30" parameterName="Mix" type="float"
minValue="0.001" maxValue="1.0" value="0.8"
trackForegroundColor="FFFF7700" trackBackgroundColor="FF000000"
width="30" height="180" style="linear_vertical" >
<binding type="amp" level="tag" identifier="0" parameter="TAG_VOLUME"
translation="table" translationTable="0,1;0.5,0;1,0" />
<binding type="amp" level="tag" identifier="1" parameter="TAG_VOLUME"
translation="table" translationTable="0,0;0.5,1;1,0" />
</control>

In this example, the two 'TAG-VOLUME's will affect the volume of the '0' and the '1' tagged groups in the Decent Sampler XML file... But you could also use tags and AMP_VOLUME if you prefer:

<binding type="amp" level="group" position="0" parameter="AMP_VOLUME" ...table1... />
<binding type="amp" level="group" position="1" parameter="AMP_VOLUME" ...table2... />

The two important bits here are the two Translation Tables:

translationTable="0,1;0.5,0.5;1,0"

translationTable="0,0;0.5,0.5;1,1"

The top table starts at 1 and drops to 0, whilst the bottom table starts at 0 and rises to 1. The middle position is 0.5, and this is where things get a little bit tricky. As you move the input control, the 'volume'  that you hear might not stay constant, and it might sound like it gets quieter, or louder, in the middle. It depends on how the volume is controlled (linear, logarithmic or other), and sometimes even the samples themselves - in the example I mentioned at the beginning, then the percussive sample is probably going to sound quieter than the sustained sample, and so even if the volume that you might see in a DAW or audio editor says that they have the same peak volume, when you mix between them it could sound strange. But this is why you have detailed control over the translation tables! 

The general case is probably going to be that you will need two curves instead of straight lines, perhaps something like the ones shown above. The easiest way to do this is to use those straight line approximations again:

translationTable="0,1;0.5,0.66;1,0"

translationTable="0,0;0.5,0.66;1,1"

So now the half-way setting of the input is going to output 2/3rds of the percussive and the sustained samples, instead of half volume. As I said, the exact value will depend on the samples and your preferences - Virtual Instruments are very context-sensitive!

The 'Arbitrary_curve' spreadsheet is another utility that helps to design volume curves...

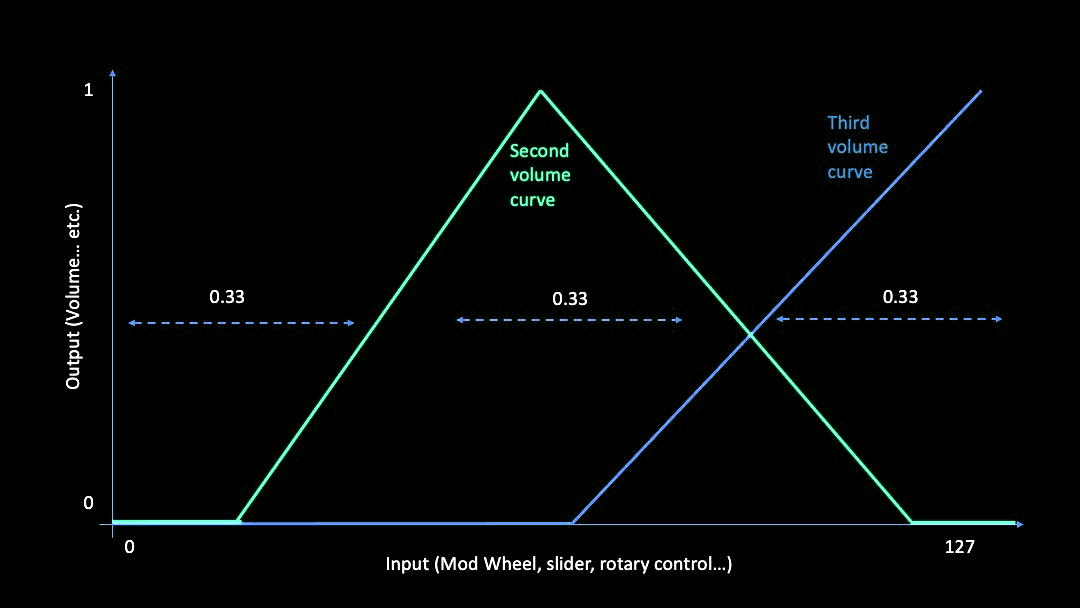
You may have realised that there's a potential problem with the mix control - it always makes a sound! What might be lots more useful (and interesting) would be a mix control that starts out at zero volume, then raises the volume of the sustained sample, and then mixes in the percussive sample whilst dropping the sustained sample, so half way would be a mix of the two sounds, and ending up with just the percussive sample at the end of the mix control's movement. This time, the curves are very different in the zero position (and I have deliberately renamed them to second and third):

At the zero position, the volume for both samples needs to be zero. As the input value rises, the sustained sample gets louder and louder, and at half way it is at full volume. Notice that the percussive (third volume curve)  doesn't start until slightly later, so that there is a 'dead zone' around the half-way point where you hear just the sustained sample. From half way to just below the maximum input control position, the sustained sample fades out as the percussive sample fade up. There is another 'dead zone' at maximum input where just the percussive sample is heard. 

<binding ... translationTable="0,1;0.2,0.5;1.0;0,0.66,0.5;0.95,0;1,0" />

<binding ... translationTable="0,0;0.55,0;0.66,0.5;1,1" />


And the curvy version is shown above - just more pairs of values in the translation table.


The UI might look something like the above draft graphics... And here is exactly this type of sustain-percussive slider in use:


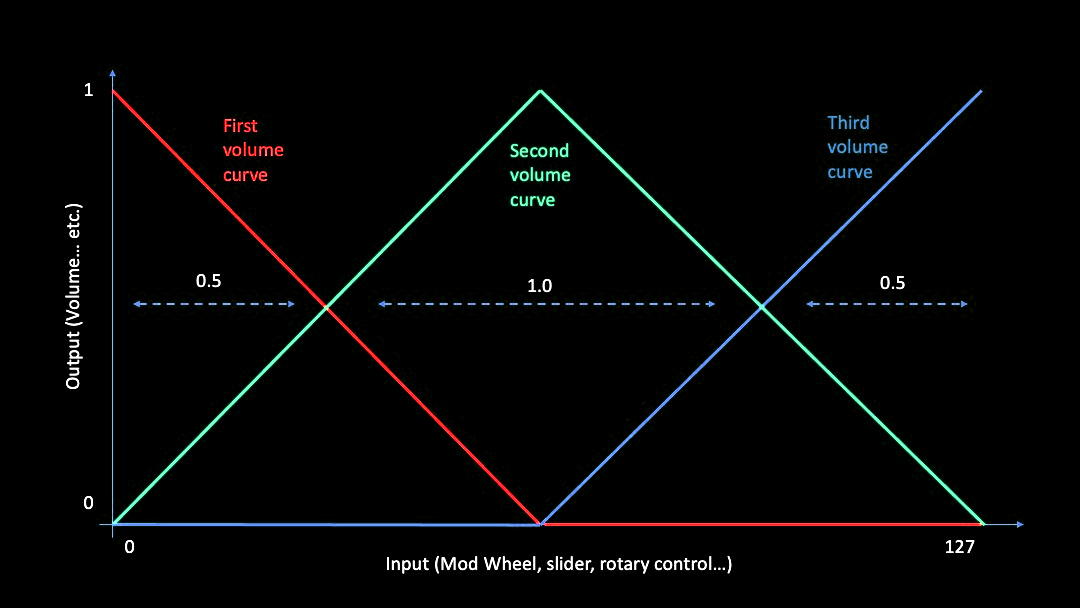
Now it may have occurred to you that the UI graphics above are actually a three-way mixer, except one of the positions is zero volume (and no sample). If we replace the zero volume with a third sample then we have a single rotary or slider control that fades between three different samples:

 
A simple form is shown above. I've not put in the dead zones that would probably be useful in a real implementation, because I wanted to show the basic form of a three-way volume control on a single rotary or slider control. This time there are three tables:

translationTable="0,1;0.25,0.5;0.5;0,0.75,0.0;1,0"
translationTable="0,0;0.25,0.5;0.5,1;0.75,0.5;1,0"
translationTable="0,0;0.25,0.0;0.5,0;0.75,0.5;1,1"


Turning this into the 'curvy' form reveals something that wasn't as significant in the sustain/percussive mixer - the middle section is too big: it is twice as big as the sections either side of it (0.5, 1.0, 0.5 in the diagram above - and yes, I know it should have been 0.25, 0.5, 0.25, but this seems to obscure things rather than making them clearer!)

translationTable="0,1;0.33,0.66;0.5;0,0.66,0.0 ;1,0"
translationTable="0,0;0.33,0.66;0.5,1;0.66,0.66;1,0"
translationTable="0,0;0.0 ,0.0 ;0.5,0;0.66,0.66;1,1"


So, using 0.33 and 0.66 as the two places where the mixing is 0.5, gives us a different curvy form. The rotary or slider control is now split into 3 zones: one for each sample. Note that this is not a full 3-way mixer: it only fades between sample 1 and 2, or 2 and 3. It isn't possible to fade between 1 and 3, because there isn't anywhere on the control that goes there! 

(I leave it as an exercise to see if you can figure out a way to provide a fade between 1 and 3... It isn't pretty, but it is possible...)

This means that the samples need to be carefully chosen, so that the user never wants to use the missing fade! One possible approach might be to have the Sustain sample in the middle (2), the Percussive sample at the top (3), and some sort of Noisy sample that complements the sustain sample at the bottom (1). This way the middle position is the default, with the user moving the control up to get a more percussive sound, and moving the control downwards to roughen up the sustain sound with noise.

There is a catch, of course. Having a single control for sustain and percussive sounds means that we can adjust the mix between them, but not the overall volume. Of course, if those are the only sounds that we are using then an Expression pedal or control could be used to alter the overall volume. But if we wanted to control the balance between two pairs of sustain/percussive sounds, then expanding things out to 4 separate volume controls is probably the best option. As someone who is notorious for having complex user interfaces (UIs), then please forgive me when I try to explore other, more 'compact'  options. Maybe there is a case for doing different UIs for different end uses...

Finally, before thinking about the next level, consider current high-end stage pianos - Nord Stage 3, Yamaha CP88, Roland RD-2000 et al. The reason they have lots of controls is because of the complexity of balancing piano with strings, pads, etc. in a modern 'gigging' context. Then think back 70 years and consider the controls on a (Fender-)Rhodes Mark 1 Stage Piano - only two rotary controls and effectively only one (very expressive) sound (although if you added an MXR Phase 90...). Times have changed!

Further extensions

The samples need not be conventional samples, they could also be release samples triggered by 'Note Off' MIDI messages, or even one of those large pools of legato samples. 

Now that I have shown you the way to move from two samples to three, you have probably realised that this can be extended to as many samples as you want, although don't forget that squashing too many samples onto a small rotary or linear control might overwhelm the end user! (It also gets harder to choose an ordering of samples that makes the limited number of available fades feel like they are the right ones, and you don't get users asking how they fade between samples in different parts of the control...)

Once you have got your head around Translation Tables, then you can do a lot with them. I have just been scratching the surface in this blog post...

The important thing is that Translation Tables are one way to achieve sophisticated user control over multiple samples, without a huge amount of complexity being required 'behind the scenes'. Anything that makes creating Decent Sampler virtual instruments easier is good in my book, and I hope that this blog post has opened up some new possibilities for your Decent Sampler programming!

The Arbitrary Curve spreadsheet

So, now that you know why translation tables are useful when controlling volume (and other parameters) in Decent Sampler, you probably want to know if there are any useful utilities to help you make them. That would be my companion to 'Power_curve', the mysteriously-named 'Arbitrary_curve'. 

The 'Arbitrary_curve' spreadsheet...

This time there are three sections, which are combined into an overview on the far right hand side. The curves shown are minor variations of the ones shown above, but with a higher degree of resolution - the previous curves were hand coded, whereas Arbitrary_curve makes it much easier to use eleven 0.1 resolution tables, which I wouldn't recommend attempting by hand.

translationTable="0,1;0.33,0.66;0.5;0,0.66,0.0 ;1,0"
translationTable="0,0;0.33,0.66;0.5,1;0.66,0.66;1,0"
translationTable="0,0;0.0 ,0.0 ;0.5,0;0.66,0.66;1,1"

The above is the hand coded, low resolution, linear-approximation version from earlier. Copying and pasting the three tables from the Arbitrary_curve spreadsheet gives this result:

translationTable="0,0;0.1,0;0.2,0;0.3,0;0.4,0;0.5,0;0.6,0;0.7,0.84;0.9,0.96;1,1"
translationTable="0,0;0.1,0;0.2,0.6;0.3,0.84;0.4,0.96;0.5,1;0.6,0.96;0.7,0.6;0.9,0;1,0"
translationTable="0,1;0.1,0.96;0.2,0.84;0.3,0.6;0.4,0;0.5,0;0.6,0;0.7,0;0.9,0;1,0"

As you can see, we have entered the arcane topic of 'obfuscation', the art of hiding things in plain sight. Via detail in this case. Your mind can cope with visualising about five points, but 11 is just too much of a stretch for most people, and the format: pairs of numbers separated by semi-colons, doesn't help. Now if we reformat the pairs:

0,    1
0.1,  0.96
0.2,  0.84
0.3,  0.6
0.4,  0
0.5,  0
0.6,  0
0.7,  0
0.9,  0
1,    0 

Then it is easier to read, and this is how you enter points into Arbitrary_curve.

One of the three 'Arbitrary' tables...

This time, there are eleven boxes to fill in. Notice that the 0, 0.1,...0.9, 1 values are fixed, so the input is always between 0 and 1. All you need to do is specify the outputs for each input. From the box, across the the right, are some automated assistance 'suggestions' which may help you to make neater curves. The 'Curve+' suggestion1 column will suggest values to enter in to box on the same row by highlighting numbers in green. if you use these then you will get curves much like the power law-ish ones shown. The next column is 'Linear', and these suggestions will just give you straight lines instead of curves. The next column is 'Curve-', and this suggests numbers that will give log-ish curves. The maths behind these numbers is not sophisticated, and it doesn't work very well at the edges, but it can be useful. In these days of everything being available as a YouTube tutorial, then I'm expecting someone to do one!

The 'Symmetry' column is for Asperger's Syndrome or OCD people, and reverses the list of points so that you can see what to enter to derive combined tables. So I tend to fill in curve 1 and 3 first, then enter the relevant values into curve 2, and so then the symmetry column shows you if you are copying across correctly. 

Spreadsheets are intended for being used by people who like playing with numbers, and often only their creator, so don't expect to be able to use Arbitrary_curve instantly or easily. It may take you a while to get your head around how it works (Power_curve is similar, but it is simpler, and so there's less risk of being overwhelmed!). The basic 'learn as you go' technique is to try making a table on Power_curve, paste it into a table in Decent Sampler, and listen to what it does. Then tweak it, paste again, and listen again. It is a tried and tested method of software development, trust me. Using utility spreadsheets makes it easier to see what you are doing, but the 'copying, pasting, evaluating, adjusting' loop is old and it works. 

Who knows, eventually Decent Sampler may get a purpose built tool that will let you define tables with just a few clicks, and there will be no need for spreadsheets. Until then... 

As it happens, I used the Arbitrary_curve spreadsheet to design the translation tables used in this Pianobook.co.uk virtual instrument:

Utilities

The 'Power_curve' spreadsheet - download

Available in .xlsx and .ods formats, this is good for designing non-linear curves for the low-pass filter cutoff frequency control, and other cases where you want specific detailed control for part of the control's range. It isn't intended for designing sophisticated Translation Tables for doing complex mixing as shown in the second half of this blog post.

The 'Arbitrary_curve' spreadsheet - download

This is also available in .xlsx and .ods formats, and is designed for creating the detailed control curves for volume, etc. This doesn't mean it is amazingly sophisticated - you will have to enter numbers into the boxes, but there are 'automated assistance' suggestions that may make it easier to figure out what those numbers should be... 

---

If you find my writing helpful, informative or entertaining, then please consider visiting this link:

Synthesizerwriter's Store (New 'Modular thinking' designs now available!)

Buy me a coffeeBuy me a coffee (Encourage me to write more posts like this one!)... or...

Buy Me a Coffee at ko-fi.com (Encourage me via a different route entirely...)

Or just tell someone else that there's this amazing blog about hi-tech music...