Showing posts with label Quick Transpose. Show all posts

Monday, 19 November 2018

Quick Transpose Customised For Live Performance Usage

This is 'Quick Transpose' customised for live performance, and so it joins the 'series' of devices that arose from me publishing my personal utility to ease my programming of Racks in Ableton Live:

Quick Transpose - my original 'make it easier' personal utility
Quick Transpose BW - with added counter
Quick Transpose Audio BW - audio instead of MIDI, and more 'live performance' oriented

Quick Transpose itself was criticised very effectively and persistently in one of the Facebook 'synthesiser' groups because it could be replaced by keyboard shortcuts for the factory 'Pitch' device. Yes, I acknowledge that this is indeed the case, but I'm a mouse clicker, not a keyboard shortcut user, and I almost always prefer to use a single mouse click to mode-changing combinations of mouse clicks to set the focus, followed by keyboard shortcuts to do the action. Different folks, different strokes.

However, brucewayne247 commented on maxforlive.com that what was also needed was what I now call 'Counter' mode, where mouse clicks advance a counter that does the transpose (and this added 'BW' to the name), and JapanLoveStar took this further by requesting via this blog that I should make everything MIDI-mappable, especially a few buttons that I had over-looked (so adding 'JLS'). Somewhere in there, there was also a request for an 'audio' version instead of just MIDI, and before I knew it, I had a series of devices that had strayed some distance from the original 'Make Rack programming easy' goal!

Quick Transpose perf JLS

Previously, when a device gets optimised for live performance, I have added a 'perf' to the end, and so that's where the 'Quick Transpose perf JLS' name comes from. This time the customisation is quite interesting because it moves away from the usual tight timing and synchronisation of DAWs in live performance, into a space where the timing is user-driven instead. I've never been very good with looping, especially not live, and hugely admire those people who have mastered them (see below), so I had to cast my mind back to when I used to do stage lighting. The result is a 'scene' based sequencer that take the output of the counter and makes it available as transposition, plus two additional other tracks that are mappable to parameters inside Ableton Live. For musical use, then I have replaced the words 'scene' with 'section', because that's the closest word I can think of for part of a song, and I'm happy for better suggestions to turn up!


The far left side of 'QT perf JLS' (as I'm going to abbreviate it herein) has the counter from the 'BW' version, but with the added 'zero' button in between the '+' and '-' buttons to clear the count quickly with a single mouse click. I also changed the 'ANO' button so that it not only flushes hanging MIDI notes, but it also sends the basic 'All Notes Off' MIDI message as well. Everything to the right is new, and reflects my new insight into this way of performing courtesy of BW and JLS. 

The most obvious part is the 'section' sequencer, which is a repurposed 'step' sequencer, and yes, the screenshot is out of date because it still has 'step' shown - the current version on maxforlive.com has a few cosmetic changes that I made after going from 'dev' to published, and so the graphics here aren't totally in sync. Versions 0.01 and 0.02 were never published because I had a little bit of development hell, but that's another story. There are three tracks: Transpose, as you expected, and C3 is the 'centre' zero, 'no transpose' pitch setting - if you press the 'X' red button on the 'Transpose' track then this resets the current sequence (there are 16 'songs', set by the big number selector) to all C3s. The 'Value1' and 'Value2' tracks are the other two, and they can only be mapped to other Ableton Live parameters using the little 'Map' buttons on the far right.


The grid is always 'live' for editing, and so when you select a track, then moving the mouse around in the grid part will edit the values of the sliders for Value1 and Value2 - for the Transpose track then you have to click in a grid cell to add or remove a pitch entry. The 'Fold' button works just like the same button in the Ableton Live piano roll window, and makes it easier to view pitch sequences with narrow ranges as well as edit within a restricted set of already-chosen values. You can always add the Ableton Live factory device called 'Scale' after 'QT perf JLS' if you want to constrain the pitches.

Immediately on the left side of the grid are the main user control buttons, and these are very similar to the '+' and '-' buttons in the counter, except that '>' moves the sequencer one step to the right, and '<' moves the sequencer one step to the left. (Interestingly, using the characters '>' and '<' in the maxforlive.com description caused me some problems, because the web-site detects them as 'HTML', and you aren't allowed to use HTML in the description field...) Anyway, as you go across the grid, then the middle purple box shows the transpose value, and so the buttons work in much the same way as the counter immediately to their left. Above the buttons, there is a tiny 'show/hide' button that allows the whole of the remaining right hand part of the device to be hidden (or revealed again!) so that you only have the main buttons visible. The idea here is that you spend time setting up the grid with the transpose and other values that you want, and then in live performance, all you want to do is advance through the sections by clicking on the upper '>' button, or maybe the middle hidden 'go to step 1' purple button. (I'm kind of assuming here that most people will start on 'no transpose' in the first section...)

On the right hand side of the grid there are the 'Song' selector (big, 1 of 16 numbered songs), the 'current section' indicator which is now echoed in the minimised tab view, the section lengths (2 section to 16), the tracks control buttons, and finally, three rather cryptic buttons that are alternatives to the '>' and '<' buttons. '|<>|' moves back and forwards across the grid, repeating the first step and the last twice, whilst '<>" moves back and forth across the grid with only one output of the first and last step. The 'R' button move across the grid randomly. All of these 'movement' buttons can be controlled by mouse clicks, or by assigning them to MIDI controller buttons.

Workflow

The workflow for using 'QT perf JLS' goes something like this:
1. Click the little round 'show/hide' button to reveal the expanded view.
2. Set the song number (1-16)
3. Decide how many sections you have in your song/piece-of-music. (<16!)
4. Set the section count to the nearest larger number.
5. Choose the Transpose track and fill in the transpose values for each section (C3=no transpose)
6. Map the 'Value' tracks to two other parameters (volume, filter cut-off, chorus, reverb, etc.)
7. Set the values for each section for the two Value tracks.
8. Reset the sequencer to section (step) 1. (The transpose and value settings should now happen!)
9. Click the little round 'show/hide' button to hide the expanded view.
10. Start the performance.
11. Click on the '>' to advance to the next section. Click on'<' if you change your mind an want to keep playing in the previous section!
12. Click on the middle button (the transpose value in the purple box) to return to section 1 and end the performance. (You could also use '3rd Hand' to help automate the volume fader...)

Masters of looping - a personal selection...


Getting Quick Transpose perf JLS

You can download Quick Transpose perf JLS for free from MaxForLive.com.

(The links above should now be fixed!)

Here are the instructions for what to do with the .amxd file that you download from MaxforLive.com:

     https://synthesizerwriter.blogspot.co.uk/2017/12/where-do-i-put-downloaded-amxd.html

(In Live 10, you can also just double-click on the .amxd file, but this puts the device in the same folder as all of the factory devices...)

Modular Equivalents

In terms of modular equivalents, then reproducing this functionality in my modulars was pretty straight-forward. It is just a couple of 8 step sequencers chained together and some patch cables - so 2ME altogether, plus maybe one or two extra ME for the random selection (which depends on how 'basic' the step sequencer is...).

Buy me a coffeeBuy me a coffee


Wednesday, 31 October 2018

Quick Transpose Special Edition - an extended MaxForLive device

One of the interesting bits of feedback that I got for the original 'Quick Transpose' was a request by someone with the MaxForLive.com user-name of 'brucewayne247' for some additional controls: single steps and user-presettable. My initial thought was that this was gong to be a quick and easy edit, but the reality turned out to be slightly trickier... So here's a 'behind the scenes' special post.

The original device, 'Quick Transpose', has gone through two quick updates recently (0v02 - to update the user interface, and 0v03 - to fix a minor user interface weakness), It has only two columns of buttons: Octave transpositions on the left, and Fifths on the right. There is a small grey box (with a '=') in the lower right hand corner shows the total transposition from the two columns, and the 'ANO!' button is a panic button that sends 'Notes Off' messages for any held notes in case any held notes occur. Despite the name, it doesn't send a MIDI 'All Notes Off' message!

The Extras 

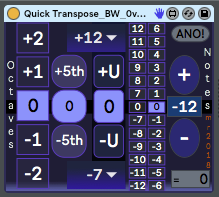
My first thought was to just add a third column of buttons, but instead of fifths, to provide a user-controllable input. The fourth set of buttons would just be semitone steps and could use the same live.tab buttons as all the previous columns. Finally, I had an idea for something that I hadn't seen before: an up/down counter that would control the transposition interval. Here's what the user interface looks like, taking all of the elements into account:


And here's an overview of the Max code that does all the 'under the covers' work to make the user interface actually do things:


The code for each of those columns is in the centre of the screenshot. From left to right, the boxes show the code for each of the columns. The leftmost column does the octaves, the next column does the fifths, and underneath them are the objects that cascade their outputs to give the final transposition value. The first of the new added columns is the large box in the middle - and it is very different from the two previous columns - getting user-settable buttons wasn't s easy to do as I had expected. The next column is the semitone selector, and the difficulty here was fitting it onto the screen - a single vertical column would have had buttons so tiny that they wouldn't have been readable. Instead, I decided to do two columns next to each other with 12 to 7 on the left side, and 6 to 1 on the right side, with two zeroes in the middle. Unfortunately, this order doesn't translate very easily to the way that the buttons ae ordered, and it took some experimentation to get the right order. The final box is the 'counter' column, and you can see the up and down buttons at the top, then the counter, and finally, the 'count' display at the lower right. 

So the three new columns weren't just repeats of the original two, they were all very different, and so what seemed like a quick programming task became something slightly more time-consuming. But eventually it was completed, and I had something that did everything that 'brucewayne247' had requested, plus that extra 'counter' just as a wild extra.

So what is it? It's a completely over-the-top transposer, with many ways to transpose, including a counter mode that you may well have never seen before and will very likely never see again. Like many of my devices, it is a bit of an experiment (Probably LFO and LFOLFO are good examples). Enjoy!

Obfuscation - a brief aside

'Obfuscation' is a wonderful word. It means to hide something: the process of making it 'obscure'. In the past I have seen MaxForLive devices which covered everything behind panels, devices which partitioned code into many sections, devices with nested patchers, and more. But recently, I saw a different approach: taking a patch, selecting everything and then expanding everything. As a result, undoing it will probably take quite a bit of time and effort. Simple and reasonably effective.  

Using Quick Transpose BW

'Quick_Transpose_BW_mr' can be used whenever you want to make quick transpositiions in Ableton Live using the mouse. Any of the transpositions can be selected with a single mouse click. I tend to use this type of device inside Instrument Racks when I'm making custom instruments:


The screenshot shows Quick Transpose BW being used inside an Instrument Rack to do rapid octave switching controlled by the Rack Macro Controls - although you could also assign other Macro Controls to the other columns. The 'Pitch' device is the standard Ableton device, and is shown here for comparison purposes.

Getting Quick_Transpose_BW_mr_0v02

You can download Quick_Transpose_BW_mr_0v02 for free from MaxForLive.com.

Here are the instructions for what to do with the .amxd file that you download from MaxforLive.com:

     https://synthesizerwriter.blogspot.co.uk/2017/12/where-do-i-put-downloaded-amxd.html

(In Live 10, you can also just double-click on the .amxd file, but this puts the device in the same folder as all of the factory devices...)

Modular Equivalents

In terms of modular equivalents, then reproducing this functionality in my modulars was harder than I thought it would be. I settled on a step sequencer and a manual clock and ended up at about 3 or 4 ME. One of the interesting things about modulars is that the mundane labour-saving modules are often the hardest to find, and I end up designing my own, and then end up with something very custom and personalised - which is what my Ableton Live looks like too...

Alternatives

Yep, you can use the factory device from Ableton: 'Pitch', to do exactly the same function. But it requires setting the focus to the rotary pitch control (with a click on the control) and then using 'shift-up arrow' to jump in octave steps. Or you can type in '12'. As I say, my preference is to do just about everything using the mouse, not the keyboard, and for me, continually jumping back and forth between mouse and keyboard is a big switch in context each time. Your preferences may differ, of course.

(You could also use the 'Transpose' box in the 'Scale' device - the 'shift-up arrow' shortcut works there as well.)

Buy me a coffeeBuy me a coffee


Monday, 22 October 2018

Quick Transpose - a free MaxForLive utility device for Ableton Live

I'm doing some tidying up at the moment so that I'm kind of ready for the upgrade to Max 8, and so some of my older MaxForLive devices are getting a fresh lick of paint...

As you probably already know, Ableton Live comes with a 'Pitch' MIDI Effect - it has a minimalistic user interface that provides a rotary control for semitone shifting of incoming MIDI notes... Now I do lots of sound design and synthesis research inside Racks, and so do lots of octave and fifth transpositions - if you have seen me demo my RUSS residuals synthesis technique at NAMM or Synthfest UK then you will have seen me do lots of live transposes as I edit sounds), and so I have spent quite a bit of time clicking on the control and then using the up or down cursor keys to adjust the pitch of a layer. Twelve clicks per octave is a lot of clicks (Using the keyboard: 'Shift and Up arrow' jumps in octave steps, but I prefer using the mouse for just about everything), so I made a utility device that reduced the amount of clicking. My usual approach with controlling things in live performance with a mouse is that the number of mouse clicks should be as few as possible: single clicks if possible...


The original device was called 'Quick Transpose', and it was a simple device with a vaguely seasonal 'late December' colour scheme that didn't fit in with any of Live's skins, and looking at it again now, it definitely doesn't look good with Live 10's 'Dark' theme. Time for an update...


The new update (to 0v03!) adds a bit more explanation (The left hand side is for selecting Octaves, whilst the right hand side is for Fifths...) and tries to make things clearer.


There are two columns of buttons: Octave transpositions on the left, and Fifths on the right. The small grey box (with a '=') in the lower right hand corner shows the total transposition from the two columns, and the 'ANO!' button is a panic button that sends 'Notes Off' messages for any held notes in case any held notes occur (although I have tried to minimise the chances of this happening in the M4L code). Despite the name, it doesn't send an 'All Notes Off' message!


The screenshot above shows the obvious way to use Quick Transpose, and this is probably where most Live users would place it automatically - the last MIDI processing device just before the 'Instrument' in a track chain. (Also notice how my colour theme kind of works in a dark skin...)

But you can put Quick Transpose anywhere in the MIDI part of a track chain, which means that it can go in front of a synthesiser inside an Instrument Rack:


This allows you to quickly transpose one of a set of synthesisers to parallel fifths or octaves with a quick click of the mouse, and you could always put another instance of Quick Transpose in front of the whole Instrument Rack to avoid needing to select notes and shift-octave them in the piano roll view. (The 'Select, Shift-Arrow' octave transposing is another way of transposing the whole sequence, but splitting poly tracks apart into mono tracks is usually a bit fiddly and slow to do.)


Here's the 'Operator' of the three parallel synths in the Instrument Rack, transposed down by one octave.


And finally, the 'Wavetable' transposed up by one octave. I have often wondered about making a device that puts controls deep inside Racks up at the top level, but I'm still learning about the programming model for Live, and I don't think my knowledge is quite up to it yet...

Getting Quick_Transpose_mr_0v03

You can download Quick_Transpose_mr_0v0for free from MaxForLive.com.

Here are the instructions for what to do with the .amxd file that you download from MaxforLive.com:

     https://synthesizerwriter.blogspot.co.uk/2017/12/where-do-i-put-downloaded-amxd.html

(In Live 10, you can also just double-click on the .amxd file, but this puts the device in the same folder as all of the factory devices...)

Modular Equivalents

In terms of modular equivalents, then reproducing this functionality in my modulars was harder than I thought it would be. I settled on a step sequencer and a manual clock and ended up at about 3 or 4 ME. One of the interesting things about modulars is that the mundane labour-saving modules are often the hardest to find, and I end up designing my own, and then end up with something very custom and personalised - which is what my Ableton Live looks like too...

Alternatives

Yep, you can use the factory device from Ableton: 'Pitch', to do exactly the same function. But it requires setting the focus to the rotary pitch control (with a click on the control) and then using 'shift-up arrow' to jump in octave steps. Or you can type in '12'. As I say, my preference is to do just about everything using the mouse, not the keyboard, and for me, continually jumping back and forth between mouse and keyboard is a big switch in context each time. Your preferences may differ, of course.

(You could also use the 'Transpose' box in the 'Scale' device - the 'shift-up arrow' shortcut works there as well.)

Inside a Rack

As I said, when I'm doing sound design and synthesis research, I spend a lot of time inside an Instrument Rack, tweaking synths and sample players and transposing to get the right feels from the layered output. What I've been working on for quite a while is a single device that puts all of that transposing into a single UI, instead of it being spread throughout the layers of the Rack. But I have always wondered if this is too specialised a device for general use... Anyway, it turns out that you can use Macros to do this...


So here's a typical three-layer synth sound, using Analog, Operator and Simpler. I have added a Quick Transpose and a Pitch M4L device in each layer, and mapped Macro Controls to each of them. This undoes the burying of the transposition controls inside the Rack, and presents them at the top level, where they are very easy to get at...

( Of course, in a real-world Rack, only three of the Macros would be assigned to transposition - the other five would be to other parameters! I'm showing the two sets of macro assignments for comparison purposes only. )


As you can see, the 'use Ableton devices' method uses Pitch to do the transpositions, and so the basic mapping gives a range of +/-128 semitones for the Macro rotary control. A quick edit to the Mapping Browser, and this rename can be set to +/-12 semitones (see the screenshot collage below). Unfortunately, Macro rotary controls do not respond to the 'Shift and Up/Down' keyboard shortcuts, and so there's quite a lot of shifted cursor key presses required to transpose by octaves (12 presses per octave).


The 'Quick transpose' method maps the three Quick Transpose devices to the three rotary Macro controls, but this time, the 'live.tab' Max object isn't very well supported in the Mapping Browser - you can't change the range, and can't invert the range. As a result, transpositions downwards require the rotary control to go clockwise, and so high values of the 0-128 value indicate low transpose values. But the live.tab object quantises the values to octaves, and so there are really only five values for the rotary controls that matter: 0-15 maps to +24 semitones (+2 octaves), 15-47 makes to +12 semitones (+1 octave), 48-79 maps to zero (no transposition), 80-111 makes to -12 semitones (-1 octave), and 112-127 maps to -24 semitones (-2 octaves). So selecting one of the five octave transposition settings is very quick if your preference is to use a mouse for most editing in the Live user interface, but transposition is slower if you use the keyboard cursor keys to move up and down one semitone at a time...


You can see the effect of the lack of an 'invert' option in the screenshot above. The 'Ableton Pitch' method gives a rotary Macro Control that goes clockwise for transposing up in pitch, whereas the 'Quick Transpose' method results in a rotary Macro Control that transposes down in pitch for clockwise rotation. But the quantisation makes it easier to set the transposition because there are only five positions for the Macro that is mapped to the 'Quick Transpose' live.tab object - and the lack of a 'Shift-Up/Down' keyboard shortcut makes the 'Pitch' method more fiddly since it requires careful mousing to move the exact multiple of 12 semitones, or requires multiples of 12 ip/down cursor key presses to shift in octaves.


For completeness, the 2 octave view is shown above.

In conclusion, then there are advantages and disadvantages for each method. The 'Use Ableton devices like the Pitch device' method doesn't require an additional M4L device, but suffers from a missing keyboard shortcut and requires lots of key presses or precise mousing. The 'Quick Transpose' method requires an additional M4L device, but has a user interface that is easier and quicker to use with a mouse, but requires huge numbers of cursor key presses. It all depends on your preferred method of interacting with the Live user interface - my preference is for mousing, but I also use the cursor keys for precise control!


Sunday, 3 January 2016

Transposing Quickly In Ableton Live

Ableton Live has a 'Pitch' MIDI Effect, which provides a rotary control for semitone shifting of incoming MIDI notes. This is fine for precise mouse-users who are not in a hurry, but isn't so good at speed...

So here's 'Quick Transpose', a simple 'holiday-themed' give-away M4L plug-in that is available from MaxForLive.com:


 There are two columns of buttons: Octave transpositions on the left, and Fifths on the right. The orange box shows the total transposition from the two columns, and the '!' button is a pain button in case any held notes occur (although I have tried to minimise the chances of this happening in the M4L code).

The screenshot above shows the obvious way to use Quick Transpose, and this is probably where most Live users would place it automatically - left most in a track chain.

But you can put Quick Transpose anywhere in the MIDI part of a track chain, which means that it can go in front of a synthesiser inside an Instrument Rack:


This allows you to quickly transpose one of a pair of synthesisers to parallel fifths or octaves with a quick click of the mouse, and you could always put another instance of Quick Transpose in front of the whole Instrument Rack to avoid needing to select notes and shift-octave them in the piano roll view. (Not that I'm saying that the 'Select, Shift-Arrow' octave transposing isn't a great time saver too!)

As with all of my recent M4L plug-ins, Quick Transpose is now also available in a 'dark' version as well. 


The 'orange box' has gone, and I'm still trying to decide how to tweak the UI to have the same indication without it looking like a button, so expect an update at some stage. (Although I'm sometimes rather slow with updates...)