Showing posts with label MIDI. Show all posts

Sunday, 10 February 2019

Scales and inverted keyboards

Some time ago, I looked at the 'factory' Ableton Live MaxForLive device called 'Scale', and in particular the 'Inverted and Useless' preset, which is both a good and a bad description. Behind the scenes, I was working on my own 'scale' device, and this has recently been updated to the point at which it is probably releasable. Yes, I know that I often seem to release things too early, but sometimes things that I don't release go through slow and tortuous development behind the scenes (Waverne 2 is one example), and there are also devices where the beta testing takes longer than expected. Anyway, NoteScalery is now at the point where I think it is ready for people to play with, and it will be followed by a number of other related devices that depend on having some way of controlling the mode/scale of the notes that they produce. All of the data spreadsheets that I produced in order to create NoteScalery will be made freely available for download.

Scales

So what's a scale (in the genre of conventional 'Western' music that MIDI 1.n kind of assumes)? For MIDI notes then it can be thought of as a mapping between all of the possible notes (128 of them, numbered from 0-127) and a smaller set of notes that follow a (normally) musical rule. So example rules might be along these lines: 'All of the white notes', or 'The notes in the key of C Major', or All notes except sharps or flats'...

Now because of the way that notes have an interesting property related to multiples of pitch, then, if you go up in semitones from a given note, after 12 semitones, you end up at the same note, but one octave higher, and this note has double the pitch or frequency of the note where you started. Octaves are very special intervals because of this doubling (or halving if you go down in pitch), and when you combine this with the equal intervals between the semitones (in equal temperament), then this hugely influences the way that people think about the way that notes work together. 12 notes in a familiar black and white pattern, and it repeats every octave, so everything must repeat every octave, yes?

Unfortunately, it isn't quite as simple as this. You can see this when a piano tuner 'tunes' a piano. Actually, whilst they do 'tune' the piano, they also have to make compromises because those 12 neat semitone notes are only an approximation that sounds reasonable in most key signatures - and the piano tuner is adjusting the notes so that various intervals sound okay 'overall'...

You can also see a problem when you have minor scales that are different when they are ascending or descending, and when you start to invert the notes in a scale then things can go very weird. So the idea that a scale applies to an octave of notes is a nice tidy approximation that works in a lot of cases, but it isn't perfect for all cases.

In musical terminology, the correct word for the mapping of notes is a 'mode', but scale is often used synonymously...

Implementation

So how are MIDI Scale devices typically implemented? Well, they use octaves - they show which notes are in the scale for an octave, and just apply this across the whole the note range. Simple.

And sometimes things really are that simple. If you look inside the MaxForLive PitchScaler device that comes with the M4L examples in Live 9, then you get code that fundamentally exploits octaves:


On the left is the raw Max code. In the middle I have marked up the main sections, and on the right is the block diagram of what is happening. So after the decoding of the incoming MIDI messages, then there is the split into two sets of numbers: Note numbers, and Octave numbers. Note numbers go from 0-11 and indicate which note in the octave has been received. To extract this from the raw MIDI Note Number you just do a modulo 12, which is what the '%12' object does - it just repeatedly subtracts 12 until the result is less than twelve. You probably know this as a 'remainder' - the number that is left when you do a division. The Octave number is interesting, because when you 'repeatedly subtract' in the modulo function to get the remainder, then the number of times that you repeat is the Octave number. So if the MIDI Note number that was received was 25 then subtracting 12 gives 13, and subtracting 12 from that gives 1, so we know that the Note number is 1 (if C=0, then 1 will be C#), and the Octave number is 2, because we had to subtract 12 twice to get a remainder which was less than 12. So the MIDI Note was a C# in the third octave.

Now that there is only one octave's worth of Note numbers, then mapping which input numbers produce which output numbers requires just a 12x12 table. Nothing needs to happen to the Octave numbers - they just pass through to the output. The output stage is shown as an addition with a '+' symbol, but actually there's two extra refinements in the code. First notice that the output of the map table has another modulo function, so if there is any unexpected value in the table, then the only Note numbers we can get out will be less than 12. Second, the Octave number is multiplied by 12, so that we undo all of the repeated subtractions. When we add together the mapped Note number and the multiplied Octave number, then we get the MIDI Note number for the mapped note on the scale - as defined in the map table.

So that's how Ableton's own example does it, and you might be forgiven for thinking that we are at the end. We have a working Scale device!


If you look at the standard 'Scale' device that is included with Live, then you can see the mapping table because Ableton made it part of the user interface (it is all those light grey, dark grey and orange squares!), and it is12x12 squares. So it seems likely that this is coded similarly to the PitchScaler MaxForLive example - and the 'Fold' function limits the output to just one octave, which is exactly what happens if the Octave number is not allowed to the output...

Unfortunately, this 'Split' approach is not perfect. As I have mentioned before, the behaviour of this type of scale mapping device breaks down if you want to invert MIDI notes, so that the high notes play low notes, and vice-versa. It is well worth going back and seeing how things can go very weird... But the main problem is those two 'modulo' functions that are cairned out on the MIDI Note numbers. You remember that these are just repeatedly subtracting 12 until they get a remainder of less than 12? Well, this requires a loop that repeatedly subtracts 12, and inside that loop is a check to see if the remainder is less than 12. For a typical MIDI Note number of say 60, then this is going to require quite a lot of operations to be carried out, and it turns out that whilst a '+' operation can be very quick, the 'modulo' function can be a lot slower. If we think what is happening here, then we have two slow operations being carried out on each and every MIDI Note message, and this is going to delay the start of the note being played by the instrument (synth, sampler...) in that channel inside the Live DAW. Unwanted delay is not good.

To remove the delay, then one method is to remove the modulo functions. This can be achieved by using a larger table - and to cover all of the MIDI Note range then we would need a table of 128x128.


Here's a conceptual diagram that shows the 12x12 tables from the Scale device, mosaic'ed together to produce a 128x128 table, so that we can map any incoming MIDI Note number to any outgoing MIDI Note number, and the only operation that is required is to look up the MIDI Note number and see what the output should be - easy to do, and fast!


Actually, most of the time, the inputs and outputs are going to be quite similar, and so if we look at a 'Chromatic' scale, where each input note maps to the same output note, then actually, most of those 'Scale' tables will not have any orange squares in them at all - the only orange squares are gong to be on the lower left to upper right diagonal. So the 'copy and paste'd Scale tables in the diagram are not a fair reflection of reality.


For an 'Inverse and Useful' mapping, then the diagonal just goes the other way. Unlike the 'Scale' device, this mapping works perfectly - it produces low MIDI note outputs for high MIDI input notes, and vice-verse, and with low delay time. In this screenshot the 'Scale' tables are not shown, and you can see that most of the table is empty. In this case, there will be just 128 orange squares along that diagonal: one for each input note (mapping it to the inverted output).

MIDINoteScalery

And that's what is inside my MIDINoteScalery device - a 128x128 table (mostly empty), plus a few utilities and an interesting way of visualising the scale and the way it maps the input notes to the output notes.


The 'zl lookup' object replaces the 'mapping' object in the previous example, and the inversion, transposing and folding are handled slightly differently, but the 128x128 table does all of the scale mapping with a single look-up operation - there are no modulo arithmetic or integer divisions required any longer... Well, as long as you don't use the 'Fold' feature, but I'm working on removing them from that as well - watch for a future release...)


Ableton's Scale device has the incoming MIDI notes going vertically, and the outputs horizontally. This isn't how MaxForLive normally shows keyboards, and so the table needs to be rotated along the diagonal - the input notes now match to the horizontal axis of the table. The orange squares have been replaced with a 'staircase' diagram that makes it easy to see if the interval between output notes is one semitone, two semitones, three, etc. For the 'C Major' scale shown here, the C# isn't present in the output, and so the interval between the C and the D is 2 semitones, so the 'tread' of the staircase is 2 semitones wide. The next interval is from D to E, which is 2 semitones again, and so the tread is 2 semitones wide. The next interval is from the E to the F, which is only 1 semitone, so the tread is only 1 semitone wide, and you can see this in the 'staircase' diagram.

So how do you make a mapping table? In this post I'm going to show you how to create the table, and all of the spreadsheets that I show will be available to download for free, so you can make your own custom tables, and your own scale/mode mapping devices if you want to.

Types of scale


There are lots of scales, and so I chose two sets: scales starting with capital letters are basic scales, whilst scales starting with lower case letters are more unusual. The scales are deliberately organised in this order, with 'invert' as the final scale.


The basic scales (or more correctly, modes) are shown above with a base key (or Tonic) of C. The 'Chromatic' mode is a 1:1 mapping - the output is the same as the input! The Ionian mode shown here only outputs the white notes; C, D, E, F, G, A, and B.
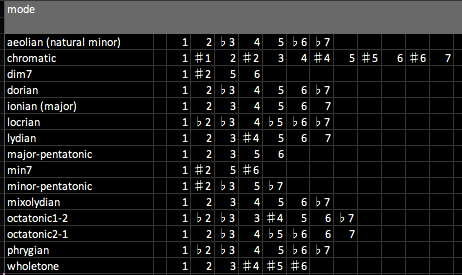

To be able to create the mapping table, then the notes need to be in a form where MaxForLive can work with them.  Here is the same table, converted to numbers instead of note names. When I did the conversion, I didn't subtract 1 from the numbers, and so you need to do this to get them into the form that is used to represent the notes in the octave: so C is 0, C# is 1, D is 2, etc.


In this table, then the numbers from the previous table have been converted again - this time into a form where the output note number is shown, and so there are always 12 outputs for the 12 note inputs in an octave. So, reading across the 'Chromatic' mode, the outputs are '0 1 2 3 4 5 6 7 8 9 10 and 11'. Reading across the 'Ionian (C Major) mode, the outputs are '0 0 2 2 4 5 5 7 7 9 9 and 11' - which means that and C# inputs will only produce a C output (the '0'), D and D# will only produce a D output (the '2'), and so on. Note that some of the modes only have a small number of output notes - the minor 7th has only 0, 3, 7 and 10, for instance.

Now this table is almost useful! If you use the 'Ionian C Major' mode, then the numbers indicate what the output should be for each input. So the numbers are '0 0 2 2 4 5 5 7 7 9 9 and 11', and this means that if the input is a C or C# (note numbers 0 and 1), then the output will be 0 (C). For the next two note inputs, D and D# (2 and 3) then the output is 2 (D), and so on. These numbers are a simple lookup table where you move horizontally for the input note number, and the number in the mapping table is the output note number.


To read this type of table into a MaxForLive 'coll' object, so that the numbers can be fed into a mapping 'zl lookup' object, then additional formatting is required. This is just a case of concatenating columns in the spreadsheet, as shown above.

The tables so far have only shown a single octave. Using a spreadsheet, it is easy to extend the table to higher numbers - all the way to 128 for all of the possible MIDI Note numbers that can be input and output. All you do is add 12 to each of the values in the first octave to get the values for this second octaves, then ad 12 to those for the third octave, and so on. This gives rows with 128 values: one for each MIDI input note number, and each number in the mapping table is the MIDI note number that will be output:


This table has entries from outputs of 0-127 for each of the 128 MIDI Note input numbers. The full table is in the downloadable spreadsheet, and contains complete tables for all of the basic and unusual modes. Note that there isn't any magic or deep maths in the mapping table - it literally is just horizontal rows of numbers that specify what the output number is for a given input number.

Utilities

The default setting for the MIDI NoteScalery device is a straight-forward mapping of input notes to output notes. The output notes are shown as colour (blue or orange - selectable), and when an accidental (black) note is output then that is shown in colour.


The '+' button (blue) allows the output notes to be transposed. If the transposition goes outside of the MIDI note range then the notes will be folded back into range.


The 'Fold' button (orange) allows the output notes to be restricted to a range of 1, 2, 3... octaves, with an offset. So if you want the output notes to be only in the range of 1 octave, then set the range to 1 and the offset to 0. As I mentioned earlier, the 'Fold' function still uses the modulo function internally, but this should be removed in a future version...
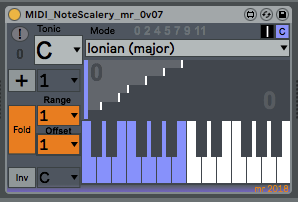

The 'Inv' button (yellow) allows the keyboard to be inverted - perfectly. High input MIDI notes will produce low MIDI note outputs, and vice-versa. This can be done for any of the modes, and it is recommended that the 'Chromatic' mode is used initially. inversion can be set to happen around any note - in the examples shown, a C input will be output as an F.


Summary


MIDI NoteScalery is one of a family of utilities intended for exploring scales and modes. All of the devices will be available from MaxForLive.com for free (and in fact, some of them are already available!).


The two devices that are included by Ableton in Live are 'Scale' and 'PitchScaler'.

Getting MIDINoteScalery

You can download MIDNoteScalery for free from MaxForLive.com.

Here are the instructions for what to do with the .amxd file that you download from MaxforLive.com:

     https://synthesizerwriter.blogspot.co.uk/2017/12/where-do-i-put-downloaded-amxd.html

(In Live 10, you can also just double-click on the .amxd file, but this puts the device in the same folder as all of the factory devices...)

Getting the 'Scales and Modes' spreadsheet...

You can download the 'Scales and Modes' spreadsheet from here. It is stored in various formats to try and maximise availability. Whilst it starts out with just music theory turned into notes, the numbers rapidly become somewhat MAX-oriented, so this isn't a general-purpose 'scale development tool', although the mapping should be reasonably easy to apply to other environments. Note that there are three tabs - people often seem to overlook tabs on spreadsheets...

'Basic' - the first tab contains just the basic scales in a 'coll'-friendly format. Just a 'cover'-screen, really.

'One Octave' - the second tab has all of the data for a single octave for the basic and extended/extra scales, and contains just about all of the notes and numbers that should be useful for making your own scales and mapping tables. The data goes quite a long way across the the right... You can use this tab for developing and testing your own scales (and getting used to the 'CONCATENATE' function that is used all over this spreadsheet, and which is indispensable for assembling data into arcane formats...) and reformatting to suit your own development environment.

'Full Range' - the third tab is the 'One Octave' extended to cover all 128 MIDI Notes. This time the spreadsheet goes a very long way over to the right, and it then continues downwards. The final 'big table' actually starts at row 58, so don't miss it. This tab is where you will produce your final 'big table'...

If you are interested in how to use the Excel 'CONCATENATE' function, then you may find this spreadsheet useful - it is used everywhere to assemble numbers into the format that objects like 'coll' expect.

If/when I get around to recoding the 'fold' code so that it doesn't use the modulo function, then the table development spreadsheets will be made available for free as well.

Modular Equivalents

In terms of modular equivalents, then it depends if you count a 'Scale' module as a 'basic' module, and  once again you rapidly get to the point where you want to step outside of the 'basic modules only' rule and go into more specialist modules. I'm going to add a 'Scale' module to the 'basic' set, and so my estimate is that full functionality is going to require a scale module plus some additional CV processing (for invert and fold) and so this gives a grand total of 3 ME.


Monday, 19 November 2018

Quick Transpose Customised For Live Performance Usage

This is 'Quick Transpose' customised for live performance, and so it joins the 'series' of devices that arose from me publishing my personal utility to ease my programming of Racks in Ableton Live:

Quick Transpose - my original 'make it easier' personal utility
Quick Transpose BW - with added counter
Quick Transpose Audio BW - audio instead of MIDI, and more 'live performance' oriented

Quick Transpose itself was criticised very effectively and persistently in one of the Facebook 'synthesiser' groups because it could be replaced by keyboard shortcuts for the factory 'Pitch' device. Yes, I acknowledge that this is indeed the case, but I'm a mouse clicker, not a keyboard shortcut user, and I almost always prefer to use a single mouse click to mode-changing combinations of mouse clicks to set the focus, followed by keyboard shortcuts to do the action. Different folks, different strokes.

However, brucewayne247 commented on maxforlive.com that what was also needed was what I now call 'Counter' mode, where mouse clicks advance a counter that does the transpose (and this added 'BW' to the name), and JapanLoveStar took this further by requesting via this blog that I should make everything MIDI-mappable, especially a few buttons that I had over-looked (so adding 'JLS'). Somewhere in there, there was also a request for an 'audio' version instead of just MIDI, and before I knew it, I had a series of devices that had strayed some distance from the original 'Make Rack programming easy' goal!

Quick Transpose perf JLS

Previously, when a device gets optimised for live performance, I have added a 'perf' to the end, and so that's where the 'Quick Transpose perf JLS' name comes from. This time the customisation is quite interesting because it moves away from the usual tight timing and synchronisation of DAWs in live performance, into a space where the timing is user-driven instead. I've never been very good with looping, especially not live, and hugely admire those people who have mastered them (see below), so I had to cast my mind back to when I used to do stage lighting. The result is a 'scene' based sequencer that take the output of the counter and makes it available as transposition, plus two additional other tracks that are mappable to parameters inside Ableton Live. For musical use, then I have replaced the words 'scene' with 'section', because that's the closest word I can think of for part of a song, and I'm happy for better suggestions to turn up!


The far left side of 'QT perf JLS' (as I'm going to abbreviate it herein) has the counter from the 'BW' version, but with the added 'zero' button in between the '+' and '-' buttons to clear the count quickly with a single mouse click. I also changed the 'ANO' button so that it not only flushes hanging MIDI notes, but it also sends the basic 'All Notes Off' MIDI message as well. Everything to the right is new, and reflects my new insight into this way of performing courtesy of BW and JLS. 

The most obvious part is the 'section' sequencer, which is a repurposed 'step' sequencer, and yes, the screenshot is out of date because it still has 'step' shown - the current version on maxforlive.com has a few cosmetic changes that I made after going from 'dev' to published, and so the graphics here aren't totally in sync. Versions 0.01 and 0.02 were never published because I had a little bit of development hell, but that's another story. There are three tracks: Transpose, as you expected, and C3 is the 'centre' zero, 'no transpose' pitch setting - if you press the 'X' red button on the 'Transpose' track then this resets the current sequence (there are 16 'songs', set by the big number selector) to all C3s. The 'Value1' and 'Value2' tracks are the other two, and they can only be mapped to other Ableton Live parameters using the little 'Map' buttons on the far right.


The grid is always 'live' for editing, and so when you select a track, then moving the mouse around in the grid part will edit the values of the sliders for Value1 and Value2 - for the Transpose track then you have to click in a grid cell to add or remove a pitch entry. The 'Fold' button works just like the same button in the Ableton Live piano roll window, and makes it easier to view pitch sequences with narrow ranges as well as edit within a restricted set of already-chosen values. You can always add the Ableton Live factory device called 'Scale' after 'QT perf JLS' if you want to constrain the pitches.

Immediately on the left side of the grid are the main user control buttons, and these are very similar to the '+' and '-' buttons in the counter, except that '>' moves the sequencer one step to the right, and '<' moves the sequencer one step to the left. (Interestingly, using the characters '>' and '<' in the maxforlive.com description caused me some problems, because the web-site detects them as 'HTML', and you aren't allowed to use HTML in the description field...) Anyway, as you go across the grid, then the middle purple box shows the transpose value, and so the buttons work in much the same way as the counter immediately to their left. Above the buttons, there is a tiny 'show/hide' button that allows the whole of the remaining right hand part of the device to be hidden (or revealed again!) so that you only have the main buttons visible. The idea here is that you spend time setting up the grid with the transpose and other values that you want, and then in live performance, all you want to do is advance through the sections by clicking on the upper '>' button, or maybe the middle hidden 'go to step 1' purple button. (I'm kind of assuming here that most people will start on 'no transpose' in the first section...)

On the right hand side of the grid there are the 'Song' selector (big, 1 of 16 numbered songs), the 'current section' indicator which is now echoed in the minimised tab view, the section lengths (2 section to 16), the tracks control buttons, and finally, three rather cryptic buttons that are alternatives to the '>' and '<' buttons. '|<>|' moves back and forwards across the grid, repeating the first step and the last twice, whilst '<>" moves back and forth across the grid with only one output of the first and last step. The 'R' button move across the grid randomly. All of these 'movement' buttons can be controlled by mouse clicks, or by assigning them to MIDI controller buttons.

Workflow

The workflow for using 'QT perf JLS' goes something like this:
1. Click the little round 'show/hide' button to reveal the expanded view.
2. Set the song number (1-16)
3. Decide how many sections you have in your song/piece-of-music. (<16!)
4. Set the section count to the nearest larger number.
5. Choose the Transpose track and fill in the transpose values for each section (C3=no transpose)
6. Map the 'Value' tracks to two other parameters (volume, filter cut-off, chorus, reverb, etc.)
7. Set the values for each section for the two Value tracks.
8. Reset the sequencer to section (step) 1. (The transpose and value settings should now happen!)
9. Click the little round 'show/hide' button to hide the expanded view.
10. Start the performance.
11. Click on the '>' to advance to the next section. Click on'<' if you change your mind an want to keep playing in the previous section!
12. Click on the middle button (the transpose value in the purple box) to return to section 1 and end the performance. (You could also use '3rd Hand' to help automate the volume fader...)

Masters of looping - a personal selection...


Getting Quick Transpose perf JLS

You can download Quick Transpose perf JLS for free from MaxForLive.com.

(The links above should now be fixed!)

Here are the instructions for what to do with the .amxd file that you download from MaxforLive.com:

     https://synthesizerwriter.blogspot.co.uk/2017/12/where-do-i-put-downloaded-amxd.html

(In Live 10, you can also just double-click on the .amxd file, but this puts the device in the same folder as all of the factory devices...)

Modular Equivalents

In terms of modular equivalents, then reproducing this functionality in my modulars was pretty straight-forward. It is just a couple of 8 step sequencers chained together and some patch cables - so 2ME altogether, plus maybe one or two extra ME for the random selection (which depends on how 'basic' the step sequencer is...).

Buy me a coffeeBuy me a coffee


Monday, 22 October 2018

Quick Transpose - a free MaxForLive utility device for Ableton Live

I'm doing some tidying up at the moment so that I'm kind of ready for the upgrade to Max 8, and so some of my older MaxForLive devices are getting a fresh lick of paint...

As you probably already know, Ableton Live comes with a 'Pitch' MIDI Effect - it has a minimalistic user interface that provides a rotary control for semitone shifting of incoming MIDI notes... Now I do lots of sound design and synthesis research inside Racks, and so do lots of octave and fifth transpositions - if you have seen me demo my RUSS residuals synthesis technique at NAMM or Synthfest UK then you will have seen me do lots of live transposes as I edit sounds), and so I have spent quite a bit of time clicking on the control and then using the up or down cursor keys to adjust the pitch of a layer. Twelve clicks per octave is a lot of clicks (Using the keyboard: 'Shift and Up arrow' jumps in octave steps, but I prefer using the mouse for just about everything), so I made a utility device that reduced the amount of clicking. My usual approach with controlling things in live performance with a mouse is that the number of mouse clicks should be as few as possible: single clicks if possible...


The original device was called 'Quick Transpose', and it was a simple device with a vaguely seasonal 'late December' colour scheme that didn't fit in with any of Live's skins, and looking at it again now, it definitely doesn't look good with Live 10's 'Dark' theme. Time for an update...


The new update (to 0v03!) adds a bit more explanation (The left hand side is for selecting Octaves, whilst the right hand side is for Fifths...) and tries to make things clearer.


There are two columns of buttons: Octave transpositions on the left, and Fifths on the right. The small grey box (with a '=') in the lower right hand corner shows the total transposition from the two columns, and the 'ANO!' button is a panic button that sends 'Notes Off' messages for any held notes in case any held notes occur (although I have tried to minimise the chances of this happening in the M4L code). Despite the name, it doesn't send an 'All Notes Off' message!


The screenshot above shows the obvious way to use Quick Transpose, and this is probably where most Live users would place it automatically - the last MIDI processing device just before the 'Instrument' in a track chain. (Also notice how my colour theme kind of works in a dark skin...)

But you can put Quick Transpose anywhere in the MIDI part of a track chain, which means that it can go in front of a synthesiser inside an Instrument Rack:


This allows you to quickly transpose one of a set of synthesisers to parallel fifths or octaves with a quick click of the mouse, and you could always put another instance of Quick Transpose in front of the whole Instrument Rack to avoid needing to select notes and shift-octave them in the piano roll view. (The 'Select, Shift-Arrow' octave transposing is another way of transposing the whole sequence, but splitting poly tracks apart into mono tracks is usually a bit fiddly and slow to do.)


Here's the 'Operator' of the three parallel synths in the Instrument Rack, transposed down by one octave.


And finally, the 'Wavetable' transposed up by one octave. I have often wondered about making a device that puts controls deep inside Racks up at the top level, but I'm still learning about the programming model for Live, and I don't think my knowledge is quite up to it yet...

Getting Quick_Transpose_mr_0v03

You can download Quick_Transpose_mr_0v0for free from MaxForLive.com.

Here are the instructions for what to do with the .amxd file that you download from MaxforLive.com:

     https://synthesizerwriter.blogspot.co.uk/2017/12/where-do-i-put-downloaded-amxd.html

(In Live 10, you can also just double-click on the .amxd file, but this puts the device in the same folder as all of the factory devices...)

Modular Equivalents

In terms of modular equivalents, then reproducing this functionality in my modulars was harder than I thought it would be. I settled on a step sequencer and a manual clock and ended up at about 3 or 4 ME. One of the interesting things about modulars is that the mundane labour-saving modules are often the hardest to find, and I end up designing my own, and then end up with something very custom and personalised - which is what my Ableton Live looks like too...

Alternatives

Yep, you can use the factory device from Ableton: 'Pitch', to do exactly the same function. But it requires setting the focus to the rotary pitch control (with a click on the control) and then using 'shift-up arrow' to jump in octave steps. Or you can type in '12'. As I say, my preference is to do just about everything using the mouse, not the keyboard, and for me, continually jumping back and forth between mouse and keyboard is a big switch in context each time. Your preferences may differ, of course.

(You could also use the 'Transpose' box in the 'Scale' device - the 'shift-up arrow' shortcut works there as well.)

Inside a Rack

As I said, when I'm doing sound design and synthesis research, I spend a lot of time inside an Instrument Rack, tweaking synths and sample players and transposing to get the right feels from the layered output. What I've been working on for quite a while is a single device that puts all of that transposing into a single UI, instead of it being spread throughout the layers of the Rack. But I have always wondered if this is too specialised a device for general use... Anyway, it turns out that you can use Macros to do this...


So here's a typical three-layer synth sound, using Analog, Operator and Simpler. I have added a Quick Transpose and a Pitch M4L device in each layer, and mapped Macro Controls to each of them. This undoes the burying of the transposition controls inside the Rack, and presents them at the top level, where they are very easy to get at...

( Of course, in a real-world Rack, only three of the Macros would be assigned to transposition - the other five would be to other parameters! I'm showing the two sets of macro assignments for comparison purposes only. )


As you can see, the 'use Ableton devices' method uses Pitch to do the transpositions, and so the basic mapping gives a range of +/-128 semitones for the Macro rotary control. A quick edit to the Mapping Browser, and this rename can be set to +/-12 semitones (see the screenshot collage below). Unfortunately, Macro rotary controls do not respond to the 'Shift and Up/Down' keyboard shortcuts, and so there's quite a lot of shifted cursor key presses required to transpose by octaves (12 presses per octave).


The 'Quick transpose' method maps the three Quick Transpose devices to the three rotary Macro controls, but this time, the 'live.tab' Max object isn't very well supported in the Mapping Browser - you can't change the range, and can't invert the range. As a result, transpositions downwards require the rotary control to go clockwise, and so high values of the 0-128 value indicate low transpose values. But the live.tab object quantises the values to octaves, and so there are really only five values for the rotary controls that matter: 0-15 maps to +24 semitones (+2 octaves), 15-47 makes to +12 semitones (+1 octave), 48-79 maps to zero (no transposition), 80-111 makes to -12 semitones (-1 octave), and 112-127 maps to -24 semitones (-2 octaves). So selecting one of the five octave transposition settings is very quick if your preference is to use a mouse for most editing in the Live user interface, but transposition is slower if you use the keyboard cursor keys to move up and down one semitone at a time...


You can see the effect of the lack of an 'invert' option in the screenshot above. The 'Ableton Pitch' method gives a rotary Macro Control that goes clockwise for transposing up in pitch, whereas the 'Quick Transpose' method results in a rotary Macro Control that transposes down in pitch for clockwise rotation. But the quantisation makes it easier to set the transposition because there are only five positions for the Macro that is mapped to the 'Quick Transpose' live.tab object - and the lack of a 'Shift-Up/Down' keyboard shortcut makes the 'Pitch' method more fiddly since it requires careful mousing to move the exact multiple of 12 semitones, or requires multiples of 12 ip/down cursor key presses to shift in octaves.


For completeness, the 2 octave view is shown above.

In conclusion, then there are advantages and disadvantages for each method. The 'Use Ableton devices like the Pitch device' method doesn't require an additional M4L device, but suffers from a missing keyboard shortcut and requires lots of key presses or precise mousing. The 'Quick Transpose' method requires an additional M4L device, but has a user interface that is easier and quicker to use with a mouse, but requires huge numbers of cursor key presses. It all depends on your preferred method of interacting with the Live user interface - my preference is for mousing, but I also use the cursor keys for precise control!


Saturday, 31 December 2016

Why would I want to invert MIDI Velocity?

My MIDIf(x)_mr MaxForLive MIDI effect allows MIDI velocity to be inverted. 


So why would you want to do this? My best answer is in two articles published by Mode Audio: purveyors of excellent sounds for Ableton Live and many other DAWs:

The articles also contain the link to a neat M4L MIDI display utility for Velocity described here.


Sunday, 27 November 2016

Tools to make tools...

One layer down...

Making audio effects in Max For Live (M4L) requires minimal setup in Ableton Live: put an instrument and the audio effect template into a track, and edit the template in Max, using the 'ASDF...' keys on the keyboard to hear what the result sounds like.

Developing a MIDI 'effect' utility like my recent MIDIf(x)_mr requires a bit more work, because the environment that Ableton Live provides lacks some features that ease and speed up working with the MIDI protocol and its fascinating quirks. Of course, M4L makes it easy to add things that compensate, but I realised recently that I have a personal toolbox of M4L 'tools' that I use a lot, but which I have never shared, because they have all been made just for the purpose of making something else - and at the time, that 'something else' was the focus of my attention and so was much more interesting.
A graphical representation of just one of the things that 'MIDIf(x)_mr' can do to MIDI Note numbers...
A long time ago, I learned that the word 'Never' is one of those key 'danger' words that will catch you unawares. As it happens, there are several new bits of M4L that I'm going to be releasing over the coming few months, and all of them depended on 'unshared' tools for their development. So, post-Loop, this looks like a good time to make those tools available to a wider audience, so that working with M4L is made easier for more people.

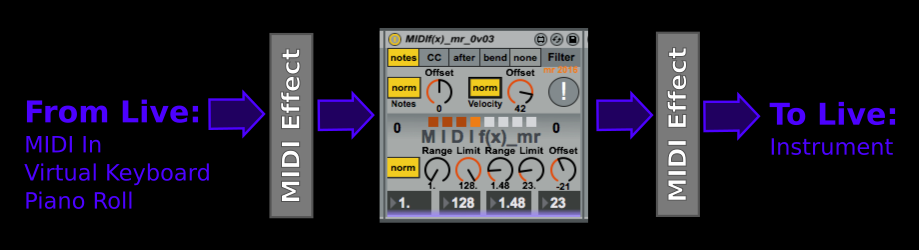
Here is the basic MIDI processing environment in Ableton Live:
MIDI messages (from the MIDI In, the Virtual keyboard (the 'ASDF...' keys..., the piano roll... ) come from Live and passes through the MIDI Effect (shown here as 'MIDIf(x)_mr', and is then sent to the Instrument, where the MIDI messages are turned into sound. 
Live allows MIDI Effects to be chained in just the same way as audio effects, and so there can be several effects in the processing chain.
Above we see one way that uses two of the built-in MIDI Effects inside Live: Pitch and Random. Pitch might be used to shift the incoming MIDI note numbers to check if the MIDIf(x)_mr 'Offset' rotary control is working properly, or maybe check if the 'Clip 0 127' Max command is working by setting very high values for note numbers. Putting 'Random' at the end of the processing chain turns the fixed, 'deterministic (predictable, the same every time)' output of MIDIf(x)_mr into just random notes. It is worth pointing out that this is the major difference between Random an MIDIf(x)_mr:
  • Random is not predictable - the output is different every time
  • MIDIf(x)_mr is just maths - the output is exactly the same every time

When you first start using MIDIf(x)_mr this difference may not be what you think is happening, of course! MIDIf(x)_mr does strange things to how you think a keyboard affects pitch...

To develop MIDIf(x)_mr, most of the time, I used this environment:
 Here the two MIDI Effects are M4L tools that I have written, but they could be any M4L tools from the MaxForLive web-site (and there are lots of useful tools on there). So the actual screenshot looks like this:
Before the MIDIf(x)_mr processing tool, I have used my keyboard 'monitor' called 'KeyMon' to show what the notes that are played on the external MIDI keyboard are, or what the piano roll is producing. MIDIf(x)_mr is set to scale pitch by 2, so an octave is twice as wide at the output as it is at the input. You can see this in the second keyboard monitor: the minor chord has been stretched so that the D# has moved up to an F#, and the G has moved up to a D (overall, the C minor chord has been changed to something where the flattened third has become a flattened fifth, and the fifth has become a 9th). MIDIf(x)_mr understands mathematics but not music, and so the built-in 'Scale' effect is added at the end of the chain so that I can constrain things harmonically if I want to. (and 'choice' is a key part of creativity!)

The other thing that KeyMon helps with is when MIDIf(x)_mr outputs very high or low notes. The input KeyMon hows that the input note root is middle C, which is MIDI note number 60. Doubling this inside MIDF(x)_mr is going to mean that the output is going to start at MIDI note number 120, which is way to the right on a keyboard. One 'hidden' feature of MIDIf(x)_mr is that the note 'Offset' rotary control at the top also affects the input of the 'Warp' processor section, and so in the screenshot above this is set so that the input is transposed down by one octave, so the input to MIDIf(x)_mr is only note number 48, and the output 'Offset' rotary control in the 'Warp' section is set to -48 (down by 4 octaves) so that the output starts an octave below middle C. By using two KeyMon effects around the MIDIf(x)_mr processor, setting all of these offsets is much easier - you just set the offsets so that the output is on the keyboard display where you want it.
By using the 'Limit' rotary control, the stretching effect can be reversed, and once again the offset rotary control is used in combination with the KeyMon keyboard monitor effect. Notice that when the warping is limited to 17, then the output Offset has been changed to 48 so that the output is pitched in the same octave as before - and the notes have moved around again!

Choosing different values of limit will change the output notes again, of course. Here are two other outputs where the scale has been fixed to C major, and a third KeyMon shows the output visually:
A limit of 19...
(The extra C note was added on the piano roll, and gets limited into the 17 note range set by the limit control.)
A limit of 20...
  The six buttons at the top of the KeyMon MIDI Effect set the lowest note displayed. In all of these diagrams it is set to '36', and so middle C is on the 'lower' keyboard. Note that the two keyboards flow from the lower one to the upper one, and so 6 octaves are shown in total. KeyMon is, as always, available from MaxForLive.com, and also comes in a dark version.
The dark version of KeyMon.
Also see: Inverted MIDI Velocity