Sometimes the spark of an idea can come from a chance comment, and can tip your mind into thinking about something from a different viewpoint. One of the comments on Maxforlive.com for one of my comb-filter-based audio effects set me thinking, because it warned against using limiting because it could change the sound...
Now changing the sound is what audio effects are all about, and every time that I think there isn't any room for anything even remotely new, then up pops something that you hadn't considered before. So after a run of filter-based audio effects, I now had a nagging suspicion that there must be something that hadn't been explored with limiting (or its cousins, compression and expansion, and the evil twin, noise gating). Which is when a crazy idea popped into my head, and resulted in a series of limiter-based effects that reaches its natural conclusion in SyncLimiter.
It is often said that there is nothing new. So I'm cautious about suggesting that this might be new, so I will caveat this with 'new to me'. I've never seen anything that deliberately mis-uses limiting with LFOs setting the threshold, but then I'm a very conventional user of limiters (as in keeping something with lots of time-varying gain stable, as in a swept comb filter) and so I may well merely be revealing my blinkered knowledge.
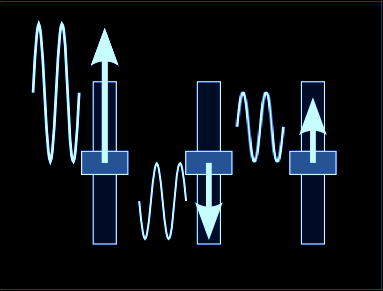
So with all that out of the way, I present SyncLimiter, an audio effect that has two independent limiters whose thresholds and compression ratios can be modulated by sample-and-hold captured sine waveforms from two independent synch-able LFOs.
I've chosen the 'mirror' look for the UI, so the left and right hand sets of controls are reflected in the vertical axis. The first control to reach is the 'Limiter' control, which is just a lift from previous projects, and which does a complex mapping of threshold and ratio to give a single control that 'feels' right to me. At zero, there's only a slight effect, whilst at 100 there is maybe just a bit too much effect on the sound, and so the place to start is at a setting of about 50. (This is the default). After that, the 'LFO Depth' controls how much the LFO affects the Limiting, and the overall modulation is shown in the dark grey indicator. The 'S&H Freq' control alters the rate at which the LFO sine waveform is sampled (and held), and so at high frequencies (10 Hz) it has little effect, whilst at lower frequencies it chops the sine wave into a 'stepped' waveform. There's lots of scope for exploration here, with the relative ratios between the four frequencies, resulting in a wide variety of stereo changes to the sound. Some of the changes are subtle, others less so.
SyncLimiter works well on drums and rhythmic material like choppy comping. You may even like the way that it can muddle up pads, but using it on vocals is probably limited in its appeal. And actually, there are no rules - and any that you are given are probably interesting to try breaking. I'd be very interested to see in what ways this is mis-used!
I also apologise here to anyone who is offended by this flagrant exploitation of limiting, and I also have to warn users that there may be clicks present in the output of this effect, despite my best efforts with Max's 'line'. This is a dirty and crude effect - you have been warned!
As usual, SyncLimiter can be found at Maxforlive.com (One of these days I hope to make something different enough to get onto the Ableton 'Friday' blog entries!)
Sunday, 6 July 2014
Sunday, 23 March 2014
Wavetables as sound effect sources
I've always been a fan of wavetables. The direct relationship between a block of memory holding waveform information and the resulting sound is useful in lots of ways, particularly if you go beyond the basic 'linear read'.
Previously, I've released some of my early experimentation in M4L with wavetables, and the latest revision is now available: Wavetable Sound Effects 0v04. (from Maxforlive.com) Compared to the previous versions, there are more wavetables, more control over the scanning through the table, and a better user interface that makes it very clear where the LFOs are and what they do. Each wavetable is just 2 seconds in length, but the sound making possibilities are much wider than this might suggest.
As usual with most devices, start off by turning the LFO modulation levels down to zero. In this case there are three: Vibrato for frequency modulation, Rangato (range-ato) for the modulation of the range of table scanning, and Timbrato (timbre-ato) for the modulation of the centre of the table scan. Once you are familiar with the basic operation, then you can return to the LFO modulation and explore how it affects the sound.
Basic operation centres around the main controls, which are in the dark backgrounded area. The Table selection chooses between ten very different sets of audio files (hand-crafted from scratch in Audacity). The Start and Finish controls adjust the region of the wavetable that will be scanned and turned into audio, and the triangle sets the centre of the region - if the white area is outside of the window, then nothing happens (the limits are hard-coded), so there's no need to explore what happens if you do this.
The Freq (uency) control sets the rate at which the region is scanned and thus turned into audio, and the High/Low button on the right controls how quickly this happens. underneath the Freq control is the Shift control, which enables the output pitch to be changed independently of the scanning rate. The sound sometimes vanishes if you set the Shift control too high, so explore the left hand side of the dial first...
The Range control provides more scanning control, and the indicator bar next to it shows the total modulation being applied to the scanner.
That's about it really. Explore and enjoy!
Previously, I've released some of my early experimentation in M4L with wavetables, and the latest revision is now available: Wavetable Sound Effects 0v04. (from Maxforlive.com) Compared to the previous versions, there are more wavetables, more control over the scanning through the table, and a better user interface that makes it very clear where the LFOs are and what they do. Each wavetable is just 2 seconds in length, but the sound making possibilities are much wider than this might suggest.
As usual with most devices, start off by turning the LFO modulation levels down to zero. In this case there are three: Vibrato for frequency modulation, Rangato (range-ato) for the modulation of the range of table scanning, and Timbrato (timbre-ato) for the modulation of the centre of the table scan. Once you are familiar with the basic operation, then you can return to the LFO modulation and explore how it affects the sound.
Basic operation centres around the main controls, which are in the dark backgrounded area. The Table selection chooses between ten very different sets of audio files (hand-crafted from scratch in Audacity). The Start and Finish controls adjust the region of the wavetable that will be scanned and turned into audio, and the triangle sets the centre of the region - if the white area is outside of the window, then nothing happens (the limits are hard-coded), so there's no need to explore what happens if you do this.
The Freq (uency) control sets the rate at which the region is scanned and thus turned into audio, and the High/Low button on the right controls how quickly this happens. underneath the Freq control is the Shift control, which enables the output pitch to be changed independently of the scanning rate. The sound sometimes vanishes if you set the Shift control too high, so explore the left hand side of the dial first...
The Range control provides more scanning control, and the indicator bar next to it shows the total modulation being applied to the scanner.
That's about it really. Explore and enjoy!
Related articles
Labels:
Ableton,
Ableton Live,
M4L,
Max for Live,
Sound effect,
Wavetable,
Wavetable synthesis
Sunday, 9 February 2014
A Limiting Solution part 3
LFO S Limiter (0v01) is just two LFO Limiters stuck together - everything is duplicated and totally separate. So you really can have completely different settings on each stereo channel - even one limited and the other not. My personal preference is for more subtle differences, with the same 'Limiter' depth amount, but slightly different LFO frequencies. Having two separate channels provides more scope for complex rhythmic and syncopation of source material...
The panel design isn't the prettiest I've done, but I struggled to find a way to have the two channels shown clearly. You can see the same dilemma in many of my devices that have two separate channels - Hairbrush is a good example where I have mirrored the two sides to see how that feels, but it isn't a perfect solution. There seem to be at least three different approaches to a two-channel layout, and I'm not sure which is the best one.
Ableton use the 'Vertical Copy' layout in the 'Analog' synthesizer, and where you have a strong flow across, with two channels and a common 'central area', then it works nicely. But you only get a single row of controls, which tends to make the device wide, which can result in lots of scrolling left and right to get the correct device visible.
The two horizontal layout options are interesting. I am very familiar with the 'Horizontal Copy' from older modular synthesizers, where you just double up on the module, and so the layout automatically copies (unless the module is stereo, of course, and modern modules do seem to use horizontal mirroring sometimes). But I actually prefer the 'Horizontal Mirror' because somehow it emphasizes the two channel-ness, and looks better aesthetically. One thought I did have was to run an experiment where I make two versions and see which one gets the most downloads...
Related articles
Labels:
Ableton,
Ableton Live,
Dynamics,
LFO,
Limiting,
Low-frequency oscillation,
Modulation,
Sound effect
A Limiting Solution part 2
When an effect is finished enough to be usable without needing to be fixed every time, then the programming task fades, and the exploration phase starts. For Comber 0v02, this is where serendipity stepped in. I was seeing what the results of some of the control settings were with the new Limiter function, and I was adjusting the Limiter depth control live, riding it as if it was just another controller. And surprisingly, the result was interesting...
| Equalizer / Compressor / Limiter (Photo credit: HSmade) |
But tweaking the Limiter depth control gave another interesting - and not natural - sound. Some similarities to gated reverb, but because it was mixed up with the comb filtering, it was worthy of further exploration...
So I added an LFO to the Limiter control and stripped out all of the comb filtering, resulting in LFO Limiter 0v01, where the depth of limiting changes over time. And because the Limiter depth control is adjusting multiple parameters inside the limiter library object, the LFO is doing something that would require very nimble finger movements on a conventional set of limiter controls.
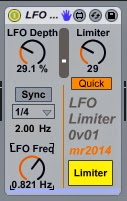
Limiter 0v01 has very few controls. The 'Quick/Smooth' time response mode switch is the same as in Comber, and the LFO is my usual free/sync sine wave taken from the MaxForLive examples. Because I'm trying to focus the attention of the user on the sound and not the technicalities, I have deliberately not put any animated display of the limiting process in action. After all, you don't show a representation of the comb filter spectral response in a phaser or flanger... Instead you get my standard 'Modulation slider' display that I tend to use whenever a value is modulated by an LFO - in this case the Limiter is modulated by the LFO Depth control. I much prefer bouncy little dots to the usual Ableton method of animating the modulated control (where the Limiter control rotates back and forth in time with the LFO modulation).
LFO Limiter should be on the MaxForLive.com site soon, and can produce some very unusual rhythmic and syncopated effects, particularly when preceded or followed by some echo.
The best way to explore it is to start out with the LFO Depth set to zero, and just get familiar with the effect of the Limiter control: zero is no limiting, 100 is pure 'pumping'. A setting of about 30 is a good place to start introducing LFO modulation, and my initial preference was to match the LFO Depth and Limiter settings, so try 30 for the LFO Depth at first. (I did contemplate having a single control that replaced the two, but the 'same setting' for both is not always appropriate for some source material, so I have left them as two separate controls.) After that, just tweak and explore.
Using LFO Limiter
The best way to explore it is to start out with the LFO Depth set to zero, and just get familiar with the effect of the Limiter control: zero is no limiting, 100 is pure 'pumping'. A setting of about 30 is a good place to start introducing LFO modulation, and my initial preference was to match the LFO Depth and Limiter settings, so try 30 for the LFO Depth at first. (I did contemplate having a single control that replaced the two, but the 'same setting' for both is not always appropriate for some source material, so I have left them as two separate controls.) After that, just tweak and explore.
Related articles
Labels:
Ableton,
Ableton Live,
Dynamics,
LFO,
Limiting,
Low-frequency oscillation,
M4L,
Max for Live,
Modulation,
Sound effect
A Limiting Solution part 1
| Feedback comb filter structure (Photo credit: Wikipedia) |
One of the traditional techniques that are often used to solve this is to use a compressor or a limiter in the feedback loop, so that the gain variation is controlled. The implementations vary - one old method involved using an incandescent light-bulb and a light-dependent-resistor. Max provides library objects that do limiting and compression, but they have a User Interface (UI) issue: too many inter-dependent controls. Limiters and compressors are powerful tools, but adding lots of controls to Comber just to make it more stable would make an already complex UI even more busy. So how could I add the minimum of controls but keep lots of versatility?
I decided to try using one control to make several changes simultaneously in a limiter. As the input gain increased, the limiter threshold would be reduced, and the output gain would increase. This way, the maximum level stays the same, but the amount of limiting that is applied can be controlled. I also enabled one additional control for time response, and here the library object provided fast and slow modes. So I had one rotary control and one switch, plus a 'Bypass' switch to remove the limiter from the output.
Using Comber
Comber has a lot of controls, so here's a quick guide to getting the most out of it.- Start with the Feedback controls set to zero, the LFO Depths set to zero, and the Pan Depths set to zero. Dry/Wet should be at 100% (Wet), Make-up Gain should be about 100%, and the Comb Gain controls should be at their default 50 position.
- Try the Comb 'Freq' (frequency) control. This moves the notches up and down in pitch, and can make big changes to the timbre of the input.
- Experiment with increasing the Comb Feedback controls from zero, and see how they change the sound.
- Use the LFO Depth control to move the Comb Freq(uency). Moving combs always sound much better than static ones!
- The Pan Depth controls move the pan position of the two channels.
- The Limiter control starts out with no limiting at zero, and increases the amount of limiting (lower threshold) as you increase it towards 100. The maximum is a very non-subtle effect!
Related articles
Labels:
Ableton,
Ableton Live,
Comb filter,
Comb Freq,
LFO Depth,
M4L,
Max for Live,
Modulation,
Notches,
Sound effect
Wednesday, 5 February 2014
Syncopated combs...
With all those extra gain controls and modulation of just about everything, then adding a Limiter after Hairbrush is quite a good idea. Ping Pong Echo also jollies up the sound a bit, and a Saturator is good for beefing up a sound. All of which gives us a chain which looks like this:
[Synth] -> [Saturator] -> [Echo] -> [Hairbrush] -> Limiter
Exploring the possibilities could take some time. (I'm one of those synth freaks that has to set every LFO to a slightly different value, every VCO slightly detuned, every filter slightly modulated, etc. It is probably no surprise to learn that I loved the sound of the original (203a) Moog PolyMoog, but hated the design with all those voice cards that were a nightmare for maintenance.) But back to Hairbrush, and the same tweaking principles apply - LFOs to different frequencies, prime numbers rule when all else fails, and syncopation is your friend.
( Hairbrush is gradually being loaded to the MaxForLive site as I go through the conversion cycle for the two profiles of Live and Max... )
Related articles
Monday, 3 February 2014
Comb filtering...
For such a shape of filter to have such an interesting effect on sound is a fascinating bonus. Resonant low-pass filters have that characteristic peak at the resonant frequency, whilst for comb filters it is the spacing between the notches that gives either a comb for linear spacing (as in a phase-shifter), or a coarse to fine spaced comb where the notches can match up to harmonics (as in a flanger). Because of the different ways that phasers and flangers typically implement comb filtering, flangers also introduce some time-modulation and time-delay effects (doppler shift and flutter echoes), but I really like either of the whooshy, resonant sounds produced by any modulated comb filter!
As you might have realised, I have been playing with comb filters recently, and I have posted the results of this to the MaxForLive web-site. Comber is a pair of modulated delay-based comb filters that can operate independently on two stereo channels, and then can be auto-panned into the final mix stage - a stereo flanger is one way of describing it.
The controls are in three sections. The LFO section modulates the delay time of the comb filter, and because this sounds like tuning the filter I have called it the 'Frequency'. The Feedback control is actually controlling the feedforward and feedback, and the Gain control allows extra tweakability (it controls the gain of the delay sections). The Pan section allows the two comb filters to be placed in the stereo image and moved around.
Because the Feedback and Gain controls in the filter can provide a wide variation in gain, there is a compensating 'Make Up' volume controller next to the Dry/Wet mix control.
Related articles
Related articles
Labels:
Ableton,
Ableton Live,
Comb,
Comb filter,
Low-frequency oscillation,
M4L,
Max for Live,
Sound effect
Subscribe to:
Posts (Atom)