
The 'Racks' in Ableton Live are very neat solutions that contain a lot more functionality than you might think at first glance. The obvious application for the Audio or MIDI Racks is to put several effects in series into a rack, and then assign Macro Controls to specific important parameters in those effects, and then hide the effects leaving just the macro panel visible.
A simple example first...
Here's exactly this process for a very common set of MIDI Effects.

The first effect is the 'Random' MIDI effect, which is being used to add an offset of -12 or +12 semitones to the incoming MIDI note number, with a 50% probability (so half of the time, the incoming note will be unchanged, and half of the time it will be transposed up or down by 1 octave).
This is followed by the 'Velocity' MIDI effect, which is adding a random number (up to 29) to the MIDI velocity of the incoming MIDI note.
The overall result of these two MIDI effects is to produce random inversions of chords (or transpositions of individual notes), with random 'voicing' (relative differences in timbre or volume caused by the velocity). This is very useful for string or synth pads, making it sound like the part, and the playing of that part, is much more complex than the contents of the source clip!
To store these two MIDI effects as a single device, you just insert a blank MIDI Effect Rack into the track strip:

The MIDI Effect Rack will initially have no effects in it (just a grey bit in the middle), so you just add the two effects to the empty 'Drop MIDI Effects Here' area in the middle.:

Which gives us a neatly encapsulated effects 'chain' that can be named and saved, and re-used whenever pad 'sweetening' is needed.
On the left hand side, there are some button that control which parts of the MIDI Effect Rack are visible. If we turn on the top button:

...then the left hand side opens up and we see the Macro Controls:

The Macro Controls have all been mapped here. So let's look at how that works. Some of the controls in the effects on the right hand side have a small green dot, and this means that they are actually controlled by one of the Macro Controls.

All that you do ito set this up s click on the control on the right hand side (four little corners appear around the control) and then right-click on it. A pop-up menu appears, and you just select the appropriate Macro Control:


There's more...
But there are more advanced ways to use Racks, and this is where people seem to have problems. The metaphors used in the Racks appear to have been strongly influenced by the way that samplers manage samples: velocity switching ('Vel'), and the note range that a sample is assigned to ('Key'). But the 'Chain' button uses a different mind-set - kind of like multiple Racks that you can switch between.
Now I have already used the word 'chain' to describe those two MIDI effects placed one after the other in the Rack - 'in series' is how techies describe this arrangement. But MIDI Effect Racks allow you to have more than one chain inside them...
Remember how the middle section had a 'Drop MIDI Effects Here' underneath the large 'Chain' box? Let's see what happens when we do that...
I'm not going to repeat the previous effects. Instead let's start by just making some chords:


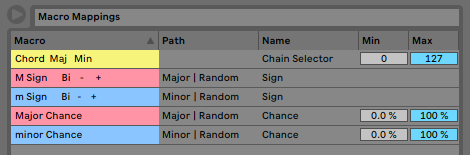
So the 0-127 horizontal bar in the 'Chain' view is for a 'Chain Selector', which means that when the value is from 0-63, then the Major MIDI Effect chain is active (soloed), and when the value is from 64-127 then the Minor MIDI Effect chain is active (soloed!).
So now we have a MIDI Effect rack which produces Major or Minor chords, with random inversions. But how can we automate the Major/Minor selection? You could map an LFO to Macro 5, but another way is to use a Clip Envelope (My Favourite!):

More chains!
Adding more chains just requires more dropping of MIDI Effects in the 'Drop MIDI Effect Here' area, and the setting of separate ranges in the 'Chain' view. Here's an example I prepared earlier:

Files
---
If you find my writing helpful, informative or entertaining, then please consider visiting this link:

 Synthesizerwriter's Store (New 'Modular thinking' designs now available!)




 Posts
Posts

