
Showing posts with label customisation. Show all posts

Thursday, 7 April 2022

I got a budget Dual Modulation Effects Pedal!

So, the JOYO Vision Dual Modulation Effects Pedal arrived, and I have been playing with it, quite a lot!

As expected, it does not meet all of my criteria for 'perfection', but sometimes, the immediacy of having lots of 'live' controls can be very useful, and I am very tempted to add an additional 'essential' feature:

- Having real-time control over a number of parameters simultaneously...

Which can be achieved in a number of ways: either directly via rotary controls (as in the Joyo Vision), or via a MIDI Controller.
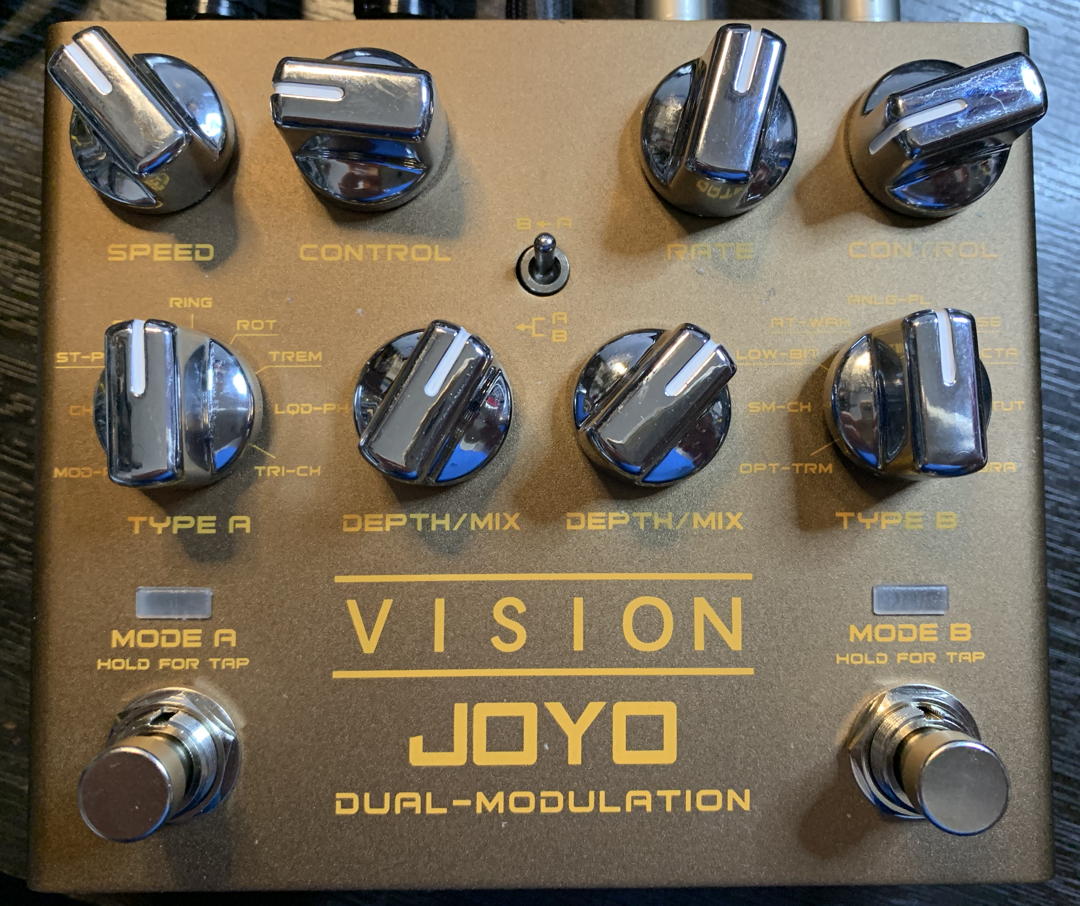
The JOYO Vision Dual Modulation Effects Pedal

Review

I promised a review of the JOYO Vision, and I'm more than happy to do so. The JOYO web-site provides some information, but Amazon did not expand on that, and there were no detailed reviews, so this will hopefully provide prospective buyers with a bit more detail.

The JOYO Vision (I'm really not sure if the 'JOYO' should be capitalised, or not) is a budget modulation effects pedal, but it has some features which move it upwards towards some much more expensive 'boutique' pedals. This compact pedal is 130 x 110 x 50 mm in size, and weighs a 'not-unusual for a pedal' 425 grams. The power consumption is 170mA from a standard centre negative barrel connector, again not unusual, and not excessive either. There is no mains adapter provided in the box, which is very often the case nowadays, when lots of people put pedals on pedal boards with sophisticated power supply (and audio routing) arrangements. The sampling rate is stated at 44.1 kHz, and the bit resolution 24 bits - I did not hear any glaring aliasing or noise artefacts whilst using it, and I do not have the test equipment to verify these figures. In any case, 44.1/24 is a pretty standard set of audio-to-digital converter specs for a modern budget pedal...

For the price, you could find any number of chorus, phaser or flanger units, but the added flexibility that the Vision offers is very welcome. This is a 'Dual' modulation pedal, with two independent effects processing sections (A and B) that can be connected in series (for complex modulations) or in parallel (for complex stereo images). But it is also a stereo in, stereo out device (or mono in, stereo out, or mono in, mono out), at a price more normally associated with mono in, mono out. You are probably expecting to hear that it is noisy (not particularly so), that the modulation effects were poor (variable would be a better word), and that it is a bit limited and unsophisticated (where you would be wrong). 

The first clue was that audio routing. Dual effects pedals are quite rare, and the ability to have the two effects in either series or parallel gives you two very different end results. Series connected effects gives the complexity of chained effects that blend together as the audio is processed , whilst parallel effects gives complex stereo imaging where the two effects are distinct and separate but mixed together to give the final stereo image. If you are one of those people who finds that most budget chorus pedals lack depth (and stereo connections) and only give limp detuning , then this is a notable exception - especially since you can combine chorus with phasing, or flanging with tremolo, or any of the 9 'A' effects with the 9 'B' effects. 

The two sets of effects are different, in what they do, how they are named, and how they are arranged around the 9-way rotary switch. This feels like a deliberate design decision with the intention of nudging you to trying out unconventional combinations, and it works: I had great fun, both trying to decipher the slightly cryptic and abbreviated names, and then seeing how they worked together. If the two selectors had the same effects at the same positions, then it could easily become a bit 'paint by numbers', but this arrangement almost forces you to try juxtaposing effects. 

For the 'A' effect, the first effect is Mod-Ph, which I interpreted as 'Modulated Phaser', and which seems to be a chorus/vibrato and phaser combined. Next is 'Cho', presumably for 'Chorus', and this was slightly deeper chorus effect, but with no phaser. The ext effect: 'St-Ph', which I assumed meant 'Stereo Phaser' caught me by surprise, because it seems to be a phaser driven by a noise S&H circuit, and so gives some of the 1970s random filter S&H mod feel - not standard in any way, and far from mundane. 'Flanger' was a typical low feedback flange sound.  'Ring-Mod' was obviously Ring Modulation, and this has quite a broad range: about 4 octaves. 'Rot' was the Rotary Speaker emulation, and was rather like the 'Mod-Ph' with less resonance. 'Trem' produced tremolos with the 'Control' rotary varying the waveform from a sine-like smooth to a more choppy square wave - although the two channels were in phase - so this isn't what I would describe as a 'stereo' tremolo because there was no side-to-side stereo panning effect. 'Liqu-Ph' was a smoother (more 'liquid'?) variant of the Stereo Phaser, although the waveform was not random but seemed to be an 8-step sequence - again, more in boutique territory than I was expecting. 'Tri-Cho' was the thickest, most-detuned sounding chorus so far, and the name suggests that three different chorus effects are being used.

The 'B effect starts with 'Opt-Trem' which suggests an Optical Tremolo (bulb and photo-resistor), although it seemed to be a sawtooth waveform and no major stereo effect.  The 'Sm-Cho' seemed to be a smaller version of the Tri-Chorus effect, but still a deeper effect than the Cho(rus) in A. 'Lo-Bit' seemed to be a bit reduction effect, and this was able to add interesting edges to some sounds,  but the 'Control' rotary control didn't seem to do much. 'AutoWah' was a sine wave modulated band-pass filter. 'Anlg Flange' had much more feedback the the 'Flanger' in A. 'Phaser' was a conventional phaser, in contrast to the three unusual ones in A. 'Octa' seemed to be another ring modulator, although with a smaller oscillator range - about one octave, and so dropping the input frequency by one octave. Having two ring modulators on a pedal is quite unusual, and if it had been me designing this, at least one of them would have been modulated by an LFO... 'Stut' is for 'Stutter: a chopper effect that always has a square wave this time. Finally, there was 'Vib' which gave a vibrato effect.

If you were counting, that's 18 different modulation effects. Note that this doesn't cover all of the effects in the table in the previous blog post...

There's a slight 'click' as you switch the effects in and out, which is not that unusual for budget pedals, but you can use the Mix rotary control to avoid switching the effect in and out, which means there are no clicks! The flanger effects in A and B are both slightly prone to the buzzing sound from any mains pick-up in cabling, which I have used as a way of checking for ground loops, showing the advantages of balanced connections, and other 'studio-optimisations' many times... As in many pedals, both budget AND boutique, for some of the effects, there's sometimes a difference in volume between the dry 'through' audio and the wet  'processed' audio. For the cost of a look-up table and an extra couple of multiplies in the code, then I'm surprised that this persistent niggle still exists. 

If I was being picky, then top of my wish-list for additions would be an expression pedal input... But this just raises the importance of looking more throughly into a mechanical linkage version...  a homebrew 'third hand' (The original TIP 'Third Hand' hasn't been made for several years, apparently...). It is on my list of projects...

One thing that I did notice, and which might be seized upon by some people as proof of the budget nature of this pedal, was the lack of much stereo imaging in most of the effects. Even so, having Trem on A in parallel with Vib on B, did give a very independent LFO Tremolo/Vibrato effect that worked very nicely with a little external reverb, and sounded very wow and fluttery at times. There's more to designing a stereo version of an effects pedal than just doubling up on the circuitry, and although there's no obvious way of updating the DSP code, I suspect that a few minor changes are all that is required to produce a marked improvement. I should point out that I'm slightly notorious for creating mastering problems by being overly enthusiastic about broad stereo, so I'm on the extreme side of good taste in terms of stereo imaging in effects pedals. 

But back to the real joy (no pun intended, really) of this dual modulation effects pedal - having two different things happening at once, either in series (complexity) or in parallel (slight stereo wobbling) is so much nicer and more sophisticated than a mono chorus pedal which just sweeps back and forth (in mono!) monotonously. With every combination of A and B offering two different rates of LFOs (I forgot to mention that they both have independent tap-tempos on the two foot-switches!), then you get a much more interesting modulation, which is exactly what I want in an effects pedal! Given the flexibility of effects combinations in the JOYO Vision, then I would be hard pressed to justify going for a similar priced but less varied mono alternative. And stereo in and out is a bonus, although I can't help thinking 'if only' for just a little bit more pan-breadth. (Now, there's a word: pan-breadth! I will see if I can work that in more often!)

Improvements

That probably set you thinking that I was about to suggest ways in which it could be improved, and I have to say that the stereo imaging was the only internal weakness I found. Oh, and the slight clicks when enabling the effects with the foot-switches (although there is a workaround with the Mix rotary controls).

An 'angled' viewpoint - note the right hand side readability

Externally, there was the strange arrangement of the Speed/Rate and Depth rotary controls for A and B, which didn't match the mirroring of the rest of the controls, but that is being picky. Perhaps best described as a 'quirky' arrangement, then. 

But the thing that I found most irking was the colour scheme! The background colour of the case is a metallic brown colour, which goes lighter when the light catches it. Unfortunately, the text is printed in an orange/yellow colour, and so it tends to vanish when the light catches the background colour. at the wrong angle, which seems to be too often... Yellowy-orange on yellowy-orangey/brown is not a good combination for easy readability... You can see the difficulty of reading in the photo at the start of this blog, but the other angled shots show very clearly how the background colour changes depending on the lighting... 

The opposite angle...

So I made two little sticky labels (see my Roland TR-505 mods post), printed them out and stuck them to the top panel, giving high contrast, stage-use-friendly, easily readable labels! 

The prototype 'Labelled' Vision...

You can find the graphics files here, and feel free to print it out and make your own labels - as below. I have recently found a source of matt-finish clear sticky-back plastic, and this makes much better looking custom labels! 

The 'Improved' front panel rotary selector graphics...

Rather than putting 'commercial printing'-style cutting marks just at the corners, I have added light grey outline boxes - because I suspect that anyone who uses these labels will be cutting them out with scissors or a scalpel. For maximum flexibility I have also added marks in the file, as well as providing an 'inverted' version with white text on a black background (and brown/yellow too!). 

This set me thinking - is there any interest in additional 'Improved' front panels for electronic music devices? I know there are skins for lots of things, but I'm thinking more UI improvements rather than just appearance.

Oh, and one extra 'feature' deserves mention - there are extra blue LEDs inside the pedal, which light up two translucent plastic inserts and make the pedal look very sci-fi and hi-tech. Very cool! (You can see a photo in the previous 'Dual Mod' blog post...

Conclusion

Starting out with a quest for a dual modulation effects pedal with a distinctly 'boutique' flavour, and buying a dual pedal from the budget end of the market may seem strange, but I'm rather delighted with the JOYO Vision. It doesn't have USB or MIDI, and is not perfect (or expensive!) but those 'live' rotary controls, stereo I/O, and the 'different' set of effects make this an interesting tool for sound design and 'What effect is that?' kudos on stage or at practice sessions. Plus, you could easily pay several times the price and end up with something far less flexible, which is always good in my book! I can definitely see myself sprinkling a little bit of Vision here and there... 

The Zoom... 

I'm still waiting for delivery of the Zoom MultiStomp pedal, and it will be interesting to compare it with the JOYO Vision (which is still cheaper than the Zoom). Will the immediacy of 'live' rotary controls beat several effects at once? We will see...

Resources:

The Roland TR-505 Mods blog post...

JOYO's web-site page for the Vision

The previous 'Dual Mod' blog post...

The graphics files for the labels...

---

If you find my writing helpful, informative or entertaining, then please consider visiting this link:

Synthesizerwriter's Store (New 'Modular thinking' designs now available!)

Buy me a coffeeBuy me a coffee (Encourage me to write more posts like this one!)... or...

Buy Me a Coffee at ko-fi.com (Encourage me via a different route entirely...)

Or just tell someone else that there's this amazing blog about hi-tech music...


Sunday, 9 January 2022

What Would The DX200 Front Panel Look Like If It Was Designed Now?

Modding, modfiying or customising musical equipment is almost as addictive as GAS, the Gear Acquisition Syndrome that many synthesizer 'collectors' suffer from. But in my mind, there are two very different reasons for modifying a piece of music gear: 

Changing (usually enhancing, but not always) what it does or how it does it; 

or 

Making it look different (better, but not always...)

I usually tend to go down the 'Enhancing Functionality' route, and so previous blog posts have covered a variety of mods:

- Roland TR-505

- Yamaha RM1x

- Rebel Technology OWL Pedal

But sometimes, I get a different itch. In this case, it was triggered by two otherwise apparently unconnected things. (Isn't that always the way!)

Thing 1

DJ Tech Tools are a small, DJ-owned DJ-equipment online store (physically located on the West Coast of the US) that also do some things which are much more oriented towards MIDI musicians. The MIDI Fighter 3D and the MIDI Fighter Twister are two MIDI Controllers (one for button mashing (finger drumming), and one for controlling lots of MIDI CCs) that are uncompromisingly professional, are built to withstand serious abuse, and I have both of them! (And I love them and use them all the time!)  They also do very nicely spec'ed audio and USB cables in a variety of bold colours. 

But their creative use of colour goes further than that - they also do Chroma Caps (replacement control knobs in bright colours) and Luma Caps (knobs which glow really nicely!). These are designed for use on stage in poor lighting, where you need to be able to find a specific control knob reliably and quickly. Gear manufacturers love black knobs, and the modern trend for soft rubbery knobs means that I have some examples where the knobs totally vanish in low light! 

One thing that bears repeating about Chroma Caps: Read the 'Technical Details' documentation carefully before ordering! The main diagrams show the view from BELOW the knob, not ABOVE! The first time I ordered I got it wrong, and my knobs were all 180 degrees off...

Anyway, I originally bought some Chroma Caps to replace a knob that had got damaged on a very old piece of Novation gear (I was using it, Officer!), and I really liked them. And late in 2021 I bought some to jazz/pimp up (you can use whatever era's slang you prefer) some of my vintage gear that tends to get used live, and when they asked me for a review, then this got me thinking...

Thing 2

Amplitube are known for their VST audio processing plug-ins (Parent company IK Multimedia does lots of other music stuff as well!). But recently, they have branched out into doing real physical 'boutique' guitar pedals that take the VSTs and make them available to a different audience: guitarists, but also the apparently growing number of synth/modular people who put audio through pedals (I can't help but point the finger at Christian Henson of Spitfire Audio for being a major populariser of this practice, and many other things!) 

The interesting aspect in terms of user interface is that each of the four pedals is colour coded and co-ordinated - but not perfectly. So the X-Space pedal is for reverb, and is blue - except for the display, which is green. The X-Time pedal is for delay, and is green, except for the display, which is orange. The X-Vibe modulation effects pedal is orange, and the display is orange, and the X-Drive distortion/overdrive pedal is red, with a red display. Notice how the X-Gear pedals are almost colour co-ordinated, but not quite...

(You may have also noticed that the photo above is strange... This is because I rotated an image taken at an angle showing the pedals in perspective, and so the viewing position isn't quite where you expect it to be, and so it looks peculiar. If you tilt your head to the left by about 30 degrees, then it should look fine!)

The Mod Proposal

The Yamaha Loop Factory 'desktop' series (the AN200, DX200 and the SU200) are arguably one of the quieter backwaters of Yamaha history. They are the sort of bits of gear which combine some very good features with some unfortunate omissions - and yes, I know that this is just the innate nature of musical gear (in fact, any gear!), particularly at the lower end of the range. But the limited front panel editing, and the complexities of trying to run late 1990s software on modern computers (How about a WebMIDI version, Yamaha, please?), probably put them in the 4 or 5 out of 10 category - although the prices on eBay or Reverb don't seem to reflect this... But I still love them and use them!

Warts and all, the AN200's early Virtual Analogue (VA) synthesis and the DX200's FM synthesis (with a VA Filter!) sound pretty good, even 25 years on, and I figured that live use would be much easier with some Chroma Caps. So here's the AN200 post-capping:

What is really interesting is that the AN200's orange colour-scheme works really well with the large chunky red 7-segment LED display and the little red LEDs, and the orange illuminated buttons.

And then to the DX200:

Oh dear! It seems that for the DX200, the green theme doesn't work at all with the red and orange LEDs. If anything, the green Chroma Caps actually make the orange feel even more wrong! It might have worked in the late 90s, but my modern-influenced eyes looking at the green (especially the rather primary green Chroma Caps - unfortunately DJTT don't do a cyan colour choice!) look at it and find it rather unsettling. 

In fact, it cries out for an aesthetic rework: change the 7-segment displays to green, and change the red and orange LEDs to green (or even an RGB LED with the green and blue LEDs lit!). But that's a huge amount of work! (Ok, so although the main PCB is surface mount, the boards with the LEDs are all thru-hole, but it is still a lot of desoldering on old lead-based solder! And I don't like the look of those soft, probably membrane switches at the bottom...) Assuming that all went well (ho ho), here's what it might look like after a lot of time and effort:


 Which, poor photoshopping apart, makes a huge difference. It now looks 'right'! So in my humble opinion, if Yamaha were designing the DX200 now, they would definitely use green LEDs. 

So, I now face a dilemma. Do I leave it alone, or do I replace the LEDs? (Or do I simply remove the Chroma Caps!) If you thought GAS was bad, then getting colours right when customising vintage gear might be worse!

 ---

If you find my writing helpful, informative or entertaining, then please consider visiting this link:


Synthesizerwriter's Store (New 'Modular thinking' designs now available!)

Buy me a coffeeBuy me a coffee (Encourage me to write more posts like this one!)

Sunday, 30 August 2020

Customising a Yamaha RM1x Groovebox Floppy Disk Emulator

Vintage gear can develop a number of problems. There is already a lot of material available online about replacing electrolytic capacitors, which heat and age can dry out causing them to lose capacitance. Unsoldering capacitors is fiddly work, really needs a good quality desoldering station, and can take a lot of time if there are lots of capacitors to change (replace with higher temperature rating and higher voltage if there is space...) Backlit LCD displays are another common problem, where the electroluminescent backlight drivers fail over time, and the LED backlights gradually seem to go dim. If you can find OLED replacements then these are arguably the best, but I haven't been able to find out much about the real-world long-term life of them - after all, 90s gear is nearly 30 years old! And then there are 3.5 inch floppy disk drives - particularly the ones which use belts instead of direct drive. It seems that old drive belts go loose, or go sticky, or go brittle, and all of these tend to result in a floppy drive that doesn't work. 

I've been gradually replacing the backlit displays and floppy drives on my vintage gear. To be more accurate, I mean 'what used to be backlit' displays. When you start replacing displays, you quickly discover that the difficulty of doing it varies enormously. Some synthesizer expander modules (the Yamaha TX7, for example) are very easy, whilst some keyboard workstations can require quite extensive amounts of disassembly. Here's a link to a pretty detailed description from a blog post describing the process for a Korg Wavestation: https://jaryic.livejournal.com/11778.html . As it says, 'not for beginners'. I couldn't find any way to backlight my Roland TR-505, though, so if anyone has any ideas, just let me know...

Floppy drives tend to be easier to replace, but there are sometimes complications. For example, the Yamaha SY99 uses a 26 pin floppy drive interface cable, rather than the more usual 34 pins, and that has long been a topic of much discussion on the relevant Yamaha forums. Most of the better companies that sell floppy drive emulators are well aware of this complication, and have their own reliable, verified and tested adapters. 

My own description of the pinouts of the 26 and 34 pin connectors is still available on the Interweb: http://www.martinruss.com/sy99adapter.html Then there is also my description of replacing a failed SY99 floppy with the long-discontinued official Yamaha replacement, complete with Yamaha adapter board: http://www.martinruss.com/sy99.html This article is probably rapidly becoming 'vintage' in its own right!

But my Yamaha RM1x floppy drive proved to be a different type of challenge. The floppy drive is accessed via the front panel of the RM1x, whilst the main control surface of the RM1x is the top surface. 

When the only control on the floppy drive was the 'Eject' button, and the writing on the floppy label was easy to read as it ejected, this was fine, but for modern floppy emulators, there are more controls, and a display. The simple 7-segment LEDs are not my recommendation - OLEDs which show file names are much better, if a little tiny. But the display is on the front of the floppy emulator... 

This means that the OLED display of the floppy emulator is not easy to see when you are using the RM1x. You only need to bend down and lean back a few times so that you can see the display before you realise that it is very awkward. So I moved the display so that it was easy to read when you are using the top 'control' surface of the RM1x!

But, first things first. I got my floppy disk emulators from CPMagneticMedia on ebay.co.uk: https://www.ebay.co.uk/usr/cpmagneticmedia , who are very knowledgable, and have a wide range of floppy emulators, backlit LCDs, and lots of other useful stuff for customisers/upgraders, etc. 

The first thing I did when I had the floppy emulator installed and working was to remove it, open it up and thus void the warranty! The OLED was held in place with hot glue, which is easy to remove if you have a hot glue gun...


But before removing the OLED display, I got a 'potting box' of about the right size and worked out how much I needed to cut it down with my trusty Dremel...


Then I removed the OLED display (Carefully! They are very delicate - note the black foam used to hold it in place...) and removed the remaining hot glue with snipe nose pliers.


Then I cut the potting box to size and cut out a window in the top surface the correct size for the OLED display - using the existing hole in the floppy emulator as a guide. 


One of the actions to keep doing when making mods like these is to check and re-check. So I now checked that the OLED, the mounting foam and the new potting box all fitted together nicely.

I then extended the four way cable to the OLED, so that I could push it through the hole in the floppy emulator front panel.


I then mounted the OLED display in the potting box, using the mounting foam and more hot glue, then glued the potting box to the floppy emulator front panel.


And from the top, things are a lot neater in appearance.


From the remains of the potting box, I then made a cover for the underside of the box, to hide the extender cable... and glued it in place.


The finished result looks very nice!


Now you can easily see the display when you are controlling the RM1x.


Full disclosure: before I extended the display into the potting box, I did explore using a prism to try and twist the display so it would be visible, but this suffered from the 'mirrors only swap one direction, not both' problem and I got reversed text on the display.

I would like to thank CPMagneticMedia for all their help with this project!

As with any mod, you are almost certainly going to invalidate warranties, and you may break rare or custom parts that are hard to find. So you do any mods at your own risk! Only do mods if you are confident and experienced. 

Postscript

Some people have asked me if I could send them the FlashFloppy FF.CFG file for the drive, as well as the jumper settings. I did not buy a generic Gotek drive, flash it and configure it - I bought a custom  RM1X-specific drive that was already flashed and pre-configured, with a rotary encoder and an OLED display. 

If you want to use FlashFloppy on a generic Gotek drive, then the GitHub site is at: 

https://github.com/keirf/FlashFloppy/wiki/FF.CFG-Configuration-File 

---

If you find my writing helpful, informative or entertaining, then please consider visiting this link:


Synthesizerwriter's StoreSynthesizerwriter's Store
 (New 'Modular thinking' designs now available!)


Friday, 21 August 2020

Customised Synthstrom Audible Deluge

One of my background tasks for the past few months has been researching mid-to-high-end 'grooveboxes'. Whilst the marketplace has lots of low cost (sub $500~) examples of 'single portable boxes that can create music using MIDI and samples' (aka grooveboxes, although there are much more sophisticated and complex definitions), from Teenage Engineering's Pocket Operators, OP-1/Z, the Roland MC-101, Novation's (hard to beat) Circuit, Korg's Electribe 2, Elektron's Digitone/Digitakt and Model:Cycles, Polyend's Tracker, the 1010 Music Blackbox, plus many more, the next level up is significantly more sparsely populated and much more diverse in approaches. Doubling the budget ($500-$1000 and more) can get you a much more capable device, but I wanted to know which one was best suited to my way of thinking? 

(The title of this post kind of gives away the end result, of course!)

Many years ago, I remember being greeted with a certain amount of disbelief when I expressed my opinion that the major deciding factor in choosing a DAW should be the workflow and its alignment with your own internal mental model of how to make music. It seemed that brand-name, who else used it, resolution, number of tracks, latency, bundled plug-ins and many other factors were far more important to many people. My opinion hasn't changed, although I have found that I have increasingly moved to the 'boutique' end of the market: small, independent manufacturers who tend to be musicians and technologists. As an example, my most sophisticated pedal is a Poly:Digit, which isn't exactly mainstream...

The other vitally important word in that brief definition is 'single'. When I go away from a DAW with access to external hardware synths and effects, into the 'live performance' scenario, then I'm looking for ideally one box, and probably three boxes maximum. I've played the game of having lots of equipment to set up and tear down, and like most people who have done that more than a few times, I have decided that:

Simplicity Means Less To Go Wrong! 

But back to those 'next level up' grooveboxes. So what are the main contenders? I whittled the list down to these:

- Elektron Octatrack (mk1 or mk2 (mk2 is a makeover that is probably more like a 1+))

- Roland MC-707

- ModDuo X

- Synthstrom Audible Deluge

- Akai Force

- plus a few others that were fighting for attention (MPCs!), and I even considered a few no-longer-current devices - even though trying to find second hand gear can be stressful... 

As always, your favourite is probably missing from this shortlist. Note that I deliberately rejected these whole categories:

- hardware 'sequencer-only' devices (no Squarp Pyramid or Polyend Seq or Social Entropy Engine...) 

- hardware controllers that require a DAW or computer (NI Maschine, Ableton Push...)

- modular 'sequencers plus a few modules'. (Creeping module purchases means your rig is never quite finished...)

My opinions

After months of careful research, here's my personal opinions:

- Elektron Octatrack. 

The Octatrack has been bubbling under on my GAS list for a long time. And that's probably the main issue - it has been around for so long that it may be about to be replaced, and I hate buying something which is immediately replaced by something much better for less money! 

Pros. Flexible sample playback, a song-mode sequencer (the Digitone and Digitakt lose points because of their lack of song support), and some neat processing. The eight channle scan also be used as a mixer, which is interesting. Looping support is also good. The Mark II's slider control is definitely a good reason to go for this in preference to the Mark I.

Cons. Seems to be difficult to learn. This might be the classic 'I will say it is hard to use because that makes me look good!' situation, but the YouTube video's of people using Octatracks seem to reinforce the amount of learning that is required. Is complexity what I want in a live environment? Probably not. Also, most people seem to use other gear with an Octatrack, so that's a concern. Finally, there's the nagging doubt that there's probably a Mark III in the pipeline, or maybe even a total revision.

- Roland MC-707

My first album was recorded using a TB-303, a TR-606 a Sequential Pro-One and a Casio CT-1000, and I've currently got a heavily modded TR-505, so I'm no stranger to Roland gear. The MC-707 is kind of what I reckon an Elektron Octatrack 3 might be like, although with a different workflow...

Pros. Ableton Live-style grid is a plus. Lots of immediately editable sounds without any need for a computer (probably the top feature request for the Novation Circuit 2). 

Cons. No song-mode is a major disadvantage. At the sub-$500 price-point then this is acceptable, but I've spent too long with old school drum machines to want me to be constantly controlling what is happening. No way to send MIDI CCs might also be a problem if I was going to use it with anything else... No 'Scale' mode for the buttons is weird when most of the sub-$500 group have this! Having to effectively sacrifice a track to sequence external MIDI is strange, but again, for a single box then this is not as important as it might be if I was using this as the centre-piece of a studio. 

- ModDuo X

I've been trying to buy one of these for over a year now, and it seems to be permanently out of stock, with pre-orders all being consumed in a few seconds of the site accepting them. So I've more or less given up on this one. I talked to Mod at one of the Ableton Loop events, and they seemed very confident, maybe not in a good way. Given their apparent supply chain problems, maybe my gut feeling was correct... 

- Synthstrom Audible Deluge

Definitely a 'boutique' device, this goes against the grain in all the right ways. No display - well, not a display in the conventional sense, although if you scaled up a Novation Circuit, it could well look a lot like this. An interesting design, with unusual/novel controls that make a lot of sense. 

Pros. Small, light, song-mode (plus arranger functions), Subtractive and FM synths, sample replay, and looping. Comprehensive features and a very good firmware update policy (frequent!). Seems to think the same way that I do!

Cons. Using the display as the main control means that you can spend a lot of time jumping in and out of song mode. As with the Octatrack, there seem to be a lot of shortcuts that require muscle-memory to learn. 

- Akai Force

I immediately thought of a 'DAW in a box' when I first saw this, and this is too much like a Push and Ableton Live. I would struggle to say that I was 'DAWless' if I used one of these.

The result?

I went for a Synthstrom Audible Deluge (a 'Deluge' from this point onwards). It offered the features I wanted, the size and weight and convenience, and a pretty good 'single box' solution. When it arrived, the adapter envelope had a note on it:

So I took the 'Martin :)' and turned it into a label for the top panel:

So if you ever see a 'Martin :)' where you were expecting a Deluge, then that will be me!

---

I will report on my progress with the Deluge as I get familiar with it... So far, I'm definitely enjoying it!

---

If you find my writing helpful, informative or entertaining, then please consider visiting this link:


Synthesizerwriter's StoreSynthesizerwriter's Store
 (New 'Modular thinking' designs now available!)


Friday, 16 November 2018

Defacing a Laptop Keyboard For Use With Ableton Live's Virtual Keyboard

I use the virtual keyboard in Ableton Live a lot - and I keep telling myself that I should tidy up and reorganise my working space so that I have room for a real keyboard, but...

The problem I have with the virtual keyboard is the black notes. Firstly, ALL of the keys on the laptop (Qwerty) keyboard are black (with white letters), and so although the two rows are pretty obvious, here's something that I did to my laptop to make it even easier to avoid pressing the Q and the R and (hardest of all) the I...

All I did was get one of the fine point fibre-tipped permanent pens and add a few bits of black to the anodised aluminium between the keys on the laptop keyboard:


And that's it. A quick, simple and very useful way to deface your laptop that makes using the virtual keyboard much easier. Yes, I know that there are various commercial keyboard overlays that also do this, but I already have other bits of black marker pen on my laptop anyway to indicate where the sockets are (I do the same with MIDI sockets so I don't have to go feeling around the back of synths...), and this cost nothing (except the use of the pen's ink), plus if I ever need to remove it, then a cotton bud and isopropanol should remove it easily.

What I'm not doing is correcting the characters, so A is not being replaced with C! Although F and G are correct, and H looks a bit like A. The D key being an E really annoys me every time, but I'm definitely not going to do this:


I know from seeing many synthesisers that are used live, that lots of people add various embellishment to their instruments - from tactile, glowing or coloured dots on keys for use in the dark, to set-list sheets, and even 'A', 'B', 'C', 'D'. etc., marked on the keys... Well, I have just extended this approach to my laptop. 

Note that I'm just showing you what I did to MY laptop. I'm not advocating, suggesting, or proposing that you should deface your laptop. What you do with your equipment is your responsibility. So you do any defacing like this at your own risk!
