Sunday, 7 April 2019

Plain text files in macOS for Nyquist plug-ins in Audacity

Sometimes interesting investigations arise completely unexpectedly! Here's a happenstance that caught me out recently...

(Yes, this screen shot shows the Audacity that I haven't updated in quite a while...)
I have written a few plug-ins for Audacity, the amazing free and open-source cross-platform audio editor software, and have never had any problems . Well, other than trying to get my head around the fascinating programming approach that it uses - an extension of the XLISP dialect of Lisp. For some reason, my brain doesn't seem to be wired to think about things the way that Lisp does, and this makes developing plug-ins quite a challenge! But I'm not used to problems with the way that the plug-ins interact with the host application (Audacity in this case)...

It happened when I was adding some functionality to an existing plug-in, the RUSS Harmonic Rejector, to cope with some unusual audio signals that I was processing. I copied across the Nyqvist text files to the appropriate 'Plug-Ins' folder on my MacBook Pro, edited the Nyqvist plug-in code, saved it, and went into Audacity to load it via the 'Effect>Add/Load Plug-Ins' menu option - and this is where things got interesting.


Here's what I saw in the dialogue box that opened:


Now those extra characters aren't there in the Nyqvist code:

;nyquist plug-in
;version 1
;type process
;name “a_RUSS_Harmonic_Filter_lp2"

Also, it turns out that in the Audacity support pages for Nyquist, there's a warning box that I hadn't paid much attention to...


Now that I read that warning again, it seems to be quite important!

But what is the warning actually saying? It says to use a plain text editor rather than a word processor, and I was using TextWrangler as my editor, and that is a plain text editor, isn't it?

It is at this point that the 'question everything, trust nothing' big red warning light starts flashing in my head, and I realise that I'm guilty of 'making assumptions'. Yep, an unquestioned, obvious assumption that you don't realise you are making until it trips you up... So I looked at the files in the Finder:


Now, the Finder is designed for 'finding' files, and it isn't particularly good at telling you much about the files themselves. There's 'Get Info...' for that, and it told me that I had two 'documents' and a document that was last saved as a 'SimpleText' document, which used to be the built-in editor for MacOS from System 7 to System 9 (I think). Unfortunately, a description like 'SimpleText' document doesn't directly indicate if it is a plain ASCII text file. ASCII, by the way, is one of the early ways of mapping numbers to keyboard characters, numbers and other functions, and so a value of 65 represents the character 'A', 49 is '1', and 10 is 'Line Feed (LF)', which is one of several characters that can indicate a new line (Carriage Return (CR) is another), and 7 is the 'Bell' character, which makes a noise (and was originally an actual physical bell!).

Anyway, I opened the Harmonic Extractor file in TextWrangler (my current but 'about-to-be-outdated' 32 bit text editor), and looked at the 'info' bar on the lower edge of the window:


Aha! This isn't a plain ASCII text file! Somewhere along the line, it has been converted to Unicode (UTF-8) encoding instead of ASCII (maybe when it was stored on Google Drive?). So what about the SimpleText document? TextWrangler said:


Now this says it is a text file, but there's an interesting 'Mac OS Roman' encoding, and it has Windows 'end of line' Carriage Return, Line Feed characters, so my tendency to use whatever text editor is around at the time is now biting me back!

Here's what the info bar should say for the 'Plain text' that the Audacity warning box was hinting at:


This is a text file, with ASCII encoding of the symbols on the keys, and with a Unix-style 'Line Feed' to indicate the end of each line. So I tried to save the Nyqvist files as Plain ASCII text files using these settings and up popped a warning that some Unicode characters could not be saved. It turns out that these were the 'smart' doubles quotes around the "title". So I took these out and replaced them with the normal less curvy double quotes and re-saved. All was well again! The plug-ins now had the correct names and were in the correct alphabetically sorted position in the menu. I also tried saving the file using the Windows 'End of Line' convention (CRLF = a Carriage Return character, followed by a Line Feed character), and that worked fine as well.

Solved


In summary:

1. You need to make very sure that your Nyquist files are 'plain ASCII text'!
2. 'Plain ASCII text' requires that your editor be set to save using the 'Western (ASCII)' encoding, and ideally to not add a hidden '.txt' extension to the end.
3. Your Nyquist files must have the '.ny' suffix (Remember that the default on macOS is to hide extensions, so use 'Get Info' to make sure that there isn't a hidden '.txt' suffix at the end of the '.ny' file.)
4. Remember that the Mac's 'Textedit' utility makes it very easy to save files as '.rtf' files, and these are NOT plain ASCII text, and just adding '.ny' at the end does not guarantee that there isn't a hidden '.txt' suffix as well...

If this was a forum, then there would be a 'SOLVED' indicator somewhere around here!

There are several things to note here. The first is that I should have thought more about how to edit a file, and especially how to save it - I'm fully guilty of this, and probably rely far too much on default settings to be appropriate to what I'm doing. The second is that Apple's 'it just works' approach sometimes works against you - in this case, setting up TextWrangler so that it saved plain ASCII text was reasonably simple, but only when you knew what was required (and even then, it is easy to end up with a hidden '.txt' extension suffix on the end of what appears to be a '.ny' file. The third is that the Audacity documentation indicated that there might be something that you should be aware of abut editing Nyqvist files, but it didn't give any explicit details, and so required more investigation. The fourth is that just adding '.ny' to the end of a filename does not make that 'extension' disappear, even if  the macOS 'Hide Extensions' default is active - but that Audacity will still accept the '.ny' as an extension even if the Mac's Finder doesn't.

What follows are some of the mitigations that can be used to try and ensure that files are created, edited and saved as plain ASCII text files, in a world where such files seem to be increasingly uncommon.

Utilities


1. TextUtil


There is a utility that can be accessed via the macOS Terminal called textutil that can convert files to plain ASCII text, and remove smart quotes. Here's a template command line for use in Terminal on a file called 'rich text.rtf' that will convert it to a plain text file called 'rich text.txt':

   >textutil richtext.rtf -convert txt

Note that there's now a '.txt' extension suffix at the end of the file. Audacity is looking for '.ny' files, so you need to edit the filename...

2. Shift + Command + T in TextEdit


Also, inside TextEdit, you can use the command: 'Shift + Command + T' to change from Rich Text format to plain text. When you do this, then the 'ribbon' of buttons at the top of the window disappears and the font changes to Courier:


Notice that the double quotes are vertical in the above screen shots...

If you get a double quote that is non-vertical, then it is a smart quote, and could cause problems if you require plain ASCII text - as Audacity does for Nyqvist files:


To make it easier to see the curved 'smart' and vertical 'non-smart', then here are some screenshots with larger text:


(Notice that the 'ribbon' of buttons and the ruler vanish when you are in the 'Plain text' mode.)

To prevent any problems, then you need to turn off the 'Smart Quotes' option in the Text Edit preferences:


You also need to add 'Western ASCII' to the encodings for saving - you do this via the 'Plain Text Encoding' selector in the 'Save' dialogue box:


And then add 'Western (ASCII):


It also seems to be good to start typing in Plain text mode to avoid any smart quotes! As you can see, it isn't entirely straightforward to adjust textEdit so that it saves files as plain ASCII text! 

3. Coteditor


Despite quite a bit of searching, I didn't find a dedicated 'plain ASCII text' editor for MacOS, and unfortunately, the free and very capable generic editor that I've been using for many years, TextWrangler from Bare Bones Software, is a 32-bit applications, and so whilst it works fine in the El Capitan version of macOS that I use on this MaxBook Pro, the future is 64-bit, and so I'm going to need to change to another editor eventually. BBEdit from Bare Bones Software would be the obvious choice, but I wondered if there was an alternative simple text editor...

In my searching I found Sublime Text, BBEdit, Atom, Vim, Brackets (from Adobe), UltraEdit, Coda and Microsoft's Visual Studio Code. Most of these are serious, professional editors, and some of them have free versions (or trials), but none of them seemed to be at the simpler end of the range. However, I did find Coteditor (from Coteditor.com) that seems to be quite simple and straightforward, and it puts the save format right at the top of the main window, where even I would probably eventually notice it!   


4. Get Info

I mentioned using the Command-I 'Get Info' utility before, so here's what it shows when you look at some edited Nyqvist files:


It turns out that the 'Get Info' utility can be very useful! The 'Hide Extension' option is the default in macOS, and so even though the nyquist files have '.ny' at the end, the '1-...' test file also has a '.txt' at the end, which means that Audacity does not include it in the 'Add/remove Plug-Ins' dialogue box. The 'Name & Extension' field can be used to remove the '.txt' suffix - just click in the field and remove the '.txt', then press 'Return'.

Let's recap that:

The '1-RUSS_Harmonic_Extractor_hi2.ny' file the you see in the Finder in macOS is actually called: '1-RUSS_Harmonic_Extractor_hi2.ny.txt' (yes, with two 'extension' suffixes), because macOS hides extensions by default. The '.ny' that looks like an extension is misleading, because the '.txt' suffix that follows is the actual extension.

If you use the 'Get Info' utility to remove the '.txt' at the end of the filename, then you get a file which looks like it has a real extension of '.ny'. The 'a-RUSS_Harm_Extract_hi2.ny' file does not have '.txt' at the end, but it appears in the Finder as 'a-RUSS_Harm_Extract_hi2.ny', which means that the '.ny' isn't a real extension, because if it was, then macOS would not show it, and the file would appear as  'a-RUSS_Harm_Extract_hi2'... However, Audacity treats the 'a-RUSS_Harm_Extract_hi2.ny' file as if it had an extension of '.ny', and thus displays it in the 'Add/Remove Plug-Ins' dialogue box.   

Conclusion


Making sure that Nyqvist files are plain ASCII text files is very easy to get wrong, and if you do get it wrong, then your plug-in may not appear in the 'Add/Remove Plug-Ins' dialogue box, or Audacity may not display the name of the plug-in correctly. Having spent a lot of time in the integrated development environment that Max offers (for MaxForLive plug-ins, as well as Max code), then it is very interesting to see how a non-integrated development system requires more thought and organisation.

I hope that this blog post will help anyone else who experiences problems with Nyqvist files in Audacity on macOS, assuming that they can find this blog post, of course!

Buy me a coffeeBuy me a coffee

Tuesday, 19 March 2019

A little bit of echo here and there - with MaxForLive in Ableton Live...

The last thing that the world needs is 'Yet Another Echo Effect'. This may sound like a good plan, but if you pronounce YAEE then you get something very like 'Yay!' and the fate of the world is sealed! And so, now, I'm going to announce another echo effect...

It was after I finished the hex frequency shifter that I looked at the central hex auto-pan section and thought: 'That would be interesting in an echo effect...' A month later, and here is the result, but, as usual, I'm not one for just doing a 'me too', and so this isn't your ordinary echo effect.

Hex Echo


The core of the Hex Echo effect is two sets of three delays, arranged in series, but with access to the delay inputs and outputs in parallel. The output section is exactly the same as the hex frequency shifter, and allows each delay to be selected and panned separately, either fixed (with a rate of zero Hertz for the LFO) or automatically. For the inputs, then you can send the stereo inputs directly to the two delay lines, so this kind of treats them as if they were in parallel as well. The inbuilt links between the three delays are still present though, because that made the routing just a tad too complex.

All of the feedback loops are also switched, which means that you can quickly turn feedback on and off without having to change a rotary control. It means that you get fast control over the feedback, which can be very useful when there's too much overall gain and it starts to run away with itself. There are memories to store your favourite settings as well, and a good idea might be to set one of these to a 'all-feedback-off' setting so that if things do start to get loud, you can stop it quickly. A post-limiter might also be a good thing to add too...


Constant Volume

Apart from having to keep track of lots of signal routing, one of the trickiest aspects of the Max programming for the Hex Echo was the output pan selection. For each channel, you can select any of the delay outputs, which means that you can have 8 combinations of the three selector switches. One of the combinations isn't very useful for most of the time - the 'all off' one where no delay line gets to the output. But actually, it can be useful, because you might want to have just one channel's delays in your output, and for that then you would want to turn all of the selectors in one channel off, and leave the other channel's selectors on. The output panning means that the outputs are positioned in stereo, so this doesn't mean that the output will be mono.

But having three selectors means that the other seven combinations will change the output volume, because when there are two outputs present then they will be louder than a single output, and three outputs will be louder still. What is needed is a 'constant volume' selector, and that is what I programmed inside. Here's the level of abstraction just above the bit where you find out how it works:


So there are three [X] selectors, which route the delay outputs to the banners (pan_mr), and the volume compensation happens in the 'selpan_mr' object, which does all the hard work.


Let's work towards a general case for volume compensation by starting with the simplest case. With two [X]  selectors, then there are only three possible combinations: both on, both off, and one off whilst the other is on. In the 'both off' case, then we don't care about the volume! But the 'both on' and 'only one on' cases will give different volumes: the 'both on' will be the result of two signals being mixed together, whereas the 'only one on' is just one signal. So if we use the 'only one on' case as the reference, then the 'both on' case needs to be reduced by half, so that the result of mixing the two signals together is the same as the single input. In other words: 1/2 plus 1/2 = 1.


For three [X] selectors, then there are more combinations, but really there are only four distinct ones:
- all off
- one on
- two on
- three on

And when there are three signals being mixed together, each one needs to be reduced to one third - which is the clue to the general case. For two signals then the volumes need to be reduced by one half (1/2), for three signals the volumes need to be reduced by one third (1/3)... So, for 'n' signals, the volumes will need to be reduced by 1/n.

For completeness, here are the intermediate stages that I went through developing the final 'selpan_mr' object. First, I tried using the 'select' object to trigger messages to provide the multiplication values (0.33, 0.5, 0.99...)


But whilst this works nicely for two values, there isn't an easy way to scale 'select' for more outputs...

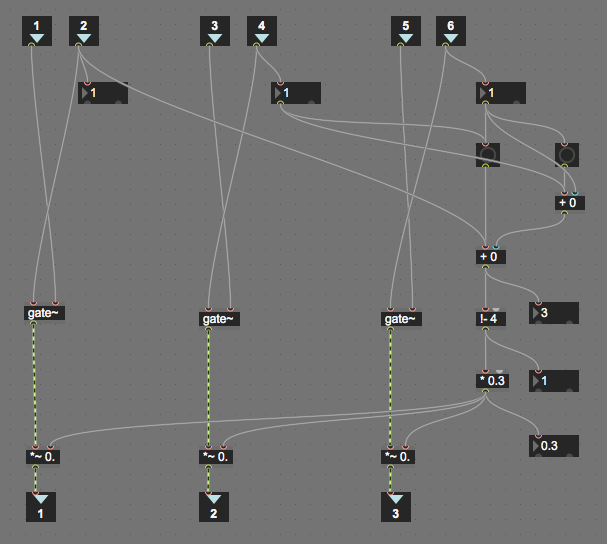
Then I tried using a simple linear equation to generate the 0.3 and 0.9 values, but this had a problem with one of the multiplication values...


There are three repeated sections, where an audio input (port in 1 for instance) is routed through a 'gate~' and then a '*~' multiplier (acting as a VCA) to the audio output (port out 1 for instance). Port in 2 controls that gate, turning it on and off, and so routing it to the panner object. But that control is also used to do the volume compensation. All of the Port Ins that controls the gates (port ins 2 4 and 6) are summed together at the '+ 0' object on the right hand side, just above the '!- 4' object. That '+ 0' object adds the three gates together, so if one gate is on, then the result of the addition is 1, whilst if all three are on, then the result is 3. (You can guess what the output is when two gates are on!) Unfortunately, the gate signals are the wrong way round in terms of adjusting the volume, and the '1- 4' object reverses the result by subtracting the sum from 4, so when all three gates are on, the output is 3, and when two gates are on, the output is 2, and all three gates on gives 1. The '* 0.3' does the volume magic - for three gates, then the 1 is multiplied by 0.3 and this is sent to the multipliers, so each port output will get about a third of the volume, and since all three ports are active, the resulting volume in the channel will be 0.9. If only one gate is on, then the subtraction gives 3, and 0.9 is sent to the multiplier for that gate, which gives 0.9 again. For two gates, then the output is 0.6 twice, which gives 1.2 volume, so this isn't right.

Testing Max patches with complicated sets of inputs and outputs requires a bit of planning. In order to use the three [X] selectors and see what is happening inside the 'selpan_mr' object that they feed into, you need to open two windows: one so that the [X] selectors can be set, and another so that the effects on the internal values inside the 'selpan_mr' object can be observed.


Here are some screenshots of the 'almost right' 'selpan_mr' object in action. (The case shown above was what happens with no gates active, so there's no output at all!)

First one gate on:


Which gives the 0.9 multiplier for that single output.

Then two gates on:


Which gives two lots of 0.6, which is 1.2, and so a little bit too big...

And finally, three gates on:


Which gives three lots of 0.3, for a final output of 0.9. Good for showing troubleshooting and testing, but that incorrect value isn't right. Compensating for volume only works if it is right!

Now there IS a 'brute force' way of doing this type of calculation - a 'look-up' table. In Max this can be done using a 'coll' object and filling it with a table that contains the values on 'n', and the corresponding multiplier values. Here's the Max patch and the table inside the 'coll' object:


And here are the two windows in use to test it:


The left hand window is used to control the [X] selectors, whilst the right hand window shows what is happening inside the 'selpan_mr' object, using the number boxes.

We now have an object that is doing maths on the 'n' value for the number of [X] selectors, but all that it says is 'coll'. The actual operation that it carries out on 'n' is hidden inside the table inside the 'coll' object. This may work, but it hides what is happening rather too deep for my taste...

So back to the general formula: 1/n. How do you code that in Max? The way to do it directly is related to the way that Max maths objects have two inputs: one on the left-hand side that is an input for a value and also a trigger for the calculation, whilst the other (on the right hand side) is just an input for a value (or is the value inside the maths object). Let's consider the case when you want a fixed value inside the object. So if you want to add 2 to 3, then you send a value of 3 into the trigger input, and an object that contains '+ 2' will produce an output of 5. But for subtraction, then this way of working has a problem. If you want to divide one number by another, then an object containing '/ 2' will produce the result '3' if you send '6' into the input, so a calculation like 6/2 is easy. But how about if we want to calculate 1/n? The value inside the object is fixed, and so we would need to use a message box to send a '1'into the left hand input, whilst sending 'n' into the right hand input, and then we would need to trigger the calculation by sending a bang into the left hand input. It is a lot of work for a simple result!

Which is why Max provides a shortcut. You put '!/ 1.' inside the maths object, and any value of 'n' that you feed into the left hand input will give the result for '1/n'. Easy, yes, but confusing to beginners in Max, and this notation still makes me stop and think even after years of using it. Anyway, if we process the number of [X] selectors that have been set with a '!/ 1.' maths object then we get the '1/n' value that we want. Here's the Max patch:


So we finally have a relatively neat way of carrying out a '1/n' maths operation, although the '!/ 1.' inside that Max object still forces me to stop and think. Anyway, we now have a 'volume compensation' object that works for three inputs, and it can be extended for additional inputs relatively easily, with the main processing done by the '!/ 1.' object to carry out the '1/n' operation, and the hardest bit of extending it is finding a way to determine the number of [X] selectors that have been set - as you can see above, for just three selectors there are a lot of objects used to produce the value of 'n' that is fed into the '1/n' maths object!

Clutter Minimisation

You may be wondering why I have the 'selpan_mr' object there at all, since it just serves as a way of lumping all of the volume compensation into one place. Well, it is my ongoing attempt to try and tidy up my Max/M4L patching!

In the past, some of my Max/M4L patches have been a little untidy, and I have tended to put all of the objects at the same level. I'm now trying to do things in a more structured way, and one of the techniques is 'encapsulation', where you hide away stuff that isn't required. The 'selpan_mr' object is a perfect example - at the highest level, you need to know that there are three [X] selector switches that route the delay outputs to the auto-pan sections, and that is all. The details of the volume compensation are fine hidden away inside the 'selpan_mr' object. So here's another example:


At this level, we have the three delays on the left-hand side, and the delay time, feedback and cross-feedback rotary controls for one of the delays on the right hand side. Notice that the rotary controls are connected directly to the delay object ('p delayer'). But what is inside the 'p delayer' delay object?


Inside the 'p delayer' object is the standard M4L 'delay~' object from Cycling'74, but also a lot of maths objects that do all of the scaling and smoothing (using the 'line~' object) for the rotary controls. If all of these maths objects were on the higher level, then the three delays would not have been as obvious, because there would have been lots and lots of other objects everywhere. But moving the processing for the rotary controls into the 'p delayer' object, then the higher level shows the high level signal flow through the 3 delays, and this is not obscured by lots of objects just to get the rotary controls to have the right values.

Topology

Hex Echo enables quite a few different configurations of the six delays, so here is a quick guide to them:

1. Three delays in series


2. Three stereo auto-panning delays


3. Three delays in parallel, and in series


4. Three delays in parallel, and in series, and with stereo auto-panning per delay


Because the two channels are separate, then you can have different arrangements of the delays and the panner in each channel. The 'cross' feedback from one channel to the other can be quite confusing if you have different arrangements, and it can be quite hard to figure out what is where. My recommendation is to use the [X] selectors to turn off signal routings and to gradually turn them back on, one by one, so that you can hear what is happening. The two pairs of vertical signal meters on either side of the panner section can also help you to figure out what is happening to the audio signals.

Six delays?

In the MaxForLive.com page description text, I mentioned '6 delays in series'. Here's how to do this:


The setup is very straight-forward - you just toggle the 'Cross Recycle' controls and set the associated rotary controls to less than 50%. (Otherwise you will get runaway feedback) The output selection for just the final delay means that you get only to hear two 'composite' delays, the first three in series for the first echo, then the second three in series for the second echo. The 'Cross Recycle' feedback will keep going round, so it can sound like more than 6 delays! Here's a diagram of the routing...


If you want to hear all of the echoes from the six delays, then you just toggle the delay selectors:


Which gives this audio routing:


So if you set each of the delay times to a different value, then you can get some interesting time patterns. Suppose you set the Left channel delays to 100, 200 and 300 ms, and the Right channel to 400, 500, and 600 - For an auto input in the left channel, then the echoes will be at 100, 200, 300, then 400, 500, and 600 ms intervals, whilst for an auto input in the Right channel, then the echoes will be at 400, 500, 600, then 100, 200, and 300 ms intervals. If you have the pan controls set to hard left and hard right, then this is quite a lot of ping-ponging across the channels!

Setting pan position

Setting the pan position might seem difficult, because there is only an LFO 'Rate' control. But this control goes all the way down to almost zero, which effectively 'stops' the LFO. So to set the pan position to anywhere you want (like hard left or hard right, or anywhere else you want), then you just do this:

1. Move the LFO 'Rate' rotary control about half way (the pointer will be vertical).
2. The Pan indicator 'block' will start to move back and forth horizontally.
3. Move the LFO 'rate' rotary control back to fully counter-clockwise when the indicator block is where you want it.

In pictures:


Once you have the pan positions set as you want them, do a save to one of the memory squares on the right hand side of the device. (Click on a square whilst holding the 'Shift' key down...) That way you always have the positions ready and waiting!

Applications

Hex Echo can be used for ordinary echoes, but the parallel/series modes and the 'per delay' feedback controls make it very good at the sort of 'cluster' echoes that you get as 'early reflections' in reverbs, especially if you have different delay settings for the two channels. Another thing to try is to set two of the delay times short, and one long (up to 2 seconds), which can be quite unusual because most ordinary echoes don't have three delays in series... The 'Recycle' feedback goes from the output of the three delays all the way back to the input, which is a total of six seconds of delay to work with (or 12 if you 'cross' it over to the other channel.

If I can find the time, then I will try to put a video together, but this takes a lot of time to do properly...

Getting Hex Echo

You can download Hex Echo for free from MaxForLive.com.

Here are the instructions for what to do with the .amxd file that you download from MaxforLive.com:

     https://synthesizerwriter.blogspot.co.uk/2017/12/where-do-i-put-downloaded-amxd.html

(In Live 10, you can also just double-click on the .amxd file, but this puts the device in the same folder as all of the factory devices...)

Oh, yes, and sometimes last-minute fixes do get added, which is why sometimes the blog post is behind the version number of MaxForLive.com...

Modular Equivalents

In terms of modular equivalents, then the Hex Echo obviously requires three delay stages, plus some switching, and a utility/attenuator for the recycle feedback, giving a total of about 5 ME. One of the things that I have noticed with the current generation of Eurorack modulars is that many people do quite a lot of post-processing on the audio, and I have seen quite a lot of multi-delay echoes being used. So an interesting side-effect of Hex Echo is that it can make Ableton Live sound more like a modular, which might be useful to some people. I count myself as one of those, because I have always tended to fall into the 'Trent Reznor' grouping where if people can tell how your sound was made, then you aren't trying hard enough.