Showing posts with label utility. Show all posts

Monday, 11 May 2020

Full-range Chromatic Note Remapper in Max For Live for Ableton Live

I have experimented with remapping previously with my MIDI ChromatixT, which takes incoming MIDI notes and changes their numbers to new ones, but each octave is treated the same, and when you generate a new mapping grid, then it is often a huge change and not the slight variation that I really wanted. So I've been playing around wth a few ideas...

MIDIchromatixN


MIDIchromatixN is the result. It combines two of the methods that I explored into one device: a random remapper and a modulo-arithmetic remapper. Both use almost exactly the same controls, and the outputs are very different - the random remapper is, well, random and wild, and the modulo remapper is more mathematical and constrained. In both cases, you need to follow them by a scale-setting device: the stock/factory Ableton Live Scale device is fine, or you could use my MIDINoteScalery device for extra control, proper invert and 'n'-octave folds as well.


MIDIchromatixN is basically just a look-up table. If you want to, you can set it so that the notes coming out have exactly the same note numbers as the ones going in (velocity is unchanged in this note remapper), but that isn't very useful. You can set it so that it inverts the whole MIDI note range as well, so that low MIDI notes become high ones, and vice-versa, but MIDINoteScalery makes that easy with a single button instead of setting about 8 rotary controls... However, if you want to gradually make changes to a constrained random (or mathematical pattern) mapping every so many bars, and have detailed control over the mapping, then you need MIDIchromatixN. In many ways, it is conceptually a bit like the stock/factory Saturator plug-in, but for note numbers rather than audio - and the mathematical functions it uses are different...

The flow diagram above also shows what you need to do to allow MIDIchromatixN to work. You need to have put some notes into a clip on the same track, and you need to add Scale or MIDI Note Scalery after MIDIchromatrixN. Finally, you need something to make a sound - any of the stock/factory Ableton Live Instruments is fine, or you could use a VST plug-in instrument.

So what does a remapper do?


A note remapper goes between the notes produced by a Clip and the sounds produced by an Instrument. MIDIchromatixN isn't sophisticated enough to do things 'in key', and so you need to add a scale controlling device after it. A remapper uses mathematical formulas to change the note numbers as they pass through. So As an example, with the Modulo mode selected, I tried 10 different variations when I input a C Major chord (C E G) and set the scale device to only let C Major notes through. The outputs were: C D A, C D A, F G D. A C G, D D F, A C G, D F C, G A F, C C D, and A F F, where a repeated letter indicates a note one octave higher. These output notes are consistent in Modulo mode - if you select a Variation number and input C E G then you will get exactly the same notes out again. Change the settings, and the output notes would be different, of course. In Random mode, things are slightly different, because the randomness gets shuffled each time you move some controls, and so, as the name suggests, you get more unpredictable 'random' notes out - and they won't be the same if you set the controls to the same settings. 

So what do you use it for?

A remapper can be used to change a melody (or chords). Whatever you put into the Clip, the output from the remapper is probably going to be different - unless you find one of the 'input=output' settings - and you would be able to see that on the display. So you can use it to create new melody ideas, or for generative music, or just for fun!

User Interface


As normal, I will go across the user interface from left to right...

There are two indicator lights with 'Yes/no' buttons underneath them, with rotary controls called 'AutoVar' or 'AutoRand'. These enable changes in the remapping to happen every 'n' bars. The 'Var' section controls the Variation rotary control, which makes small changes to the mapping. You can move the Variation rotary control manually to audition the effect that it has on the remapping of notes. The 'Var' section works in either of the two modes of operation (more about them in a moment). To enable the automatic variation, you just select the repetition rate (every 'n' bars) and click on the 'Yes/No' button so that it says 'Yes'. When Ableton Live's transport is running, then the indicator light will flash after that number of bars have happened, and the Variation rotary control will increase by one. After 127, it resets to 1 again.


Well, that WAS how it worked, right up until when I was writing this, where I realised that having the Variations button always cycle through all 128 possible values was a bit boring... As a result, I added 'Start' and 'Range' numbers, plus 'nudge' controls to adjust them, and now you can set the start Variation number, plus how many increments it will make before it returns to the start value. You can see the new controls on the far left hand side in the diagram above.

So if you set the Start to 1, and the Range to 4, then it will increment through Variations 1, 2, 3, and 4 (and then back to 1) every 'n' bars - where 'n' is set by the 'AutoVar' rotary control. If you set the Start to 8 and the Range to 16, then it will increment through Variations 8, 9, 10, 11, 12, 13, 14, 15, 16, 17, 18, 19, 20, 21, 22, and 23 (and then back to 1).

The 'AutoRand' section only works in the 'Random' mode, and causes a new random remapping to be generated every 'n' bars - if the 'Yes/No' button is set to 'Yes'. Note that the two auto bar settings can be different values. To the right of the AutoRand section is the 'Transport' section: the red/green indicator light shows when Live is stopped (red) or running (green).  The small indicator light will flash once every beat, and the bar count on the right will increment every bar. You need to make sure that you stop Live in order for the bar counting to work properly - just pressing the spacebar for pause doesn't work properly, but I'm working on it...

The main control just above the transport indicators is the 'Random/Modulo' button. In 'Random' mode the remappings are rough and 'random', plus the background colours are slightly more purple, whilst in 'Modulo' mode the remappings are more repetitive and mathematical in appearance. Apart from the AutoRand only happening in 'Random' mode, all of the other controls work in both modes.

Above the mode button are the main set of controls for the remapping. There are two identical mathematical generators inside, connected in series (the notes from the clip go through generator 1 first, then generator 2, then go to the Scale device) and each generator has a Range rotary control and a Step rotary control. Range sets the range of output notes, and Step sets the increment of the output notes within that range - which roughly equates to the slope of the diagonals (within limits, as we will see). If you set the controls like this:


...then you get what you might expect - the Ranges mean that the remapping uses the whole of the output range, whilst the step size of 1 means that every output note is used, and so you get a 1:1 mapping of input notes to output notes. So every incoming note will cause the exact same output note to be output, although the Scale device may then change that note, of course. You might wonder why you have a device that does nothing! But set the controls like this (turn Step2 to 64, and Pitch2 to 32):


...and things are now very different. The output range is only half what is was before, and there are now two different input notes that produce the same output note. Let's look at that 'sawtooth' shape in more detail...

The central user interface feature is what looks like a strange audio waveform on a dark background, or maybe a broken LFO waveshape. Above this are 128 numbers which define the mapping of input MIDI note numbers to output MIDI note numbers - and they are very small because for most purposes they are very boring and you may not need to use them very often! So when we had the first setting, then there was a straight line across the rectangle, from lower left to upper right. When we set the Range2 rotary control to 64, then there were two diagonal lines and we needed to alter the Pitch2 control to get the output notes playing the correct notes. So what would happen if we set the Step1 value to -1 instead of 1?


The screenshot above shows the effect of a Step1 of -1 - with Pitch2 increased to 95 to compensate for the pitch dropping. The diagonal lines are now sloping the opposite way. Let's reiterate how to think about the controls, and add a caveat: the Range controls set the output range of notes, but these may need adjusting with the Pitch controls so that they are not limited by the top and bottom (0 and 127) of the note numbers. 

Let's see what happens if we rewind a couple of steps and change Range1 down to 96:


This gives us one diagonal controlled by Range2, and another controlled by Range1. Okay, which means that the Range controls are separate. Got it.

Earlier I said that the Step controls changed the slope of the diagonals. If we change Step1 to -2, then this happens - but it shows that the Range 1 control might not have been doing what it seemed to be. Here's what it now looks like:


Yep, we have squashed two repeats into the space of one horizontally, and what looked like two little diagonals is now revealed to be just one. Unfortunately, just as you think you have got the hang of this, then there's a problem because when the diagonals get to a certain slope, then they 'alias', just like digital audio. Here's what this looks like:


There have been several changes to the Range and Step values, but what you see instead of the nice, neat diagonals, are more complex mappings between the input and the output. But the same principles apply: Range sets the output note range, Pitch puts the notes back into a usable range, and Step alters the diagonals - except that now we have individual aliased dots instead of diagonal lines. Here's another example of the sort of mapping that you can produce:


In the course of playing with the values, the two Pitch controls on the far right hand side have also been introduced, and they complete the user interface. Don't forget that the Scale device that follows allows you to constrain the output of the remapper so that it plays only the notes that you want, and remember that you could use the MIDI NoteScalery device instead of scale, so that you can have more scales, better folding, correct inverting, etc.:


One final thing to note: if you try to set the Step value to zero, then the rotary control background will turn red to remind you that you shouldn't use this value.

Theory 

The rectangle with all the sawtooth and dots in it is really just a squashed lookup table:


The diagonal line that we started with should really be like this: 128 values on the lower edge for the input note numbers from 0 to 127, and 128 values on the right hand edge for the output note numbers from 0 to 127. Because the diagonal sets how an input maps to an output, then in this case, any input number maps to the same output number. 42 in maps to 42 out, as shown on the diagram above.

Do you remember when Step2 was set to 64, and the Pitch2 was adjusted so that the two sawtooth shapes were in the middle of the display? Let's look at what this does to the mapping:


The two sawtooths set the mapping of input note numbers to output note numebrs, so when there are two shapes like this, there are two inputs for every output. So an input of 43 produces an output of 78, but so does an input of 98. The smaller the output range, the more there will be several notes on the input that produce the same output note number. If you tweak the settings, then you will probably find some that produce a horizontal line, and this is a special case: there is only one output note number, and every input note number maps to that number. This isn't very useful...

If you look up MIDIchromatixT, then you will see that it only has 12 inputs and outputs, and that it repeats that octave for the full 0-127 range. MIDIchromatixN has no repeats! All 128 note input numbers are mapped individually to the 128 output note numbers.

When the Range and Step values give us mappings that aren't anything like a nice simple diagonal line, then the mapping can be lots more complex. Here's a Random mode mapping:


This mapping has none of the obvious repeated patterns of previous examples, but you should now be able to confidently adjust the output range of notes by changing the Range values, and then using the Pitch values to get the pitches at the right place, and know that changing the Step values will alter where the dots are horizontally.

Inside

This time I'm not going to go very deep into how MIDIchromatixN works in Max For Live, and instead I'm going to show how one very useful bit of the UI is done, and show you where to find more related stuff.

The little red/green indicator light that shows when Live is stopped or running is the target. The code looks like this:

For when Live's transport is not running/playing. However, if you try to open the Help page for this, then you get the help page for a patcher object, which isn't quite a useful. instead, what you need to do is go to the 'Extras' menu in Max:


...and there is the M4L.api.ListOfAbstractions, which opens a window full of interesting objects:


,,,including the one that I used to find out if Live was running or stopped - there in the lower right hand box. Clicking on the text for Global.ObserveTransport opens the tiny little box on the far right hand side, which shows how to use it. Here's that same code, but this time with Live's transport running:


Each of those six boxes covers a topic, and there are all sorts of other interesting objects in there, ready for you to use!

Getting MIDIchromatixN_mr

You can get MIDIchromatixN_mr here:

     https://maxforlive.com/library/device/6263/midichromatixn

Here are the instructions for what to do with the .amxd file that you download from MaxforLive.com:

     https://synthesizerwriter.blogspot.co.uk/2017/12/where-do-i-put-downloaded-amxd.html

(In Live 10, you can also just double-click on the .amxd file, but this puts the device in the same folder as all of the factory devices...)

Oh, yes, and sometimes last-minute fixes do get added, which is why sometimes a blog post is behind the version number of MaxForLive.com...

Getting MIDI Note Scalery 

MIDI Note Scalery can be downloaded from here, with documentation here.

    https://maxforlive.com/library/device/5260/midinotescalery

Modular Equivalents

In terms of basic modular equivalents, then implementing MIDIchromatixN_mr is quite awkward. The Make Noise 'Maths' module starts to get somewhere close, but not entirely. The Expert Sleepers 'Disting mk4' also gets close, and maybe the Quantizer can be tweaked suitably, or possibly the Waveform Animator, maybe. But I couldn't find a direct equivalent. This means, of course, that I will get a comment pointing me to a classic module that I have overlooked, or never heard of, or forgotten, or didn't know about - there are lots of modules out there. Anyway, until then, I don't have an ME for this device... (This is a first, I think!)

---

If you find my writing helpful, informative or entertaining, then please consider visiting this link:


Monday, 23 March 2020

Swapping MIDI Note Number and Velocity Value in a Max For Live plug-in for Ableton Live

When I produced the MIDI Note Filter recently, I realised that the internal processing would allow some other interesting MIDI processing functions to be carried out. One thing that I have always wanted to experiment with spans across two different topic areas: music and steganography (hiding data in other data), and it builds on my recent explorations of Note On and Off messages, as well as a recent twitter message that talked about security.

(I have also been busy producing material for Christian Henson's 'Pianobook Pianoday 2020' collaborative 'systems music' project due to be released on the 28th March 2020 as 'Music by 300 Strangers'. Search for '#pianobookpianoday2020' on YouTube to see some of the contributions... This has put me in a more experimental and explorative mode than my usual analytical one, so what follows is not my usual type of Max For Live plug-in... but this is a good thing!)


MIDIswapNVmr01 is a Max For Live plug-in that swaps the note number and the velocity value in MIDI Note On messages that pass through it, and it works with the implied Note Off messages that occur when the velocity value is zero. A button is provided that toggles between 'Swap' mode and 'Thru' mode, and the usual '!' panic button is also there to stop hanging notes (I have called it 'ANO' here because it flushes out hanging notes, but note that it does not send a MIDI 'All Notes Off' message - Ableton Live does that when you press 'Stop', which is why the dark blue ANO is shown by the monitor...). Yep, a minimal user interface!

One thing which I hadn't thought about until I created the MIDIfilterNOTEmr plug-in was what happens when you turn off a Max For Live plug-in using the 'Power' button in the top left hand corner. It turns out that if you turn a M4L plug-in off, then it is bypassed, so you can use the power button as a kind of secondary 'Thru' button. So I have included this in the screenshots!

Screenshots


The screenshot above shows the plug-in swapping note numbers and velocities. I have put two MIDI Monitor utilites before (on the left side) and after (on the right side) so that you can see what is happening. Looking at the very last note (just before the dark blue 'All Notes Off' ANO MIDI message), then you can see a Note On (shown as 'NON' in the Monitor utility) for E3 with a velocity of 65 goes through the plug-in and comes out as a Note On for F3 with a velocity of 64. You won't be surprised if I reveal that F3 is the note that corresponds to note number 65, so the incoming velocity of 65 has been converted to a note number (F3) as intended. The E3 incoming note is note number 64, and so this turns into the velocity of the outgoing note as 64.

Let's pause for a moment here whilst you get your head around this. The incoming note is E3 (65) with a velocity of 65. The outgoing note from the plug-in is F3 (64) with a velocity of 64. So the note number and the velocity value have been swapped.

A quick note about note offs. As I've mentioned several times recently, a MIDI Note On message with zero velocity is treated as if it is a Note Off message. So in MIDIswapNVmr01, a Note Number of 0 (C-2) turns into a velocity of zero, which means that whatever the value of the velocity of an incoming note, if the note number is zero (C-2), then the output will appear to be a Note Off message. As it happens, the 'hanging note' suppression mechanism that I use ignores Note Off messages that haven't ever had a preceding Note On, and so nothing comes out of the plug-in!


I wasn't sure how to capture 'nothing' happening, so for the screenshot above I played several C-2s and then an A-2, and then C-2 again. As you can see, the only output from the plug-in is an E6 with a velocity of 9, which is because the incoming note's A-2 is note number 9, and the incoming note's velocity of 100 maps to  E6 when it gets turned into a note number. The C-2 notes thus turn into pairs of 'Note Ons messages with zero velocity acting as Note Off messages', which are then stripped away by the hanging note protection, and so never even make it out of the plug-in.

So there's a caveat / warning / note for this plug-in:

If you input a C-2 into this plug-in, it will never get out!


The screenshot above shows the inputs and outputs in the 'Thru' mode - so the MIDI messages pass through with no changes.


And the 'Power Off' mode, where the power button in the top left hand corner is clicked to turn off the plug-in. This gives the same result as the 'Thru': the MIDI messages are not affected.

As an interesting extra, here's what happened when I tried the MIDI Monitor from the Max for Cats 'Gratis Hits' bundle pack of free Max For Live devices:


As you can see, the MIDIswapNVmr01 plug-in is disabled (powered off) and so the MIDI messages are unchanged, but the Monitor utility on the right has added an octave to each note number: C3 becomes C4, C4 becomes C5, and C5 becomes C6. I'm very used to seeing different octave numbers in MIDI software because there are various interpretations of the standard, and I tend to use whatever the software uses, which in the case of Ableton Live and Max is C3=60, so this has probably been fixed in an update, and I just don't have that update! One area that I steer well away from are any discussions about Middle C and MIDI.

Because this post has talked a lot about MIDI Note Numbers, then this seems like a good place to share two charts that I use a lot when I'm playing/programming. The first is a classic that you have probably seen in various forms before:


So the table above has notes along the top, and caves up and down, and lets you find the note number of any of the 128 MIDI notes. You can also use it in reverse - look up a number in the grid, and then read the note and octave from the two axes.

The second is more unusual...


This is a kind of 'inverted' version of the first table. It has decades (10s (tens)) on the vertical axis, and units (1s (ones)) on the horizontal axis. So to look up 65 (note F3 from earlier) you go down to the row that starts with 60, and then go across that row until you are in the column with 5 at the top. For 65 you get F 3 in the two boxes (note/octave). What is interesting about this are the patterns that you get when you take the usual '2 and 3' pattern of accidentals that you see on a normal music keyboard and wrap it around decimal numbers. The columns have either 3 and 3, or 2 and 4 patterns of notes, and the diagonals have more patterns: 3 and 4 and 2 and 3. if you are into patterns, then the last row of blocks of 2 always repeat the octave in the cell underneath, whilst blocks of 4 repeat the octave value of the cell above the first row. Block of 3 do different things depending on if they contain accidentals or not! If you are familiar with chess, then 'Knight's moves' on this table give you the cycle of fifths...

If you have ever seen one of my Tweets about cryptography, then my fascination with patterns now probably makes more sense. Music and cryptography both contain a lot of maths underneath, and so patterns are not unexpected!

Controllers and control

Swapping the note number for the velocity value renders makes it very difficult to play keyboards and MIDI controllers because the velocity value is often difficult to control with the same amount of precision as you would find on a keyboard where each key produces a specific note number. Velocity is determined by the rate at which the key is pressed down, and so is based on a time measurement. By swapping these two values, keyboards and MIDI controllers gain precise control over velocity (what used to be pitch control is now velocity control!), but lose the precision of pitch control.

Steganography


Steganography is all about hiding information in places where it is not visible. One example is in JPEG picture files, where it is possible to hide data inside them by spreading it across the whole picture in ways that are not obvious. So there might be slight and gradual changes to brightness, colours, levels of noise or other parameters, that are not visible o the human eye, but that can be detected.

In this case, MIDIswapNVmr01 increases the precision with which changes can be made to the velocity value, but the pitch becomes less precise - in fact, trying to control pitch by how quickly you press a key spreads out pitch control into a very imprecise form! In graphical form, this might be represented by the amount of blurring (as a metaphor for the spreading out of data):

So a conventional music keyboard has precise control over pitch, so the word 'Pitch' is in focus, whilst the velocity control is less precise, and so the word 'Velocity' is blurred.


What MIDIswapNVmr01 does is swap the blurring - so now the word 'Pitch' is blurred, whilst 'the word 'Velocity' is in focus.


At Synthfest UK 2019, I spoke to Paul Ward about some of the FM sounds that I had programmed anonymously for the UK DX Owners' Club (many of which are widely available in various Public Domain collections - one set of my sounds have distinctive titles like : '-=[V]=- 1', for example), where there was a high amount of velocity sensitivity built into many of them. Controlling them can be tricky for fast runs of notes, and so Paul said that he preferred to use controllers like Mod Wheels to give more precise control.


What MIDIswapNVmr01 provides is precise velocity control from a keyboard, but sacrifices pitch control. With a fixed velocity from a keyboard, then MIDIswapNVmr01 only outputs one pitch, but you have precise control over velocity - and in fact, even a 88-note keyboard is going to give you access to only part of the full 1-127 velocity range (in exactly the same ways as it only normally lets you play 88 of the 0-127 range of MIDI note numbers!).

Which is why I said right at the start that this was for experimental purposes. I'm not expecting a sudden change in workflow so that people enter pitches very precisely (as usual!) and then use MIDIswapNVmr01 to enable them to add precise velocity as well. But my thinking is that given recent developments with MPE, and with sophisticated controllers like the Roli Seaboard, Haken Continuum and Expressive E Osmose or Expressive E Touche (others are available!)  then it might make people think more about additional control other than the pitch, timing and a very imprecise velocity value that you get from a traditional music keyboard.

Real-world instruments often have a lot of ways that the timbre can be influenced in real-time, and their players know how to exploit this - so I reckon that electronic musical instruments should be controllable in multiple dimensions as well. One very interesting illustration of this is in sample libraries of sounds produced using FM synthesis - what you get are very nicely sampled 'snapshots' of specific timbres, but you lose a lot of the subtle velocity control that programmers like myself put into sounds, and so the timbral variation is missing. I always remember when the first mass-market sampled pianos came out in the 1980s (Technics et al) that they were described by many players as sounding like:

'A very good recording of a piano, but not a piano.' 

Inside

As I mentioned, this plug-in is based on the MIDI processing core of the MIDIfilterNOTEmr utility, so let's see how it works:


As usual, I have tidied my normally untidy code in the screenshot above. The right hand side is very similar to the MIDIfilterNOTEmr code, with the 'select' object switching between two values depending on the incoming value. But here the 'swap' object at the top is used to change the note number and velocity over (as well as changing their 'right=-to-left' processing order), and so the velocity value does the same switching depending on 'Note On' or 'Note Off', but now switches the note number value because that is what will end up in the middle 'velocity' input of the 'note out' object.

On the left hand side, the 'select' object is again doing switching, but this time it is actually making sure that the velocity value is stored. The velocity value that comes out of the 'swap' object contains two values, the velocity value from the incoming notes, or zeroes from the Note Off messages. So the left hand side is all about capturing the non-zero velocity value, and making sure that it is stored when the zero velocity is output by the 'swap' object. So the two grey message boxes are just two stores in series, and the trigger for the storing is produced by the 'select' object when it detects a Note On or Note Off message. Finally, that captured and stored velocity value is fed into the left hand 'Note number' input of the 'note out' object. 

This approach could be extended to longer serial chains, and might open up additional possibilities for doing more complex MIDI processing. Because some previous posts have talked about Max's sample-level lower-level programming, then the message box approach used here could be thought of as being kind of half-way between ordinary Max and Gen: MIDI-event-level, perhaps? 

Fun!

One unintentional side effect of MIDIswapNVmr01 is that it makes playing a music keyboard in the conventional way almost impossible... So if you are every visited by a highly skilled concert pianist, and they want to play one of your keyboards, then using MIDIswapNVmr (to swap the MIDI note number and the velocity value of their playing) will considerably impede them...

Alternatively, sometimes, changing a familiar constraint (like pitch control from a keyboard and changing it to being controlled by velocity) can break you out of creative road-blocks... Inverted keyboards are another way to do this, and I have produced a Max For Live plug-in that does 'proper' inverted MIDI keyboard mappings and lots more!), but just using a Scale utility over an octave can achieve a similar 'writer's block' mitigation.

Actually, combining the ideas in the previous paragraph - adding a Scale utility after MIDIswapNVmr01 so that the MIDI notes are constrained to a specific scale - is a very practical and useful way of using many of my weirder plug-ins (like my MIDI note range expander/compressor and offset utility). What the Scale utility is doing is constraining the variability from the velocity measurement, which takes us to the several variations of 'constrained randomness' in another of my plug-ins.

I'm wondering if I can find time to do a 'how to use my plug-ins in combination' tutorial...

Getting MIDIswapNVmr01

You can get MIDIswapNVmr01 here:

     https://maxforlive.com/library/device/6081/midiswapnvmr

Here are the instructions for what to do with the .amxd file that you download from MaxforLive.com:

     https://synthesizerwriter.blogspot.co.uk/2017/12/where-do-i-put-downloaded-amxd.html

(In Live 10, you can also just double-click on the .amxd file, but this puts the device in the same folder as all of the factory devices...)

Oh, yes, and sometimes last-minute fixes do get added, which is why sometimes a blog post is behind the version number of MaxForLive.com...

Modular Equivalents

In terms of basic modular equivalents, then implementing MIDIswapNVmr01 depends on your MIDI/keyboard interface. If that produces CV outputs for Note Number (Pitch) and Velocity, then a couple of patch cables crossed over and connected to the output (with a gate cable as well) will do this directly, giving an ME of 1! This is the lowest modular equivalent so far, if my memory serves me correctly...

Links from this post:


Roll Seaboard (Company web-site)

Haken Continuum (Company web-site)

Expressive E Osmose (Company web-site)

Expressive E Touche (Company web-site)

MIDIfilterNOTE (MaxForLive.com)

MIDIfilterNOTE (Blog post)

Christian Henson (YouTube channel)

#pianobookpianoday2020 (YouTube search)

---

If you find my writing helpful, informative or entertaining, then please consider visiting this link:


Saturday, 27 July 2019

Several M4L variations on Random for controlling parameters in Ableton Live

I am my own worst enemy. I find it difficult to resist making comments on some Facebook posts, and I find it hard to not create MaxForLive devices when there isn't one available as part of the comment.

Which is where MIDIrandomA comes from. Andxre Andre posted in the 'Max For Live Users' group that it seemed like:

'...the max for live essentials LFO... feels like it always gets to the same values a lot'.  

 And I commented:

Random’ is a difficult topic. People have a number of expectations that do not necessarily match to a true random source. There have been published papers describing the differences between a true random source and what people perceive/expect. People seem to expect no repeated/similar values, no small differences between successive values, and no repeated similar sequences, and more... Some ‘random’ sources are actually processed so that they fit better with expectations - Apple’s iTunes playlist generation and shuffle, for example. 

And I kind of committed myself to making a less random 'random generator'...


MIDIrandomA


MIDIrandomA is the result. It isn't perfect (the repeated sequences' bit isn't included yet...), but it does provide 'constrained' random values that can have the sort of characteristics that Andxre Andre is looking for. As always with my rapid development devices, there's probably a lot that can be improved, so feel free to let me know what you think.

MIDIrandomA is a random 'control voltage'/number/value source. It has three different types of random noise, instead of the more usual single source, and so provides comprehensive control for exacting requirements.

Type A has four rotary controls, and provides detailed control over the gain, the quantisation, the smoothing (logarithmic accumulation), and the thinning (non-linear amplification).

Type B is the classical 'Random Walk' and only provides control over the maximum size of the step between one output and the next.

Type C is the opposite of B - no repeated adjacent values are allowed, and the delta size (difference between successive output values) is the minimum that is allowed.

The generation of random number values (0-127) can be triggered by a free-running LFO (Rate, =Not Synced=), or one of several MIDI note or velocity triggers, which work from notes on a piano-roll Clip in the same track.

The output can be mapped to any co-operating control in Ableton Live.

Getting MIDIrandomA 0v01

You can get MIDIrandomA on https://www.maxforlive.com/library/device/5604/midirandoma

Here are the instructions for what to do with the .amxd file that you download from MaxforLive.com:

     https://synthesizerwriter.blogspot.co.uk/2017/12/where-do-i-put-downloaded-amxd.html

(In Live 10, you can also just double-click on the .amxd file, but this puts the device in the same folder as all of the factory devices...)

Oh, yes, and sometimes last-minute fixes do get added, which is why sometimes the blog post is behind the version number of MaxForLive.com...

Modular Equivalents

In terms of basic modular equivalents, then MIDIrandomA 0v01 would probably require three different npise/random generators, plus some post-processing (non-linear amplifier, filter/accumulator, not sure about the repeated value removal...) to give the same sort of functionality, plus a little bit of switching to do the 'Type' selection and the sync options, giving a total of about  10 ME.

Update


There's now a three output version of this, called MIDIrandomABCmr02. You can learn more about it here:

http://blog.synthesizerwriter.com/2020/04/three-mappable-outputs-of-controllable.html

And here's a link to click on if you find my writing informative:


Sunday, 10 February 2019

Scales and inverted keyboards

Some time ago, I looked at the 'factory' Ableton Live MaxForLive device called 'Scale', and in particular the 'Inverted and Useless' preset, which is both a good and a bad description. Behind the scenes, I was working on my own 'scale' device, and this has recently been updated to the point at which it is probably releasable. Yes, I know that I often seem to release things too early, but sometimes things that I don't release go through slow and tortuous development behind the scenes (Waverne 2 is one example), and there are also devices where the beta testing takes longer than expected. Anyway, NoteScalery is now at the point where I think it is ready for people to play with, and it will be followed by a number of other related devices that depend on having some way of controlling the mode/scale of the notes that they produce. All of the data spreadsheets that I produced in order to create NoteScalery will be made freely available for download.

Scales

So what's a scale (in the genre of conventional 'Western' music that MIDI 1.n kind of assumes)? For MIDI notes then it can be thought of as a mapping between all of the possible notes (128 of them, numbered from 0-127) and a smaller set of notes that follow a (normally) musical rule. So example rules might be along these lines: 'All of the white notes', or 'The notes in the key of C Major', or All notes except sharps or flats'...

Now because of the way that notes have an interesting property related to multiples of pitch, then, if you go up in semitones from a given note, after 12 semitones, you end up at the same note, but one octave higher, and this note has double the pitch or frequency of the note where you started. Octaves are very special intervals because of this doubling (or halving if you go down in pitch), and when you combine this with the equal intervals between the semitones (in equal temperament), then this hugely influences the way that people think about the way that notes work together. 12 notes in a familiar black and white pattern, and it repeats every octave, so everything must repeat every octave, yes?

Unfortunately, it isn't quite as simple as this. You can see this when a piano tuner 'tunes' a piano. Actually, whilst they do 'tune' the piano, they also have to make compromises because those 12 neat semitone notes are only an approximation that sounds reasonable in most key signatures - and the piano tuner is adjusting the notes so that various intervals sound okay 'overall'...

You can also see a problem when you have minor scales that are different when they are ascending or descending, and when you start to invert the notes in a scale then things can go very weird. So the idea that a scale applies to an octave of notes is a nice tidy approximation that works in a lot of cases, but it isn't perfect for all cases.

In musical terminology, the correct word for the mapping of notes is a 'mode', but scale is often used synonymously...

Implementation

So how are MIDI Scale devices typically implemented? Well, they use octaves - they show which notes are in the scale for an octave, and just apply this across the whole the note range. Simple.

And sometimes things really are that simple. If you look inside the MaxForLive PitchScaler device that comes with the M4L examples in Live 9, then you get code that fundamentally exploits octaves:


On the left is the raw Max code. In the middle I have marked up the main sections, and on the right is the block diagram of what is happening. So after the decoding of the incoming MIDI messages, then there is the split into two sets of numbers: Note numbers, and Octave numbers. Note numbers go from 0-11 and indicate which note in the octave has been received. To extract this from the raw MIDI Note Number you just do a modulo 12, which is what the '%12' object does - it just repeatedly subtracts 12 until the result is less than twelve. You probably know this as a 'remainder' - the number that is left when you do a division. The Octave number is interesting, because when you 'repeatedly subtract' in the modulo function to get the remainder, then the number of times that you repeat is the Octave number. So if the MIDI Note number that was received was 25 then subtracting 12 gives 13, and subtracting 12 from that gives 1, so we know that the Note number is 1 (if C=0, then 1 will be C#), and the Octave number is 2, because we had to subtract 12 twice to get a remainder which was less than 12. So the MIDI Note was a C# in the third octave.

Now that there is only one octave's worth of Note numbers, then mapping which input numbers produce which output numbers requires just a 12x12 table. Nothing needs to happen to the Octave numbers - they just pass through to the output. The output stage is shown as an addition with a '+' symbol, but actually there's two extra refinements in the code. First notice that the output of the map table has another modulo function, so if there is any unexpected value in the table, then the only Note numbers we can get out will be less than 12. Second, the Octave number is multiplied by 12, so that we undo all of the repeated subtractions. When we add together the mapped Note number and the multiplied Octave number, then we get the MIDI Note number for the mapped note on the scale - as defined in the map table.

So that's how Ableton's own example does it, and you might be forgiven for thinking that we are at the end. We have a working Scale device!


If you look at the standard 'Scale' device that is included with Live, then you can see the mapping table because Ableton made it part of the user interface (it is all those light grey, dark grey and orange squares!), and it is12x12 squares. So it seems likely that this is coded similarly to the PitchScaler MaxForLive example - and the 'Fold' function limits the output to just one octave, which is exactly what happens if the Octave number is not allowed to the output...

Unfortunately, this 'Split' approach is not perfect. As I have mentioned before, the behaviour of this type of scale mapping device breaks down if you want to invert MIDI notes, so that the high notes play low notes, and vice-versa. It is well worth going back and seeing how things can go very weird... But the main problem is those two 'modulo' functions that are cairned out on the MIDI Note numbers. You remember that these are just repeatedly subtracting 12 until they get a remainder of less than 12? Well, this requires a loop that repeatedly subtracts 12, and inside that loop is a check to see if the remainder is less than 12. For a typical MIDI Note number of say 60, then this is going to require quite a lot of operations to be carried out, and it turns out that whilst a '+' operation can be very quick, the 'modulo' function can be a lot slower. If we think what is happening here, then we have two slow operations being carried out on each and every MIDI Note message, and this is going to delay the start of the note being played by the instrument (synth, sampler...) in that channel inside the Live DAW. Unwanted delay is not good.

To remove the delay, then one method is to remove the modulo functions. This can be achieved by using a larger table - and to cover all of the MIDI Note range then we would need a table of 128x128.


Here's a conceptual diagram that shows the 12x12 tables from the Scale device, mosaic'ed together to produce a 128x128 table, so that we can map any incoming MIDI Note number to any outgoing MIDI Note number, and the only operation that is required is to look up the MIDI Note number and see what the output should be - easy to do, and fast!


Actually, most of the time, the inputs and outputs are going to be quite similar, and so if we look at a 'Chromatic' scale, where each input note maps to the same output note, then actually, most of those 'Scale' tables will not have any orange squares in them at all - the only orange squares are gong to be on the lower left to upper right diagonal. So the 'copy and paste'd Scale tables in the diagram are not a fair reflection of reality.


For an 'Inverse and Useful' mapping, then the diagonal just goes the other way. Unlike the 'Scale' device, this mapping works perfectly - it produces low MIDI note outputs for high MIDI input notes, and vice-verse, and with low delay time. In this screenshot the 'Scale' tables are not shown, and you can see that most of the table is empty. In this case, there will be just 128 orange squares along that diagonal: one for each input note (mapping it to the inverted output).

MIDINoteScalery

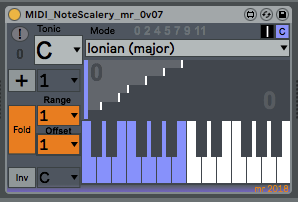
And that's what is inside my MIDINoteScalery device - a 128x128 table (mostly empty), plus a few utilities and an interesting way of visualising the scale and the way it maps the input notes to the output notes.


The 'zl lookup' object replaces the 'mapping' object in the previous example, and the inversion, transposing and folding are handled slightly differently, but the 128x128 table does all of the scale mapping with a single look-up operation - there are no modulo arithmetic or integer divisions required any longer... Well, as long as you don't use the 'Fold' feature, but I'm working on removing them from that as well - watch for a future release...)


Ableton's Scale device has the incoming MIDI notes going vertically, and the outputs horizontally. This isn't how MaxForLive normally shows keyboards, and so the table needs to be rotated along the diagonal - the input notes now match to the horizontal axis of the table. The orange squares have been replaced with a 'staircase' diagram that makes it easy to see if the interval between output notes is one semitone, two semitones, three, etc. For the 'C Major' scale shown here, the C# isn't present in the output, and so the interval between the C and the D is 2 semitones, so the 'tread' of the staircase is 2 semitones wide. The next interval is from D to E, which is 2 semitones again, and so the tread is 2 semitones wide. The next interval is from the E to the F, which is only 1 semitone, so the tread is only 1 semitone wide, and you can see this in the 'staircase' diagram.

So how do you make a mapping table? In this post I'm going to show you how to create the table, and all of the spreadsheets that I show will be available to download for free, so you can make your own custom tables, and your own scale/mode mapping devices if you want to.

Types of scale


There are lots of scales, and so I chose two sets: scales starting with capital letters are basic scales, whilst scales starting with lower case letters are more unusual. The scales are deliberately organised in this order, with 'invert' as the final scale.


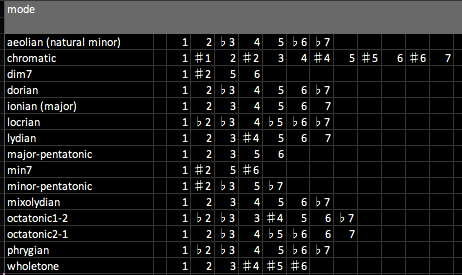
The basic scales (or more correctly, modes) are shown above with a base key (or Tonic) of C. The 'Chromatic' mode is a 1:1 mapping - the output is the same as the input! The Ionian mode shown here only outputs the white notes; C, D, E, F, G, A, and B.


To be able to create the mapping table, then the notes need to be in a form where MaxForLive can work with them.  Here is the same table, converted to numbers instead of note names. When I did the conversion, I didn't subtract 1 from the numbers, and so you need to do this to get them into the form that is used to represent the notes in the octave: so C is 0, C# is 1, D is 2, etc.


In this table, then the numbers from the previous table have been converted again - this time into a form where the output note number is shown, and so there are always 12 outputs for the 12 note inputs in an octave. So, reading across the 'Chromatic' mode, the outputs are '0 1 2 3 4 5 6 7 8 9 10 and 11'. Reading across the 'Ionian (C Major) mode, the outputs are '0 0 2 2 4 5 5 7 7 9 9 and 11' - which means that and C# inputs will only produce a C output (the '0'), D and D# will only produce a D output (the '2'), and so on. Note that some of the modes only have a small number of output notes - the minor 7th has only 0, 3, 7 and 10, for instance.

Now this table is almost useful! If you use the 'Ionian C Major' mode, then the numbers indicate what the output should be for each input. So the numbers are '0 0 2 2 4 5 5 7 7 9 9 and 11', and this means that if the input is a C or C# (note numbers 0 and 1), then the output will be 0 (C). For the next two note inputs, D and D# (2 and 3) then the output is 2 (D), and so on. These numbers are a simple lookup table where you move horizontally for the input note number, and the number in the mapping table is the output note number.


To read this type of table into a MaxForLive 'coll' object, so that the numbers can be fed into a mapping 'zl lookup' object, then additional formatting is required. This is just a case of concatenating columns in the spreadsheet, as shown above.

The tables so far have only shown a single octave. Using a spreadsheet, it is easy to extend the table to higher numbers - all the way to 128 for all of the possible MIDI Note numbers that can be input and output. All you do is add 12 to each of the values in the first octave to get the values for this second octaves, then ad 12 to those for the third octave, and so on. This gives rows with 128 values: one for each MIDI input note number, and each number in the mapping table is the MIDI note number that will be output:


This table has entries from outputs of 0-127 for each of the 128 MIDI Note input numbers. The full table is in the downloadable spreadsheet, and contains complete tables for all of the basic and unusual modes. Note that there isn't any magic or deep maths in the mapping table - it literally is just horizontal rows of numbers that specify what the output number is for a given input number.

Utilities

The default setting for the MIDI NoteScalery device is a straight-forward mapping of input notes to output notes. The output notes are shown as colour (blue or orange - selectable), and when an accidental (black) note is output then that is shown in colour.


The '+' button (blue) allows the output notes to be transposed. If the transposition goes outside of the MIDI note range then the notes will be folded back into range.


The 'Fold' button (orange) allows the output notes to be restricted to a range of 1, 2, 3... octaves, with an offset. So if you want the output notes to be only in the range of 1 octave, then set the range to 1 and the offset to 0. As I mentioned earlier, the 'Fold' function still uses the modulo function internally, but this should be removed in a future version...


The 'Inv' button (yellow) allows the keyboard to be inverted - perfectly. High input MIDI notes will produce low MIDI note outputs, and vice-versa. This can be done for any of the modes, and it is recommended that the 'Chromatic' mode is used initially. inversion can be set to happen around any note - in the examples shown, a C input will be output as an F.


Summary


MIDI NoteScalery is one of a family of utilities intended for exploring scales and modes. All of the devices will be available from MaxForLive.com for free (and in fact, some of them are already available!).


The two devices that are included by Ableton in Live are 'Scale' and 'PitchScaler'.

Getting MIDINoteScalery

You can download MIDNoteScalery for free from MaxForLive.com.

Here are the instructions for what to do with the .amxd file that you download from MaxforLive.com:

     https://synthesizerwriter.blogspot.co.uk/2017/12/where-do-i-put-downloaded-amxd.html

(In Live 10, you can also just double-click on the .amxd file, but this puts the device in the same folder as all of the factory devices...)

Getting the 'Scales and Modes' spreadsheet...

You can download the 'Scales and Modes' spreadsheet from here. It is stored in various formats to try and maximise availability. Whilst it starts out with just music theory turned into notes, the numbers rapidly become somewhat MAX-oriented, so this isn't a general-purpose 'scale development tool', although the mapping should be reasonably easy to apply to other environments. Note that there are three tabs - people often seem to overlook tabs on spreadsheets...

'Basic' - the first tab contains just the basic scales in a 'coll'-friendly format. Just a 'cover'-screen, really.

'One Octave' - the second tab has all of the data for a single octave for the basic and extended/extra scales, and contains just about all of the notes and numbers that should be useful for making your own scales and mapping tables. The data goes quite a long way across the the right... You can use this tab for developing and testing your own scales (and getting used to the 'CONCATENATE' function that is used all over this spreadsheet, and which is indispensable for assembling data into arcane formats...) and reformatting to suit your own development environment.

'Full Range' - the third tab is the 'One Octave' extended to cover all 128 MIDI Notes. This time the spreadsheet goes a very long way over to the right, and it then continues downwards. The final 'big table' actually starts at row 58, so don't miss it. This tab is where you will produce your final 'big table'...

If you are interested in how to use the Excel 'CONCATENATE' function, then you may find this spreadsheet useful - it is used everywhere to assemble numbers into the format that objects like 'coll' expect.

If/when I get around to recoding the 'fold' code so that it doesn't use the modulo function, then the table development spreadsheets will be made available for free as well.

Modular Equivalents

In terms of modular equivalents, then it depends if you count a 'Scale' module as a 'basic' module, and  once again you rapidly get to the point where you want to step outside of the 'basic modules only' rule and go into more specialist modules. I'm going to add a 'Scale' module to the 'basic' set, and so my estimate is that full functionality is going to require a scale module plus some additional CV processing (for invert and fold) and so this gives a grand total of 3 ME.