
For the whole month of August, I've been voted into the prestigious role of 'Samplist of the Month' for Pianobook.co.uk by the eponymous Discord community, and I wanted to mark it with something special...
So on the 1st of August, I published two new sample packs of virtual instruments on Pianobook.co.uk: 'Deimos Strings', and 'Fairy Piano Extras'. The following day I published a second experimental sampled choir virtual instrument called 'Dan Time 2', but that's another story entirely.
Deimos Strings
 |
| Not one of the moons of Mars... |
Deimos Strings is string pads produced digitally, but with a lot of the characteristics that people normally associate with analogue synthesis. At its heart are a dual filter and a quad chorus effect, and there's a bug in the filter control XML, but it sounds interesting, so I have left it in! The quad chorus also has a slight volume dip as you increase the modulation depth, but this is easily compensated for by using the Expression control. There are quite a few presets, and there's an amazing demo from Bemused on SoundCloud.
But the 'special' bit is the other release:
Fairy Piano Extras
I've been doing a lot of reviewing at the quieter end of the Pianobook.co.uk review queue - where the sample packs of virtual instrument with no or very few reviews live. I try to review any Decent Sampler submissions, and I have now done quite a few reviews!
One thing that I often do in my reviews is suggest little additions or modifications to the XML file that is the .dspreset file that defines a Decent Sampler preset. Often this is just turning on looping so that you get interesting syncopation during the release phase of the envelope, but sometimes I get inspired and do lots more modifications. And then I had an idea...
Why not make these 'Extra' presets available to everyone on Pianobook.co.uk?
Which is what 'Fairy Piano Extras' is - three additional presets for my pre-existing 'Fairy Piano' sample pack, but going slightly beyond just making a few changes to the values of the controls. In an 'Extra', anything is allowed, except changing the samples, and you need to get the permission and final approval of the original publisher of the sample pack, of which more in a moment... So you could do things like:
- Transpositions in round-robins for Victor Borge soundalikes, automatic inversions, and more,
- Micro-tuning in round-robins for subtle detunes or crazy 'honky-tonk' wobbles,
- Dynamic tweaks, inversions, layering and other sample playback modifications,
- New controls for new features! Want to add a High-Pass Filter? Easy! Want to be able to change the Reverb Room Size? Easy? Make a menu to turn looping on and off? Needs a bit of care, but do-able! In Fairy Piano Extras, the 'Drone' preset has new additional controls that weren't needed in the original Fairy Piano:
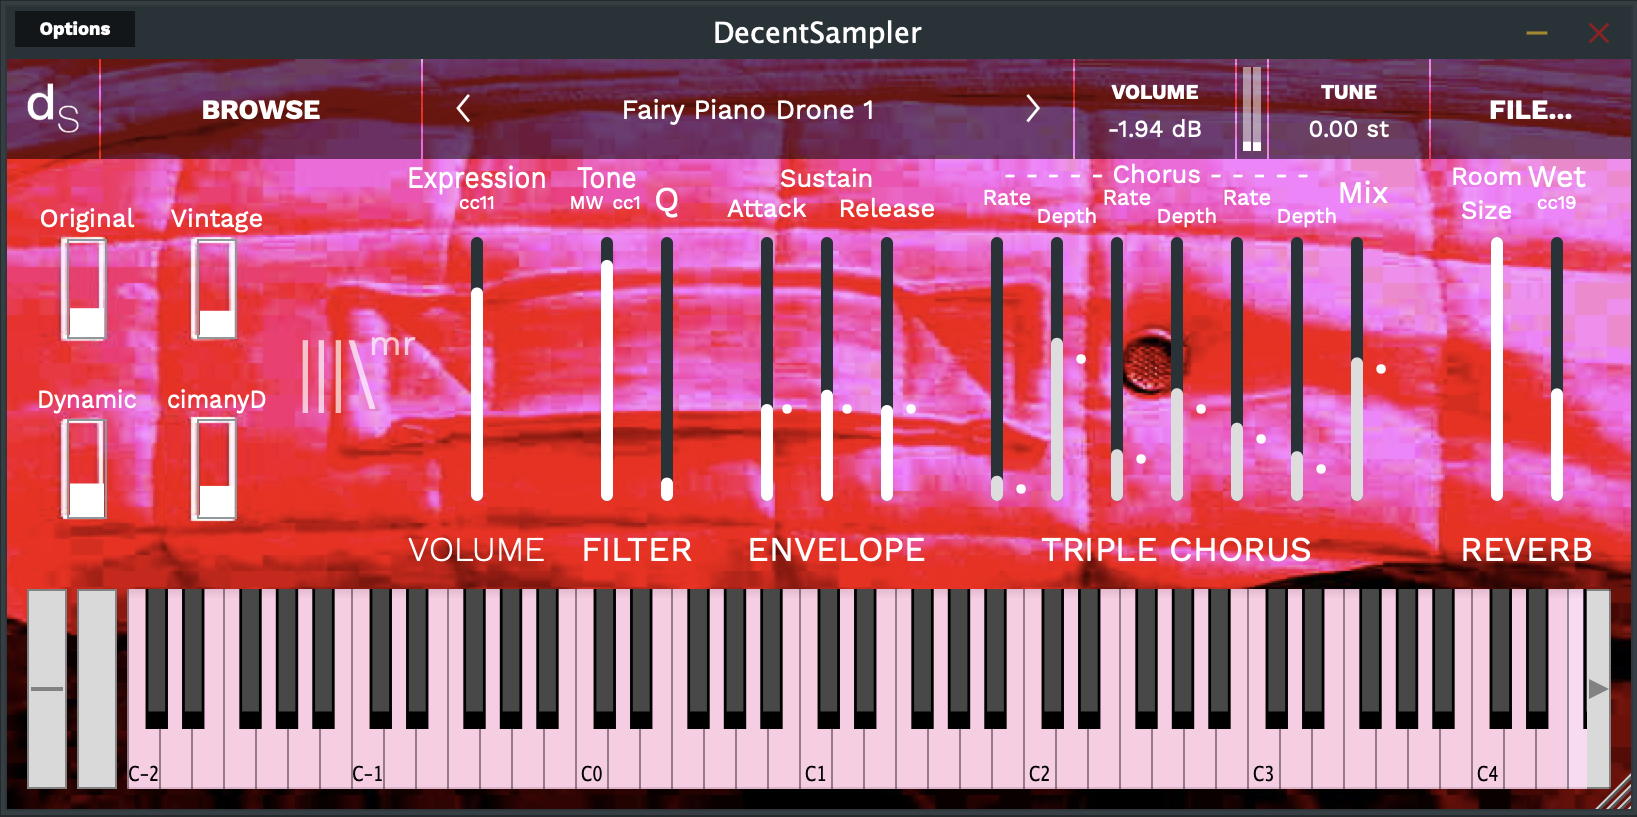
The Fairy Piano Drone User Interface - can you spot the design influence?
Because it makes drone sounds, the percussive, fast attack and slow decay envelope that works for piano, isn't really suitable, so I replaced it with and ASR (Attack-Sustain-Release) envelope, where the attack and decay are linked together. The triple chorus is a step towards the quad chorus used in Deimos Strings - remember that I do everything in little steps... Anyway, Fairy Piano Drone is a very different instrument to the basic Fairy Piano...
So that's what Extras are all about - remixing, customising, tweaking, and sometimes, completely reworking the user interface, functionality and sound of a sample pack or virtual instrument!
Now my Fairy Pianos Extras is unusual, because it is me 'remixing' my own sample pack, so it works slightly differently to the more usual case - where another person produces an Extras pack for a samplist's sample pack, so let's look at that scenario first...
How Do Extras Work?
Extras are just ordinary .dspreset files, but made by someone other than the original samplist. They are in an additional folder/directory inside the main sample pack. So for a Decent Sampler sample pack called 'Piano Buck', then the ordinary main folder/directory would look like this:
 |
| An ordinary Decent Sample folder/directory... |
 |
| A Decent Sampler folder/directory with Extras inside |
All of the extras are in the '<name> Extras' folder/directory - synthesizerwriter (of course!) in this case. If you get Extras from other people, then this keeps them nice and tidy. Note that the additional presets all end with initials ('sw' for synthesizerwriter in this case). Also notice the two JPEG files - these are the background graphics for Decent Sampler (probably saying something like: 'An Extra from synthesizerwriter'), and you will need to make sure that the 'bgImage=' path in the .dspreset points to that graphics file - it isn't in the resources folder/directory!
 |
| The background graphics are in the same folder as the .dspreset files... |
One more thing needs to be done during the development of the Extras presets. You need to add a modification to every path= element in your .dspreset files:
 |
| Add ../ to the start of the paths... |
Adding '../' to the start of every path (before the Samples/ bit), tells Decent Sampler where to find the samples! This is because the Extras presets are in a sub-folder/directory to the main one, and so the '../' goes up one level and then back into the Samples folder/directory. So an Extras pack contains just the .dspreset files and the background graphics. You can add a README.txt file if you want, although the best place for any information about the presets in the Extras pack is inside the main README.txt file, so all that the samplist needs to do is add the contents of your README.txt to their main README.txt file.
And that's it. You have made an Extras pack, and people who download it will now have access to all of the new 'Extra' presets!
Permission
The first thing that you need to do if you want to make an Extras pack is to contact the original samplist and ask for permission to use their samples to make a 'derived work'. Yep, that sounds like a legal phrase because it is - the original samplist of the samples owns the copyright on the audio content in those samples, and so it is only polite and proper to get their permission in order for you to use their material. And remember, the samplist needs to add your Extras folder to their download, so they are in control! If they don't like your Extras, then they don't get added to the download...
(For samplists, then they retain final control over what Extras are published, and when, and by whom. Plus, best of all, once a sample pack has been published, then you can upload a new zip file at any time, so the samplist decides when to do an update, when to add Extras, etc. Once the sample pack is published by Pianobook.co.uk, the samplist has control over what is in it.)
If you don't get permission, then don't even start to make an Extras pack - try another samplist!
Inside Fairy Piano Extras
As I said earlier, doing your own Extras is slightly different. It doesn't really make sense to have a separate folder - unless you have very different .dspresets. In the case of Fairy Piano Extras, then the Drone version, the reverse version and the inverse version are all very different, with major changes to the functionality. Luckily, the samples are tiny, and so they can be included, but if the samples were large then this would be a problem and the approach described above would be better.
Special!
So that's Extras. I think they are pretty special! I think they give Pianobook.co.uk new functionality that turns it into something even more interesting...
If you go to The Imperfect Drummer's Pianobook profile page, then you will find his excellent 'Mom's 1974 Baby Grand' sample packs, and if you download the Decent Sampler version, then you will find 12 additional .dspresets - Extras created by me! Enjoy!
 |
| One of the Extras for Mom's 1974 Baby Grand... |
---
If you find my writing helpful, informative or entertaining, then please consider visiting this link:
 Buy me a coffee (Encourage me to write more posts like this one!)... or...
 (Encourage me via a different route entirely...)




 Posts
Posts

