Monday, 28 February 2022

Preparing a Decent Sampler Instrument (or Sample Pack) for uploading to Pianobook.co.uk - Part 1

Ok, so ever since Pianobook.co.uk was launched on the 29th of March, 2018, you’ve spent ages sampling your piano, and then more time editing the samples, then taken a photograph that you are happy with, then decided on using Decent Sampler as your sample player, then edited your ‘MyDecentSampleStuff.dspreset’ file so that it works correctly (and you’ve struggled with the instructions, read Dave Hilowitz’s 'format documentation' numerous times and you still don’t quite understand all of it, and more…). But, finally, you think that you are finally ready to submit it to pianobook.co.uk!

Not quite.


There’s just one more hoop to jump through… Preparing your Decent Sampler Sample Pack for uploading to Pianobook.co.uk.


Actually, this bit is quite simple, with just a few easy steps…


I have done this quite a few times now, so this blog post contains a lot of tips on how to do it and get it right, and avoid problems.


( I’ve screen-shotted a Mac for this tutorial document, but the process should be very similar on Windows or Linux. I’ve tried to remember to say folder/directory each time I use the word… )


Preparation for submission:


0. Signing up with pianobook.co.uk

(In everything that follows, I am using the convention that your Instrument / Sample Pack is called: MyDecentSampleStuff, and that this will be abbreviated to MDSS. So for Decent Sampler development, all of the working files will be in a folder / directory called MyDecentSampleStuff. I will be highlighting important file-names in orange!


If you have not signed up with with the pianobook.co.uk web-site, then you will need a few other files and bits of information that will be used to personalise your experience, and to customise your profile on Pianobook.co.uk:

[ ] A banner photo or graphic of 2000 x 500 pixels, which can be in colour, and can be a .jpg or a .png. This will be faded to white by the web-site when you scroll down. I called this file: profile-banner-2000x500.jpg, which makes it easy to get the right size of photo or graphic, and easy to find when you upload it to the web-site and into the banner in your profile. There is a maximum size of 2 MBytes for this file, which is shown in the dialogue as 2mb (a typo), which is millibits, which equals 2/1000th of a bit. You can't fit very much graphical information in that amount of data...

Dave - the Neumann KU 100 binaural head microphone

[ ] A photo of you, or some graphics that you wish to be identified with. If you do not provide a photo, then pianobook.co.uk will use a default picture of Christian Henson’s Neumann KU 100 binaural head microphone (used for Head-Related Transfer Function recordings for binaural audio, ambisonics, 3D audio...), which he calls ‘Dave’, will be used instead, and you do not want that to happen, do you? This time, the picture has to be a .jpg, in colour, and should be at least 500 x 500 pixels in size. It seems that .png files are not accepted…so beware! The web-site will switch between the colour version and a derived black-and-white version of this photo (or graphics), so choose your colours wisely. (The ‘suspicion turned up to 11’ cyber security person in my head tells me that the reason for this being converted to monochrome by the pianobook.co.uk volunteers might be because it is possible to have hidden messages in colour photos that only appear when they are automatically converted to black-and-white (or monochrome)). I called this file: profile-photo-500x500.jpg, which makes it easy to get the right size of photo or graphic, and easy to find when you upload it to the web-site and into your profile.

[ ] Some text that you might need to think about beforehand. 

- Name
- Email address
- Username
- Display Name
- Password

Your Name and Email address should be easy. But you might want to consider your User Name (used for logging in, and any spaces will be removed...), and your Display Name (how you want to be known on the web-site) early rather than when you get to the dialogue box, and the pressure to be smart and subtle and cool starts to build…

Let's think about the Username first. The name itself is a clue - notice that there is no space between User and name. This name will be used to log in to Pianobook.co.uk, and so it can be anything you want because it will never be seen by anyone else. In fact, it is best to keep it private because it makes it more difficult for someone else to log in and pretend to be you. So in my case, I would avoid anything with 'synthesizer' or 'writer' in it, and I might go for something like 'gasresister' or 'toomanyfx'. Again, you should choose your own, and you can use CamelCase capitalisation to make it easier to see words: 'GasResister' or 'TooManyFX'. One thing to not do is to make it the same as your Display Name, because that is the first thing an attacker would use to try and break into your account. 

Since I have mentioned Display Name, then that is the next thing to think about. In this case, this is the way that you will be referred to inside Pianobook.co.uk - so I was completely obvious and chose 'synthesizerwriter'! But there's nothing to stop you using another name if you want - unless you have a standard online identity like I have. As I said in Part 1, you should think about what you want for your Display Name before you get to this dialogue box, because it is much easier to be creative when you don't have the pressure of filling in the field in the dialogue box. 

Finally you need to provide a password, twice. That cyber security guy in my head says that you should use a password manager (an app, not a web-based potential leak source) and use a ‘Sweetener plus words’ template. So the ‘Sweetener’ bit is something like ‘ABC123+++’ to provide capital letters, numbers and symbols, and I’m sure that you can come up with something better than my example! What follows the Sweetener are four or five words. Plain ordinary words are fine. So you could use ‘trainbananazippershake’, although again, you need to do the creativity bit here. 

So the resulting password (different for every app, remember, which is why you need that password manager) looks like this: ‘ABC123+++trainbananazippershake’, which is 31 characters long, is going to take a very very long time for bad people to crack, and is easy to type if you ever need to. If you always use a password manager, then you can have fun replacing the vowels in the word list and trying to avoid rude words, or maybe trying to get to rude words: ‘treanbinonezupporshike’ which sounds like an exotic bird of some sort. Oh, and for a while, you may find yourself giggling when you say ‘binone’ (pronounced maybe as something like: ‘bih noh nay’) instead of ‘banana’…  

Password managers come in two main flavours: on-line and off-line. I prefer to use an off-line one on my Apple devices (Strongbox), but that needs a bit more looking after, and so most people will use on-line ones that work in a browser. A Google search is going to throw up quite a few, but one of the long-established names is LastPass, while Keeper is another well rated one that is enterprise-oriented but also does 'personal' use... As always, when doing your comparisons, you will need to check that it supports your operating system - but there's an added complication with a password manager, because ideally, you want the same one to run on ALL of your devices that might require passwords to be managed, which could be a desktop, laptop, mobile phone, tablet... (Trust me, having different password managers for different devices is not a good idea!) Pricing-wise, you will have to make the usual agonising decision between free (with some compromises), and paid (which is probably going to be a monthly subscription these days, possibly with a discount for a whole year). My personal rule of thumb is that I never go for a subscription option where it says: 'For less than a cup of coffee!', but that's just me...

[ ] Additional information that will be used on your Profile web-page. You will probably need to look up some of these names and URLs:

- Your web-site URL (https://...)  
- Your Twitter name (@yourname)
- Your Instagram name (@yourname)
- Your YouTube Channel URL (https://...)
- Your SoundCloud URL (https://...)
- A highlights video from YouTube, or a highlights playlist from SoundCloud )https://...)

Note that you do not need to have any of these! It is okay to leave them blank. But if you do have any of these names or links, then people will be able to visit them from your Pianobook.co.uk Profile web-page...

As you can see, there is a lot of information on your Profile web-page. This is because it will become your catalogue - where you display all of your Instruments / Sample Packs, and where people will go to download them.

1. The starting point.


It might be a good idea to make a tick-list of all the files that you will need:


[ ] A plain text file, called README.txt, containing: 


 - The name of the Instrument / Sample Pack (avoid copyrighted and trademarked names, please) (40 characters max)


 - The ‘tag line’: about 10 words, approximately, that encapsulate why your Instrument / Sample Pack is special… (140 characters max) 


 - The ‘Story’: why you made the Instrument / Sample Pack, how you made it, how to use it, how the user interface works, what presets are included, how the MIDI CCs are mapped… This is a long piece of text, in many cases… It has to be at least 150 characters, but should ideally be considerably longer - there should be a lot to say about your instrument / Sample Pack! One useful tip is to put a version number at the end of the text, so that you know which version is currently on Pianobook.co.uk - I have a tracking spreadsheet that I use as well... Another tip is to write the 'Story' in a text editor or word processor, and then just copy and paste it into the text field in the dialogue... 


[ ] Samples recorded by you from your piano or kalimba or toothbrush… or other source, and then probably edited to clean them up, possibly processed, and named with an identifier, a note value (as per A#, not Ab) - all stored inside folder called 'Samples' (Or 'NR' if they are noise-reduced samples!). I also tend to add the number of samples in the sample (minus 1) to the filename, so that it is easy to set the ‘end=‘ parameter inside the Decent Sampler .dspreset XML file. This can make looping samples much easier to manage, so it is strongly recommended. So a typical sample file might be named: 'MDSS A0 10123.wav'.


[ ] A photo of your piano, kalimba, recorder, or other source (Some of mine are a bit abstract!). This should be at least 1000 x 500 pixels, (or it could be 1624 x 750 pixels, if it is a double size version of your Decent Sampler background picture), in monochrome (black and white), and be a .jpg (JPEG) or a .png (PNG) file. If you submit a colour picture, the the Pianobook people will turn it into black and white, but you will not have any control over how they do the conversion. So, remove the middle-person, and do the greyscale conversation yourself. I tend to call this by an abbreviation the name of the Instrument / Sample Pack, plus ‘-photo’, which isn’t original, but is easy to find when you are searching for it to add it to a dialogue box. So, for ‘MyDecentSampleStuff’ the file would be called ‘MDSS-photo.jpg’. 


[ ] A photo or graphic of 812 x 375 pixels, that will be used as the background by Decent Sampler. This can be a .jpg or a .png. A .png file is probably going to be larger than the equivalent .jpg in most cases. I tend to name this file starting with the Instrument / Sample Pack name abbreviation, followed by ‘-background’, so ‘MDSS-background.jpg’ etc.


[ ] A picture of the user interface of your Instrument / Sample Pack. The easiest way to do this is to capture a screenshot of Decent Sampler with your .dpreset file loaded into it, and then to crop it down to the edges of the Decent Sampler application/plug-in. Again, I tend to call this file with the Instrument / Sample Pack name abbreviation, followed by ‘-UI-user-interface’, so ‘MDSS-UI-user-interface.jpg etc. This can be a .jpg or a .png.


I can’t stress how much easier it is to find files when they are named consistently with names that still make sense several days, weeks or months later. Alternatively, if you are happy with trying to remember if it was ‘ZpOld34x.jpg’ or ‘ZdOlp43c.jpg’ that was the edited version of your background, then that’s fine by me.


2. In more detail…


Thinking about that main photo, the ‘MDSS-photo.jpg’ that will be the main way that people visualise your Instrument / Sample pack, then you might need to think about the composition a little bit: 

Before the October 2021 update of the pianobook.co.uk web-site, one thing to be very aware of was that the photo would have the name of your Instrument/Sample Pack inbound white text in the centre of the photo on the wen-site, and in the ‘PianoDrop’ videos where 5 submissions from the previous month were showcased. 


So any white parts of the photo would reduce the readability. In fact, this meant that the photos used tended to be quite dark. One way of looking at this is to use the ‘Levels’ graphs available in many graphics editing applications.


In the screenshot above, the levels graph has no white pixels, which is why the red ellipse is empty.


In contrast, in the screenshot above, the levels graph has white pixels from the 'NAME' text, and these are shown as the thin black line in the red ellipse - they are VERY white pixels! (Any less-than-very-white pixels would be shown as black across the the left of the thin black line.) You can clearly see on a 'levels' graph like this, that the the background is all greys and blacks, whilst the text is all very bright white.


However, after the October 2021 update of the pianobook.co.uk web-site, the name of the Instrument/Sample Pack has moved to a dark 'racing green' bar underneath the photo (which is now a 2:1 aspect ratio), and the frequency of PianoDrop videos has dropped from monthly to irregularly. As you can see above, the new approach to displaying the name presumably reduces the need for photo editing, and so reduces the workload - which must be significant given the number of submissions that are being processed and the number of checks that are made on the submissions. 

In fact, it seems that the pianobook.co.uk web-site has been a victim of its own success, because in a few months, the number of instruments has more than doubled (828 Sample Packs on the 1st of March 2022), And, over time,  there have been various rumours of long waits for submissions to be published. My own experience has been variable. Some Instruments/Sample Packs have been submitted and published in a few hours, whilst other have taken a few days, weeks, and in a couple of cases, months. This suggests that the workload is considerable. 

The checking is very impressive and very detailed - I have had several Instruments / Sample Packs rejected by pianobook.co.uk because of issues like clicks, UI inconsistencies and (the most embarrassing) incorrect pitching of samples (Where playing a ‘C’ on the keyboard produced an ‘A’ pitched note, for example). Actually, 'rejected' is the wrong word, because the email tells you the issue, and suggests how it can be fixed, so all you need to do is correct the problem, and re-submit. 

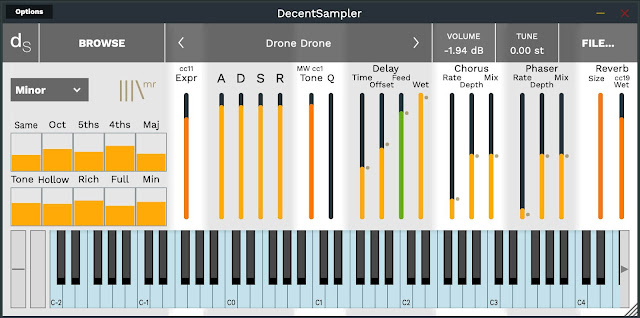
Anyway, the requirement for dark photos seems to have gone, although if you use the same photo as the background for Decent Sampler, then using levels to make sure that the UI text will be readable, is still a good idea. And on this topic of readability, here are two of my Instruments/Sample Pack UI screenshots from  pianobook.co.uk , one with black text on a light background, 


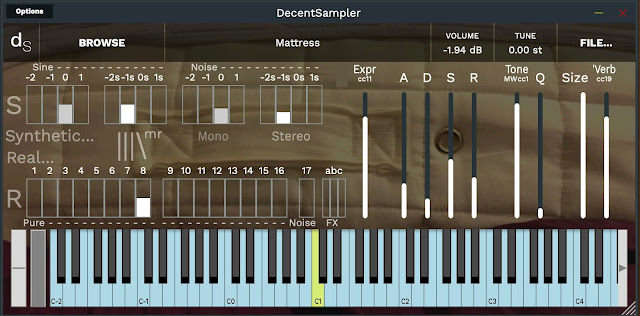
and one with white text on a dark-ish background: 


Remember that my UIs (User Interfaces) are notoriously busy - which means that your don't want a 'busy' background as well. So if you have a lot of controls, then you should reduce the contrast of your photo to avoid too much distracting detail from showing.

It probably isn't a great leap of the imagination to see that you should prepare two template .dspreset XL files: one with the text set to opaque white (#FFFFFFFF), and one with the text set to opaque black (#00000000), so that you can produce Instruments / Sample Packs with dark or light backgrounds and not have to swap colours in your XML.

Maybe I should do a blog post on programming for Decent Sampler?


3. Filling the folder…


Let’s look at the folder/directory named whatever your equivalent of ‘MyDecentSampleStuff’ is first - this is where you should have been storing the working files whilst you have been developing your Sample Pack (or Instrument). It really isn’t a good idea to have all the file spread across lots of different folders/directories or drives! But now is a very good time to consolidate all of these files into one place!

Now if you are like Christian Henson, you have probably used click-bait naming conventions, and so it might well be called: ‘BestPianoEver’, but in this tutorial, I’m going to use ‘MyDecentSampleStuff’. In all of the screenshots that follow, you will need to figure out what your names are for all the files, because there’s no way that I can know what they are… So, as always, these are suggestions for you to use or improve upon!

Inside the folder/directory you should have the MyDecentSampleStuff.dspreset file that you have been working on (and there is a backup on a separate drive or in the Cloud, isn’t there?), plus a ‘Samples’ folder/directory that contains all of the samples (CH has a specific way of naming samples that you can use, and details are given here: https://www.pianobook.co.uk/resources/how-to-sample/recording-your-piano/ ) that are used by MyDecentSampleStuff.dspreset. As I noted earlier, I also add the length of each wav file in samples (minus 1) so that setting the loop length is easier (and harder to get wrong!) when editing the XML .dspreset file). 

For historical reasons (= maybe we did it wrong from the start) the 812 x 375 pixel .png background photo or graphics (called ‘MDSS-background.jpg here), is often found in the Samples folder/directory.
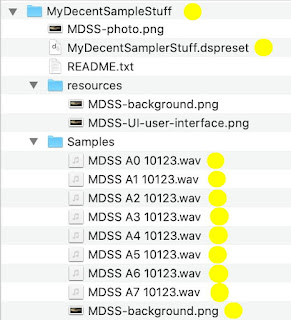


(Yes, there's a typo in the screen shots! The .dspreset file is called: 'MyDecentSamplerStuff'. Score one point and move on.)

The files that you will normally have in your ‘MyDecentSampleStuff' folder/directory during development of a sample set and a Decent Sample .dspreset XML file are shown with yellow dots to the right. Now you need to add a few extra files, and duplicate one file.

From the top downwards, the first file you need to add to the folder/directory is the ‘MDSS-photo’ which can be a .jpg or a .png. The second file to add is the README.txt file, which is the plain text (.txt) file that contains the majority of the text that you will enter into the first submission dialogue box.
The next thing to do is to create a ‘resources’ folder/directory. This will be used to hold a backup of the background graphics used by Decent Sampler, plus the screenshot of the user interface of your Instrument / Sample Pack. You could also put a safety copy of the MDSS-photo file and the README.txt file in this folder/directory. (Many operating systems have a keyboard combination that will turn a mouse drag into a copy, which can speed up all sorts of file management tasks, and is well worth finding and learning...)

(Alternatively, and probably better practice, you could use the background in the 'resources' folder/directory as the master, and the one in the 'Samples' folder/directory as the safety copy. This way the code will always use the 'Samples' folder/directory for samples, and the 'resources' folder/directory for any other... resources.)

You can use the next picture as a tick list for filling the folder/directory:


(A quick aside here. This is the MINIMUM set of files that you should put into a Decent Sampler folder. One additional 'goodie' that you can add is a few extra 'Presets'. These are .dspreset files that you save by using Decent Sampler's 'File>Developer Tools>Save Preset...' menu option. Take the time to name and number these, so that users will know what they are, and also to make them easy to spot against the MyDecentSampleStuff.dspreset file, which is the default 'preset' file. One approach might be to use a  naming template something like 'MDSS-Preset01-Best-Piano-Ever'... Note that the XML is formatted slightly when it is saved, so comments are removed, and the text is wrapped, so the process of saving presets should be a one-way process - this way you don't lose your beautifully commented, un-wrapped master .dspreset file that you have spent hours editing.)

Once the folder contains all the files you want to include, then select the top level folder/directory: MyDecentSampleStuff, and compress it using ZIP compression. There are a number of utilities that can do this. On a Mac, this is the native compression algorithm, so just select the folder and select ‘Compress…’ (Red box = Compress this folder!)


Unsurprisingly,  the larger your MyDecentSampleStuff folder/directory is, the longer the compression will take to complete... When it is finished, you should have a .zip file called ‘MyDecentSampleStuff.zip'. 

You will need to change the suffix from a .zip to a .dslibrary. 

This doesn't change the file, it just changes the way that the Operating System thinks about the file. It can be used to automatically open Decent Sampler when you double click on a file, for example - and you wouldn't want it to open your UnZip utility. (Some Operating Systems will complain about this change of suffix, but just OK the change, and remind yourself that the Operating System is trying to protect you from problems.) 

In summary: 1st Compression: Change the suffix from .zip to .dslibrary. Leave the filename alone.


This file should then be put inside the ‘MyDecentSampleStuff’ folder/directory…


Remember that the .dspreset file is just an XML (text) file containing only the instructions for playing the samples, and so is usually quite a small size file. In complete contrast, the .dslibrary file contains all of the files for the user interface and the samples themselves, and so will be much larger in size. Take care not to mix these two files up - they are very different!

(Yes, there's still a typo in the screen shots! The .dspreset file is called: 'MyDecentSamplerStuff'. Score one bonus point and move on.)

The next thing to do is to select the ‘MyDecentSampleStuff’ folder/directory again, and compress it into a .zip file. (Red box = Compress this folder!)


When the compression has finished, the result will be a ‘MyDecentSampleStuff.zip’ file. This time, you DO rename this file but you leave the suffix alone - this is the .zip file that you will upload at the end of the submission process, and so it needs extra information to help yourself and the people at Pianobook.co.uk. My suggestion is to use 'ReverseDate-InstrumentName-YourName-Vnumber.zip' using 'camel-case' for the names. The reverse date format (YYYYMMDD) means that your .zip files will sort in date order when you look at them in a computer.  So the final .zip file name might look like: '20220226-MyDecentSampleStuff-YourName-V1.zip' for something uploaded by YourName on the 26th of February 2022.

In summary: 2nd Compression: Change the file name as per the template. Leave the suffix (.zip) alone.


4. Completed!


That’s it! All done! You can now fill in the series of dialogues in the 'Submit' tab on pianobook.co.uk, and when it asks you to upload/submit your ‘Zip file’, you just find the ‘20220226-MyDecentSampleStuff-YourName-V1.zip’ file and upload/submit that file. 

And don't forget to change 'MyDecentSampleStuff' to the name of your project, and use your own name instead of YourName!

(More on the submission process itself will be in Part 2...)

Note. It may seem strange to zip things twice, but this is so that you have a single file that can be uploaded, and so that you have a stand-alone .dslibrary file which contains everything required by Decent Sample for ‘MyDecentSampleStuff’. (You can just drop it on Decent Sampler and you will get everything!) If you drop a .dspreset folder onto Decent Sampler, then it has to be from inside a folder/directory called ‘MyDecentSampleStuff’, from where Decent Sampler will look for various files in a folder/directory called ‘Samples’ and will need to load them in order to work.. 

DO NOT stop after the first compress and think you have finished! Yes, I know it (temporarily) produces a .zip file, but you are going to immediately change the suffix so that you have a .dslibrary file that contains a complete set of instructions, graphics and samples for Decent Sampler. You need to have a .dspreset file, a .dslibrary file, and everything else in the final .zip file. You can use the following screenshot as a check-list and reminder:
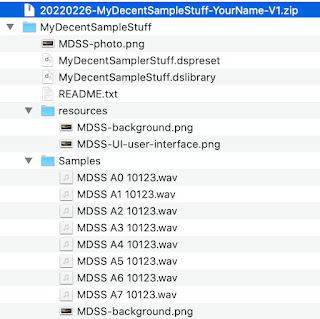

The ‘20220226-MyDecentSampleStuff-YourName-V1.zip' file highlighted in blue on the top line contains everything in the 'MyDecentSampleStuff' folder underneath it.

In the next part I will go through the ‘Submission’ dialogues in the same level of detail.

 ---

If you find my writing helpful, informative or entertaining, then please consider visiting this link:


Synthesizerwriter's Store (New 'Modular thinking' designs now available!)

Buy me a coffeeBuy me a coffee (Encourage me to write more posts like this one!)


Sunday, 9 January 2022

What Would The DX200 Front Panel Look Like If It Was Designed Now?

Modding, modfiying or customising musical equipment is almost as addictive as GAS, the Gear Acquisition Syndrome that many synthesizer 'collectors' suffer from. But in my mind, there are two very different reasons for modifying a piece of music gear: 

Changing (usually enhancing, but not always) what it does or how it does it; 

or 

Making it look different (better, but not always...)

I usually tend to go down the 'Enhancing Functionality' route, and so previous blog posts have covered a variety of mods:

- Roland TR-505

- Yamaha RM1x

- Rebel Technology OWL Pedal

But sometimes, I get a different itch. In this case, it was triggered by two otherwise apparently unconnected things. (Isn't that always the way!)

Thing 1

DJ Tech Tools are a small, DJ-owned DJ-equipment online store (physically located on the West Coast of the US) that also do some things which are much more oriented towards MIDI musicians. The MIDI Fighter 3D and the MIDI Fighter Twister are two MIDI Controllers (one for button mashing (finger drumming), and one for controlling lots of MIDI CCs) that are uncompromisingly professional, are built to withstand serious abuse, and I have both of them! (And I love them and use them all the time!)  They also do very nicely spec'ed audio and USB cables in a variety of bold colours. 

But their creative use of colour goes further than that - they also do Chroma Caps (replacement control knobs in bright colours) and Luma Caps (knobs which glow really nicely!). These are designed for use on stage in poor lighting, where you need to be able to find a specific control knob reliably and quickly. Gear manufacturers love black knobs, and the modern trend for soft rubbery knobs means that I have some examples where the knobs totally vanish in low light! 

One thing that bears repeating about Chroma Caps: Read the 'Technical Details' documentation carefully before ordering! The main diagrams show the view from BELOW the knob, not ABOVE! The first time I ordered I got it wrong, and my knobs were all 180 degrees off...

Anyway, I originally bought some Chroma Caps to replace a knob that had got damaged on a very old piece of Novation gear (I was using it, Officer!), and I really liked them. And late in 2021 I bought some to jazz/pimp up (you can use whatever era's slang you prefer) some of my vintage gear that tends to get used live, and when they asked me for a review, then this got me thinking...

Thing 2

Amplitube are known for their VST audio processing plug-ins (Parent company IK Multimedia does lots of other music stuff as well!). But recently, they have branched out into doing real physical 'boutique' guitar pedals that take the VSTs and make them available to a different audience: guitarists, but also the apparently growing number of synth/modular people who put audio through pedals (I can't help but point the finger at Christian Henson of Spitfire Audio for being a major populariser of this practice, and many other things!) 

The interesting aspect in terms of user interface is that each of the four pedals is colour coded and co-ordinated - but not perfectly. So the X-Space pedal is for reverb, and is blue - except for the display, which is green. The X-Time pedal is for delay, and is green, except for the display, which is orange. The X-Vibe modulation effects pedal is orange, and the display is orange, and the X-Drive distortion/overdrive pedal is red, with a red display. Notice how the X-Gear pedals are almost colour co-ordinated, but not quite...

(You may have also noticed that the photo above is strange... This is because I rotated an image taken at an angle showing the pedals in perspective, and so the viewing position isn't quite where you expect it to be, and so it looks peculiar. If you tilt your head to the left by about 30 degrees, then it should look fine!)

The Mod Proposal

The Yamaha Loop Factory 'desktop' series (the AN200, DX200 and the SU200) are arguably one of the quieter backwaters of Yamaha history. They are the sort of bits of gear which combine some very good features with some unfortunate omissions - and yes, I know that this is just the innate nature of musical gear (in fact, any gear!), particularly at the lower end of the range. But the limited front panel editing, and the complexities of trying to run late 1990s software on modern computers (How about a WebMIDI version, Yamaha, please?), probably put them in the 4 or 5 out of 10 category - although the prices on eBay or Reverb don't seem to reflect this... But I still love them and use them!

Warts and all, the AN200's early Virtual Analogue (VA) synthesis and the DX200's FM synthesis (with a VA Filter!) sound pretty good, even 25 years on, and I figured that live use would be much easier with some Chroma Caps. So here's the AN200 post-capping:

What is really interesting is that the AN200's orange colour-scheme works really well with the large chunky red 7-segment LED display and the little red LEDs, and the orange illuminated buttons.

And then to the DX200:

Oh dear! It seems that for the DX200, the green theme doesn't work at all with the red and orange LEDs. If anything, the green Chroma Caps actually make the orange feel even more wrong! It might have worked in the late 90s, but my modern-influenced eyes looking at the green (especially the rather primary green Chroma Caps - unfortunately DJTT don't do a cyan colour choice!) look at it and find it rather unsettling. 

In fact, it cries out for an aesthetic rework: change the 7-segment displays to green, and change the red and orange LEDs to green (or even an RGB LED with the green and blue LEDs lit!). But that's a huge amount of work! (Ok, so although the main PCB is surface mount, the boards with the LEDs are all thru-hole, but it is still a lot of desoldering on old lead-based solder! And I don't like the look of those soft, probably membrane switches at the bottom...) Assuming that all went well (ho ho), here's what it might look like after a lot of time and effort:


 Which, poor photoshopping apart, makes a huge difference. It now looks 'right'! So in my humble opinion, if Yamaha were designing the DX200 now, they would definitely use green LEDs. 

So, I now face a dilemma. Do I leave it alone, or do I replace the LEDs? (Or do I simply remove the Chroma Caps!) If you thought GAS was bad, then getting colours right when customising vintage gear might be worse!

 ---

If you find my writing helpful, informative or entertaining, then please consider visiting this link:


Synthesizerwriter's Store (New 'Modular thinking' designs now available!)

Buy me a coffeeBuy me a coffee (Encourage me to write more posts like this one!)

Saturday, 18 December 2021

Synthesizerwriter audio

Publicly, as far as audio is concerned, I'm not very visible. Here are some places where you can find bits of audio that I have created:

Synthesizerwriter

Two singles have been uploaded via DistroKid so far (one of them very recently, so it may take a while for it to ripple through the system...) and so should be available on most popular steaming services. Searching for the name 'Synthesizerwriter' should be all that you need to do...

Stry


An experiment in not following the rules, which describes me quite well in some circumstances and contexts. The timing, phrasing and structure are deliberately not the usual multiples of four.

Turc


What might a 17th Century composer have done with electronic music? Would they have avoided adding  Tubular Bells to create a seasonal (December) piece of music? Why have I always been hooked on old music? There may be some answers here...  

SoundCloud


This is not going to be very useful in a lot of cases. Just about everything that I have uploaded to SoundCloud is an audio demonstration to illustrate something I have been working on - often MaxForLive devices. A few of these are arguably 'pieces of music', but many are not. Probably for completists only, or people who have downloaded the M4L devices!

Scoring


This is an example of using modular synthesis plus orchestral sample-based instrumentation for a 'music for pictures' project. I was deliberately avoiding the 'Marvel'-sound that has become very popular in scoring in recent years.

Derived Works

You can hear demos produced by other people, but which use the sample packs and virtual instruments that I have produced for Christian Henson's amazing Pianobook.co.uk project here:

Synthesizerwriter - Demos. (Go to any of the sample packs and look for the demos on the right hand side...)

I have the greatest admiration of the astonishing compositional skills of the people who produce demos on Pianobook.co.uk! 

---

If you find my writing helpful, informative or entertaining, then please consider visiting this link:


Synthesizerwriter's Store (New 'Modular thinking' designs now available!)

Buy me a coffeeBuy me a coffee (Encourage me to write more posts like this one!)


Wednesday, 15 December 2021

Increment and Decrement Buttons...

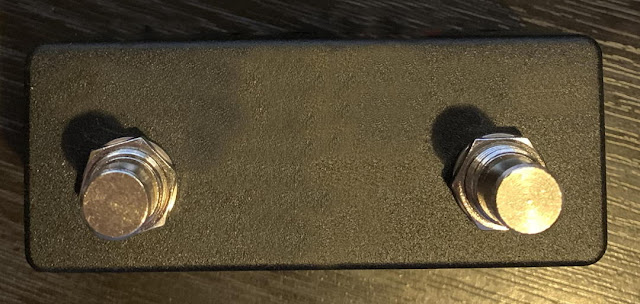
 Sometimes, things jump out at you unexpectedly, and by their very nature, they catch you by surprise. For me, ideas can appear from the most mundane triggers. Here's a recent example, where the inspiration came from a simple two footswitch box:

A simple two footswitch box...

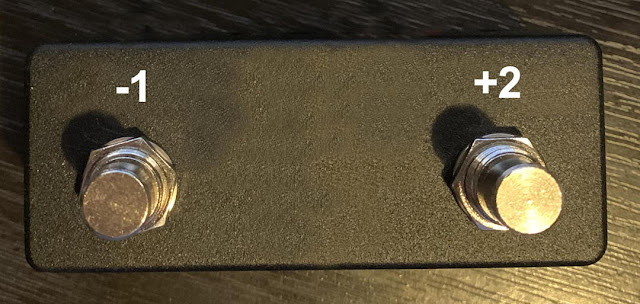
Yep, I've removed the logo from the box... One of the common uses for a two footswitch box like this is to increment and decrement values - so they are used for moving up or down through scenes or cues or programs. depending on the application. Simple and completely straight-forward, and with no room whatsoever for a different way of looking at how they work - or so you might think. 

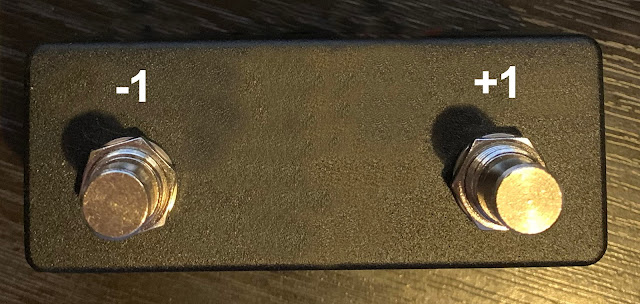
Increment (+1) and Decrement (-1) switches...

Adding labels to the switches makes the intended purpose much more obvious, which is where my brain kicks in and starts analysing...

First thought: Should the +1 be on the left or the right? (and vice-versa for the -1...) Is there a convention for this? (Yes - and I got it correct without thinking when I added the labels and then looked for references as to which way it should be...) The placement is interesting - is the +1 (increment) on the right because the majority of people are right-handed? Curiously, if you rotate the two buttons through 90 degrees then there is no question about the placement - the increment button is in the upper position, and the decrement button is in the lower position. This up/down increment/decrement implication is so entrenched in my mind that I have never questioned it...

Up / Down and Increment / Decrement

Now the difference between up/down and left/right is related to the way that human eyes work, and is connected to that old question about why mirrors invert images horizontally, but not vertically. Having two eyes separated horizontally is related to widescreen TV and movies, and to why magicians often hide their manipulations above or below a person's eyeline. People rarely look up!

So if up and down, and the implied increment/decrement meaning, are so ingrained, why are left and right not similarly connected? (I do now wonder what would happen if the Up and Down buttons on Lifts/Elevators were reversed? Would people adapt, or just get very confused?) I suspect that there may be some readers who do not agree with my positioning of the increment (+1) button on the right, because they always think it should be on the left. 

Sometimes...


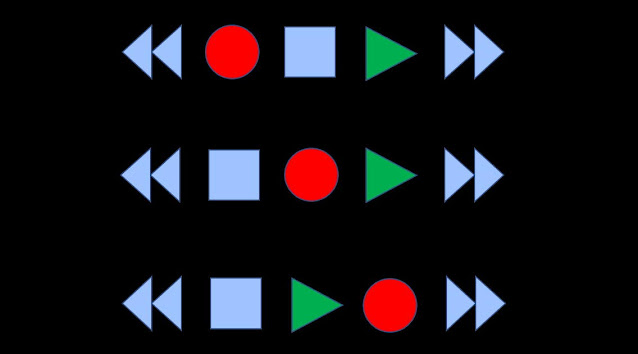
As a historical aside, I can remember always being intrigued by the placement of the 'transport' controls in cassette players in the 20th Century (and it also applies to the transport controls in DAWs, of course). Obviously, fast forward is on the right, fast reverse/backwards is on the left, and Stop should be in the middle, with Play next to it, on the right. But where does the Record button go? On the left, or on the right? 


Looking around my studio, I can see examples of each layout! And when you add in a Pause button, then things get really complicated!

But back to increment and decrement. What really caught my imagination was the limits of buttons like these. Adding or subtracting one is fine for small integers, but what happens when you have more values. Imagine a live gig where you need to select between 10 sounds on a synth or 10 effect settings on an effects pedal. So from number 1, then you can increment all the way up to 10, and decrement back to 1. So from number 1, it will take 9 increments to get to 10, and from 10, it will take 9 decrements to get to 1.

But, if you are on number 1, is there a more efficient way to press buttons or switches to get to number 10? (Or from 10 to 1?)

The answer is probably completely obvious, and you are giggling at me for not mentioning it. When you are at 1, then decrementing takes you to 10, and when you are on 10, then incrementing takes you to 1. Again, the usual expectation seems to be that if you have a range of 10 numbers, then when you increment past the highest value, it 'jumps' down to the lowest value. Conversely, when you decrement 'below' the lowest value (1), then the number jumps to the highest value, 10. So the numbers are arranged like this:

Decrement ...1 2 3 4 5 6 7 8 9 10 1 2 3 4 5 6 7 8 9 10... Increment

This means that the quickest way to get from number 1 to number 10 is to push the decrement footswitch or button. So should the -1 button or switch be re-labelled as +9 when the current number is 1? Or should the +1 button be labelled as -9 when the current number is 10? Of course not, you are thinking. It is obvious! (Please keep your reaction here carefully stored away for future consideration.)

When people say that something is obvious, they often mean that the convention is so ingrained, so much part of common experience, that no explanation is required - it is just 'how things work'. I imagine that companies who make equipment with increment/decrement switches or buttons get very few user complaints about the behaviour of those switches at the highest and lowest values of looping ranges of numbers. 

Unfortunately, my mind doesn't work like this. When I started thinking about the most efficient way of moving between numbers, and thought about having to relabel at the highest and lowest numbers, then a light came on, and an idea popped into my brain...

The Pre-amble


To understand the idea, and to put it in context, let's look at 'efficient selection'. If we want to control the selection of a number between 1 and 10, and we have two buttons, switches, or foot-switches to do this task, then what is the best measure of efficiency? Is it the minimum number of button/switch presses that we need to make? Or the maximum? If the current number is 1, then incrementing takes us to 2, and decrementing takes us to 10. So the minimum number or presses is 1 to get from 1 to a 'target' of 2 or 10. But for a target of 6, then we would need to press the increment 5 times, or the decrement 5 times, to get from 1 to 6. So the maximum number of presses required is 5. 

(I'm not going to talk here about Fitt's Law, which is one of the fundamentals of User Interface or Interaction design, or various other 'Laws'... But suffice it to say that there are all sorts of analogies and correlations that can be drawn with various formal ways of approaching and characterising this sort of problem...)

In terms of 'annoyance', then I reckon the maximum number is the one that matters. Having to press a button (or switch) once to go from 1 to 2 is fine. Pressing it twice to go from 1 to 3 is also okay. But 5 presses to go from 1 to 6 is beginning to be 'too many' presses. There's a set of sloppy descriptors that you could use for the number of button presses required:

One, two, too many!

5 is probably solidly in the 'Too many' category. And that's probably where most people would leave it, because for 10 possible numbers, then obviously it will take between 1 and 5 presses to get to any of them.

Except it doesn't, as it turns out...

My brain looked at those two re-labelled buttons, for -9 and +9, and, as I said, a light came on in my head. It suddenly struck me that there was a better way to control the selection of a looped set of numbers, and it requires just a minor change to one of the two buttons...

All you need to do is change one of the two increment or decrement buttons/switches/footswitches to be double the amount. So a +1 would become a +2, or a -1 would become a -2. Whichever you change, you leave the other button alone. So, assuming that we double the increment, you would have two buttons: -1 and +2.


Suppose we start at 6 as the current selected number. We can decrement to 5, decrement again to 4, decrement again to 3, and decrement again to 2, and finally, decrement again to get to 1. That's five (5) presses of the button/switch/footswitch. But suppose we use the double increment button? 6+2 takes us to 8, and another 2 takes us to 10, and another 2 takes us to 2. If we then decrement we get to 1. That's four presses. 

So the maximum number of presses required to move from any number in a looped list of 10 numbers using two buttons is not 5 - it is 4 (four)! To me, four is less solidly in the 'too many' set, and it is definitely less than 5! 

Exploring more formally how this works, here's a table that shows different looped lists of numbers, plus the maximum number of presses required to move from one number in the list to another...

Maximum number of presses with the +1,-1 scheme...


So the simplest case is on the left hand side - in the second column (with a zero at the top): a looped list consisting of 1 number requires zero presses to get to the same number. The next column across, with the 1 at the top, is for a looped list of 2 numbers, where it takes a maximum of 1 presses to get to the other number. This continues across to the right, until we get to the right-most column, where it takes a maximum of 6 presses to get from a looped list of 13 numbers to any other number in the list. This table considers only the 'usual' increment and decrement values or +1 and -1, which, for want of a better word, I call a 'scheme'... I went all the way up to a list of 13 numbers to check that the case of 10 numbers is not a special 'edge' example. Note that the maximum number of presses (increments or decrements) is the integer value of half of the numbers in the looped list. So for 13 numbers, half is 6.5, and the integer value is 6. 

For other schemes, then the table has more columns:

Maximum number of presses with other schemes...

What is interesting now is that for a looped list of 9 numbers, then the +2,-1 scheme makes no difference - the maximum is still 4 presses. The first looped list of numbers where the +2,-1 scheme has an effect is fo a list of 10 numbers. For lists of more than 10 numbers, then a pattern starts to emerge, where the +2,-1 scheme reduces the maximum number of presses by one, but schemes like +4,-1 do not give an overall advantage. The +2,-1 scheme thus seems to be the optimum scheme, at least with these small numbers. I haven't done any deeper analysis...

Summary

The maximum number of presses required to move from any number in a looped list of 10 numbers using two buttons is four (4), not five (5) as you might expect. I wasn't able to find a scheme that gave any better results than four, but my searches were not exhaustive. I have not been able to find any information on this topic on the InterWeb, but trying to express this sort of study in words is not easy, and searching for this type of thing is not very reliable. I hope that by posting on this blog, someone who knows more about this topic might find it, and if so, I would be very interested in learning about any published research that is available.

Regardless of the 'state-of-the-art' in UI or Interaction Design , I now have an interesting alternative to the usual +1/-1 increment/decrement buttons/switches, and I'm going to continue investigating it. Also, anyone who reads this blog now knows how to do it as well, and it will be interesting to see what happens over the next few months...If you do use this idea, then an acknowledgement of the source would be good. Thanks.

---

If you find my writing helpful, informative or entertaining, then please consider visiting this link:


Synthesizerwriter's Store (New 'Modular thinking' designs now available!)

Buy me a coffeeBuy me a coffee (Encourage me to write more posts like this one!)


Tuesday, 30 November 2021

How To Make a 'Perfect' Guitar Pedal - For Synthesizers!

I have always liked pedals. I could try to clarify but then if I was to say 'guitar pedals' then that excludes 'expression pedals' and 'wah pedals' (the first treddled foot pedal I ever bought was a Colorsound Wah Pedal), but these days many synthesists also use 'guitar pedals' (and expression pedals), but rarely wah pedals, and so just saying 'pedals' could be very confusing. Er, and then there's the word 'effects' as well to contend with... Audio effects? Guitar effects? 

So, here we go again. I like effects pedals that are made for use by guitarists but can also be used for processing the sounds of synthesizers (and drum machines). I also like expression pedals that have foot-operated 'treadles' - the bit that moves and you put your foot on. Over time, one or two pedals have found their way into my studio 'gear', and or or two have been modded and sold on - which was a different world and not something I do now, although it is quite a fascinating topic... Of these pedals, very few are perfect. In fact, 'perfect' gear is very rare. 

Which made me think: what would 'pedal perfection' actually look like?

Photo by Kornelije Casni on Unsplash

The Perfect Pedal?

In this blog post, I am going to describe my ideal specifications for a pedal that does exactly what I want in a pedal to process synthesizers (and drum machines), and no more. In the process, I'm going to describe some 'must haves', as well as some 'not required', and I may prevaricate with some 'not essentials' as well, which are exactly what their name suggests: not essential, and probably a distraction from the main 'must haves'. Finally, I will note the 'annoying compromises' that often sabotage a pedal's attempt to reach the highest levels of perfection.

Also, notice how this blog post title avoids using click-bait techniques like:

"This effects pedal is perfect!"

MUST HAVES

Stereo Audio Inputs and Outputs

Synthesizers tend to have stereo outputs, even when that is because there's an 'affordable' chorus unit (or a stereo panner) at the end of the processing chain. But samplers, or as many get used most of the time, sample replayers, can sometimes output real stereo, from two different samples, although there are some that use chorus, panning or reverb to turn mono into something more spatialised across the stereo sound stage/field. From my own experimentation with Dave Hilowitz's excellent Decent Sampler, I have become convinced that stereo samples (where they really are two different samples, recorded from two microphones, or synthesized/processed via two different virtual locations) are definitely a desirable sound source, and the next decade is probably going to see me increasingly pushed towards surround of one flavour or another. 

I did think about mentioning line level switches, but decided that would complicate things even more (plus, I had no winners!)

Dual DSPs/Engines/Processors

Polyphonic synthesizers were only just starting to appear when I started buying synths, and so I spent a lot of time on monophonic synthesizers like the OB-1, ARP Odyssey and the Moog Model D Minimoog

1 or 2 oscillators? (VCOs)

History is very cruel for monosynths with only one oscillator (or VCO in those days), and so the single oscillator ARP Axxe is much less well-known than its dual oscillator (and duophonic) sibling, the Odyssey. (So much so that it doesn't get a full entry on Wikipedia, which has to be close to an InterWeb insult...) But, presumably because of cost, pedals with two effects inside ('dual' pedals) are the norm, and pedals with more effects ('multi-effects') tend to have cut-down effects rather than fully-featured.

Connecting/Routing options for single and dual effects

In just the same way that 2 oscillator monosynths can have different transpositions, waveforms, detuning, PWM and more, dual effects can provide additional creative possibilities - two different shimmer pitch-shifts, for example, or two different types of reverb with different algorithms. But pedals offer an additional option: the effects can be in parallel, or in series. So rather than having two different shimmers mixed together, the output of the first shimmer is passed through the second, which can sound much more complex and interesting. Feeding a reverse reverb into a hall reverb can give a composite which is much bigger, denser, and way removed from reality. 

(I'm not going to extend this Oscillator metaphor to include series and parallel connections of oscillators!)

Also, just as presets changed the way that monosynths were used in live performance (videos of 70s live performances often show the keyboard player adjusting Minimoog settings between songs, or during songs...), then having presets which recall all the settings for two effects simultaneously is a great time-saver, and prevents mis-matches when only one effect setting is changed. Pedal boards with sophisticated controllers and switch matrices can solve this for single effect pedals, but pedal boards tend to be used by guitarists, and less so by keyboard players or synthesists.  In the 70s and 80s, one MXR effects pedal (usually an orange Phase 90) tended to be placed on top of the Fender Rhodes piano (the curved top didn't help with stability), next to the Minimoog, whilst the Pete Cornish pedal board would be on the floor in front of the guitarist. 

So dual is definitely my preference, but it is very rare.

Series and Parallel audio examples...

Serial


Parallel


MIDI and Expression and Switches...

This is easily overlooked. Many pedals add MIDI sockets, Expression pedal inputs, and additional foot switch inputs in a simple linear relationship with the cost. The higher the cost of the pedal, the more interfaces that you get. So simple, affordable pedals with stereo in and out might have no MIDI and no Expression pedal input, and to get those extra sockets you could easily double or treble the cost. Sometimes you get a single interface that can be used for MIDI OR Expression OR foot switches - but only one of these, although usually purchasing an additional box will allow two or more of them to be used (So an Expression pedal can be converted to MIDI controller messages and sent to multiple pedals, alongside MIDI clock and program changes, etc.) 

My ideal would be to have separate interfaces (sockets!) for each of these control functions: MIDI, Expression, and foot switches. Once again, this is quite unusual.

Simple UI for the Dual Functions

Having two separate effects in the same pedal does not mean duplication of the controls, it just requires a clear way of indicating which of the two effects you are editing at any time, and when you are hearing both of them during performance. On my TC Electronics Flashback Triple Delay, I always forget to move the little toggle switch which changes between the front panel controls so that I can edit each of the three delays individually, and so I am always changing the parameters for the wrong delay! There are three foot switches which turn the three delays on or off, but these do not affect which delay settings the front panel controls will alter. So there are two different ways to select a delay: one of three foot switches for the audio, and a separate little toggle switch for the front panel controls. I lose track every time! (But it is still a great device for creating complicated/long delays!)

So, a clear way of indicating which effect you are editing, and when both are playing, is essential. Altering the functionality of the controls when playing is fine, because that's a third mode: Playing, as opposed to Editing Effect 1, or Editing Effect 2. Simples.

MIDI Clock

If there are tap tempo functions in the pedal to set the timing of delays or reverbs or LFOs, then these should also be able to use MIDI Clock as a source of timing information. 

Mobile/Desktop Editing/Librarian over USB

Being able to edit presets, save them locally or in The Cloud, and to share them with other users, is kind of the way that effects work nowadays. But it is doubly (or more) important when you have the complexity of dual effects, with series or parallel routing of the audio, and three different sets of controls: Editing 1, Editing 2, Playing. 

I haven't included Bluetooth because in a computer environment with lots of USB 3.1 connections, I find that Bluetooth is unreliable - particularly as the number of Bluetooth devices goes up. I have a GoCube 3x3 Cube that refuses to sync when it is anywhere near my mouse, keyboard, headphones...

NOT ESSENTIAL

Complex Audio Ins and Outs

Quad ins and outs are either twice as desirable, or just doubling up on stereo in and out. So the Poly Effects Beebo pedal's quad ins and outs gives it a good head start over just about everything else... 

The ability to put the pedal in the effects loop of a guitar amplifier, or the send/return loop of a mixer, is useful if your studio is focussed around the mixer, and you always use the same effect (or chain of effects) on several channels. If the pedals are channel specific then a patch-bay and a pool of pedals may be more flexible and rapidly reconfigurable.

Multiple Simultaneous Effects

Guitar pedal boards have complex chains of pedals that serve at least two purposes: tone modification (fuzz, distortion, compression, gating), plus time and frequency modulation effects (chorus, flanging, delay, reverb, tremolo, vibrato...), and so often have a large number of pedals. Keyboards and synthesizers, particularly when used polyphonically,  tend to only require the modulation effects, and so multi-effects tend to be less useful, especially when the type of effect is limited to one delay, one reverb and one chorus/phaser.flanger type of effect. Monosynths can use tone modification effects, but there is a tendency for them to then sound like guitars, or a guitar using a 'synth' pedal to sound like a monosynth. The sound output from my Yamaha TX7 (another device that doesn't get a Wikipedia entry) paired with a Valeton GP-100 multi-effect pedal is a perfect example - sometimes I'm not sure if it is an FM synth, or a heavily processed guitar...

So whilst there are many examples (Helix et al) multi-effects tend to be cut-down, simplified 'guitar-oriented' pedal board replacements, which are very useful in some circumstances, but which struggle to be the subtle, unusual, studio effects that can bring an otherwise bland and boring synthesizer or keyboard to life!

Multiple MIDI and Expression and Switches...

Having two merged MIDI Ins, and more than one MIDI Thru and Out is overkill on a pedal. These functions can be added separately if required. The same with Expression Pedal inputs: one is fine, because most high-end pedals will allow the expression input to be mapped to more than one parameter. Alternatively, there are a number of MIDI Controller devices for pedal boards that can map a single Expression Pedal to several different MIDI controllers on different MIDI channels, and so control several parameters simultaneously. 

Sometimes adding switches prevents MIDI or Expression altogether. I have one device which uses a MIDI foot switch to provide additional control, but you then lose the MIDI Input for any other purpose - like MIDI Clock...

Duplication of Controls

Dual effects does not mean dual (or triple) controls. But a clear way of indicating what is being edited or played is good. If I was to be pedantic (me?) then there are four modes: Editing Effect 1, Editing Effect 2, Editing the dual effect playing setup, and actually Playing both effects. I would propose that, in a lot of cases, the last two are effectively the same mode in most cases. 

Tap Tempo Switch Input

An input socket for a tap tempo switch, or from a pedal that outputs tempo as switch presses (quite rare) is not, in my humble opinion, essential. Useful, yes, but this functionality can be easily replaced by a MIDI Controller that sends MIDI Clock over MIDI. 

Mobile/Desktop Editing/Librarian over Bluetooth

I am biased. I haven't included Bluetooth because in a computer environment with lots of USB 3.1 connections, then I find that Bluetooth connectivity can be very unreliable - particularly as the number of Bluetooth devices goes up. It seems that Bluetooth and USB 3.1 don't get along nicely... 

USB Audio Interface

Recently, from about 2015, some devices with USB sockets have started to provide built-in USB Audio Interfaces, so that they can send digital audio to and from DAWs (or the host computers!). This took the idea of stand-alone USB Audio Interfaces, like the Focusrite Scarlett, from about 2010 (and still in production. several generations later), and put the technology inside individual devices. This has accelerated in the 2020s, and now even small stand-alone synthesizers like the Rebel Technology Witch have USB Audio Interfaces built-in. 

Discord has other uses besides chat!

You can test this using something like Discord - a dialogue will pop up if you connect a USB device that supports USB Audio, or go to this URL with a WebMIDI browser like Chrome: https://webmidi.info This URL checks your browser for WebMIDI compatibility, and will also report if a USB Audio device is connected...

Visiting https://webmidi.info

In my opinion, whilst useful sometimes, and although it converts the signal to digital earlier in the audio chain, it is better to use a dedicated USB Audio Interface like a Focusrite Scarlett (there are many other USB Audio Interfaces). This is because you will be using the same audio interface for all audio-to-digital conversions, and so you get consistency of sample rate, of anti-aliasing filtering, of dithering, of power supply noise leakage, and more. 

In the future, the burgeoning availability of high quality USB Audio Interfaces could well influence things towards the use of digital audio interconnectivity instead of analogue audio on quarter inch jacks or RCA connectors, but we are not there yet, particularly with guitar pedals. It will be an interesting transition...

USB Host

The last few years have also seen a rise in the demand for USB Host sockets (usually via the familiar rectangular USB-A sockets instead of the squarer 'printer' USB-B sockets). These allow a device to have MIDI Controllers connected to it (keyboards, pad matrices, sliders...) and to be controlled by them, without any need for a computer (OK, technically, the device acts as a computer!). 

Whilst the 'Does it have a USB Host socket?' question is becoming increasingly frequent in device FAQs, I think it will be a few years before it appears on guitar pedals. It also makes much more sense, particularly in pedal board designs, to have a single MIDI Controller that give a foot switch and display for controlling several pedals with preset selection, expression pedal routing, MIDI Clock tempo control and routing and controlling audio switching. 

ANNOYING COMPROMISES

Mono Inputs and Stereo Outputs

Good for guitar players, but for synthesizers, then only useful for vintage gear from the 70s and 80s that have mono outputs. More importantly, a pedal like this can only be put at the start of a chain of pedals - putting it in the middle requires compromises - like combining the two channels by mixing, or maybe by subtracting, or some other processing (correlation)? 

Stereo Inputs and Outputs using Stereo Jack Sockets

Some otherwise strong contenders fall at this fence. The Hologram Microcosm has a stereo jack input, and two mono jack output for the Left and Right output channels - yep, the input and output sockets really are different. This is fine where you have immediate access to a stereo-to-twin-mono cable, but a pain when you don't - and yes, a patchbay insert cable does this, but it seems to me that there is a pretty strong negative correlation between people with patchbays and people with lots of guitar pedals...

Fixed Ordering and Types of Effects in a Multi-Effect pedal

Multi-effects pedals come in three flavours:

1. The order and type of effect in each 'slot' is fixed. e.g. Distortion->Chorus->Delay->Reverb->Amp->Cab. So you can have any type of delay or Reverb you like, but the delay is always before the reverb. And you can't ever have two delays, or two reverbs, or more than one of anything!
2. The order of the effects can be changed, but only one instance of a type. In this flavour, you can have the reverb before the delay, but you can't have another reverb (or delay, or any other repeated effect) anywhere in the chain. 
3. The order and type of effects can be changed. This allows you to have more than one delay or reverb or chorus..., and in any order. This is the rare and expensive flavour, and you might find that there are still hidden limitations - like an overall limit of the total time delay that you can produce, for example. 

All three flavours make compromises, and there is usually a strong correlation with the cost: higher price = less compromises. 

MIDI OR Expression OR Switches...

Sometimes pedals will provide a single 'unified' interface that can be used for MIDI OR Expression OR foot switches - but only one of these. So yes, you have access to the functionality, just not all of them at once. Usually the solution to this is to purchase an additional box that will allow two or more of them to be used at the same time...

What Editing Mode is This?

Minimising the number of controls is often a good thing, but if the end user does not know what they are editing, then that just causes confusion. Clear modes (Edit Effect 1, Edit Effect 2, Play Dual) can help to avoid this, particularly if a switch position is clearly visible or LEDs can be used to indicate which mode is active. 

I don't think that a display is essential - lots of classic outboard gear does not have a display. But an annoying compromise would be a display that doesn't clearly show which mode is active, or which is too small. And  a few LEDs can be very effective at indicating which of three modes is active!

USB for Everything

I have read that MIDI, Expression Pedals and Additional Foot Switch inputs can all be replaced by USB connections. I do have a USB Audio Interface, and so MIDI to USB is easy, but converting an Expression Pedal to MIDI is harder, and interfacing analogue foot switches to USB is even harder. Maybe this will change over time, but in my current present, waiting for the future just wastes time.

NOT REQUIRED

Mono Audio Input and Output

I want to like some mono pedals. I have some! But only when there really isn't a stereo alternative. It also seems like a waste of money to buy two just to get two channels of processing, even though the differences may actually contribute to the final sound - of which more in the 'must haves'. (I made no guarantees about being consistent!) Or worst case, having two separate channels processed separately may cause problems because of phase cancellations further down the processing chain. Forced compromise is not something that I think belongs in a 'perfect' pedal specification.

More than Two...

Two reverbs (or delays, or tremoloes, or...) in series, or parallel, can be very useful for making complex harmonic or polyrhythmic sounds. But the law of diminishing returns often means that three of the same effect can start to be too many. I have a TC Electronics Flashback Triple delay, which can have three separate delays in series (or in parallel), and whilst it is incredibly useful/powerful for making ambient music and 'Frippertronics' tape delay effects, a lot of the time I could probably get very similar results using only two delays. I have never contemplated buying a second one!

The other aspect of having multiple (more than two) instances of an effect is the cost and resources. When boutique pedals cost between £350-£500+ (or the equivalent in your local currency), then 'dual'ling one, even with cost savings by sharing some circuitry, is going to increase the cost by a significant amount. Tripling a boutique pedal could easily become prohibitively expensive, rather like the way that a Lamborghini (subsidiary of Audi), Ferrari, Bugatti (etc.) supercar can have a cost many times that of a more conventional car. 

Big, Colour Displays

Pedals do not have to be big, and I'm not thinking about a rack-mounted pedal, because that would be a piece of outboard gear. Equally, large colour displays (and touch sensitive!) are not essential, although using two or three LEDs to indicate the mode of a dual pedal is a must have.

Examples

Finally, we get to the bit you have been waiting for. The grand reveal. The long list of dual pedals that get my approval as being more or less perfect, as far as the specifications above are concerned.

(Publicity photos from Source Audio and MOD Devices)

That's it. Probably a slightly shorter list than you and I were expecting. Congratulations to Source Audio and MOD Devices for making just about perfect pedals!

All of the other contenders that you might have been expecting ( Strymon, Empress, EHX, etc. ), unfortunately seem to fail in one way or another (- although I'm willing to be corrected if I have missed an example). It doesn't mean that they are not excellent and very desirable pedals. It just means that in this very specific context, they are not perfect. 

Perfection is rare. Very rare! ...And personal!

Oh, and here's a recent blog post on a very different, but also excellent pedal from Chase Bliss Audio!

---

If you find my writing helpful, informative or entertaining, then please consider visiting this link:


Synthesizerwriter's Store (New 'Modular thinking' designs now available!)

Buy me a coffeeBuy me a coffee (Encourage me to write more posts like this one!)