Showing posts with label detailed walkthrough for submission. Show all posts

Monday, 7 March 2022

Preparing a Decent Sampler Instrument (or Sample Pack) for uploading to Pianobook.co.uk - Part 2

Part 1 talked about gathering together all the files that you would need in order to submit an Instrument / Sample Pack using Decent Sampler so that it could be submitted to pianobook.co.uk . You could think of it as most of the 'Theory' side of the process.

This post, Part 2, is all about how you actually go about doing the registering with the pianobook.co.uk web-site, and then how you actually submit the files and fill in the text fields so that your Instrument / Sample pack actually gets uploaded correctly and with minimum hassle. So this is the 'Practical' side of the process.

The most important thing... is what you forgot to mention last time...

In Part 1, I forgot something very important, although I did mention it in passing. So, since this is all about the 'practical' bit, it is a good time to reiterate it. When you are developing anything based on samples, one of the most important things that you must do, before sending off any files, is to:

check your tuning and transposition... 

It is all too easy to work in a closed development loop, jumping back and forth between Decent Sampler and your favourite editor, (well, my current one anyway), and, unless you have perfect pitch (which fades with age, allegedly), or employ other tuning checks, then you can end up with a 'C' on the keyboard that plays an 'A' pitch, and you get an email from Pianobook Submissions that politely ruins your day...  

But I learn quickly (and forget faster), and so I bought two things:

- a Guitar Pedal that does tuning, which, it turns out, shows the Note, but not the Octave (Wah!)

  (There are lots of 'Tuner' pedals available at your favourite local or online music retailer, or Amazon. They come in many different sizes, and there are quite a few approaches to how the tuning is shown. The one I got shows A-G, plus sharps and flats, as well as how close your input actually is to that note, but not the octave.)

- a Tuner/Metronome, probably originally intended for more classical musicians that most readers of this blog, but which it turns out, is also mildly technologically-friendly: it has a jack socket and can be battery-powered! 

 (I bought a Korg TM-60, which has a quarter-inch jack input that accepts line level audio, and so can be used to check the output of Decent Sampler via a DAW via an audio interface (mine is a Focusrite Scarlett 2i4 2nd Gen). Once again, I got one that doesn't show the octave, just the note... But for ease of use, then the TM-60 is definitely a winner.)

Alternatively, you could use your DAW, which almost certainly has a 'Tuner' plug-in...and it may even show the octave! And if there isn't one bundled in, then there are lots of Tuner plug-ins available from many online retailers. You may even find a free one. 

Despite all of this process, my brain still seems to find the connection between the Root Note of a sample and actual pitch a difficult topic. As I write, this, I have received another 'day ruining' email from submissions @ Pianobook.co.uk, telling me that their checks have found a tuning error in yet another virtual instrument. So, I make mistakes as well, and I can't even follow my own suggestions! Hopefully you will be better!

Registering

Part 1 was all about preparing the necessary files, so that the actual registration process would be as smooth as possible. So now, let's register... 

If you visit the Pianobook.co.uk web-site and are not a member, then the far right top menu bar will say 'Login / Signup. If you click on that button to Sign Up, then you get taken to the Login page, which is slightly confusing - but underneath the two big 'Login' text boxes it says:

Not signed up yet?

and there is a 'Join Now' button underneath. (There is also a 'Lost your password?' link!)

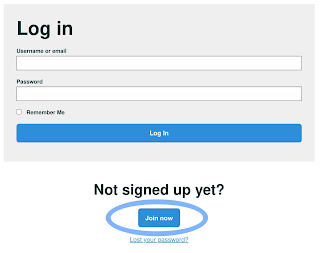
The Login dialogue box - you need the 'Join Now' button near the bottom...

Clicking on this button takes you to: https://www.pianobook.co.uk/members/register/ , which is a big dialogue box.

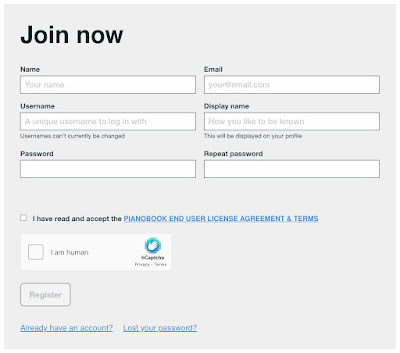
The 'Join Now' dialogue box...

Note that this page is also where you can go to if you need to reset your password... 

What you need to do first is fill in the six text boxes, which is where Part 1 comes in. I'm assuming that the 'Name' and 'Email' fields will be easy to fill in. but the next two fields have some instructions in grey text inside them, as reminders for what you should think about when choosing what to put in them.

Username is going to be used whenever you login to Pianobook.co.uk. In Part 1, I said that you should avoid using your real name or the Display Name which you will be using as your identification inside Pianobook.co.uk.  You can't have spaces either, so there's a temptation to use the first part of your email address (before the '@' symbol), which isn't a good idea because people may already know it. So 'johnsmith27' isn't so good, but 'SampleExpert1000' is quite good, and 'SampleXpert1k' is easier to type and harder to predict. There is also a note that reminds you that you cannot change your username currently, so one you have set your Username, it will stay like that. This is perhaps another reason to choose carefully. Perhaps I should have used a Username like: 'RememberTuning' so that I would check my sample tuning more carefully!

The Display Name can have spaces, and will appear on every post and reply that you make in the Pianobook.co.uk Forum, as well as being the name that will be shown alongside all of the Instruments / Sample packs that you upload. Forum posts will have your Gravatar picture visible, with your Display Name underneath, whilst for your Sample Packs, your profile photo will have your Display Name underneath it. So visitors to the Pianobook.co.uk web-site are going to associate your photo and your name with your samples or your Forum posts and replies. You should not use your Username, and if you have an online identity that is associated with your music, then you should use that. So, if you want to find me on Pianobook.co.uk, you would search for 'synthesizerwriter', and you will find me! 

A quick aside on Gravatar.com


When I mentioned Gravatar in the context of Forum posts, then you either knew what I was talking about, or else you wondered what a Gravatar 'picture' was? If you don't know about Gravatars, then your Forum posts and replies will use a simple white and grey picture, which is very boring. 


This is the default picture that everyone would see if I didn't have a Gravatar picture...


And these are the two Gravatar pictures that appear in the Forum. The synthesizerwriter one is from when the makers of 'The Simpsons' had a web-site that would turn a photo of you, into a 'Simpsonised' version. Unfortunately, the web-site is long gone. The Martin Russ picture (the name has been changed from the 'Not Dave' variant) is just me in my studio.

To get a Gravatar picture, you go to Gravatar.com and create a WordPress account (the process is not that different to what we have been doing here!) and you can then register email addresses and upload photos or pictures that will be associated with those email addresses. Any web-site that uses Gravatars will then use the picture that you have associated with an email address whenever that email address is used to identify you. In the case of Pianobook.co.uk, you have already entered your email address, and this will have been checked against Gravatar.com - if you have an account on Gravatar, and a picture associated with that email address, then that is what will appear in the Forum. 

(Yes, this is yet another hoop to jump through, but once you have done it, you will find that all sorts of web-sites will start to show your picture when you have told them your email address when you registered with them - many web-sites based on WordPress, for instance... )

Stop Press: As I was writing this, Pianobook.co.uk started making the transition to using Discord as a replacement for the Forum, so this information is now out of date... However, a lot of OTHER sites  use Gravatars!

Back to Pianobook.co.uk Registration...


Anyway, back to the Pianobook.co.uk registration:

The most important thing to remember here is:

Username and Display Name should be different!

Hopefully, you have got used to using a Password Manager by now, and so you will be ready with a brand new, different password, generated just for Pianobook.co.uk use. You should never, ever, use the same password for different web-sites, applications, or services. 

You need to enter the password twice. This is a subtle way to try and get you to use a password manager, because you may well make mistakes if you try to manually type the same mix of upper and lower case letters, numbers and symbols twice, exactly. Once you have made a mistake, then you will need to manually type the password twice again, which will quickly become tedious. In contrast, with a password manager, you take your new 'Pianobook.co.uk-only password, copy it, and then paste it into the two fields. Job done!

As is often the case with registering for a web-site or service, there are some terms and conditions to read. You need to read them via the link (open in a new tab) and then tick the box.

To try and prevent malicious people from flooding Pianobook.co.uk with lots of fake accounts, the Captcha tries to make sure that you are a real person, using various (and evolving) methods. In the early days of the InterWeb, Captchas were used to test out Optical Character Recognition systems - so if a text recognition system thought a phrase in some scanned text was 'Roland Jupiter-8', then a Captcha would be used to check if people read the same words. Nowadays, instead of words, Machine Learning systems that analyse photos are checked by asking people if they can see bicycles, traffic lights, busses, trains, etc. in photos, and these are compared with the computer results. So it tends to make creating fake accounts more difficult...

Finally, there is the 'Register' button. If you have filled in everything above satisfactorily (don't you just hate that word?), then you can proceed to the next stage. Notice that there is also an 'Already got an account' link, so that if you somehow thought that entering in your name, email, username, display name and passwords was the normal way to lo in to pianobook.co.uk, then you can go straight to that Login page and just enter your Username and password. A second password reset link is also on this page.  

 The Profile

When you have registered and have logged in to your new account on Pianobook.co.uk, the far right top menu bar will change so that it sats: 'account' followed by a downwards pointing arrow that drops down a menu.


 The drop-down menu has a few options:


'Profile' is the one that you use to edit your User Profile, so let's look at that page:


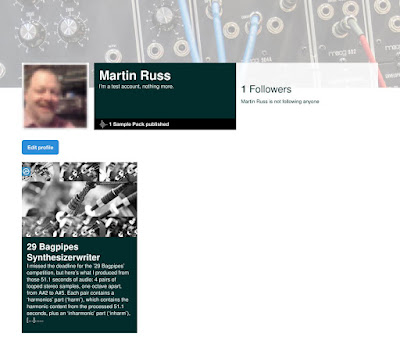
As you can see, I haven't used 'synthesizerwriter' for this test account, but 'Martin Russ Not Dave' instead. Remember that this is a Display Name, so it can have spaces in it, and it will appear anytime that you post, reply or publish anything - so I'm not going to be using this test account with a name like this.

Any Sample Packs (virtual instruments) that you publish will appear below this top part of the page, below that 'Edit Profile' button. As you can see, Martin Russ Not Dave has published one Sample Pack, and has 1 follower, but is not following anyone. The profile photo is an inverted and mirrored version of the 'Dave' photo, and the photo at the tope, the 'banner-photo' is the default photo of a piano keyboard.

So let's replace the banner-photo. See that blue 'Replace banner' button, with an icon of two pictures being swapped? Click on it. 


You will get another dialogue box, where you can choose a new banner-photo - click on the blue 'Choose file' button, and choose a photo... Note that is says that the size has to be at least 2000 x 500 pixels, under 2 MBytes in size, and despite what it says (and you can check experimentally) the file can be a .jpg or a .png. 

Now, banner-photo is the very first photo that you were asked to prepare in Part 1. Maybe you still like that one, or maybe you want to browse through some alternatives? Well, one source (apart from taking your own photos!) is Unsplash.com - a source of freely-usable photos. To replace the piano keyboard, I used a photo of a classic Moog modular by Steve Harvey on Unsplash ...


Once you have 'Save'd the new banner-photo with the blue 'Save' button, then the Profile web-page will have a new banner photo across the top:


The Profile page with the new banner photo.

Next, that Display Name needs changing to something sensible, and the photo of Dave needs to be changed as well, and more... The photo of Dave is the profile-photo, which has to be a .jpg (JPEG) file. But where is the blue button? Actually, you need to hover your mouse over the photo, and a blue button will appear, with the 'two files swapping position' icon that was on the banner-photo button. The dialogue box is identical, except that it states that the photo has to be square, and at least 500 pixels wide. So I chose a pixellated version of one of the photos on Gravatar:


To change the rest of the Profile web-page, you click on the blue 'Edit profile' button. You may not be surprised to learn that this opens another dialogue box, with fields to fill in!


After changing the text fields with the information that you prepared in Part 1, and saving with the blue 'Save changes' button, the revised Profile web-page is complete:


Now, we need to upload a Decent Sampler Instrument / Sample pack!

Submitting... 

Back to the menu bar, and this time, the 'Submit' button. 


On Pianobook.co.uk, you 'Submit' an Instrument / Sample Pack for evaluation, and after various checks (tuning, perhaps? keyboard colouring?...) in the 'Submit Queue', it will be published, and made available for anyone to download from your 'Profile' web-page. So your Profile web-page is the first destination that anyone searching for you and your Instruments / Sample Packs will find, and it is a catalogue of all your published Instruments / Sample Packs. So how your Profile web-page appears is very important - lots of people are going to see it. This is why the first section of this blog post has concentrated on showing you how to fill it with your photos and text. 

When you click on the 'Submit' button (which, for once, is NOT blue!), then you get taken to a page which has a banner photo at the top, containing a selection of microphones, to remind you that this is a web-site where samples are important! Scroll down the page, read the instructions, and keep scrolling down until you get to the big reveal...another dialogue box:


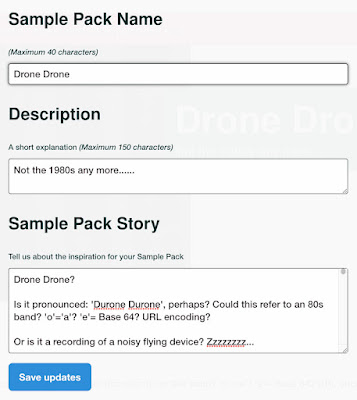
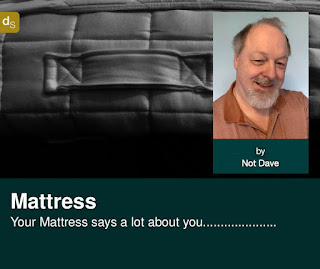
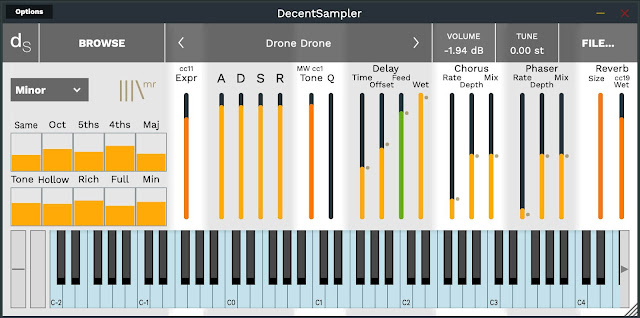
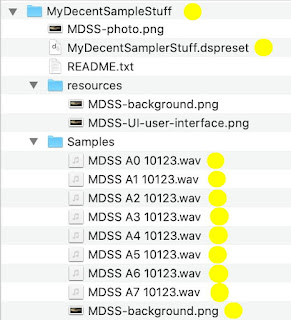
Once again, the text fields should have already been prepared. In this first dialogue box for the submission process, the three fields are found in the 'README.txt 'Story' file that is in the main 'MyDecentSamplerStuff' folder. You can see that I have copied and pasted the relevant fragments of text from the README.txt file for my 'Drone Drone' Instrument / Sample Pack, into the three fields. Note that the 'Story' field requires at leat 150 characters, although many people provide a lot more than this (yes, me, guilty as charged). When you have done this, then click on the blue 'Save updates' button and you will be taken to the next dialogue box....

Choose your category!

This dialogue box is where you choose a category for your Instrument / Sample Pack by ticking a box. For some submissions this is easy, but for others it can be very difficult. The Pianobook.co.uk web-site doesn't seem to use this feature very much (there's a 'Sample Packs' menu button that shows some of these categories, for example), but as the number of Instruments / Sample Packs get larger (1,000 is the next major milestone) and goes beyond that, then ways of partitioning the available instruments / Sample Packs into manageable numbers will be increasingly important if visitors to the web-site are not going to be overwhelmed. Christian Henson has talked about using the Ratings system to help with this, apparently by allowing the best to have the most visibility... 

The next dialogue box is for photos and a video to accompany all the text...


The 'Sample Pack Image' is the '<Sample-Pack-Name>-photo.jpg' that you prepared in Part 1. It should be at least 1000 x 500 pixels, in monochrome (black and white), and be a .jpg (JPEG) or a .png (PNG) file. When you click on the blue 'Choose file' button, you just need to be looking for the 'photo' file in the 'resources' folder. 
 
The 'GUI Images' is the same procedure, but this time you are looking for the 'ui-user-interface' file in the 'resources' folder.

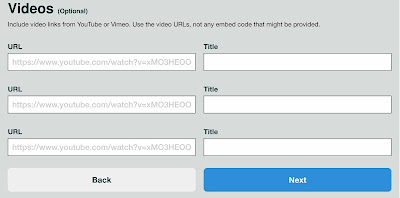
The 'Videos' is two text fields that need a URL and a title. I use this to provide access to a video that explains my User Interfaces (UI, or GUI, for Graphical User Interface, as it says in the dialogue box). I use the title: 'UI User Interface Video' so that people know what the video is, and you could also make the video thumbnail or the start of the video say something similar. 

Remember that those amazing individuals who produce demos for Pianobook.co.uk are going to be all over your submission, turning it into a gorgeous demonstration of how good your Instrument / Sample Pack can sound when used in context by another composer. And these people will hear your Instrument / Sample Pack fresh and without any baggage, so you may well get a very different interpretation of how it can be used, and the timbres that it can produce. All of which is a long-winded way of saying that maybe this video is a good place for instructional material on how the user interface works, how to select different timbres, etc., and not a demo of how it sounds. The web-page is organised as : Story on the Left, Demos on the right, and you don't want to confuse visitors.

There's an interesting feature that you might miss the first time you use this dialogue box. It is the small blue box on the right hand side with a '+' in it. This allows you to add up to two additional videos (for a total of three!) if you want... (When you get to three pairs of URL and Title fields, then the blue '+' box vanishes, so you can't just keep adding videos and videos forever!)

Clicking the '+' box allows up to three videos to be added to your 'Profile' web-page...

Then there's the legal stuff, where you carefully read every word of the End User Licence Agreement (EULA), making sure that you understand it completely, and then tick three boxes in a checklist to confirm that you have done stuff. 

Read, tick, tick, tick....Next!

The first bit is easy - just a few minutes of reading the first time, and after that (for your next Instrument / Sample Pack!), then just checking that the EULA hasn't been updated. 

The checkboxes are interesting. 

ONE The first one is Kontakt-specific, and doesn't apply to Decent Sampler Instruments / Sample Packs - but I tick it anyway, for completeness (Who wants an empty tick-box?). Some people might be confused because the word 'unticked' is included in the explanatory text, but there's definitely a tick required in this tick box.

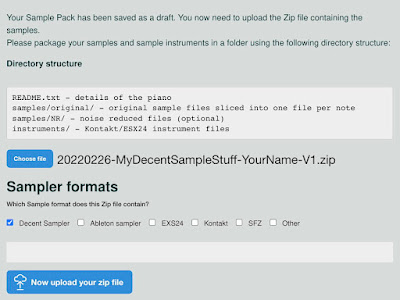
TWO The second is confirming that you have created a single .zip file, and this is essential if you want to be able to upload your submission in the next (and final) dialogue box... So this is a tick as well. 

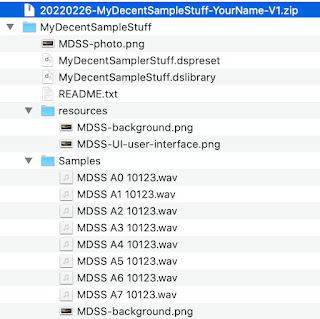
(You have been following this, haven't you? You have double compressed your folder and have created the '20220226-MyDecentSampleStuff-YourName-V1.zip', haven't you?)

THREE The third is agreeing to the Terms and Conditions, which are on the same page as the EULA, and you probably already read them anyway, since they are just after the EULA and you tend to just keep reading through that sea of text... and so this is a tick as well. 

Once all three tick boxes are ticked, you can click on the blue 'next' button and go to the final dialogue box...

The final dialogue... for now...

The blue 'Choose file' button is what you need to click first. Choose your .zip file ('20220226-MyDecentSampleStuff-YourName-V1.zip'), and it will appear as shown in the screenshot above.

This is a good time to make sure that you selected the correct .zip file! Remember that this .zip file is NOT inside the 'MyDecentSampleStuff' folder! it is at the same level, so you may need to go back up the folder hierarchy by one level...

Then tick the 'Decent Sampler' tick-box, and you are ready to press the blue 'Upload your zip file' button.

The grey/gray bar will show progress uploading your .zip file to Pianobook.co.uk. As always, the longer the file, the more time it will take. Faster broadband will reduce the time it takes to upload. 

The first time I uploaded a 2 Gigabyte (actually Gibibyte, but that's a totally different blog post!) file, I worried that this would be too big for Pianobook.co.uk to cope with, but remember that they are used to receiving very large files! Huge files for you are everyday for them...


Tidying Up

Sorry, you aren't quite finished. Not yet.

Yes, your .zip file has been received, and is in the 'Submit Queue' being analysed and processed, but there's a couple of things that still need to be done...


Go to your Profile web-page, and right at the bottom of the page, you should find a 'Your Pending Submisions' area with your brand new Instrument / Sample Pack. Click on that (the green will go pink) and the web-page for that Instrument will open... 

(Yes, this isn't from the test account, because I don't want to actually upload a test .zip file. Instead, this is the 'Submit Queue' from my 'synthesizerwriter' account on Pianobook.co.uk, showing two versions of 'Drone Drone' waiting to be processed. Yes, I made several updates very quickly!)


And this is the 'Pending' page that only you see whilst your .zip file is in the 'Submit Queue'. There's a pink banner across the top of the page, and you can see the Sample Pack Name (Drone Drone in this case), the Description / Tag Line (Not the 1980's any more...), and the 'photo', as well as the 'Story'. 

Now, before Aril 2022, this was the point where you would notice that the 'Story' doesn't look right...

All the Carriage Returns and Line Feeds would have been removed, and so there would be just one long piece of text, with no paragraphs, no 'white space'. You would then need to fix this after you had uploaded a .zip file and it hd been approved (you get a 'Congratulations' email) and then placed into the 'Submit Queue', and appears as Pending in your personal 'Profile' page.


Okay, so after April 2022, the carriage returns, line feeds and various other characters were no longer removed, so there's now no need to edit the text any longer...

Unfortunately...

People are very interesting. No matter how much they try to make a piece of text perfect, with no typos, correct spelling, good grammar, no swearing, not too many exclamations marks!!!, and more, then the more likely it is that one of these will sneak past them and get into the text you have just uploaded. So, although the text that you see at this point is no longer a solid block of text, it is almost a certainty that when you read it, then you will find a typo, some bad spelling... etc. So although the April fix makes it easier, there's something inherent in the human psyche that means that you will probably find something that needs to be fixed in your text... 

To fix it, you need to scroll down, past the 'Story', past the UI Video, and past the GUI screenshot. There , just before the Ratings and Reviews, you will find the 'Sample Pack' control panel.


These blue buttons are the key to fixing any problems or missions that you find after you have submitted the .zip file. From left to right, you can edit:

- The text fields: Sample Pack Name, Description (tag line), and the 'Story'.
- The photo for the Instrument / Sample Pack (there's a typo here, although you could argue that the 'photo' is in the same place as the 'banner' on your Profile web-page...)
- The videos (up to three, remember). Videos are rarely correct first time, so this allows you to add some more.
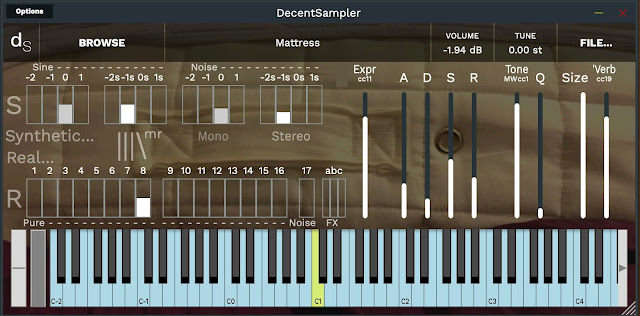
- The UI screenshot. Again, it is only after you have uploaded the .zip file that you notice the glaring error in the UI screenshot.

To fix the 'Story' text, you use the blue 'Edit text' button. This opens... a dialogue box!


The screenshot above shows the 'after' view. What you start with looks like this:

Drone Drone? Is it pronounced: 'Durone Durone', perhaps? Could this refer to an 80s band? 'o'='a'? 'e'= (Base 64? URL encoding? ) Or is it a recording of a noisy flying device? Zzzzzzzz...

And all you do is just add 'Returns' in to break it up into the lines that you had in the original text file for the 'Story'. 

Now the text field is quite small, but there's another of those 'not obvious at first glance' features at play here. Look in the lower right hand corner of the text field, and you will see two little diagonal lines - these allow you to expand the text field downwards so that editing is much easier!

(In case you were wondering why things happened in April 2022, well, I put in a bug report for the loss of the carriage returns and line feeds... This may, or my not, have had something to do with them no longer being removed after April 2022. I like to think that I might have just nudged things along ever so infinitesimally!)

You have now completed the Submission process for a Decent Sampler instrument / Sample Pack for publishing on Pianobook.co.uk.

Completion


When your submission has passed through the whole publishing process, a new box will appear on your Profile web-page:

Your Profile web-page should now have the Instrument / Sample Pack on it.

My apologies for the Kontakt Instrument / Sample Pack shown here - my test account only has this on it. 

In the next part, Part 3, I will look at what happens when you need to update a Decent Sampler Instrument / Sample Pack... and I'm still working on that...

---

If you find my writing helpful, informative or entertaining, then please consider visiting this link:


Synthesizerwriter's Store (New 'Modular thinking' designs now available!)

Buy me a coffeeBuy me a coffee (Encourage me to write more posts like this one!)


Buy Me a Coffee at ko-fi.com

Monday, 28 February 2022

Preparing a Decent Sampler Instrument (or Sample Pack) for uploading to Pianobook.co.uk - Part 1

Ok, so ever since Pianobook.co.uk was launched on the 29th of March, 2018, you’ve spent ages sampling your piano, and then more time editing the samples, then taken a photograph that you are happy with, then decided on using Decent Sampler as your sample player, then edited your ‘MyDecentSampleStuff.dspreset’ file so that it works correctly (and you’ve struggled with the instructions, read Dave Hilowitz’s 'format documentation' numerous times and you still don’t quite understand all of it, and more…). But, finally, you think that you are finally ready to submit it to pianobook.co.uk!

Not quite.


There’s just one more hoop to jump through… Preparing your Decent Sampler Sample Pack for uploading to Pianobook.co.uk.


Actually, this bit is quite simple, with just a few easy steps…


I have done this quite a few times now, so this blog post contains a lot of tips on how to do it and get it right, and avoid problems.


( I’ve screen-shotted a Mac for this tutorial document, but the process should be very similar on Windows or Linux. I’ve tried to remember to say folder/directory each time I use the word… )


Preparation for submission:


0. Signing up with pianobook.co.uk

(In everything that follows, I am using the convention that your Instrument / Sample Pack is called: MyDecentSampleStuff, and that this will be abbreviated to MDSS. So for Decent Sampler development, all of the working files will be in a folder / directory called MyDecentSampleStuff. I will be highlighting important file-names in orange!


If you have not signed up with with the pianobook.co.uk web-site, then you will need a few other files and bits of information that will be used to personalise your experience, and to customise your profile on Pianobook.co.uk:

[ ] A banner photo or graphic of 2000 x 500 pixels, which can be in colour, and can be a .jpg or a .png. This will be faded to white by the web-site when you scroll down. I called this file: profile-banner-2000x500.jpg, which makes it easy to get the right size of photo or graphic, and easy to find when you upload it to the web-site and into the banner in your profile. There is a maximum size of 2 MBytes for this file, which is shown in the dialogue as 2mb (a typo), which is millibits, which equals 2/1000th of a bit. You can't fit very much graphical information in that amount of data...

Dave - the Neumann KU 100 binaural head microphone

[ ] A photo of you, or some graphics that you wish to be identified with. If you do not provide a photo, then pianobook.co.uk will use a default picture of Christian Henson’s Neumann KU 100 binaural head microphone (used for Head-Related Transfer Function recordings for binaural audio, ambisonics, 3D audio...), which he calls ‘Dave’, will be used instead, and you do not want that to happen, do you? This time, the picture has to be a .jpg, in colour, and should be at least 500 x 500 pixels in size. It seems that .png files are not accepted…so beware! The web-site will switch between the colour version and a derived black-and-white version of this photo (or graphics), so choose your colours wisely. (The ‘suspicion turned up to 11’ cyber security person in my head tells me that the reason for this being converted to monochrome by the pianobook.co.uk volunteers might be because it is possible to have hidden messages in colour photos that only appear when they are automatically converted to black-and-white (or monochrome)). I called this file: profile-photo-500x500.jpg, which makes it easy to get the right size of photo or graphic, and easy to find when you upload it to the web-site and into your profile.

[ ] Some text that you might need to think about beforehand. 

- Name
- Email address
- Username
- Display Name
- Password

Your Name and Email address should be easy. But you might want to consider your User Name (used for logging in, and any spaces will be removed...), and your Display Name (how you want to be known on the web-site) early rather than when you get to the dialogue box, and the pressure to be smart and subtle and cool starts to build…

Let's think about the Username first. The name itself is a clue - notice that there is no space between User and name. This name will be used to log in to Pianobook.co.uk, and so it can be anything you want because it will never be seen by anyone else. In fact, it is best to keep it private because it makes it more difficult for someone else to log in and pretend to be you. So in my case, I would avoid anything with 'synthesizer' or 'writer' in it, and I might go for something like 'gasresister' or 'toomanyfx'. Again, you should choose your own, and you can use CamelCase capitalisation to make it easier to see words: 'GasResister' or 'TooManyFX'. One thing to not do is to make it the same as your Display Name, because that is the first thing an attacker would use to try and break into your account. 

Since I have mentioned Display Name, then that is the next thing to think about. In this case, this is the way that you will be referred to inside Pianobook.co.uk - so I was completely obvious and chose 'synthesizerwriter'! But there's nothing to stop you using another name if you want - unless you have a standard online identity like I have. As I said in Part 1, you should think about what you want for your Display Name before you get to this dialogue box, because it is much easier to be creative when you don't have the pressure of filling in the field in the dialogue box. 

Finally you need to provide a password, twice. That cyber security guy in my head says that you should use a password manager (an app, not a web-based potential leak source) and use a ‘Sweetener plus words’ template. So the ‘Sweetener’ bit is something like ‘ABC123+++’ to provide capital letters, numbers and symbols, and I’m sure that you can come up with something better than my example! What follows the Sweetener are four or five words. Plain ordinary words are fine. So you could use ‘trainbananazippershake’, although again, you need to do the creativity bit here. 

So the resulting password (different for every app, remember, which is why you need that password manager) looks like this: ‘ABC123+++trainbananazippershake’, which is 31 characters long, is going to take a very very long time for bad people to crack, and is easy to type if you ever need to. If you always use a password manager, then you can have fun replacing the vowels in the word list and trying to avoid rude words, or maybe trying to get to rude words: ‘treanbinonezupporshike’ which sounds like an exotic bird of some sort. Oh, and for a while, you may find yourself giggling when you say ‘binone’ (pronounced maybe as something like: ‘bih noh nay’) instead of ‘banana’…  

Password managers come in two main flavours: on-line and off-line. I prefer to use an off-line one on my Apple devices (Strongbox), but that needs a bit more looking after, and so most people will use on-line ones that work in a browser. A Google search is going to throw up quite a few, but one of the long-established names is LastPass, while Keeper is another well rated one that is enterprise-oriented but also does 'personal' use... As always, when doing your comparisons, you will need to check that it supports your operating system - but there's an added complication with a password manager, because ideally, you want the same one to run on ALL of your devices that might require passwords to be managed, which could be a desktop, laptop, mobile phone, tablet... (Trust me, having different password managers for different devices is not a good idea!) Pricing-wise, you will have to make the usual agonising decision between free (with some compromises), and paid (which is probably going to be a monthly subscription these days, possibly with a discount for a whole year). My personal rule of thumb is that I never go for a subscription option where it says: 'For less than a cup of coffee!', but that's just me...

[ ] Additional information that will be used on your Profile web-page. You will probably need to look up some of these names and URLs:

- Your web-site URL (https://...)  
- Your Twitter name (@yourname)
- Your Instagram name (@yourname)
- Your YouTube Channel URL (https://...)
- Your SoundCloud URL (https://...)
- A highlights video from YouTube, or a highlights playlist from SoundCloud )https://...)

Note that you do not need to have any of these! It is okay to leave them blank. But if you do have any of these names or links, then people will be able to visit them from your Pianobook.co.uk Profile web-page...

As you can see, there is a lot of information on your Profile web-page. This is because it will become your catalogue - where you display all of your Instruments / Sample Packs, and where people will go to download them.

1. The starting point.


It might be a good idea to make a tick-list of all the files that you will need:


[ ] A plain text file, called README.txt, containing: 


 - The name of the Instrument / Sample Pack (avoid copyrighted and trademarked names, please) (40 characters max)


 - The ‘tag line’: about 10 words, approximately, that encapsulate why your Instrument / Sample Pack is special… (140 characters max) 


 - The ‘Story’: why you made the Instrument / Sample Pack, how you made it, how to use it, how the user interface works, what presets are included, how the MIDI CCs are mapped… This is a long piece of text, in many cases… It has to be at least 150 characters, but should ideally be considerably longer - there should be a lot to say about your instrument / Sample Pack! One useful tip is to put a version number at the end of the text, so that you know which version is currently on Pianobook.co.uk - I have a tracking spreadsheet that I use as well... Another tip is to write the 'Story' in a text editor or word processor, and then just copy and paste it into the text field in the dialogue... 


[ ] Samples recorded by you from your piano or kalimba or toothbrush… or other source, and then probably edited to clean them up, possibly processed, and named with an identifier, a note value (as per A#, not Ab) - all stored inside folder called 'Samples' (Or 'NR' if they are noise-reduced samples!). I also tend to add the number of samples in the sample (minus 1) to the filename, so that it is easy to set the ‘end=‘ parameter inside the Decent Sampler .dspreset XML file. This can make looping samples much easier to manage, so it is strongly recommended. So a typical sample file might be named: 'MDSS A0 10123.wav'.


[ ] A photo of your piano, kalimba, recorder, or other source (Some of mine are a bit abstract!). This should be at least 1000 x 500 pixels, (or it could be 1624 x 750 pixels, if it is a double size version of your Decent Sampler background picture), in monochrome (black and white), and be a .jpg (JPEG) or a .png (PNG) file. If you submit a colour picture, the the Pianobook people will turn it into black and white, but you will not have any control over how they do the conversion. So, remove the middle-person, and do the greyscale conversation yourself. I tend to call this by an abbreviation the name of the Instrument / Sample Pack, plus ‘-photo’, which isn’t original, but is easy to find when you are searching for it to add it to a dialogue box. So, for ‘MyDecentSampleStuff’ the file would be called ‘MDSS-photo.jpg’. 


[ ] A photo or graphic of 812 x 375 pixels, that will be used as the background by Decent Sampler. This can be a .jpg or a .png. A .png file is probably going to be larger than the equivalent .jpg in most cases. I tend to name this file starting with the Instrument / Sample Pack name abbreviation, followed by ‘-background’, so ‘MDSS-background.jpg’ etc.


[ ] A picture of the user interface of your Instrument / Sample Pack. The easiest way to do this is to capture a screenshot of Decent Sampler with your .dpreset file loaded into it, and then to crop it down to the edges of the Decent Sampler application/plug-in. Again, I tend to call this file with the Instrument / Sample Pack name abbreviation, followed by ‘-UI-user-interface’, so ‘MDSS-UI-user-interface.jpg etc. This can be a .jpg or a .png.


I can’t stress how much easier it is to find files when they are named consistently with names that still make sense several days, weeks or months later. Alternatively, if you are happy with trying to remember if it was ‘ZpOld34x.jpg’ or ‘ZdOlp43c.jpg’ that was the edited version of your background, then that’s fine by me.


2. In more detail…


Thinking about that main photo, the ‘MDSS-photo.jpg’ that will be the main way that people visualise your Instrument / Sample pack, then you might need to think about the composition a little bit: 

Before the October 2021 update of the pianobook.co.uk web-site, one thing to be very aware of was that the photo would have the name of your Instrument/Sample Pack inbound white text in the centre of the photo on the wen-site, and in the ‘PianoDrop’ videos where 5 submissions from the previous month were showcased. 


So any white parts of the photo would reduce the readability. In fact, this meant that the photos used tended to be quite dark. One way of looking at this is to use the ‘Levels’ graphs available in many graphics editing applications.


In the screenshot above, the levels graph has no white pixels, which is why the red ellipse is empty.


In contrast, in the screenshot above, the levels graph has white pixels from the 'NAME' text, and these are shown as the thin black line in the red ellipse - they are VERY white pixels! (Any less-than-very-white pixels would be shown as black across the the left of the thin black line.) You can clearly see on a 'levels' graph like this, that the the background is all greys and blacks, whilst the text is all very bright white.


However, after the October 2021 update of the pianobook.co.uk web-site, the name of the Instrument/Sample Pack has moved to a dark 'racing green' bar underneath the photo (which is now a 2:1 aspect ratio), and the frequency of PianoDrop videos has dropped from monthly to irregularly. As you can see above, the new approach to displaying the name presumably reduces the need for photo editing, and so reduces the workload - which must be significant given the number of submissions that are being processed and the number of checks that are made on the submissions. 

In fact, it seems that the pianobook.co.uk web-site has been a victim of its own success, because in a few months, the number of instruments has more than doubled (828 Sample Packs on the 1st of March 2022), And, over time,  there have been various rumours of long waits for submissions to be published. My own experience has been variable. Some Instruments/Sample Packs have been submitted and published in a few hours, whilst other have taken a few days, weeks, and in a couple of cases, months. This suggests that the workload is considerable. 

The checking is very impressive and very detailed - I have had several Instruments / Sample Packs rejected by pianobook.co.uk because of issues like clicks, UI inconsistencies and (the most embarrassing) incorrect pitching of samples (Where playing a ‘C’ on the keyboard produced an ‘A’ pitched note, for example). Actually, 'rejected' is the wrong word, because the email tells you the issue, and suggests how it can be fixed, so all you need to do is correct the problem, and re-submit. 

Anyway, the requirement for dark photos seems to have gone, although if you use the same photo as the background for Decent Sampler, then using levels to make sure that the UI text will be readable, is still a good idea. And on this topic of readability, here are two of my Instruments/Sample Pack UI screenshots from  pianobook.co.uk , one with black text on a light background, 


and one with white text on a dark-ish background: 


Remember that my UIs (User Interfaces) are notoriously busy - which means that your don't want a 'busy' background as well. So if you have a lot of controls, then you should reduce the contrast of your photo to avoid too much distracting detail from showing.

It probably isn't a great leap of the imagination to see that you should prepare two template .dspreset XL files: one with the text set to opaque white (#FFFFFFFF), and one with the text set to opaque black (#00000000), so that you can produce Instruments / Sample Packs with dark or light backgrounds and not have to swap colours in your XML.

Maybe I should do a blog post on programming for Decent Sampler?


3. Filling the folder…


Let’s look at the folder/directory named whatever your equivalent of ‘MyDecentSampleStuff’ is first - this is where you should have been storing the working files whilst you have been developing your Sample Pack (or Instrument). It really isn’t a good idea to have all the file spread across lots of different folders/directories or drives! But now is a very good time to consolidate all of these files into one place!

Now if you are like Christian Henson, you have probably used click-bait naming conventions, and so it might well be called: ‘BestPianoEver’, but in this tutorial, I’m going to use ‘MyDecentSampleStuff’. In all of the screenshots that follow, you will need to figure out what your names are for all the files, because there’s no way that I can know what they are… So, as always, these are suggestions for you to use or improve upon!

Inside the folder/directory you should have the MyDecentSampleStuff.dspreset file that you have been working on (and there is a backup on a separate drive or in the Cloud, isn’t there?), plus a ‘Samples’ folder/directory that contains all of the samples (CH has a specific way of naming samples that you can use, and details are given here: https://www.pianobook.co.uk/resources/how-to-sample/recording-your-piano/ ) that are used by MyDecentSampleStuff.dspreset. As I noted earlier, I also add the length of each wav file in samples (minus 1) so that setting the loop length is easier (and harder to get wrong!) when editing the XML .dspreset file). 

For historical reasons (= maybe we did it wrong from the start) the 812 x 375 pixel .png background photo or graphics (called ‘MDSS-background.jpg here), is often found in the Samples folder/directory.


(Yes, there's a typo in the screen shots! The .dspreset file is called: 'MyDecentSamplerStuff'. Score one point and move on.)

The files that you will normally have in your ‘MyDecentSampleStuff' folder/directory during development of a sample set and a Decent Sample .dspreset XML file are shown with yellow dots to the right. Now you need to add a few extra files, and duplicate one file.

From the top downwards, the first file you need to add to the folder/directory is the ‘MDSS-photo’ which can be a .jpg or a .png. The second file to add is the README.txt file, which is the plain text (.txt) file that contains the majority of the text that you will enter into the first submission dialogue box.
The next thing to do is to create a ‘resources’ folder/directory. This will be used to hold a backup of the background graphics used by Decent Sampler, plus the screenshot of the user interface of your Instrument / Sample Pack. You could also put a safety copy of the MDSS-photo file and the README.txt file in this folder/directory. (Many operating systems have a keyboard combination that will turn a mouse drag into a copy, which can speed up all sorts of file management tasks, and is well worth finding and learning...)

(Alternatively, and probably better practice, you could use the background in the 'resources' folder/directory as the master, and the one in the 'Samples' folder/directory as the safety copy. This way the code will always use the 'Samples' folder/directory for samples, and the 'resources' folder/directory for any other... resources.)

You can use the next picture as a tick list for filling the folder/directory:


(A quick aside here. This is the MINIMUM set of files that you should put into a Decent Sampler folder. One additional 'goodie' that you can add is a few extra 'Presets'. These are .dspreset files that you save by using Decent Sampler's 'File>Developer Tools>Save Preset...' menu option. Take the time to name and number these, so that users will know what they are, and also to make them easy to spot against the MyDecentSampleStuff.dspreset file, which is the default 'preset' file. One approach might be to use a  naming template something like 'MDSS-Preset01-Best-Piano-Ever'... Note that the XML is formatted slightly when it is saved, so comments are removed, and the text is wrapped, so the process of saving presets should be a one-way process - this way you don't lose your beautifully commented, un-wrapped master .dspreset file that you have spent hours editing.)

Once the folder contains all the files you want to include, then select the top level folder/directory: MyDecentSampleStuff, and compress it using ZIP compression. There are a number of utilities that can do this. On a Mac, this is the native compression algorithm, so just select the folder and select ‘Compress…’ (Red box = Compress this folder!)


Unsurprisingly,  the larger your MyDecentSampleStuff folder/directory is, the longer the compression will take to complete... When it is finished, you should have a .zip file called ‘MyDecentSampleStuff.zip'. 

You will need to change the suffix from a .zip to a .dslibrary. 

This doesn't change the file, it just changes the way that the Operating System thinks about the file. It can be used to automatically open Decent Sampler when you double click on a file, for example - and you wouldn't want it to open your UnZip utility. (Some Operating Systems will complain about this change of suffix, but just OK the change, and remind yourself that the Operating System is trying to protect you from problems.) 

In summary: 1st Compression: Change the suffix from .zip to .dslibrary. Leave the filename alone.


This file should then be put inside the ‘MyDecentSampleStuff’ folder/directory…


Remember that the .dspreset file is just an XML (text) file containing only the instructions for playing the samples, and so is usually quite a small size file. In complete contrast, the .dslibrary file contains all of the files for the user interface and the samples themselves, and so will be much larger in size. Take care not to mix these two files up - they are very different!

(Yes, there's still a typo in the screen shots! The .dspreset file is called: 'MyDecentSamplerStuff'. Score one bonus point and move on.)

The next thing to do is to select the ‘MyDecentSampleStuff’ folder/directory again, and compress it into a .zip file. (Red box = Compress this folder!)


When the compression has finished, the result will be a ‘MyDecentSampleStuff.zip’ file. This time, you DO rename this file but you leave the suffix alone - this is the .zip file that you will upload at the end of the submission process, and so it needs extra information to help yourself and the people at Pianobook.co.uk. My suggestion is to use 'ReverseDate-InstrumentName-YourName-Vnumber.zip' using 'camel-case' for the names. The reverse date format (YYYYMMDD) means that your .zip files will sort in date order when you look at them in a computer.  So the final .zip file name might look like: '20220226-MyDecentSampleStuff-YourName-V1.zip' for something uploaded by YourName on the 26th of February 2022.

In summary: 2nd Compression: Change the file name as per the template. Leave the suffix (.zip) alone.


4. Completed!


That’s it! All done! You can now fill in the series of dialogues in the 'Submit' tab on pianobook.co.uk, and when it asks you to upload/submit your ‘Zip file’, you just find the ‘20220226-MyDecentSampleStuff-YourName-V1.zip’ file and upload/submit that file. 

And don't forget to change 'MyDecentSampleStuff' to the name of your project, and use your own name instead of YourName!

(More on the submission process itself will be in Part 2...)

Note. It may seem strange to zip things twice, but this is so that you have a single file that can be uploaded, and so that you have a stand-alone .dslibrary file which contains everything required by Decent Sample for ‘MyDecentSampleStuff’. (You can just drop it on Decent Sampler and you will get everything!) If you drop a .dspreset folder onto Decent Sampler, then it has to be from inside a folder/directory called ‘MyDecentSampleStuff’, from where Decent Sampler will look for various files in a folder/directory called ‘Samples’ and will need to load them in order to work.. 

DO NOT stop after the first compress and think you have finished! Yes, I know it (temporarily) produces a .zip file, but you are going to immediately change the suffix so that you have a .dslibrary file that contains a complete set of instructions, graphics and samples for Decent Sampler. You need to have a .dspreset file, a .dslibrary file, and everything else in the final .zip file. You can use the following screenshot as a check-list and reminder:


The ‘20220226-MyDecentSampleStuff-YourName-V1.zip' file highlighted in blue on the top line contains everything in the 'MyDecentSampleStuff' folder underneath it.

In the next part I will go through the ‘Submission’ dialogues in the same level of detail.

 ---

If you find my writing helpful, informative or entertaining, then please consider visiting this link:


Synthesizerwriter's Store (New 'Modular thinking' designs now available!)

Buy me a coffeeBuy me a coffee (Encourage me to write more posts like this one!)