
The enquirer asked about how to make a movement-sensing MIDI controller more predictable or repeatable. If you have ever tried to use any location-dependent controller that relies on where you hold your hands in the open air, then you may already be resonating with the difficulty. If you have ever played a Theremin, then you probably already know one of the challenges: making rapid, precise and repeatable movements of your hand between a small number of locations in 3D space is difficult. There's also the 'two different actions at once' problem: making the 'pitch-controlling' movements as rapid as possible (but don't forget precise and repeatable!) with one hand, to reduce the portamento between notes (and making the pitching as accurate as possible), whilst at the same time, making slow back and forth 'volume-controlling' expression movements with the other hand. It's tricky to master, and one of the ways that the 'not in tune' pitch variability can be mitigated is to apply 'quantisation': constraining continuous values to a small set of fixed values. For note length then DAWs have quantisation as a standard function. For MIDI controller messages then I assumed that there would be lots of utilities readily available...
MIDIccQuant

Here's the overall flow diagram for what is happening, with the relevant bits of the UI above or below:

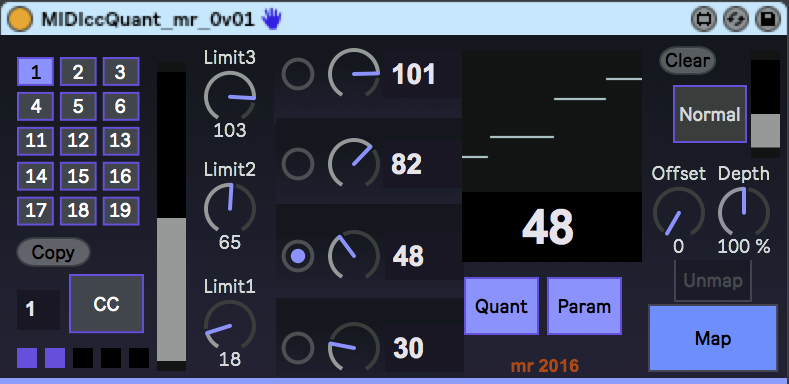
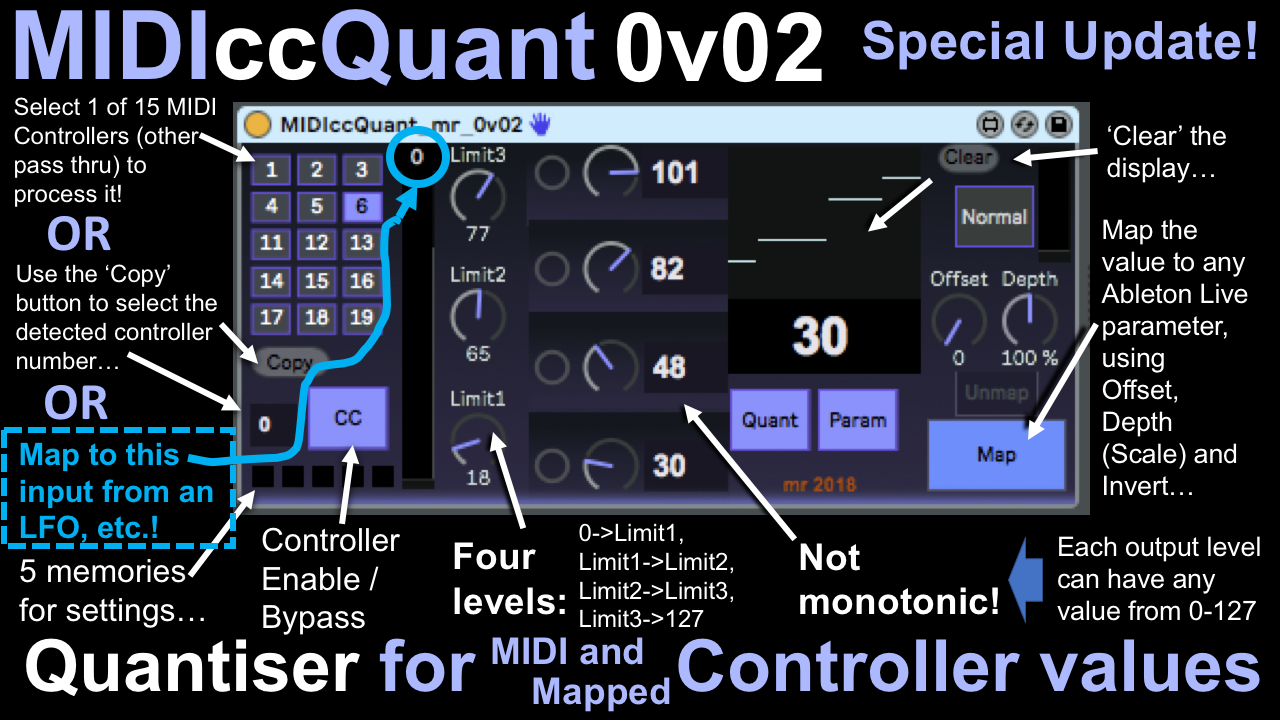
MIDIccQuant can process any one of 15 inputs, and the choices are the basic low-end simple controllers: Modulation, Breath Controllers, Foot Controller, Data Entry, Expression, and the general purpose controllers. These are the sort of controller numbers that a lot of MIDI Controller devices will be mapped to. I have always disliked the way that many utilities expect you to know what the controller numbers are, and so MIDIccQuant shows a number in the lower left hand corner that indicates what controller number incoming messages are from. Assuming that you don't have more than one controller active at once, then all you do is wiggle the MIDI Controller (or move your hand if it is a movement/position sensor) and look at the number that is displayed. To make it even easier, then clicking on the 'Copy' button will set the 15-button pad to that controller. If you prefer, and you already know the controller number, then you can just select the appropriate number on the pad!
The big 'CC' button controls the output of the processed controller value. When it is bright, then the controller value is quantised and sent out as a controller message. When it is dim, then the controller value is not quantised, and passes through the device unchanged. There's a big vertical indicator that shows the controller value.
There are seven rotary controls for the quantiser: three that set the levels at which the quantisation happens, and four that set what value is output for each of the four output states. This is slightly different to the way that note length quantisation does, because for that there is an assumption that you want to quantise a note to either slightly shorter or slightly longer, and so if you have an input that is just slightly longer than an 8th note, then you would expect it to be quantised to an 8th note, or a dotted 8th note, or maybe even a quarter note, depending on the quantiser settings. But MIDIccQuant allows the result of the quantisation to be any of the 128 MIDI controller values, and so if you set the lowest level to 15, then that output will be active for any incoming controller values between 0 and 15, and this could be set to output anything from 0-128. Rather like the Theremin, this might require some getting used to, and so the recommendation is that you set the outputs to get higher as you move up in the device UI.
Let's look at levels and outputs in more detail. The three 'Limit' rotary controls divide the 0-127 MIDI Controller values into 4 Levels:
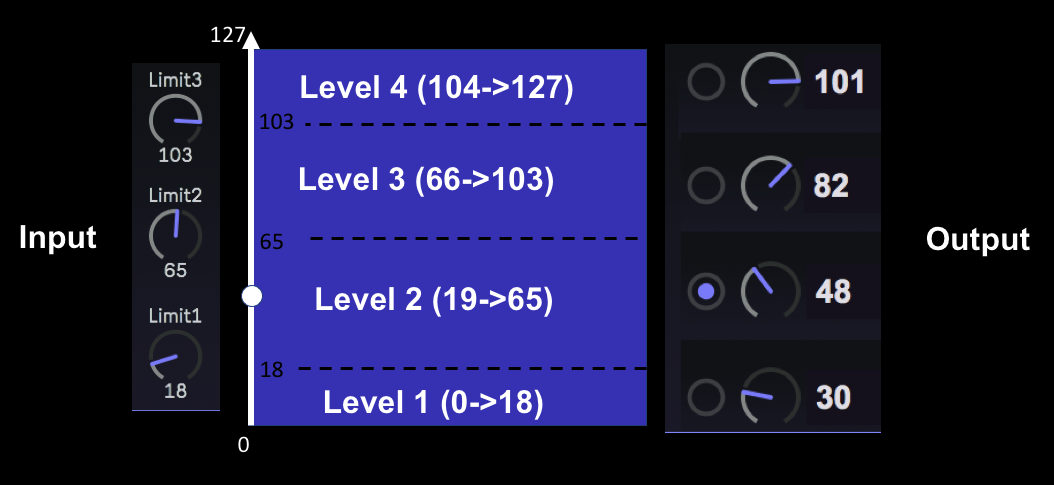
So the lowest level (Level 1) is from 0 to Limit1 (0-18 in this example). The next level is Level 2, from Limit1 to Limit2 (19-65). Level 3 is from Limit2 to Limit3 (66-103) and finally, Level 4 is from Limit3 to 127 (104-127). Note that although the Levels are always arranged from 1 to 4, where Level 1 always starts at 0 and Level 4 always ends with 127, the same is not true for the Outputs - you can put any value you like (0-127!) for any level. If an output always has steps that increase as the input increases, then it is called 'Monotonic', and so this quantiser is non-monotonic. So if you want Level 1 to output 127, and Level 4 to output 0, then MIDIccQuant will do this.

In the above example, on the left hand side, as the input controller values increases, the output jumps UP from 30 to 48, then jumps UP to 82, then jumps UP to 101. So it always goes up as the input goes up - this is monotonic behaviour.
The right hand side has swapped the outputs for Levels 2 and 3, so Level 2 is 82, whilst Level 3 is 48. So as the incoming controller value increases, it starts out outputting 30, then when the input reaches 18, the output jumps UP to 82. As the incoming controller continues to increase, the output stays at 82 until the input is 65, at which point the output jumps DOWN to 48. When the input reaches 103, then the output jumps UP to 101. This is non-monotonic behaviour.
All you then need to do is make sure the whatever device you are controlling is getting the quantised controller value. Remember that if the 'CC' button is bright, then it will be receiving quantised controller values, and so the usual 'just testing' technique of waggling the mod wheel (et.) may not work if your quantisation is set with extreme values. So, slightly counterintuitively, you need to click the 'CC' button so that it goes dark, which bypasses the quantisation, and then do the testing. When the target device is confirmed to be receiving the controller values, then just click again on the 'CC' button to restore the quantisation.

To make the utility more useful, then there is a second output. The right hand side is my standard controller mapper, which lets you optionally invert the controller value, add an offset, scale it with the 'Depth' control, and map this to any controllable parameter in Ableton Live (and unmap it, of course). The 'Quant' button controls if the output from the parameter mapping is quantised or not, which can be useful if you want to have different consequences from the controller in two different places. The big 'Param' button disables the parameter output when dim, and enables the output when bright.
To visualise the quantisation levels, there's a display that shows the four levels - it builds up as you input values, so if you change the levels, then you can click on the 'Clear' button to clear the display. This can also be used as a simple MIDI controller debug facility.
More than just MIDI Controllers...
Version 0.02 adds a small input number at the top of the input bar indicator. This allows you to map any controller so that it can be processed by MIDIccQuant. So you can now take an LFO (or any other MaxForLive device that has a 'Map' button) and quantise its output! I'm expecting some interesting applications of this from my users...
Getting MIDIccQuant_mr_0v02
You can download MIDIccQuant_mr for free from MaxForLive.com.Here are the instructions for what to do with the .amxd file that you download from MaxforLive.com:
https://synthesizerwriter.blogspot.co.uk/2017/12/where-do-i-put-downloaded-amxd.html
(In Live 10, you can also just double-click on the .amxd file, but this puts the device in the same folder as the factory devices...)


No comments:
Post a Comment